
What is Device Manager?
Device Manager is a built-in Windows tool that allows users to manage and monitor the hardware devices connected to their computer. It provides a comprehensive view of all the devices installed on the system, such as the motherboard, graphics card, sound card, network adapter, and more.
With Device Manager, users can easily check the status of their hardware devices, update drivers, enable or disable devices, and troubleshoot issues. It displays information about each device, including driver version, resources used, device ID, and more.
Accessing Device Manager is simple. There are multiple ways to open it, including:
1. Pressing the Windows key + R on the keyboard to open the Run dialog box, then typing “devmgmt.msc” and pressing Enter.
2. Right-clicking on the Start button and selecting “Device Manager” from the context menu.
Once Device Manager is opened, users will see a list of different hardware categories, such as Display adapters, Sound, video and game controllers, Network adapters, and more. Each category contains the associated devices installed on the system.
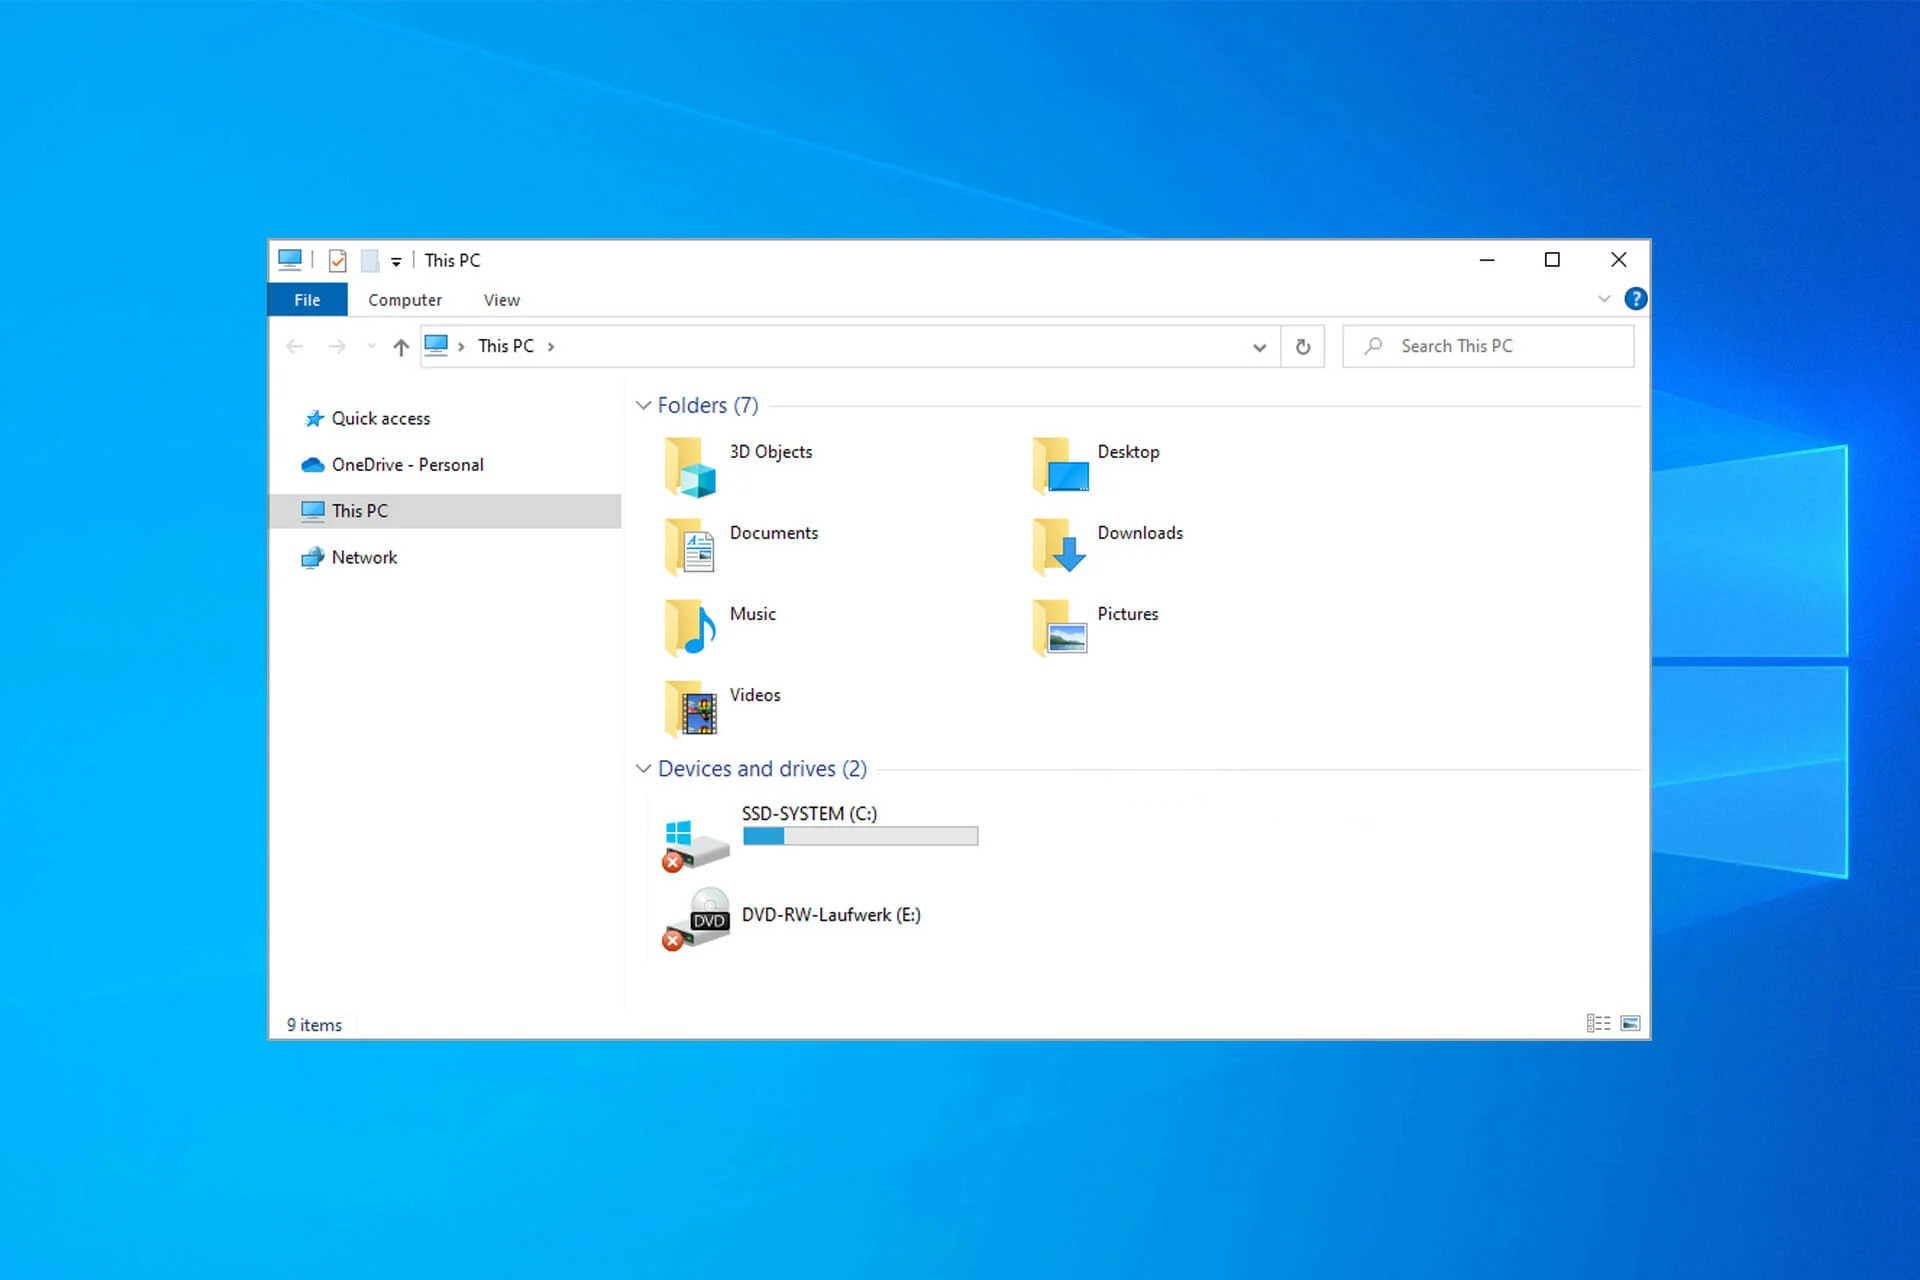
Device Manager is a valuable tool for troubleshooting hardware issues. By checking Device Manager, users can quickly identify if there are any problems with their devices. One common indicator of an issue is a red X symbol displayed next to a device.
In the next section, we’ll explore what a red X in Device Manager means and some common reasons behind its appearance.
How to open Device Manager
Opening Device Manager in Windows is a simple process. Here are a few methods you can use to access Device Manager:
Method 1: Using the Run dialog box
- Press the Windows key + R on your keyboard to open the Run dialog box.
- Type “devmgmt.msc” in the text field and click OK or press Enter.
Method 2: Using the Start Menu
- Right-click on the Start button in the bottom-left corner of the screen.
- From the context menu, select Device Manager.
Method 3: Using the Control Panel
- Open the Control Panel by searching for it in the Start menu.
- In the Control Panel, change the view to either Large icons or Small icons.
- Click on the Device Manager icon to open it.
Regardless of the method you choose, the Device Manager window will open, displaying a hierarchical list of hardware categories and their associated devices.
Note: In some cases, you may need to provide administrative privileges to open Device Manager. If prompted, click Yes or enter your administrator password to continue.
Once Device Manager is open, you can explore the different categories to view and manage your installed devices.
Device Manager is a powerful tool that allows you to update drivers, disable or enable devices, uninstall devices, and troubleshoot hardware issues. It’s especially useful when you encounter problems with a specific device and need to perform diagnostics or updates.
Now that you know how to open Device Manager, let’s take a look at what a red X symbol next to a device means and the common reasons behind it in the next section.
What does a red X in Device Manager mean?
A red X symbol next to a device listed in Device Manager indicates that there is a problem with that particular device. It means that the device is currently not functioning correctly or is disabled.
When you see a red X, it’s important to address the issue promptly, as it can lead to device malfunction or other system-related problems. By identifying and resolving the underlying cause, you can restore the device’s functionality and ensure optimal performance.
It’s crucial to note that the red X symbol is not always an indication of a severe problem. It could simply mean that the device is disabled or that the driver is not installed correctly. However, it can also signify more complex issues such as hardware conflicts or faulty hardware.
In the next section, we will discuss some common reasons behind the appearance of a red X in Device Manager and how you can troubleshoot them effectively.
Common reasons for a red X in Device Manager
There are several common reasons why you may see a red X symbol next to a device in Device Manager. Understanding these reasons can help you diagnose and fix the issue effectively. Here are the most frequent causes:
1. Missing drivers: This is one of the most common reasons for a red X. If a device’s driver is missing or not installed correctly, Windows will display a red X to indicate the problem. In such cases, you will need to install the appropriate driver to resolve the issue.
2. Disabled devices: Sometimes, you may accidentally disable a device in Device Manager, which can trigger the appearance of a red X. To fix this, you can enable the device by right-clicking on it and selecting the “Enable” option.
3. Hardware conflicts: When two or more devices have conflicting resource allocations, it can result in a red X in Device Manager. This often happens when new hardware is installed or when there are issues with drivers. Resolving hardware conflicts may involve adjusting resource settings or updating drivers.
4. Faulty hardware: A red X can indicate that the device itself is faulty or experiencing hardware failure. In such cases, troubleshooting steps may involve checking connections, replacing cables, or even replacing the device if necessary.
5. Power supply issues: Insufficient power supply to a device can also cause a red X. This can happen when the system is unable to supply enough power to the device, leading to its malfunction. In such cases, checking the power connections, using a different power source, or upgrading the power supply unit may be necessary.
Understanding these common reasons for a red X in Device Manager can provide you with a starting point for troubleshooting and resolving the issue. In the next sections, we will discuss how to fix these problems step by step.
How to fix a red X in Device Manager for missing drivers
When you encounter a red X in Device Manager due to missing drivers, you can follow these steps to resolve the issue:
1. Identify the device: Take note of the device name or its hardware ID, which can be found by right-clicking on the device with the red X and selecting “Properties.” Under the “Details” tab, choose “Hardware Ids.” This information will help you find the appropriate driver.
2. Download the correct driver: Visit the official website of the device manufacturer or the computer’s manufacturer and search for the drivers section. Locate the driver for your specific device model and download the latest version compatible with your operating system.
3. Install the driver: Once the driver is downloaded, run the installation file and follow the on-screen instructions to install it. If the driver is in a ZIP or compressed format, extract the files before running the setup file.
4. Update driver via Device Manager: If you already have the driver downloaded on your computer, you can right-click on the device with the red X, select “Update driver,” and choose the option to browse your computer for the driver software. Locate the downloaded driver file and follow the instructions to install it.
5. Restart your computer: After installing the driver, it is recommended to restart your computer to ensure that the changes take effect and the device is recognized correctly by the operating system.
If the red X persists even after installing the correct driver, try uninstalling the device from Device Manager and then restart your computer. Windows will automatically reinstall the device and its associated driver.
By following these steps, you should be able to resolve the red X issue caused by missing drivers. However, if the problem persists or you encounter any other complications, further troubleshooting may be required.
How to fix a red X in Device Manager for disabled devices
If you encounter a red X in Device Manager due to a disabled device, you can follow these steps to enable it:
1. Open Device Manager: Start by opening Device Manager using one of the methods mentioned earlier in this article.
2. Locate the disabled device: In Device Manager, navigate to the category that contains the device with the red X. Look for the device name with a downward-pointing arrow or a grayed-out icon, indicating that it is disabled.
3. Enable the device: Right-click on the disabled device and select “Enable” from the context menu. This action will prompt Windows to enable the device and remove the red X.
4. Check for conflicts: After enabling the device, it’s essential to check for any conflicts that may have caused the device to be disabled. Right-click on the device and select “Properties.” In the “General” or “Resources” tab, look for any error messages or conflicts and resolve them accordingly.
5. Restart your computer: It’s recommended to restart your computer after enabling the device to ensure the changes take effect.
If the red X reappears after enabling the device or you encounter any issues, you can try the following additional troubleshooting steps:
Update the driver: Sometimes, outdated or incompatible drivers can result in a disabled device. Right-click on the device with the red X, select “Update driver,” and follow the on-screen instructions to update the driver.
Reinstall the driver: Uninstall the device from Device Manager by right-clicking on it and selecting “Uninstall device.” Restart your computer, and Windows will automatically reinstall the device and its driver.
Check system settings: Ensure that the device is enabled in the computer’s BIOS settings, as some devices may require specific settings to be enabled at the hardware level.
By following these steps, you can successfully fix a red X in Device Manager caused by disabled devices. However, if the issue persists or you encounter any other complications, further troubleshooting or professional assistance may be necessary.
How to fix a red X in Device Manager for hardware conflicts
When you encounter a red X in Device Manager due to hardware conflicts, you can follow these steps to resolve the issue:
1. Identify the conflicting devices: Look for devices with a red X or a yellow exclamation mark in Device Manager. These indicate devices in conflict. Expand the categories and check for any devices with conflicting resource allocations.
2. Disable and re-enable the conflicting devices: Right-click on one of the conflicting devices and select “Disable device.” Restart your computer and enter Device Manager again. Right-click on the same device and select “Enable device.” Repeat this process for all conflicting devices.
3. Change resource settings: If disabling and re-enabling the devices doesn’t work, you can try manually changing their resource settings. Right-click on the device, select “Properties,” and go to the “Resources” tab. Uncheck the “Use automatic settings” box and modify the resource settings manually. Experiment with different settings until the conflict is resolved.
4. Update drivers: Outdated or incompatible drivers can sometimes cause hardware conflicts. Right-click on the conflicting device, select “Update driver,” and choose either the automatic or manual driver update option. If available, download and install the latest driver from the device manufacturer’s website.
5. Remove unnecessary devices: Sometimes, having multiple devices connected can lead to resource conflicts. Remove any unnecessary devices, such as USB peripherals or secondary monitors, and check if the conflict is resolved.
6. Check for firmware updates: Some devices, like graphics cards or BIOS interfaces, may require firmware updates to resolve conflicts. Visit the device manufacturer’s website and check for any available firmware updates. Follow the provided instructions to update the firmware.
7. Consult technical support: If the hardware conflict persists or you are unsure about changing resource settings, it’s recommended to seek technical support from the device manufacturer or a professional technician. They can provide guidance and assistance specific to your hardware configuration.
By following these steps, you should be able to fix a red X in Device Manager caused by hardware conflicts. However, if the issue persists or you encounter any other complications, further troubleshooting may be necessary.
How to fix a red X in Device Manager caused by faulty hardware
When you encounter a red X in Device Manager caused by faulty hardware, it indicates that the device itself is experiencing issues or hardware failure. Here are some steps you can take to address this problem:
1. Check physical connections: Ensure that all cables and connectors associated with the device are securely connected. Sometimes, loose or faulty connections can lead to device malfunctions. Disconnect and reconnect the device, ensuring a proper and tight connection.
2. Update drivers: Outdated or incompatible drivers can sometimes cause devices to malfunction. Right-click on the device with the red X, select “Update driver,” and choose either the automatic or manual driver update option. If available, download and install the latest driver from the device manufacturer’s website.
3. Test the device on another computer: To determine if the issue is with the device itself or other components of your computer, try connecting the device to another computer. If it works on the other computer without any issues, the problem may lie with your computer’s hardware or configuration.
4. Replace cables or peripherals: Faulty cables or peripherals can also cause device malfunctions. Consider replacing the cables or peripherals associated with the faulty device to see if it resolves the issue. Try using a different cable, adapter, or power supply to eliminate potential hardware problems.
5. Contact device manufacturer: If the device is still malfunctioning after performing the above steps, it may require professional repair or replacement. Contact the device manufacturer’s support team for further assistance. They can provide specific troubleshooting steps or advise you on the best course of action to resolve the hardware issue.
6. Consult a professional technician: If you are not comfortable performing hardware repairs or troubleshooting on your own, it’s advisable to seek assistance from a professional technician. They have the expertise and tools to diagnose and fix hardware-related issues effectively.
It’s essential to handle faulty hardware issues with care and ensure appropriate safety measures are taken. Do not attempt to repair hardware components without proper knowledge or experience, as it may result in further damage.
By following these steps, you can address a red X in Device Manager caused by faulty hardware. However, if the issue persists or you encounter any other complications, it’s recommended to seek professional help for further assistance and resolution.
Other troubleshooting steps for a red X in Device Manager
If you continue to experience a red X in Device Manager despite trying the previous solutions, there are additional troubleshooting steps you can take to resolve the issue:
1. System Restore: Use the System Restore feature to revert your computer back to a previous working state, potentially resolving any conflicts or issues that may be causing the red X. Open the System Restore utility, choose a restore point prior to the appearance of the red X, and follow the prompts to restore your system.
2. Windows Update: Check for Windows updates to ensure your operating system is up to date. Sometimes, missing or outdated system components can contribute to device malfunctions. Go to the Windows Update settings and check for any available updates. Install them, restart your computer, and check if the red X has been resolved.
3. Check for malware: Malware or viruses on your computer can interfere with the proper functioning of devices. Perform a full system scan using reliable antivirus software to detect and remove any potential threats. Restart your computer and check if the red X issue persists.
4. System File Checker: Run the System File Checker (SFC) utility to scan for and repair any corrupt or missing system files. Open the Command Prompt as an administrator and enter the command “sfc /scannow.” Allow the process to complete, restart your computer, and check if the red X has been resolved.
5. Check hardware compatibility: Ensure that the device experiencing the red X is compatible with your computer’s hardware and operating system. Verify that the device’s specifications match the system requirements provided by the manufacturer. Incompatible hardware can lead to malfunctions and conflicts.
6. Perform a clean boot: Perform a clean boot to start your computer with only essential services and drivers running. This can help identify if any third-party software or services are causing conflicts with the device. Follow the instructions specific to your version of Windows to perform a clean boot.
7. Seek professional assistance: If all else fails, consider seeking professional assistance from a computer technician or contacting the support team of the device or your computer’s manufacturer. They can provide personalized guidance and further troubleshooting steps based on your specific hardware and system configuration.
By going through these additional troubleshooting steps, you can increase your chances of resolving the red X issue in Device Manager. Remember to approach each step cautiously and make backups of important data before attempting any major changes to your system.