
Why would you want to disable a device in Device Manager?
Device Manager is a powerful tool in Windows that allows you to manage and control the devices connected to your computer. It provides a centralized location to view and modify hardware settings, drivers, and device properties. One of the key features of Device Manager is the ability to disable devices that are causing issues or are no longer needed.
There are several reasons why you might want to disable a device in Device Manager:
- Troubleshooting: If you are experiencing problems with a particular device, disabling it can help you determine if the device itself is the source of the issue. By temporarily disabling the device, you can see if the problem persists or if it is resolved.
- Incompatibility: Some hardware devices may not be compatible with certain software or drivers. Disabling the device can prevent conflicts and ensure the smooth operation of your system.
- Power management: Disabling certain devices, such as USB ports or network adapters, can help conserve battery life on laptops or reduce power consumption on desktops.
- Security: Disabling unnecessary devices can help tighten the security of your computer. For example, disabling unused Bluetooth or Wi-Fi adapters can prevent unauthorized access or potential vulnerabilities.
- Upgrades: Before upgrading hardware components, such as replacing a graphics card or adding a new sound card, it is often recommended to disable the old device in Device Manager to prevent conflicts or driver-related issues.
Disabling a device in Device Manager is a straightforward process, and it allows you to have better control over your computer’s hardware. Whether you are troubleshooting problems, optimizing power management, or ensuring compatibility, Device Manager’s disable feature can be a valuable tool in your Windows toolkit.
How to open Device Manager in Windows
Device Manager is a built-in tool in Windows that allows you to view and manage the hardware devices connected to your computer. Whether you want to update drivers, troubleshoot device issues, or disable specific hardware, accessing Device Manager is the first step. Here’s how you can open Device Manager in Windows:
- Using the Start menu: Click on the Start button located at the bottom-left corner of your screen. Type “Device Manager” in the search bar and select the Device Manager app from the search results.
- Using the Run dialog: Press the Windows key + R on your keyboard to open the Run dialog. Type “devmgmt.msc” in the text field and click “OK” or press Enter. This will directly open Device Manager.
- Using the Control Panel: Open the Control Panel by searching for it in the Start menu or by pressing the Windows key + X and selecting “Control Panel” from the menu. In the Control Panel, set the “View by” option to “Large icons” or “Small icons” and locate and click on the “Device Manager” icon.
- Using the Windows PowerShell: Press the Windows key + X and select “Windows PowerShell” or “Windows PowerShell (Admin)” from the menu. In the PowerShell window, type “devmgmt.msc” and press Enter. This will launch Device Manager.
Once you have successfully opened Device Manager, you will be able to see a comprehensive list of all the hardware devices connected to your computer. From here, you can explore each device, update drivers, troubleshoot issues, and even disable or enable specific devices as necessary.
Being able to access Device Manager is essential for managing your computer’s hardware efficiently. Whether you prefer using the Start menu, the Run dialog, the Control Panel, or even Windows PowerShell, knowing how to open Device Manager gives you the control and flexibility you need to keep your system running smoothly.
How to disable a device in Device Manager
Device Manager in Windows allows you to disable specific hardware devices to troubleshoot issues, prevent conflicts, or conserve power. Disabling a device temporarily stops it from functioning without completely removing it. Here’s how you can disable a device in Device Manager:
- Open Device Manager: There are multiple ways to open Device Manager, such as using the Start menu, Run dialog, Control Panel, or Windows PowerShell. Choose your preferred method and launch Device Manager.
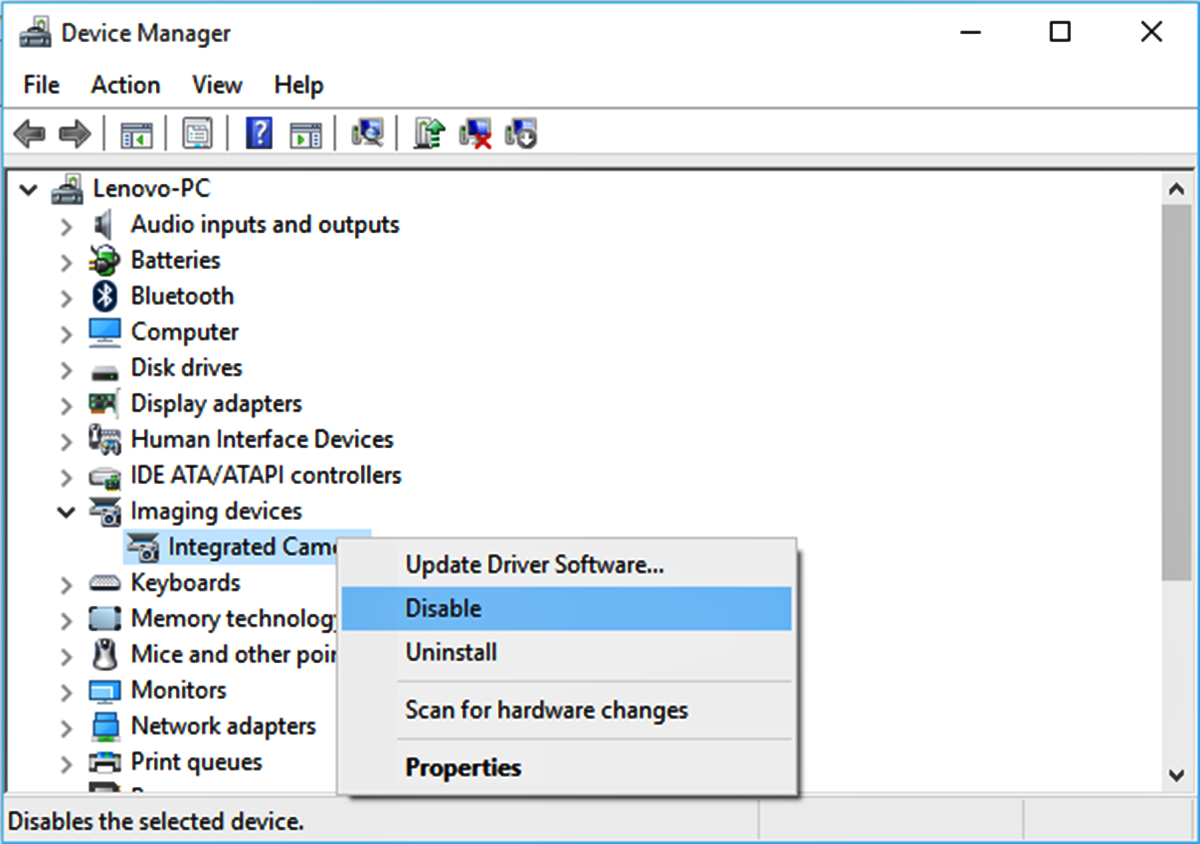
- Locate the device: In the Device Manager window, you will find a list of all the hardware devices connected to your computer. Expand the categories to locate the specific device you want to disable.
- Disable the device: Right-click on the device you wish to disable and select “Disable” from the context menu. A warning dialog may appear, informing you that disabling the device will stop it from functioning. Confirm the action by clicking “Yes” or “OK.”
- Verify the device status: Once the device is disabled, you will notice a downward arrow or a red “X” symbol next to it in Device Manager. This indicates that the device is currently disabled.
It’s important to note that disabling a device may impact the functionality of certain features or peripherals associated with that device. Therefore, consider the consequences before disabling a device, and ensure it is necessary for your specific situation.
If you need to enable the device again, simply follow the same steps but select the “Enable” option instead of “Disable.” This will re-enable the device and restore its functionality.
By knowing how to disable a device in Device Manager, you have the ability to troubleshoot issues, manage hardware conflicts, and optimize your computer’s performance. It’s a useful feature that empowers you to have greater control over your system’s hardware configuration.
What happens when you disable a device
When you disable a device in Device Manager, it temporarily stops the device from functioning on your computer. Disabling a device has several effects and implications, including:
- Device functionality: Once a device is disabled, it will no longer perform its intended function. For example, if you disable a network adapter, you will lose network connectivity until you re-enable it.
- Driver and software control: Disabling a device effectively cuts off communication between the device and its associated drivers and software. This means the device’s drivers will be unloaded from memory, and any software that depends on the device will no longer be able to interact with it.
- System resources: Disabling a device will free up system resources such as memory and processing power. This can be beneficial if you have a resource-intensive application running or if you want to conserve power on a laptop.
- Hardware conflicts: Disabling a problematic device can help resolve hardware conflicts. If two devices are conflicting with each other, disabling one of them can prevent conflicts and allow the remaining device to function properly.
- Troubleshooting: Disabling a device is often used as a troubleshooting step to determine if the device itself is causing issues. By disabling the device, you can observe if the problem persists or is resolved. If the issue no longer occurs, it may indicate that the device is faulty or requires updated drivers.
It’s worth noting that disabling a device is a temporary action, and the device can be easily re-enabled in Device Manager. Once re-enabled, the device will regain its functionality, and its associated drivers and software will resume control.
Before disabling a device, consider the potential impact on your system and ensure it is necessary for troubleshooting, resolving conflicts, or conserving resources. It’s always a good practice to consult documentation or seek expert advice if you have any doubts about disabling a specific device.
How to enable a disabled device in Device Manager
Enabling a disabled device in Device Manager allows it to resume functioning on your computer. If you have previously disabled a device and want to re-enable it, follow these steps:
- Open Device Manager: Launch Device Manager using your preferred method, such as the Start menu, Run dialog, Control Panel, or Windows PowerShell.
- Navigate to the disabled device: In Device Manager, locate the device that you want to enable. Look for the device with a downward arrow or a red “X” symbol next to it, indicating that it is disabled.
- Enable the device: Right-click on the disabled device and select “Enable” from the context menu. This will initiate the process of enabling the device.
- Verify the device status: Once enabled, the downward arrow or red “X” symbol next to the device should disappear in Device Manager. This indicates that the device is now enabled and ready for use.
Enabling a disabled device allows it to regain full functionality, and any associated drivers and software will resume their control over the device. It’s important to note that if you were troubleshooting an issue by disabling a device, re-enabling it will restore the device’s functionality and may revert any changes you made during the troubleshooting process.
By knowing how to enable a disabled device in Device Manager, you have the flexibility to manage and control your computer’s hardware configuration effectively. It allows you to easily reactivate devices that were temporarily disabled for troubleshooting, power management, or conflict resolution purposes.
Common reasons to disable a device in Device Manager
Device Manager in Windows provides a convenient way to manage and control the hardware devices connected to your computer. There are various scenarios where disabling a device in Device Manager can be beneficial. Here are some common reasons to disable a device:
- Troubleshooting: Disabling a device can help identify and troubleshoot issues. If a specific device is causing problems or malfunctions, disabling it allows you to determine if the issue persists without that device’s involvement.
- Incompatibility: In some cases, certain hardware devices may not be compatible with the software or drivers on your computer. Disabling the incompatible device can prevent conflicts and ensure smooth operation of your system.
- Power management: Disabling certain devices can help conserve power. For example, disabling a Bluetooth adapter or unused USB ports on a laptop can extend battery life, while disabling network adapters on a desktop can reduce power consumption.
- Security: Disabling unnecessary devices can enhance the security of your computer. For instance, disabling unused Wi-Fi or Bluetooth adapters can prevent unauthorized access or potential security vulnerabilities.
- Hardware upgrades: When upgrading hardware components, it is advisable to disable the old device before installing the new one. Disabling the old device helps prevent driver conflicts and ensures a smoother transition to the upgraded hardware.
These are just a few examples of common situations in which disabling a device in Device Manager can be useful. The ability to disable specific devices provides better control over your computer’s hardware configuration and enables efficient troubleshooting and management.
Tips for troubleshooting disabled devices in Device Manager
When you encounter issues with a disabled device in Device Manager, there are several troubleshooting tips you can follow to identify and resolve the problem. Here are some helpful tips:
- Update drivers: Before disabling or troubleshooting a device, ensure that you have the latest drivers installed. Outdated or incompatible drivers can cause device malfunctions. Visit the manufacturer’s website or use Windows Update to check for driver updates.
- Check for conflicts: Enable “Show hidden devices” in Device Manager to reveal any hidden devices that may be conflicting with the disabled device. Resolve conflicts by disabling or uninstalling conflicting devices.
- Review error messages: If there are error messages associated with the disabled device, make note of them, as they can provide clues about the nature of the issue. Use online resources or consult support forums to find specific solutions based on error codes or messages.
- Perform a system restart: Sometimes, a simple restart can resolve temporary issues. Restart your computer and check if the disabled device starts functioning after the restart. This can help reset any temporary glitches or conflicts.
- Run hardware diagnostics: Many manufacturers provide diagnostics tools for their devices. These tools can help identify hardware-related problems and provide specific solutions. Check the manufacturer’s website for any relevant diagnostic tools.
- Scan for malware: Malware infections can affect device functionality. Run a thorough scan of your system using reliable antivirus software to detect and remove any malicious software that may be interfering with the disabled device.
- Seek professional assistance: If you have exhausted all troubleshooting steps and are still unable to resolve the issue, it may be best to seek help from professional support technicians or contact the device manufacturer’s support team. They can provide specialized assistance and guidance.
Remember to create a system restore point before making any significant changes in Device Manager as a precautionary measure. This allows you to revert back to a previous state if something goes wrong during troubleshooting.
By following these tips and employing a systematic approach to troubleshooting, you can effectively address disabled device issues in Device Manager and restore functionality to your computer’s hardware devices.