
What Is a C Wire?
A C wire, short for common wire, is an essential component in the installation of a Nest thermostat or any other smart thermostat. It plays a crucial role in providing a constant source of power to the thermostat’s display, Wi-Fi connectivity, and internal components.
The C wire acts as a return path for the current flowing through the other wires in the thermostat system. It completes the circuit and ensures a stable and consistent power supply to the thermostat, even when the system is not actively heating or cooling. Without a C wire, the thermostat may experience power fluctuations, inaccurate temperature readings, or even fail to function altogether.
The C wire is typically labeled with the letter “C” or “COM” and is often colored blue. However, it’s important to note that not all HVAC systems have a C wire installed by default. Older systems or basic thermostats may only have wires for heating (RH or R) and cooling (Y), without a dedicated C wire.
While the C wire may not be a necessity for every HVAC system, it is becoming increasingly important for newer smart thermostats. These devices rely on continuous power to support advanced features like learning algorithms, remote access, and energy-saving programs.
Why Do You Need a C Wire for a Nest Thermostat?
Installing a C wire for your Nest thermostat is highly recommended, as it offers several benefits that enhance the functionality and performance of your smart thermostat.
First and foremost, a C wire ensures a constant power supply to your Nest thermostat. This eliminates the need for the thermostat to rely on batteries or power stealing, which can result in inconsistent power and potential shutdowns. With a C wire, your thermostat will have a stable power source to operate reliably and accurately.
Additionally, having a C wire allows your Nest thermostat to fully utilize its advanced features. The constant power supply enables features such as continuous Wi-Fi connectivity, allowing you to control and monitor your thermostat remotely through the Nest app. It also enables the thermostat to maintain its display and memory settings, ensuring that your preferred temperature settings are preserved even during power outages.
A C wire also assists in optimizing your Nest thermostat’s energy-saving capabilities. With a constant power source, the thermostat can continuously monitor and adjust your home’s temperature, making precise calculations to optimize energy usage. This can lead to significant cost savings on your energy bills.
Furthermore, a C wire provides a reliable connection and reduces the chance of system malfunctions. Without a C wire, your Nest thermostat may experience intermittent power interruptions, resulting in unpredictable behavior and possible system errors or shutdowns. By installing a C wire, you ensure a consistent flow of power, reducing the likelihood of issues.
Overall, while a C wire may not be a mandatory requirement for all thermostats, installing one for your Nest thermostat is highly recommended. It eliminates power-related issues, unlocks advanced features, enhances energy efficiency, and ensures the overall reliability and performance of your smart thermostat.
How Does a C Wire Work?
A C wire, also known as a common wire, is an essential component of a thermostat’s electrical system. It functions by providing a continuous return path for electrical current flow from the thermostat to the HVAC (Heating, Ventilation, and Air Conditioning) system.
The C wire serves as the neutral wire in the circuit, completing the electrical loop necessary for the thermostat to operate. It allows the thermostat to receive a constant source of power, even when the heating or cooling system is not actively running.
When the thermostat calls for heating or cooling, it sends a signal to the HVAC system through the appropriate wires, usually labeled with letters such as R, W, Y, and G. Along with these control wires, the C wire carries the return current back to the HVAC system, completing the electrical circuit.
The C wire is typically connected to the C terminal on both the thermostat and the HVAC system. This connection ensures a stable power supply to the thermostat and helps maintain its functionality and performance.
With the C wire in place, the thermostat is powered continuously, allowing it to maintain its display, communicate with the HVAC system, and perform other functions, such as powering Wi-Fi connectivity or supporting advanced features like learning algorithms and energy-saving programs.
It’s important to note that not all HVAC systems have a C wire installed by default. In such cases, there are alternative options for powering the thermostat, such as using the G wire as a makeshift C wire with the help of a power adapter.
What If You Don’t Have a C Wire?
If your HVAC system doesn’t have a C wire, don’t worry – there are options available to power your Nest thermostat without it. Although having a C wire is highly recommended for optimal performance, you can explore alternative solutions to ensure that your thermostat functions properly.
One common workaround is to use the G wire as a makeshift C wire. The G wire is usually used to control the fan in your HVAC system. By repurposing it, you can provide a continuous power supply to your Nest thermostat.
To use the G wire as a C wire, you’ll need to make some adjustments. First, you’ll need to access your HVAC system’s control board. Look for the wire connected to the G terminal and disconnect it. Then, connect both the G wire and the R wire to the C terminal on the control board. This will provide a power source for your Nest thermostat.
However, it’s important to note that repurposing the G wire as a C wire may disable the independent control of your HVAC system’s fan. This means that the fan will run whenever the system is heating or cooling. If you prefer to have separate control over the fan, this workaround may not be suitable.
If using the G wire as a C wire is not an option, you can consider using a power adapter. A power adapter offers an external power source that bypasses the need for a C wire. It connects to your HVAC system’s control board and provides the necessary power to your Nest thermostat.
Installing a power adapter typically requires some electrical knowledge and expertise. If you’re not comfortable with DIY electrical work, it’s advisable to seek professional assistance to ensure a safe and proper installation.
It’s worth mentioning that some Nest thermostat models, like the Nest Thermostat E, are designed to be more power-efficient and may work without a C wire in certain HVAC systems. However, it’s still recommended to have a C wire for optimal performance and stability.
How to Check If You Have a C Wire?
If you’re unsure whether your HVAC system has a C wire, you can perform a simple check to determine its presence. Here are a few steps to follow:
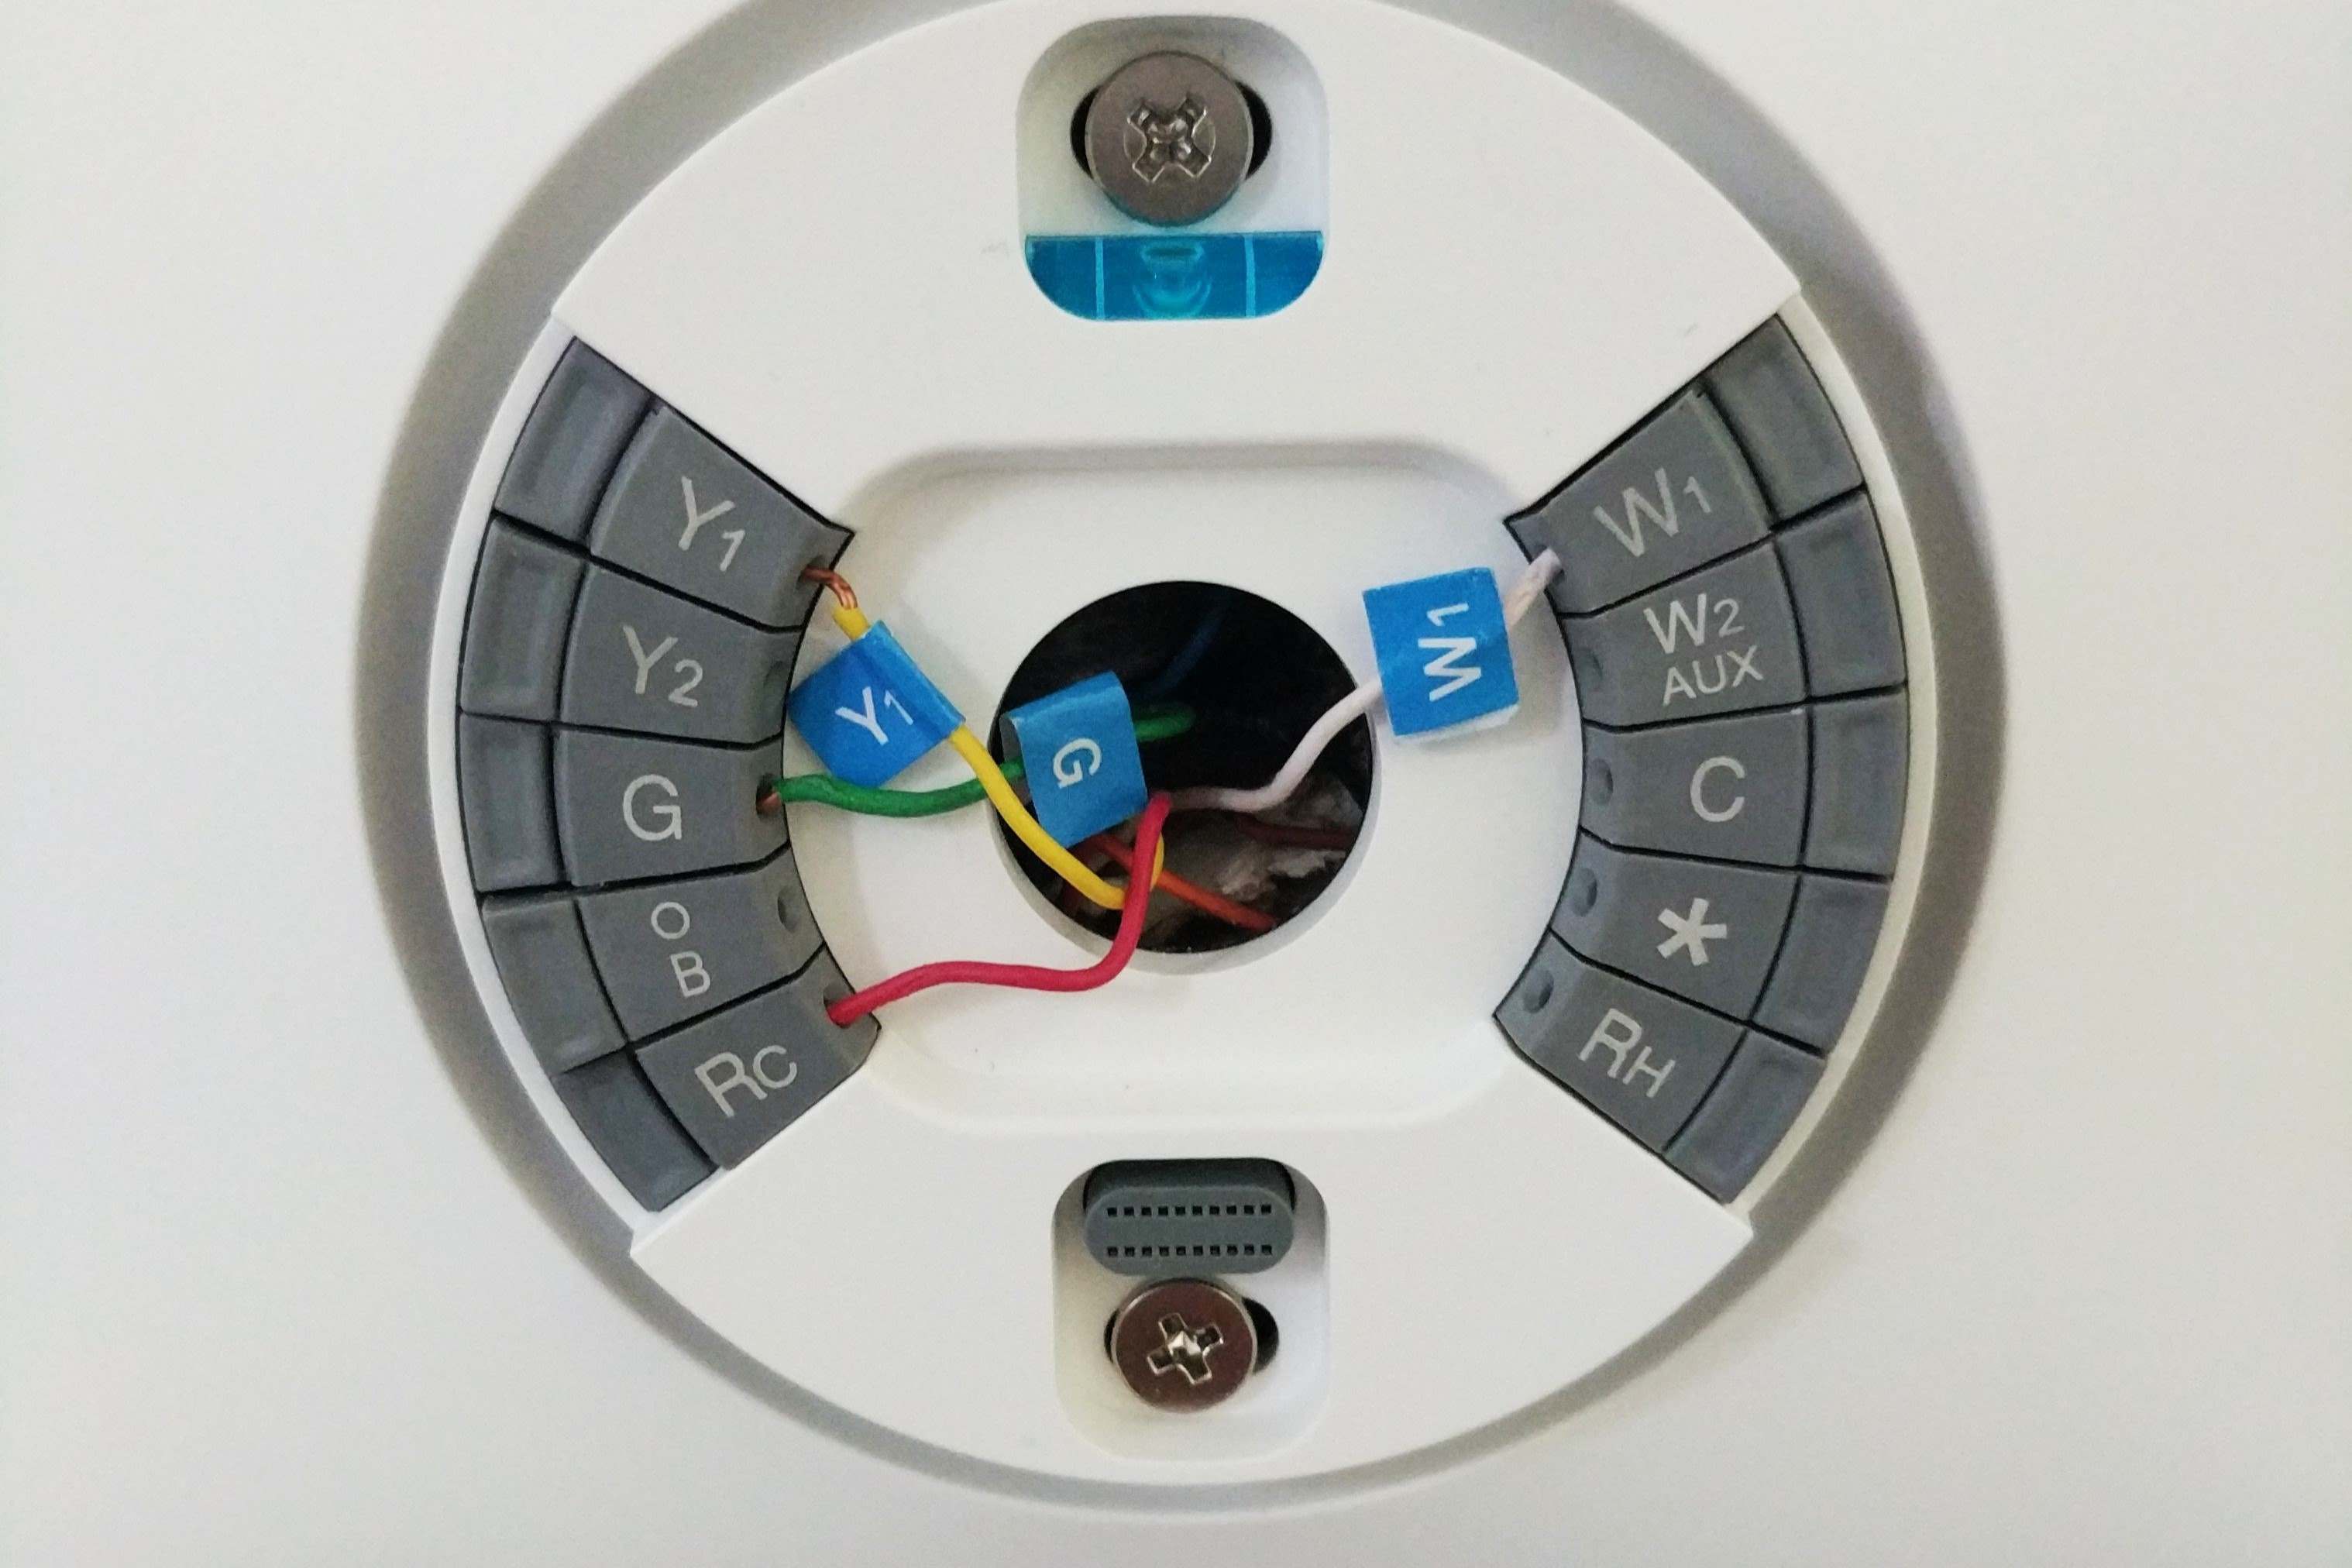
- Locate your thermostat and remove it from its wall plate.
- Inspect the wires connected to the terminals on the wall plate.
- Look for a wire labeled “C” or “COM.” This wire is typically colored blue, but it can also be another color, so labeling is important.
- If you find a wire labeled “C” or “COM,” congratulations – you have a C wire installed in your HVAC system.
- If you don’t see a wire labeled “C” or “COM,” it’s possible that your system doesn’t have a C wire installed by default.
If you’re still unsure whether you have a C wire, you can consult the documentation or user manual for your HVAC system. These resources may provide information about the wiring configuration and whether a C wire is present.
If you have access to your HVAC system’s control board, you can also verify the presence of a C wire there. Open the control board and look for a wire connected to the C terminal. If a wire is present, it confirms that you have a C wire.
Keep in mind that some older or basic HVAC systems may not have a C wire installed. In such cases, you’ll need to explore alternative solutions to power your Nest thermostat, such as using the G wire or a power adapter.
If you’re unsure or uncomfortable with identifying or modifying the wiring yourself, it’s always advisable to consult a professional HVAC technician. They can assess your system, determine the presence of a C wire, and assist you with any necessary installations or modifications.
Installing a C Wire for Your Nest Thermostat
If your Nest thermostat requires a C wire and your HVAC system doesn’t have one, you can install a C wire yourself or hire a professional to do it for you. Here’s a general guide to installing a C wire:
- Turn off the power to your HVAC system at the circuit breaker to ensure safety.
- Locate your HVAC system’s control board, which is usually found near the furnace or air handler.
- Identify the terminal labeled “C” on the control board. If it’s not labeled, consult the system’s wiring diagram or the manufacturer’s documentation.
- Prepare a length of wire to be used as the C wire. It’s recommended to use 18-gauge wire and ensure it’s long enough to reach from the control board to the Nest thermostat location.
- Connect one end of the wire to the C terminal on the control board, ensuring a secure and tight connection.
- Route the wire from the control board to the location where your Nest thermostat will be mounted. Use existing wire pathways or create new ones if necessary. Be cautious to avoid any sharp objects or potential hazards.
- Connect the other end of the wire to the C terminal on your Nest thermostat’s base plate. Again, ensure a secure connection.
- Mount your Nest thermostat onto the base plate, following the manufacturer’s instructions.
- Turn the power back on at the circuit breaker.
- Follow the setup and installation instructions provided by Nest to connect and configure your thermostat.
It’s important to note that the installation process may vary depending on your specific HVAC system and the configuration of your control board. If you’re unsure or uncomfortable with the installation process, it’s best to seek professional assistance from a licensed HVAC technician or an electrician.
A professional can assess your system, determine the best method for installing a C wire, and make any necessary adjustments to ensure a safe and reliable installation.
DIY vs. Professional Installation of a C Wire
When it comes to installing a C wire for your Nest thermostat, you have the option of doing it yourself or hiring a professional for the job. Here are some considerations for both DIY and professional installation:
DIY Installation:
- Cost: DIY installation of a C wire is typically more cost-effective as you won’t have to pay for professional services.
- Skills and Knowledge: You’ll need some basic electrical knowledge and DIY skills to install the C wire properly. It’s crucial to understand the wiring configuration of your HVAC system and follow all safety guidelines.
- Time and Effort: Installing a C wire yourself can be time-consuming, especially if you’re not familiar with HVAC systems or wiring. You’ll need to research and follow installation guides, troubleshoot any issues that arise, and ensure a secure and proper connection.
- Risk of Error: Installing a C wire requires precision and accuracy. Making a mistake could potentially damage your HVAC system or result in improper functioning of your Nest thermostat.
Professional Installation:
- Expertise and Experience: HVAC technicians and electricians have the necessary expertise and experience to install a C wire correctly. They are familiar with different HVAC systems and wiring configurations, reducing the risk of errors or damage.
- Efficiency: Professionals can complete the installation quickly and efficiently, saving you time and effort. They have the necessary tools and knowledge to handle any challenges that may arise during the installation process.
- Warranty and Guarantees: Hiring a professional often comes with warranties or guarantees for their work. If any issues occur after the installation, you can rely on their expertise to rectify the problem.
- Safety: Professional installation ensures that all safety standards and electrical codes are followed, minimizing the risk of accidents or damage to your HVAC system.
Deciding between DIY and professional installation of a C wire depends on your comfort level, skills, and budget. If you have the necessary knowledge and experience, and you’re confident in your abilities, DIY installation can be a cost-effective option. However, if you’re uncertain or uncomfortable with electrical work, it’s advisable to hire a professional to ensure a safe and proper installation that minimizes the risk of damage or malfunctioning.
Common Challenges and Solutions When Installing a C Wire
While installing a C wire for your Nest thermostat can greatly enhance its performance, there are some common challenges that you may encounter during the installation process. Here are a few of these challenges and potential solutions:
1. Limited Access to the Control Board: Some HVAC systems have control boards that are difficult to access, making it challenging to identify and connect the C wire.
Solution: In such cases, you may need to remove panels or components to gain access to the control board. Take caution and refer to the system’s manual or consult a professional if you’re unsure.
2. Incompatible Wiring: The existing wiring of your HVAC system may not be compatible with the installation of a C wire.
Solution: You can consider alternatives like using a power adapter or repurposing the G wire as a makeshift C wire. Alternatively, consult a professional who can assess your system and suggest the best solution.
3. Inadequate Power Supply: In some cases, the HVAC system may not have enough power to support the Nest thermostat and the additional load of a C wire.
Solution: You can upgrade your HVAC system’s power supply by installing a transformer or consult a professional to assess and upgrade the electrical system if necessary.
4. Incorrect Wiring Connections: Incorrectly connecting the C wire to the control board or the Nest thermostat can lead to power supply issues or system malfunctions.
Solution: Double-check the wiring connections and consult the wiring diagrams provided by Nest. If unsure, it’s best to seek professional assistance to avoid any potential damage or hazards.
5. Compatibility Issues: Depending on your Nest thermostat model and HVAC system, there may be compatibility issues that prevent the installation of a C wire.
Solution: Consult the Nest support resources or contact their customer service for guidance on compatibility or alternative options available for your specific system.
It’s important to remember that any modifications or installations involving electrical systems carry certain risks. If you encounter any challenges that you’re not confident in resolving or if you’re unsure about the installation process, it’s advisable to seek assistance from a professional HVAC technician or an electrician. They can accurately diagnose and address the challenges while ensuring a safe and proper installation of the C wire.
Alternative Options If You Can’t Install a C Wire
If it’s not feasible to install a C wire for your Nest thermostat, there are alternative options available to power and operate your thermostat. Here are a few alternatives to consider:
1. Use the G Wire:
If your HVAC system has a G wire (usually used for controlling the fan), you can repurpose it as a makeshift C wire. By making this adjustment, you can provide a continuous power supply to your Nest thermostat.
Important Note: By using the G wire as a C wire, the independent control of your HVAC system’s fan may be disabled. The fan will run whenever the system is heating or cooling. If separate control over the fan is a priority, this may not be the ideal solution.
2. Power Adapter:
An alternative option is to use a power adapter to provide power to your Nest thermostat. A power adapter bypasses the need for a C wire by connecting directly to your HVAC system’s control board.
Important Note: Installing a power adapter usually requires some electrical knowledge and expertise. If you’re not comfortable with DIY electrical work, it is recommended to seek professional assistance to ensure a safe and proper installation.
3. Battery Power:
Depending on your Nest thermostat model and HVAC system, you may have the option to rely on battery power. Some Nest thermostat models have built-in batteries that can power the device for an extended period.
Important Note: Battery power is a temporary solution and may require frequent battery replacement or recharging. This option is suitable for short-term use or as a backup power source during power outages.
4. Upgrade Your HVAC System:
If installing a C wire or utilizing alternative options is not feasible, you may consider upgrading your HVAC system to one that supports a C wire or is compatible with smart thermostats without the need for a C wire. Consult with HVAC professionals to explore this possibility and determine the best course of action.
When exploring alternative options, it’s important to consider the compatibility, functionality, and potential limitations associated with each solution. If you’re uncertain which option is best for your specific situation, it’s recommended to consult the Nest support resources, contact their customer service, or seek assistance from a professional HVAC technician or an electrician. They can guide you in selecting the most suitable alternative option for your Nest thermostat.