
What are macros?
A macro is a sequence of actions or commands that can be recorded and replayed in Microsoft Word. It is essentially a way to automate repetitive tasks, saving you time and effort in your daily work. Macros can be used to perform a wide range of actions, from inserting pre-defined text to formatting documents, and are especially useful for tasks that require multiple steps.
With macros, you can streamline your workflow and increase your productivity. Instead of manually performing repetitive tasks, you can simply run a macro and let Word do the work for you. Macros are particularly beneficial for individuals who regularly perform the same actions in their documents, such as formatting, inserting tables, or adding specific headers and footers.
Macros in Microsoft Word are created using Visual Basic for Applications (VBA), which is a scripting language that allows for automation and customization of various Microsoft Office applications. VBA allows you to write code to control Word and perform specific actions. However, you don’t need to be an expert programmer to utilize macros in Word – the application provides a user-friendly interface to record and modify macros without writing any code.
By using macros, you can save a significant amount of time and reduce the risk of errors that can occur when performing repetitive tasks manually. Macros not only increase efficiency but also ensure consistency in your documents. Once you have recorded or created a macro, you can use it in any document, allowing you to replicate specific actions across various files.
In the next sections, we will explore how to enable the Developer tab in Word, create and record macros, edit and run them, save and share macros, and provide some useful tips and tricks to make the most out of macros. So let’s dive in and unlock the power of macros in Microsoft Word!
How to enable the Developer tab
The Developer tab is a hidden tab in Microsoft Word that contains advanced tools and options, including the ability to work with macros. By default, this tab is not displayed in the ribbon, but you can enable it easily by following these steps:
- Open Microsoft Word and click on the File tab located in the top-left corner of the screen.
- In the menu that appears, click on Options at the bottom left.
- A new window will open. Here, click on the Customize Ribbon option on the left-hand side.
- In the Customize the Ribbon section, you will find a list of main tabs. Look for the Developer checkbox and make sure it is selected.
- Click OK to save the changes and close the window.
After following these steps, the Developer tab will be added to the ribbon in Microsoft Word, giving you access to various advanced features, including macros.
If you don’t see the Developer tab even after enabling it, it may be due to the specific version of Microsoft Word you are using. The Developer tab is available in certain versions of Word, such as Word 2010, Word 2013, Word 2016, and Word 2019. If you are using an older version that does not support the Developer tab, you may need to upgrade to a more recent version or check if there are any add-ins available to enable the Developer tab.
Enabling the Developer tab is the first step towards harnessing the power of macros in Microsoft Word. Once you have access to this tab, you can start creating, recording, and running macros to automate repetitive tasks and simplify your workflow. In the next sections, we will explore the process of creating and recording macros in more detail.
Creating a simple macro
Now that you have enabled the Developer tab in Microsoft Word, you can start creating your own macros. A macro is essentially a recorded sequence of actions that can be replayed whenever needed. Let’s walk through the process of creating a simple macro:
- Click on the Developer tab in the ribbon to access the developer tools.
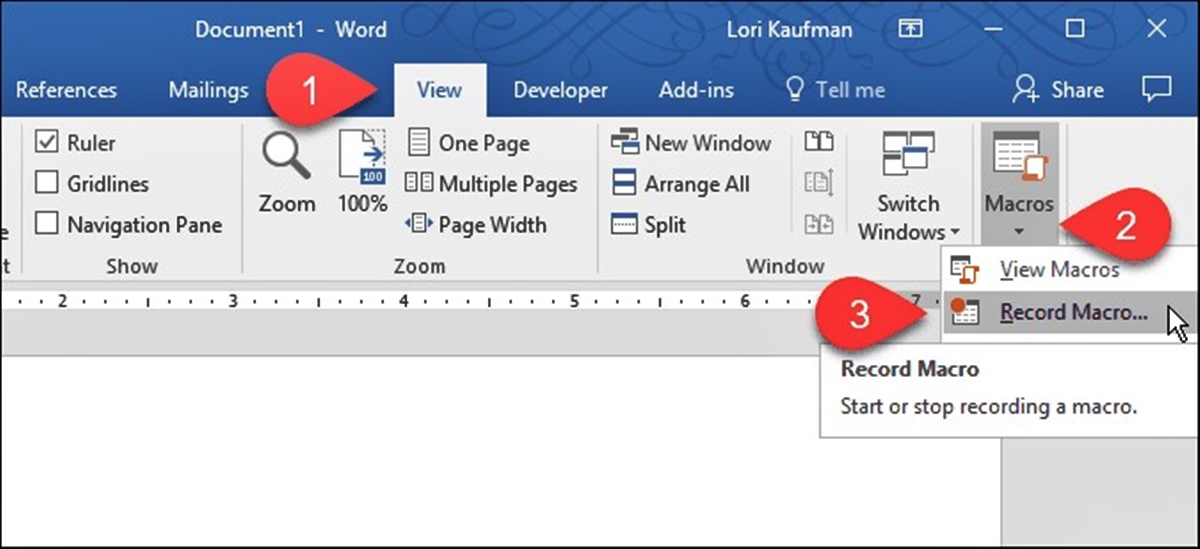
- In the Code group, click on the Record Macro button.
- A Record Macro dialog box will appear. Here, you can provide a name for the macro and optionally assign a keyboard shortcut to it.
- Choose a name for your macro that is descriptive and easy to remember. Avoid using spaces or special characters in the name.
- Click on the OK button to start recording your actions.
- Perform the actions that you want to record as part of the macro. For example, you can format text, insert tables or images, apply headers and footers, or any other actions you typically perform in your documents.
- Once you have completed your actions, click on the Stop Recording button in the Code group of the Developer tab.
Congratulations! You have successfully created your first macro. Word has recorded all the actions you performed during the recording session. Now, whenever you run this macro, it will replay those same actions, saving you time and effort.
It’s important to note that macros can include a wide variety of actions and commands beyond the basic example provided here. You can use VBA code to customize and enhance your macros, but for simple tasks, the macro recording feature is usually sufficient.
In the next section, we will explore how to make changes to an existing macro by editing its code. Editing macros allows you to fine-tune the recorded actions or add additional functionality to suit your specific needs.
Recording actions in a macro
Recording actions in a macro allows you to automate a series of tasks in Microsoft Word. By recording your actions, Word captures the steps you take and converts them into a macro code that can be replayed later. Here’s how you can record actions in a macro:
- Open the document in which you want to record the macro.
- Go to the Developer tab in the ribbon.
- In the Code group, click on the Record Macro button.
- In the Record Macro dialog box, provide a name for the macro and optionally assign a keyboard shortcut.
- Click on the OK button to start recording.
- Begin performing the actions you want to include in the macro.
- Word will record each action you perform, such as formatting text, inserting tables, or applying styles.
- Once you have completed the actions, click on the Stop Recording button in the Code group of the Developer tab.
During the recording process, Word captures every action you perform, including cursor movements, formatting changes, and content insertions. It converts these actions into VBA code that represents the macro. This code is stored and can be replayed whenever you want to run the macro again.
When recording a macro, it’s important to be mindful of the actions you perform. Unnecessary actions or mistakes made during the recording will be captured and replayed when you run the macro. Therefore, it’s a good practice to perform a “dry run” of the actions before recording the macro to ensure a smooth and error-free recording.
Keep in mind that recording macros has its limitations. Complex actions or tasks that involve user prompts, such as selecting options from dialog boxes, may not be accurately recorded. In such cases, it may be necessary to manually edit the macro code to add or modify specific actions.
In the next section, we will discuss how to edit macros, allowing you to customize the recorded actions or add advanced functionality to your macros.
Editing a macro
After recording a macro in Microsoft Word, you may find the need to make changes or add additional functionality to suit your specific requirements. Editing a macro allows you to modify the recorded actions or add new commands to enhance its functionality. Here’s how you can edit a macro:
- Open the document that contains the macro you want to edit.
- Go to the Developer tab in the ribbon.
- In the Code group, click on the Macros button.
- In the Macros dialog box, select the macro you want to edit from the list.
- Click the Edit button to open the Visual Basic Editor (VBE).
- The VBE will display the macro code that represents your recorded actions.
- You can make changes to the code, such as modifying existing commands or adding new commands using Visual Basic for Applications (VBA) syntax.
- Save the changes you made by clicking the Save button in the VBE.
- Close the VBE to return to Microsoft Word.
When editing a macro, it’s important to have some knowledge of VBA syntax and programming concepts. You can use the various VBA commands and functions to enhance the functionality of your macro. The VBE provides features such as syntax highlighting and code suggestions to assist you in writing the code correctly.
Editing a macro allows you to customize the recorded actions according to your specific requirements. You can add conditions, loops, variables, and other programming constructs to create more powerful and versatile macros. Additionally, you can make changes to the macro name, description, or keyboard shortcut assigned to it.
Remember to test your edited macro to ensure that it functions as expected. Running the macro and observing the results will help you identify any errors or unexpected behaviors in the code.
In the next section, we will cover how to run a macro that you have recorded or edited, allowing you to automate the execution of a series of actions in Word.
Running a macro
Once you have created or edited a macro in Microsoft Word, you can easily run it to automate a series of actions. Running a macro allows you to execute the recorded or modified commands without manually performing each step. Here are the steps to run a macro:
- Open the document where you want to run the macro.
- Go to the Developer tab in the ribbon.
- In the Code group, click on the Macros button.
- In the Macros dialog box, select the macro you want to run from the list.
- Click the Run button to execute the macro.
When you run a macro, Word will automatically perform the recorded or edited actions in the order specified. You will be able to observe the macro’s effects on the document, such as text formatting, table insertion, or any other actions included in the macro. The macro will run until it completes all the specified commands or until you stop it manually.
Alternatively, you can assign a macro to a keyboard shortcut or add it as a button to the Quick Access Toolbar (QAT) for quick and easy access. To assign a keyboard shortcut, you can go to the Macros dialog box, select the macro, and click on the Options button. Here, you can specify the desired keyboard shortcut. To add a macro to the QAT, right-click on the QAT and choose Customize Quick Access Toolbar to access the customization options.
By running macros, you can save significant time and effort by automating repetitive tasks. Macros can greatly increase your productivity, especially when working with large documents or performing complex formatting. It is important to test and verify the macro’s functionality before running it on important documents to ensure that it produces the desired results.
In the next section, we will discuss how to save and share macros, enabling you to use them across different documents or share them with colleagues.
Saving and sharing macros
After you have created or edited a macro in Microsoft Word, it is important to save it for future use and potentially share it with others. Saving and sharing macros allows you to use them across different documents or distribute them to colleagues, increasing efficiency and consistency. Here’s how you can save and share macros:
- Open the document where the macro is located.
- Go to the Developer tab in the ribbon.
- In the Code group, click on the Macros button.
- In the Macros dialog box, select the macro you want to save or share from the list.
- Click on the Edit button to open the Visual Basic Editor (VBE).
- In the VBE, click on the File menu and choose Save to save the macro.
- You can choose to save the macro in the current document or in a separate template file.
- If you want to share the macro, you can save it in a template file and distribute that file to others.
When saving a macro, you have the option to save it in the current document or in a template file. Saving it in the document will make the macro available only in that particular document. However, saving it in a template file, such as the Normal template, will make the macro accessible in any document based on that template.
To share a macro with others, you can save it in a template file, such as a Word template (.dotx), and distribute that file to colleagues. They can then use the macro by opening a new document based on the template file. Alternatively, if everyone has access to the same shared network, you can save the template file in a shared folder for easy access.
When sharing macros, it is important to ensure that the recipients have the necessary permissions and have enabled the Developer tab in their version of Word. This will allow them to access and run the macros without any issues.
By saving and sharing macros, you can streamline workflows, maintain consistency, and increase productivity within your team or organization. It allows everyone to benefit from the automation and efficiency provided by macros.
In the next section, we will provide some useful tips and tricks for using macros, helping you make the most out of this powerful feature in Microsoft Word.
Tips and tricks for using macros
When it comes to using macros in Microsoft Word, there are several tips and tricks that can help you maximize their potential and improve your overall productivity. Here are some valuable tips to consider:
- 1. Assign keyboard shortcuts: Assigning keyboard shortcuts to frequently used macros allows for quick and easy access. This eliminates the need to navigate through menus or toolbar buttons.
- 2. Organize macros: If you have multiple macros, create a naming convention and group related macros together. This makes it easier to find and manage them.
- 3. Use error handling: Incorporate error handling in your macros to anticipate and handle unexpected situations. This helps prevent issues that could disrupt your workflow.
- 4. Combine macros: If you have multiple macros that perform related tasks, consider combining them into a single macro. This reduces clutter and improves efficiency.
- 5. Document your macros: Add comments within the macro code to document its purpose, usage instructions, and any important details. This makes it easier for you or others to understand and maintain the macro in the future.
- 6. Test and troubleshoot: Before deploying macros on a large scale or sharing them, thoroughly test them in different scenarios to ensure they produce the expected results. Debug any issues that may arise.
- 7. Regularly review and update: As your workflow or document requirements evolve, revisit your macros periodically to ensure they still meet your needs. Update and refine them as necessary.
Remember, macros are a powerful tool, but it’s important to use them responsibly. Be cautious when running macros from untrusted sources or macros that you haven’t reviewed thoroughly to avoid potential security risks.
By incorporating these tips and tricks into your workflow, you can harness the full potential of macros and significantly streamline your document creation process within Microsoft Word.
Now that you have a better understanding of macros and how to use them effectively, you can save time and effort by automating repetitive tasks, improving consistency, and boosting your overall productivity.
Using advanced features in macros
Macros in Microsoft Word offer advanced features and capabilities that can further enhance their functionality. By utilizing these advanced features, you can create more versatile and customized macros. Here are some of the key advanced features to consider:
- 1. Conditional statements: Add conditional statements to your macros, such as ‘if’, ‘if-else’, or ‘switch’ statements. This allows you to perform different actions based on certain conditions, which can greatly expand the flexibility and adaptability of your macros.
- 2. Loops: Incorporate loops into your macros to repeat a set of actions multiple times. This is useful when you need to perform certain tasks on a range of items or when you want to automate repetitive actions.
- 3. Variables: Use variables to store and manipulate values in your macros. Variables can be used to capture user input, store temporary data, or dynamically modify the behavior of the macro.
- 4. Error handling: Implement error handling techniques in your macros to gracefully handle unexpected errors or exceptions that may occur during the execution. This helps improve the robustness and reliability of your macros.
- 5. User forms: Create user forms within your macros to prompt users for specific information or choices. User forms provide a user-friendly interface and allow for interactive input, making your macros more user-friendly and versatile.
- 6. External data sources: Access and manipulate data from external sources, such as databases or spreadsheets, within your macros. This enables you to automate tasks that involve interacting with external data.
- 7. Custom functions: Develop custom functions in your macros to perform complex calculations or operations. Custom functions extend the capabilities of macros and allow for more sophisticated data processing.
By incorporating these advanced features into your macros, you can create powerful automation solutions tailored to your specific needs. These features enable you to handle dynamic situations, interact with external data, and perform complex operations, unlocking new possibilities for increased efficiency and productivity.
However, it’s important to note that utilizing advanced features in macros requires a deeper understanding of Visual Basic for Applications (VBA) and programming concepts. It may be beneficial to further explore VBA resources, tutorials, or seek assistance from experienced VBA developers when implementing more complex functionalities.
With the utilization of these advanced features, you can take your macros to the next level and achieve even greater automation and customization within Microsoft Word.
Troubleshooting common issues with macros
While macros in Microsoft Word provide immense automation capabilities, you may encounter certain issues or errors when working with them. Understanding and troubleshooting these common issues can help you resolve them quickly and efficiently. Here are some common issues you may encounter with macros and how to troubleshoot them:
- 1. Macro not running: If a macro does not run when you try to execute it, check the following:
- Ensure that macros are enabled in your Word settings. Go to the File tab, click on Options, and navigate to the Trust Center settings.
- Verify that the macro is present and saved correctly in the document or template you are working with.
- Check for any errors or issues in the macro code using the Visual Basic Editor (VBE) and correct them as needed.
- 2. Unexpected behavior: If a macro is producing unexpected results or behaving differently than intended, consider the following:
- Review the macro code for any logical errors. Check for missing or incorrect syntax, improper formatting, or incorrect references.
- Check if there are any conflicts between the macro and other macros or add-ins. Disable any conflicting add-ins or consolidate conflicting macros.
- Verify that the document or data the macro is operating on is in the expected format and contains the required elements.
- 3. Recording errors: If you encounter issues while recording a macro, take these steps:
- Ensure that you have the necessary permissions to write to the document or template in which you are trying to record the macro.
- Reset the security settings for macros or temporarily disable antivirus software that could be interfering with the macro recording process.
- Check if there are any advanced features, such as dialog boxes or commands not supported for recording. In such cases, you may need to manually write the VBA code instead of recording the actions.
- 4. Compatibility issues: Macros may not work across different versions of Microsoft Word or on different operating systems. Ensure that the macros you create or share are compatible with the specific environment in which they will be used.
When troubleshooting macro issues, it can be helpful to consult Microsoft’s official documentation, online forums, or seek assistance from experienced VBA developers. They can often provide helpful insights and guidance in resolving specific issues.
Remember to regularly update your Microsoft Word application and any related add-ins to ensure compatibility and take advantage of the latest bug fixes and enhancements. Proper testing and verification of macros will also help identify and resolve any issues before they impact your workflow.
By troubleshooting and addressing common macro issues, you can ensure the smooth functioning and reliability of your macros in Microsoft Word.