
What is System Recovery Options?
System Recovery Options is a set of tools and features available in the Windows operating system that can help you troubleshoot and repair issues that may be preventing your computer from functioning properly. It is essentially a built-in safety net that allows you to repair your system when it encounters problems.
When your computer is not working as expected, the System Recovery Options can be accessed to perform various recovery tasks such as repairing startup issues, restoring the system to a previous point in time, recovering from a system image backup, running memory diagnostics, accessing the command prompt, and even resetting the entire system if necessary.
This set of recovery options is especially useful when you encounter problems such as a blue screen error, software or driver conflicts, corrupted system files, or other issues that prevent your computer from booting up or operating smoothly.
System Recovery Options provides you with a range of tools and methods to diagnose and fix these problems, allowing you to regain control over your system and ensure its smooth functioning.
It is important to note that System Recovery Options should be used as a last resort when all other troubleshooting methods have been exhausted. Under normal circumstances, you would use these options when your computer is unable to start up or operate properly.
By understanding what System Recovery Options are and how they can be utilized, you can take advantage of these built-in tools to resolve issues and restore your system’s functionality without the need for external assistance or reinstalling the operating system.
Why would you need System Recovery Options?
System Recovery Options can be a lifesaver when your computer encounters issues that hinder its normal operation. Here are some scenarios in which you may find yourself needing to use these recovery options:
1. Startup Issues: If your computer fails to start up properly or displays errors during the startup process, System Recovery Options can help diagnose and repair underlying problems. It can be particularly useful in resolving issues caused by corrupt boot files, damaged system files, or problematic drivers.
2. System Instability: If your computer frequently crashes, freezes, or experiences random reboots, System Recovery Options can help identify and fix the underlying causes. It allows you to restore system settings to a previous stable state or diagnose and repair software conflicts that may be causing instability.
3. Malware Infections: If your computer gets infected with malware, such as viruses, Trojans, or spyware, System Recovery Options can provide a way to remove the malicious software. You can use antivirus or antimalware tools available in the options to scan and remove the infections, helping restore your system’s security.
4. System Restore: System Recovery Options includes the option to perform a System Restore, which allows you to revert your computer’s settings to a previous state. This can be beneficial if you recently installed new software, drivers, or updates that caused issues. By restoring to a previous point, you can undo any changes that resulted in system instability.
5. Recovery from Disasters: In case of a catastrophic system failure or hardware malfunction, System Recovery Options can help you recover your data and restore your system. By using the System Image Recovery option, you can restore your computer to a previously created backup image, ensuring that all your files and settings are intact.
6. Diagnosing Hardware Issues: System Recovery Options includes tools such as Windows Memory Diagnostic, which allows you to check for memory errors and diagnose potential hardware problems. This can be helpful when your computer experiences frequent crashes, error messages, or other symptoms indicative of faulty hardware.
7. Advanced Troubleshooting: System Recovery Options provides access to the Command Prompt, allowing you to use advanced commands for troubleshooting and system repair. This can be helpful in fixing issues that are not resolved through the other available options.
Overall, System Recovery Options is essential to have at your disposal when your computer encounters problems that affect its performance and functionality. By utilizing these recovery tools, you can save time and effort by resolving issues yourself, without the need for professional assistance, and get your system back up and running smoothly.
How to access System Recovery Options
Accessing System Recovery Options in Windows is relatively straightforward and can be done through different methods:
1. Using the Advanced Startup Options:
- Restart your computer, and as it starts up, press and hold the appropriate key to access the boot menu, usually Esc, F8, F12, or Del.
- Select “Troubleshoot” or “Advanced options” from the boot menu.
- From the Advanced options menu, choose “System Recovery Options.”
2. Using a Windows installation media:
- Insert the Windows installation disc or USB drive into your computer.
- Restart the computer, and on the initial boot screen, press the appropriate key to access the boot menu.
- Choose to boot from the installation media.
- Select your language preferences and click “Next.”
- Click on “Repair your computer.”
- From the “Choose an option” screen, select “Troubleshoot” and then “Advanced options.”
- Finally, choose “System Recovery Options.”
3. Using the “Settings” menu:
- Click the “Start” button and open the “Settings” menu (gear icon).
- Select “Update & Security.”
- In the left sidebar, choose “Recovery.”
- Under “Advanced startup,” click “Restart now.”
- After the computer restarts, select “Troubleshoot” and then “Advanced options.”
- From there, you can access “System Recovery Options.”
Note that the availability of these methods may vary depending on your specific Windows version. It’s always a good idea to refer to official Microsoft documentation or consult your computer manufacturer’s support resources for accurate and up-to-date instructions.
Once you have successfully accessed System Recovery Options, you will be presented with a menu that lists various recovery tools and options. Depending on your specific needs or the issues you are facing, you can choose the appropriate tool to troubleshoot, repair, or restore your computer system.
Keep in mind that some options may require administrative credentials or specific knowledge to be used effectively. It is recommended to proceed with caution and follow any on-screen instructions or guidance provided by the recovery options to ensure proper and effective usage.
Startup Repair
Startup Repair is a feature in System Recovery Options that helps diagnose and fix issues preventing your computer from starting up properly. It is particularly useful when you encounter problems such as blue screen errors, boot loops, or system crashes during startup.
When you select the Startup Repair option, Windows will automatically scan your system for errors and attempt to fix any issues it detects. This includes repairing problems with corrupt or missing system files, damaged device drivers, and other startup-related errors.
The Startup Repair process will run a series of diagnostic tests to identify the root cause of the startup problem. It will then apply repairs or solutions to resolve the issue and allow your computer to boot up normally.
Here’s how you can use Startup Repair:
- Access System Recovery Options using one of the methods described earlier.
- Select “Startup Repair” from the list of recovery options.
- Windows will begin the diagnostic process, analyzing your system for any startup issues.
- If any problems are detected, Windows will automatically attempt to repair them.
- During the repair process, your computer may restart multiple times.
- Wait for the process to complete.
- If the repairs were successful, your computer should start up normally. If not, Startup Repair may provide additional options or recommend further steps for troubleshooting.
It’s important to note that Startup Repair does not guarantee a fix for all startup issues. In some cases, more advanced troubleshooting or manual intervention may be required. However, it is often an effective first step in resolving common startup problems.
If you still experience issues after using Startup Repair, you may consider trying other recovery options such as System Restore, System Image Recovery, or further advanced options available in System Recovery Options.
Startup Repair can be a valuable tool in your arsenal when it comes to resolving startup-related problems. It provides an automated solution to diagnose and fix issues that may be disrupting the normal boot process, allowing you to regain access to your computer and get it back up and running smoothly.
System Restore
System Restore is a powerful feature in System Recovery Options that allows you to revert your computer’s settings to a previous date and time. It can be invaluable when you encounter issues after making changes to your system, such as installing new software, drivers, or updates.
System Restore works by creating restore points on your computer at various intervals or before significant changes are made. These restore points serve as snapshots of your system’s settings and configuration, allowing you to roll back to a previous state if problems arise.
Here’s how you can use System Restore:
- Access System Recovery Options using one of the methods mentioned earlier.
- Select the “System Restore” option from the list of recovery options.
- A wizard will appear, guiding you through the system restore process.
- You will be presented with a list of available restore points. Choose a restore point that predates the emergence of the problem you’re facing.
- Click “Next” and then “Finish” to begin the system restore process.
- Windows will restore your computer’s settings and configuration to the selected restore point.
- Your computer will restart, and the changes will take effect.
It’s worth noting that System Restore primarily affects system settings, registry entries, and installed applications. Your personal files, such as documents, pictures, and videos, are generally not impacted by the restore process. However, it is always wise to have backups of important data to ensure their safety.
System Restore is a powerful tool for undoing recent changes and resolving issues caused by software conflicts, driver problems, or system updates. It can help you revert your system to a stable state without the need for manual troubleshooting or reinstallation of software.
Remember that System Restore is not a guaranteed solution for all problems. Some issues may not be resolved through a system restore, especially if they are related to hardware failures or severe system corruption. In such cases, other recovery options or assistance from technical support may be necessary.
Overall, System Restore can be a lifesaver when you encounter problems after making system changes. It provides a simple and efficient method to return your computer to a previous working state and restore functionality to your system.
System Image Recovery
System Image Recovery is a powerful feature in System Recovery Options that allows you to restore your computer to a previous state using a previously created system image. This feature is particularly useful when you encounter severe system issues, hardware failures, or want to transfer your entire system to a new hard drive.
A system image is an exact copy of a drive or partition, including the operating system, installed programs, settings, and files. It serves as a comprehensive backup of your entire system, allowing you to restore it to the exact state it was in when the image was created.
Here’s how you can use System Image Recovery:
- Access System Recovery Options using one of the methods mentioned earlier.
- Select the “System Image Recovery” option from the list of recovery options.
- Windows will detect the available system image backups. If the image is stored on an external hard drive, make sure it is connected to your computer.
- Choose the system image you want to restore, and click “Next.”
- Review the details of the restore operation, including what will be affected by the restore process.
- Click “Finish” to begin the system image recovery process.
- Windows will restore your computer’s system image, overwriting the existing system configuration and files.
- After the restoration is complete, your computer will restart.
Note that the system image used for recovery must have been created earlier, preferably when your system was in a stable and healthy state. Regularly creating and updating system image backups ensures that you can easily recover your system if a critical issue arises.
System Image Recovery is a robust solution for restoring your entire system to a known working state. It not only helps address severe software issues but can also be used for hardware upgrades or transferring your system to a new hard drive or computer.
However, it’s important to exercise caution when performing a system image recovery, as the process will replace all the contents of the destination drive or partition. Make sure to back up any important data or files stored on that drive or partition to avoid permanent data loss.
Overall, System Image Recovery is a valuable tool for system restoration, providing an efficient way to recover from severe system failures or perform hardware upgrades without the need to manually reinstall the operating system and applications.
Windows Memory Diagnostic
Windows Memory Diagnostic is a tool available in System Recovery Options that allows you to test your computer’s memory for any potential errors or issues. Memory problems can often lead to system crashes, blue screen errors, and overall system instability. By using Windows Memory Diagnostic, you can identify and troubleshoot these memory-related problems.
Here’s how you can use Windows Memory Diagnostic:
- Access System Recovery Options using one of the methods mentioned earlier.
- Select the “Windows Memory Diagnostic” option from the list of recovery options.
- You will be presented with two options: “Restart now and check for problems (recommended)” or “Check for problems the next time I start my computer.” Choose the option that suits your needs.
- If you choose to restart immediately, your computer will restart, and the memory diagnostic tool will automatically run.
- If you choose to run the diagnostic on the next restart, make sure to save any unsaved work before rebooting.
- During the memory diagnostic, Windows will test your computer’s RAM for errors by performing a series of diagnostic tests. These tests include various patterns and data writes to detect issues with memory cells or data corruption.
- Once the test is complete, your computer will restart.
- After the restart, you can access the results of the memory diagnostic by checking the Event Viewer or by clicking the Start button, typing “Memory Diagnostic” in the search bar, and clicking “Windows Memory Diagnostic.”
If Windows Memory Diagnostic detects any errors in your system’s memory, it will provide information about the nature and location of the problem. This information can be helpful for determining whether faulty memory modules need to be replaced or if other troubleshooting steps are necessary to resolve the issue.
By running Windows Memory Diagnostic, you can ensure the reliability and stability of your computer by identifying and addressing potential memory-related issues. Regular memory testing is especially important for systems that frequently experience crashes or unusual behavior.
It’s important to note that Windows Memory Diagnostic is a built-in tool that primarily focuses on testing the computer’s RAM. If you suspect other hardware issues or want to perform comprehensive hardware testing, you may need to rely on additional diagnostic tools or seek professional assistance.
Overall, Windows Memory Diagnostic is a valuable tool for diagnosing memory problems in your computer. Its use can help troubleshoot and resolve issues related to system crashes, instability, and blue screen errors caused by faulty memory modules.
Command Prompt
Command Prompt is a powerful tool available in System Recovery Options that provides a command-line interface to perform advanced troubleshooting, system repair, and management tasks. It allows you to execute commands to interact directly with your computer’s operating system.
Here’s how you can use Command Prompt:
- Access System Recovery Options using one of the methods mentioned earlier.
- Select the “Command Prompt” option from the list of recovery options.
- A command prompt window will open, displaying a black screen with a blinking cursor.
- You can now enter various commands to perform different tasks. Command Prompt commands are typically typed in the format of
commandname argument1 argument2. - For example, you can use the
chkdskcommand to check your system’s hard drive for errors, or thesfc /scannowcommand to scan and repair corrupt system files. - Familiarize yourself with common Command Prompt commands and their syntax to perform the desired actions. You can find online resources and documentation that provide a list of useful commands.
- Execute the desired commands in Command Prompt and observe the output for any relevant information or error messages.
- Once you’ve completed the necessary tasks or troubleshooting steps, you can close the Command Prompt window.
Command Prompt provides a high level of control and flexibility in performing system repairs and advanced troubleshooting. It allows you to execute commands that may not be accessible through other graphical user interfaces or recovery tools.
While Command Prompt provides powerful capabilities, it’s important to exercise caution when using it, especially if you’re not familiar with the commands or their potential impact. Incorrect use of commands or entering incorrect syntax can lead to unintended consequences or system errors.
When using Command Prompt, it’s always recommended to consult official resources, tutorials, or experienced users to ensure you’re using the correct commands and following proper procedures.
Overall, Command Prompt is a valuable tool for advanced system management, troubleshooting, and repair tasks. With the ability to execute commands directly in the operating system, it provides a flexible and efficient way to perform various actions and resolve issues that may be affecting your computer’s functionality.
Reset This PC
The “Reset this PC” option in System Recovery Options is a powerful feature that allows you to restore your computer to its original factory settings or initiate a clean installation of Windows. This can be useful when your system is plagued by persistent issues, malware infections, or performance problems that cannot be resolved through other means.
Here’s how you can use the “Reset this PC” feature:
- Access System Recovery Options using one of the methods mentioned earlier.
- Select the “Reset this PC” option from the list of recovery options.
- You will be presented with two options: “Keep my files” and “Remove everything.”
- If you choose “Keep my files,” Windows will reinstall the operating system while preserving your personal files. However, software applications and settings will be removed or restored to their default state.
- If you choose “Remove everything,” Windows will remove all personal files, applications, and settings, giving you a clean installation of Windows.
- Select the desired option and follow the on-screen instructions to initiate the reset process.
- Windows will restart your computer and perform the necessary actions to reset your system.
- Once the reset process is complete, you may need to go through the initial setup and configuration steps, such as creating user accounts and personalizing settings.
Before initiating a reset, it’s important to back up any important files or data that you want to keep, as the process will remove them. You can consider using an external storage device or cloud storage to securely store your files.
Resetting your PC can be a drastic solution, so it’s advisable to attempt less invasive troubleshooting methods first. However, when other options have been exhausted or you want to start fresh, “Reset this PC” provides an effective way to restore your computer’s performance and functionality.
It’s important to note that the availability and options of the “Reset this PC” feature in System Recovery Options may vary depending on your specific Windows version and edition. Make sure to refer to official documentation or consult your computer manufacturer’s support resources for accurate instructions.
Overall, the “Reset this PC” feature can be a powerful tool to resolve persistent issues, remove malware, or start afresh with your computer. It provides a straightforward process to restore your system to its original state or perform a clean installation of Windows, giving you a fresh start and potentially improving your computer’s performance.
Advanced Options in System Recovery Options
In addition to the main recovery options discussed earlier, System Recovery Options also offers advanced options that provide additional tools and functionality for troubleshooting and repairing your computer system. These advanced options can be accessed from the System Recovery Options menu and can help you overcome more complex issues or perform advanced tasks.
Here are some of the advanced options available in System Recovery Options:
1. System Restore: This option allows you to restore your computer to a previous restore point, as discussed in the earlier section. It can be useful for resolving issues caused by recent changes to your system.
2. System Image Recovery: This option enables you to restore your computer from a previously created system image backup, as covered earlier. It is particularly useful for recovering from severe system failures or migrating your system to a new hard drive.
3. Startup Repair: This advanced option automatically diagnoses and repairs startup-related issues, such as damaged boot files or incompatible drivers. It is an effective tool for resolving problems that prevent your computer from booting properly.
4. Command Prompt: This option provides a command-line interface where you can execute various commands to perform advanced system repairs, troubleshoot issues, or manage your system. It allows direct interaction with the operating system and is especially useful for advanced users or system administrators.
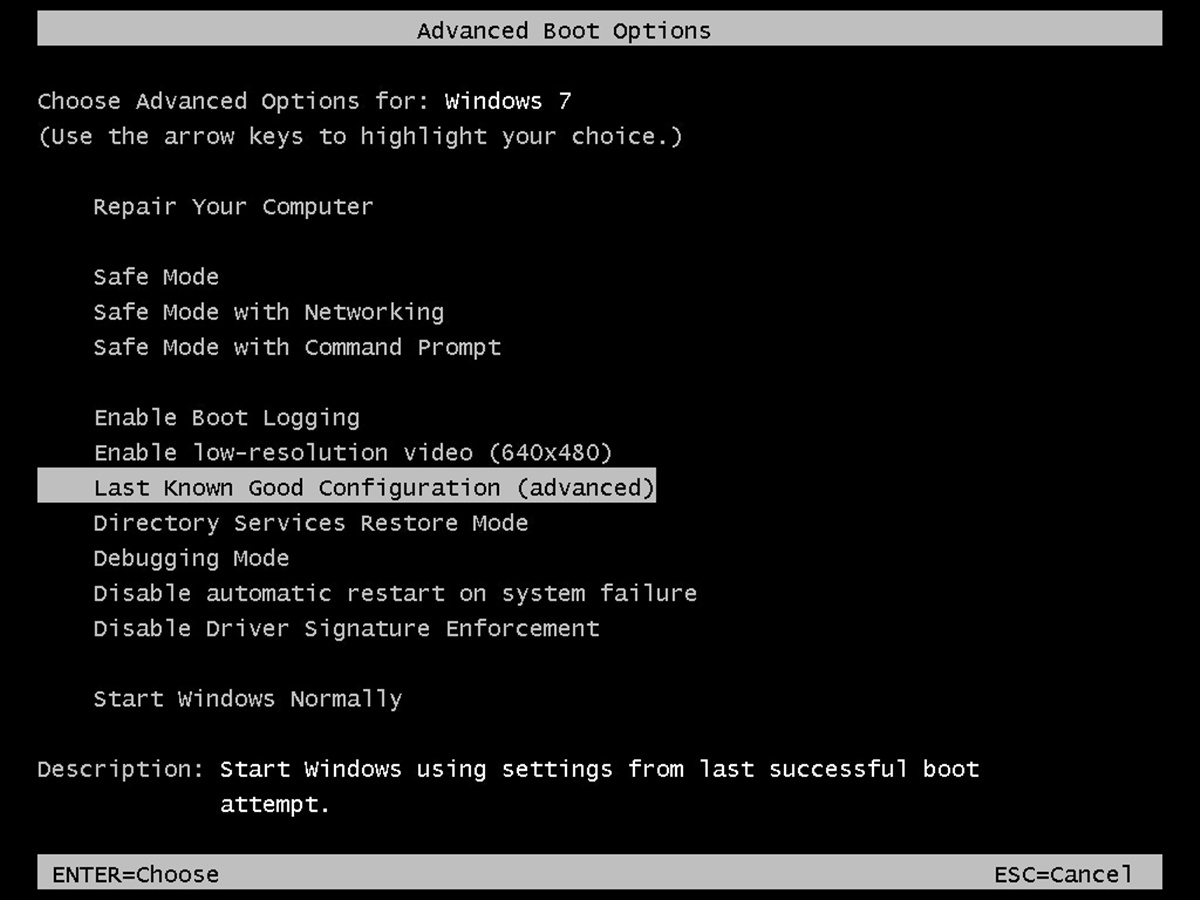
5. Enable Safe Mode: Safe Mode is a diagnostic mode of Windows that starts your computer with a limited set of drivers and services. Enabling Safe Mode can help isolate and troubleshoot issues by allowing you to access the system with minimal, essential functionality.
6. Uninstall Updates: This option allows you to remove recently installed updates that might be causing compatibility issues or system instability. It is particularly useful when you encounter problems following a recent update.
7. UEFI Firmware Settings: This option enables you to access your computer’s UEFI (Unified Extensible Firmware Interface) firmware settings. It allows you to configure hardware settings, manage secure boot options, and make changes to your system’s firmware.
These advanced options give you more control and flexibility in troubleshooting and repairing your computer. They provide powerful tools to address complex issues and perform advanced tasks that may not be available through standard recovery options.
When using the advanced options in System Recovery Options, it’s important to understand the potential impact and implications of the actions you take. It’s advisable to have backups of your important data and to consult official documentation or seek expert advice when you’re unsure about the correct course of action.
Overall, the advanced options in System Recovery Options provide additional tools and functionality for diagnosing, troubleshooting, and repairing your computer. They can help you overcome more complex issues and perform advanced tasks to ensure the optimal functioning of your system.