
Checking the compatibility of your iPod with iTunes
If you’re looking to sync music to your iPod, the first step is to ensure that your iPod is compatible with iTunes. iTunes is a software developed by Apple that allows you to manage and transfer your music, videos, and other media files onto your iPod. Before proceeding with the syncing process, here are a few things to check:
- Check your iPod model: Different iPod models have different compatibility with iTunes. Make sure to check if your iPod is listed as compatible on the iTunes website or in the iTunes software.
- Check the iOS version: Ensure that your iPod is running on a compatible iOS version required by iTunes. You can check the iOS version under the “Settings” menu on your iPod.
- Check the computer requirements: Make sure your computer meets the system requirements for installing iTunes. This includes the operating system version, available disk space, and minimum RAM requirements.
If your iPod is compatible with iTunes, you’re ready to proceed with syncing your music. However, if your iPod is not compatible, you may need to consider alternative methods to transfer music, such as using third-party software or cloud storage services.
Remember, it’s important to regularly update both your iPod’s software and iTunes to ensure compatibility and access to the latest features and enhancements. Visit the Apple Support website for instructions on how to update your iPod and iTunes software.
By ensuring compatibility between your iPod and iTunes, you can enjoy the convenience of syncing music and other media files effortlessly. Now that you know your iPod is compatible, let’s move on to the next steps of installing iTunes on your computer and creating an iTunes account.
Installing iTunes on your computer
To begin syncing music to your iPod using iTunes, you’ll need to install the iTunes software on your computer. Here’s a step-by-step guide to help you through the installation process:
- Visit the iTunes website: Head over to the official Apple website or search for iTunes in your preferred search engine.
- Select your operating system: Choose the version of iTunes that corresponds to your computer’s operating system. Whether you’re using Windows or macOS, make sure to download the compatible version.
- Start the installation: Once the download is complete, double-click on the downloaded file to start the installation process. Follow the on-screen instructions to proceed.
- Agree to the terms and conditions: During the installation, you’ll be prompted to accept the terms and conditions. Take a moment to review them and click on the “Agree” button to continue.
- Customize the installation: By default, iTunes installs with standard settings. However, you can customize the installation options according to your preferences. Choose the desired options and click “Next” to proceed.
- Wait for the installation to complete: The installation process may take a few minutes. Once it finishes, you’ll see a confirmation message informing you that the installation was successful.
With iTunes successfully installed on your computer, you’re one step closer to syncing your music to your iPod. Before you can start transferring music, you’ll need to create an iTunes account if you don’t have one already. In the next section, we’ll guide you through creating an iTunes account.
Remember to keep your iTunes software up to date by regularly checking for updates. This ensures you have access to the latest features, bug fixes, and security enhancements provided by Apple. Now let’s move on to creating an iTunes account so you can start enjoying your favorite tunes on your iPod.
Creating an iTunes account
To sync music to your iPod using iTunes, you’ll need to create an iTunes account. This account will allow you to access the vast library of music and other media available through the iTunes Store. Here’s how you can create your iTunes account:
- Open iTunes: Launch the iTunes software on your computer. If you haven’t installed iTunes yet, please refer to the previous section on how to install it.
- Go to the iTunes Store: In the top navigation menu within iTunes, click on “iTunes Store.” This will take you to the iTunes Store homepage.
- Find the “Account” option: Look for the “Account” button, usually located in the top navigation bar of the iTunes Store homepage. Click on it to proceed.
- Choose “Create New Apple ID”: Under the “Sign In” section, select the option to “Create New Apple ID.” This will guide you through the account creation process.
- Fill out the required information: Follow the prompts and enter the necessary information, including your email address, password, and security questions. Make sure to provide accurate and up-to-date details.
- Accept the terms and conditions: Read through the terms and conditions, then tick the box to indicate your agreement. Click on “Continue” to proceed.
- Verify your account: To ensure the security of your account, you may be required to verify your email or identity. Follow the instructions provided to complete the verification process.
- Set up your payment method (optional): If you plan to make purchases from the iTunes Store, you can set up your preferred payment method. This can include adding a credit card or redeeming gift cards.
Once you’ve successfully created your iTunes account, you’re ready to start exploring the vast collection of music and media available. In the next section, we’ll guide you through connecting your iPod to your computer, so you can begin syncing your favorite songs to your device.
Remember to keep your login credentials secure and avoid sharing them with others to protect your personal information. Now let’s move on to connecting your iPod to your computer and preparing for the music syncing process.
Connecting your iPod to your computer
Once you have installed iTunes and created an iTunes account, the next step is to connect your iPod to your computer. This allows you to establish a connection between your iPod and iTunes, enabling you to transfer music and other media files. Follow these steps to connect your iPod:
- Prepare your iPod and computer: Ensure that both your iPod and computer are powered on and functioning properly. Make sure your computer is connected to the internet.
- Use the USB cable: Locate the USB cable that came with your iPod. Connect one end of the cable to the port on your iPod, and the other end to an available USB port on your computer.
- Unlock your iPod: If your iPod has a passcode lock, unlock it before proceeding. This allows your computer to detect and connect to your iPod.
- Authorize the connection: When you connect your iPod to your computer for the first time, you may be prompted to authorize the connection. Follow the on-screen instructions to authorize the device.
- Wait for the connection: Once you’ve connected your iPod to your computer, iTunes should automatically launch and detect your device. You may see a notification confirming the successful connection.
- Sync preferences: Review the sync preferences in iTunes and customize them according to your preferences. This includes choosing what types of data to sync, such as music, videos, podcasts, and more.
- Start the syncing: To sync music to your iPod, click on your iPod’s icon in the iTunes interface. Navigate to the “Music” tab, select the desired options, and click on the “Sync” button to initiate the syncing process.
During the syncing process, iTunes will transfer the selected music from your iTunes library to your iPod. Depending on the amount of data and the speed of your computer, this process may take some time. Once the syncing is complete, you will have your favorite music available on your iPod.
Remember to properly eject your iPod from your computer before disconnecting it to avoid any data loss or corruption. In the next section, we’ll explore how to sync music from your iTunes library to your iPod in more detail, as well as how to manage your music collection on iTunes.
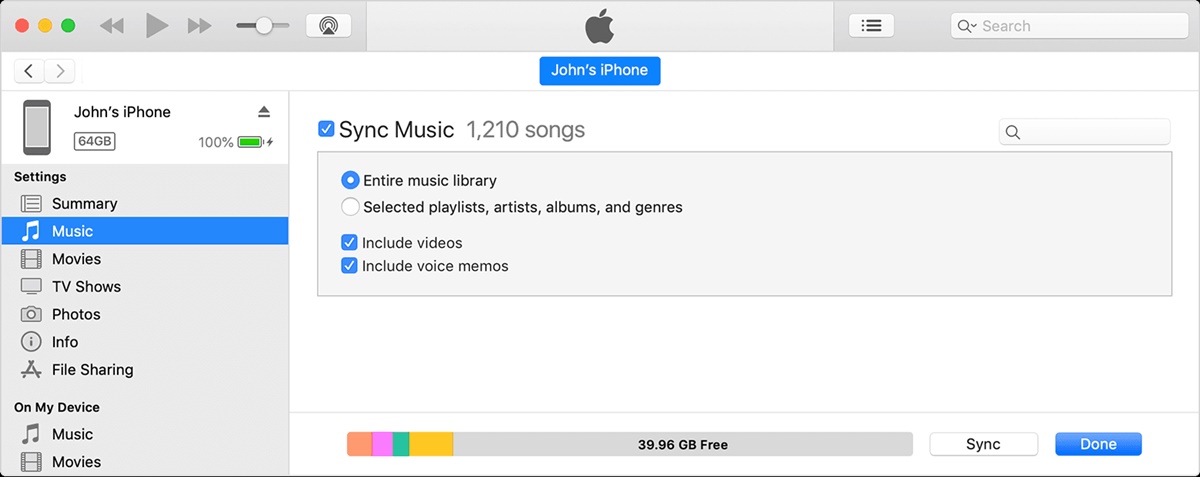
Syncing music from your iTunes library to your iPod
Syncing music from your iTunes library to your iPod allows you to enjoy your favorite songs on the go. With iTunes, you can easily manage your music collection and transfer your desired tracks onto your iPod. Let’s go through the steps to sync music from your iTunes library:
- Select your iPod: In the iTunes interface, click on your iPod’s icon to access its settings and syncing options.
- Navigate to the “Music” tab: Within your iPod’s settings, click on the “Music” tab to specify your syncing preferences.
- Select the music you want to sync: Choose whether you want to sync your entire music library or specific playlists, artists, albums, or genres.
- Customize additional options: iTunes provides additional options such as including music videos, selecting a maximum size for your music library, and excluding specific tracks based on their star ratings.
- Initiate the syncing process: Click on the “Apply” or “Sync” button to start syncing the selected music from your iTunes library to your iPod.
- Monitor the syncing progress: You can track the progress of the syncing process through the status bar or progress indicator displayed in iTunes.
- Enjoy your synced music: Once the syncing is complete, disconnect your iPod from your computer and start enjoying your synced music on the go.
Whenever you add or remove music from your iTunes library, it’s important to update your iPod to reflect those changes. Simply reconnect your iPod to your computer and re-sync your music to keep your iPod up to date with your iTunes library.
Remember to consider the available storage space on your iPod when selecting the music to sync. It’s also a good practice to regularly organize your iTunes library by creating playlists, albums, or genres to make it easier to manage and sync your music to your iPod.
In the next sections, we’ll delve deeper into managing your music on iTunes, including creating and editing playlists, adding music to your iTunes library, and removing unwanted tracks.
Managing your music on iTunes
Managing your music on iTunes allows you to stay organized and have full control over your music collection. From creating playlists to adding new tracks and removing unwanted ones, here’s how you can effectively manage your music on iTunes:
To create a playlist:
- Click on the “File” menu in iTunes and select “New Playlist”.
- Give your playlist a name and drag and drop songs from your iTunes library into the playlist.
- You can rearrange the songs by dragging them within the playlist and customize the order in which they will play.
To edit a playlist:
- Select the playlist you want to edit from the sidebar in iTunes.
- To add songs, simply drag and drop them from your iTunes library into the playlist.
- To remove songs, right-click on the song you want to remove and select “Delete from Playlist”.
- You can also rearrange the songs within the playlist by dragging them to the desired position.
To add music to your iTunes library:
- Click on the “File” menu in iTunes and select “Add File to Library” or “Add Folder to Library”.
- Locate the music files or folder on your computer and select them. Click “Open” to import them into your iTunes library.
- The imported music will now be available in your iTunes library for syncing to your iPod.
To remove music from your iTunes library:
- Highlight the song or album you want to remove from your iTunes library.
- Right-click on the selection and choose “Delete from Library”.
- You’ll be given the option to either keep the file on your computer or move it to the recycle bin/trash.
By effectively managing your music on iTunes, you can ensure that your library is organized and tailored to your preferences. This makes syncing music to your iPod a smoother and more enjoyable experience. In case you want to troubleshoot any common syncing issues with iTunes and your iPod, refer to the next section for helpful troubleshooting tips.
Creating and editing playlists on iTunes
Creating and editing playlists on iTunes allows you to curate customized collections of songs based on your preferences and moods. With playlists, you can easily organize and access your favorite tracks. Here’s how you can create and edit playlists on iTunes:
To create a playlist:
- Open iTunes on your computer and select the “Library” tab.
- Click on the “+” button at the bottom left corner of the iTunes window to create a new playlist.
- Give your playlist a name and press Enter to save it.
- Locate the songs you want to add to your playlist in your iTunes library.
- Drag and drop the selected songs into your newly created playlist.
To edit a playlist:
- Select the playlist you want to edit from the sidebar in iTunes.
- To add songs, simply drag and drop them from your iTunes library into the playlist.
- To remove songs, right-click on the song you want to remove and select “Delete from Playlist”.
- You can also rearrange the songs within the playlist by dragging them to the desired position.
To rename a playlist:
- Right-click on the playlist you want to rename.
- Select “Rename” from the context menu.
- Type the new name for your playlist and press Enter to save it.
To delete a playlist:
- Right-click on the playlist you want to delete.
- Select “Delete” from the context menu.
- Confirm your choice by clicking “Delete” in the confirmation pop-up window.
Creating and editing playlists on iTunes enables you to organize your music collection in a way that suits your preferences and listening habits. You can create playlists for different genres, moods, or even for specific occasions. By customizing your playlists, you can easily access and enjoy your favorite songs on your iPod.
Now that you know how to create and edit playlists on iTunes, let’s move on to adding music to your iTunes library in the next section. This will expand your music collection and provide you with more options for creating exciting playlists.
Adding music to your iTunes library
Expanding your iTunes library with new music can be an exciting way to discover and enjoy a variety of songs. Whether you have music stored on your computer or want to explore the vast collection available in the iTunes Store, here are a few ways to add music to your iTunes library:
Method 1: Importing music files from your computer:
- Open iTunes on your computer and go to the “Music” tab.
- Click on the “File” menu and select “Add File to Library” if you want to add individual songs or “Add Folder to Library” if you want to add an entire folder of music.
- Navigate to the location where your music files are saved on your computer.
- Select the desired files or folder and click “Open” to import them into your iTunes library.
- The imported music will now be visible in your iTunes library and available for syncing to your iPod.
Method 2: Purchasing and downloading music from the iTunes Store:
- Open iTunes and click on the “iTunes Store” button in the top navigation menu.
- Browse or search for the music you want to add to your library.
- Select the desired album or song and click on the “Buy” button.
- Enter your iTunes account credentials if prompted and confirm the purchase.
- The purchased music will automatically download and be added to your iTunes library.
Method 3: Using iTunes Match or Apple Music:
- If you have an iTunes Match or Apple Music subscription, you can access a vast library of music from the iTunes Store.
- Simply sign in to your iTunes account within iTunes and enable iTunes Match or Apple Music.
- Search for the desired songs or albums and click on the “+” symbol to add them to your library.
- The added music will be available for streaming or offline listening through iTunes and can be synced to your iPod.
By adding new music to your iTunes library, you can expand your music collection and enjoy a diverse range of songs on your iPod. Whether you import music from your computer or explore the vast iTunes Store, iTunes provides you with endless possibilities for discovering and enjoying music.
In the next section, we’ll explore how to remove unwanted music from your iTunes library, allowing you to keep your collection organized and clutter-free.
Removing music from your iTunes library
Managing your iTunes library involves not only adding new music but also removing unwanted songs to keep your collection organized and clutter-free. If you come across tracks that you no longer enjoy or want to free up storage space, here are a few methods to remove music from your iTunes library:
Method 1: Removing individual songs or albums:
- Open iTunes on your computer and go to the “Music” tab in your library.
- Locate the song or album you want to remove.
- Right-click on the individual song or album and select “Delete from Library”.
- Choose whether you want to keep the song file on your computer or move it to the recycle bin/trash.
- The selected music will be removed from your iTunes library and will no longer appear in your playlists or collection.
Method 2: Deleting songs or albums from playlists:
- If you have songs or albums in playlists that you want to remove, open the playlist in iTunes.
- Locate the song or album you wish to delete and right-click on it.
- Select “Remove from Playlist” to remove it from the playlist only.
- If you want to remove the song or album from both the playlist and the library, choose “Delete from Library” instead.
Method 3: Using the “iTunes Library.xml” file:
- Navigate to the iTunes folder on your computer’s file system. The default location for the iTunes folder is:
C:\Users\YourUsername\My Music\iTunesfor Windows~/Music/iTunes/for macOS- Locate the file named “iTunes Library.xml” and open it with a text editor.
- Search for the name of the song or album you want to remove and delete the corresponding entry in the XML file.
- Save the changes and exit the text editor.
- The next time you open iTunes, the removed song or album will no longer be listed in your library.
By removing music from your iTunes library, you can keep your collection organized and only have the songs you truly enjoy readily accessible. It also helps in managing storage space on your computer and syncing only the desired music to your iPod.
If you accidentally remove a song or album and later want to restore it, you can check the “Trash” or “Recycle Bin” on your computer to recover the deleted music files.
In the next section, we’ll address common syncing issues you may encounter with iTunes and your iPod, and provide troubleshooting techniques to resolve them.
Troubleshooting common syncing issues with iTunes and iPod
While syncing music from iTunes to your iPod is usually a straightforward process, there may be times when you encounter some issues. Here are some common syncing issues and troubleshooting techniques to help you resolve them:
Issue 1: iPod not recognized by iTunes:
- Ensure that you have the latest version of iTunes installed on your computer.
- Try using a different USB cable or USB port to connect your iPod.
- Restart your computer and reconnect your iPod.
- If the issue persists, update your iPod’s software by connecting it to iTunes and checking for updates.
Issue 2: Songs not syncing to iPod:
- Check if the songs you want to sync are selected in your iTunes library.
- Make sure that the checkboxes are enabled for the selected songs in the “Music” tab of your iPod’s settings in iTunes.
- Try unchecking and rechecking the songs before initiating the sync process.
- If the issue persists, try restarting both your computer and iPod, then attempt to sync again.
Issue 3: Incomplete or interrupted syncing:
- Ensure that you have enough available storage space on your iPod to accommodate the songs you want to sync.
- Check if any error messages are displayed during the syncing process and follow the instructions provided.
- Try disconnecting and reconnecting your iPod to your computer before initiating the syncing process again.
- If the problem persists, try resetting your iPod by pressing and holding the Sleep/Wake button along with the Home button until the Apple logo appears.
Issue 4: Syncing takes too long or freezes:
- Close any unnecessary applications or processes running on your computer that may be affecting the syncing speed.
- Ensure that your computer meets the minimum system requirements for running iTunes smoothly.
- Make sure you have a stable internet connection as slow or interrupted connectivity can affect the syncing process.
- Consider reducing the number of songs or media files being synced at once to improve the syncing speed.
If none of these troubleshooting steps resolves your syncing issues, you can visit the Apple Support website or contact Apple Support for further assistance.
By troubleshooting and resolving common syncing issues with iTunes and your iPod, you can ensure a smooth and frustration-free experience when syncing music to your device. In the next section, we’ll cover the proper steps to disconnect your iPod from your computer to ensure data integrity.
Disconnecting your iPod from your computer
When you’re finished syncing music to your iPod and want to safely disconnect it from your computer, it’s important to follow the proper steps to ensure the integrity of your data and prevent any potential damage. Here’s how you can safely disconnect your iPod from your computer:
Step 1: Stop the sync process:
- If iTunes is currently syncing your iPod, wait for the sync process to complete before proceeding.
- Depending on the size of your music library and the transfer speed, this process may take a few minutes. Look for the progress bar in iTunes to know when the sync is finished.
Step 2: Eject your iPod from iTunes:
- In the iTunes interface, click on the eject icon next to your iPod’s name in the sidebar of the iTunes window.
- Alternatively, you can right-click on your iPod’s name and select the “Eject” option from the context menu.
- Wait for a notification or confirmation message indicating that it’s safe to disconnect your iPod.
Step 3: Safely unplug your iPod:
- Once you have safely ejected your iPod from iTunes, gently unplug the USB cable from your iPod.
- Avoid pulling or forcefully removing the cable as this can cause damage to the port or the cable itself.
- Store the USB cable properly, ensuring it’s not tangled or twisted, for future use.
By following these steps, you can prevent data loss or corruption and maintain the proper functioning of your iPod. Abruptly disconnecting your iPod from your computer without properly ejecting it from iTunes may result in errors or incomplete transfers.
Keep in mind that if you have made any changes or additions to your iPod’s library or settings, it’s essential to perform a proper disconnect to ensure those changes are saved correctly.
Now that you know how to disconnect your iPod safely, you can enjoy your synced music and explore the many features and functionalities of your device.