
Choosing the Right Speakon Connector
When it comes to wiring a Speakon connector, the first step is to ensure you have the right connector for your specific needs. Speakon connectors are commonly used in professional audio systems, especially for connecting amplifiers to speakers. They are known for their secure locking mechanism and ability to handle high power levels, making them a popular choice in the audio industry.
There are different types of Speakon connectors available, each designed for specific applications. The two most common types are the 2-pole and 4-pole Speakon connectors. The 2-pole connectors are typically used for connecting to high-power amplifiers, while the 4-pole connectors are suitable for bi-amping or connecting to powered speakers.
Before selecting a Speakon connector, it’s essential to consider the power requirements of your audio setup. Determine the power rating of your amplifier and speakers to ensure that the connector can handle the power levels without any risk of damage or signal degradation. Additionally, consider the number of connections needed and whether you require a locking mechanism for secure connections.
It’s also crucial to verify the compatibility of the Speakon connector with your existing audio equipment. Some amplifiers and speakers may only be compatible with specific types of connectors, so it’s important to check the manufacturer’s specifications or consult with audio professionals if you’re unsure.
Ultimately, choosing the right Speakon connector involves understanding the power requirements, the type of connections needed, and the compatibility with your audio equipment. By selecting the appropriate connector for your setup, you can ensure reliable and secure connections, contributing to optimal audio performance.
Gathering the Necessary Tools and Materials
Before embarking on the process of wiring a Speakon connector, it’s essential to gather all the required tools and materials to ensure a smooth and efficient workflow. Having the necessary items at hand will not only streamline the process but also minimize interruptions during the assembly.
The following tools and materials are essential for wiring a Speakon connector:
- Speakon Connector: The primary component of the assembly, the Speakon connector, should be selected based on the specific requirements of the audio system, as discussed in the previous section. Ensure that the connector is compatible with the amplifier and speakers, and choose between the 2-pole and 4-pole configurations based on the intended application.
- Speaker Cable: Select a high-quality speaker cable with the appropriate gauge to accommodate the power requirements of the audio setup. The cable should be of sufficient length to allow for flexibility in connecting the components.
- Wire Strippers: A reliable pair of wire strippers is essential for removing the insulation from the speaker cable, exposing the conductors for connection to the Speakon connector.
- Screwdriver or Hex Key: Depending on the type of Speakon connector chosen, a screwdriver or hex key may be required to secure the cable and make the necessary connections within the connector.
- Wire Cutters: Precision wire cutters are indispensable for trimming the speaker cable to the appropriate length and ensuring clean, accurate cuts.
- Heat Gun or Lighter (Optional): While not essential, a heat gun or lighter can be used to shrink heat shrink tubing over the cable connections for added insulation and protection.
- Marker or Labeling Tape: To maintain organization and clarity, a marker or labeling tape can be used to identify the polarity or specific connections on the speaker cable.
By ensuring that all the necessary tools and materials are readily available, you can proceed with confidence and efficiency when wiring the Speakon connector. This preparation sets the stage for a successful assembly process, leading to reliable and secure connections within the audio system.
Preparing the Speaker Cable
Before connecting the speaker cable to the Speakon connector, it’s crucial to prepare the cable properly to ensure secure and reliable electrical connections. The preparation process involves assessing the cable, identifying the conductors, and making necessary adjustments to facilitate a seamless integration with the connector.
The following steps outline the process of preparing the speaker cable:
- Inspect the Cable: Begin by examining the speaker cable for any signs of damage, such as cuts, fraying, or exposed conductors. It’s essential to use a cable that is in good condition to maintain the integrity of the electrical connections.
- Determine Polarity: Identify the polarity of the speaker cable, distinguishing between the positive and negative conductors. Some speaker cables may feature color-coded insulation, making it easier to differentiate between the conductors. If the cable is not color-coded, use a marker or labeling tape to designate the polarity for future reference.
- Trim Excess Strands: If the speaker cable contains excess strands of wire that extend beyond the main insulation, carefully trim these strands to ensure a clean and uniform appearance. This step contributes to the overall neatness and manageability of the cable during the wiring process.
- Separate the Conductors: If the speaker cable consists of multiple conductors within a single sheath, carefully separate and organize the conductors to facilitate individual connection to the Speakon connector. Ensuring that the conductors are neatly arranged minimizes the risk of accidental short circuits or crossed connections.
- Measure and Cut: Determine the appropriate length of the speaker cable required for the specific installation, allowing for sufficient slack to accommodate potential adjustments or repositioning. Use wire cutters to trim the cable to the desired length, ensuring precision and accuracy in the cutting process.
By meticulously preparing the speaker cable, you lay the groundwork for a successful and efficient wiring process. Attention to detail at this stage contributes to the overall quality and reliability of the electrical connections, setting the stage for optimal audio performance within the system.
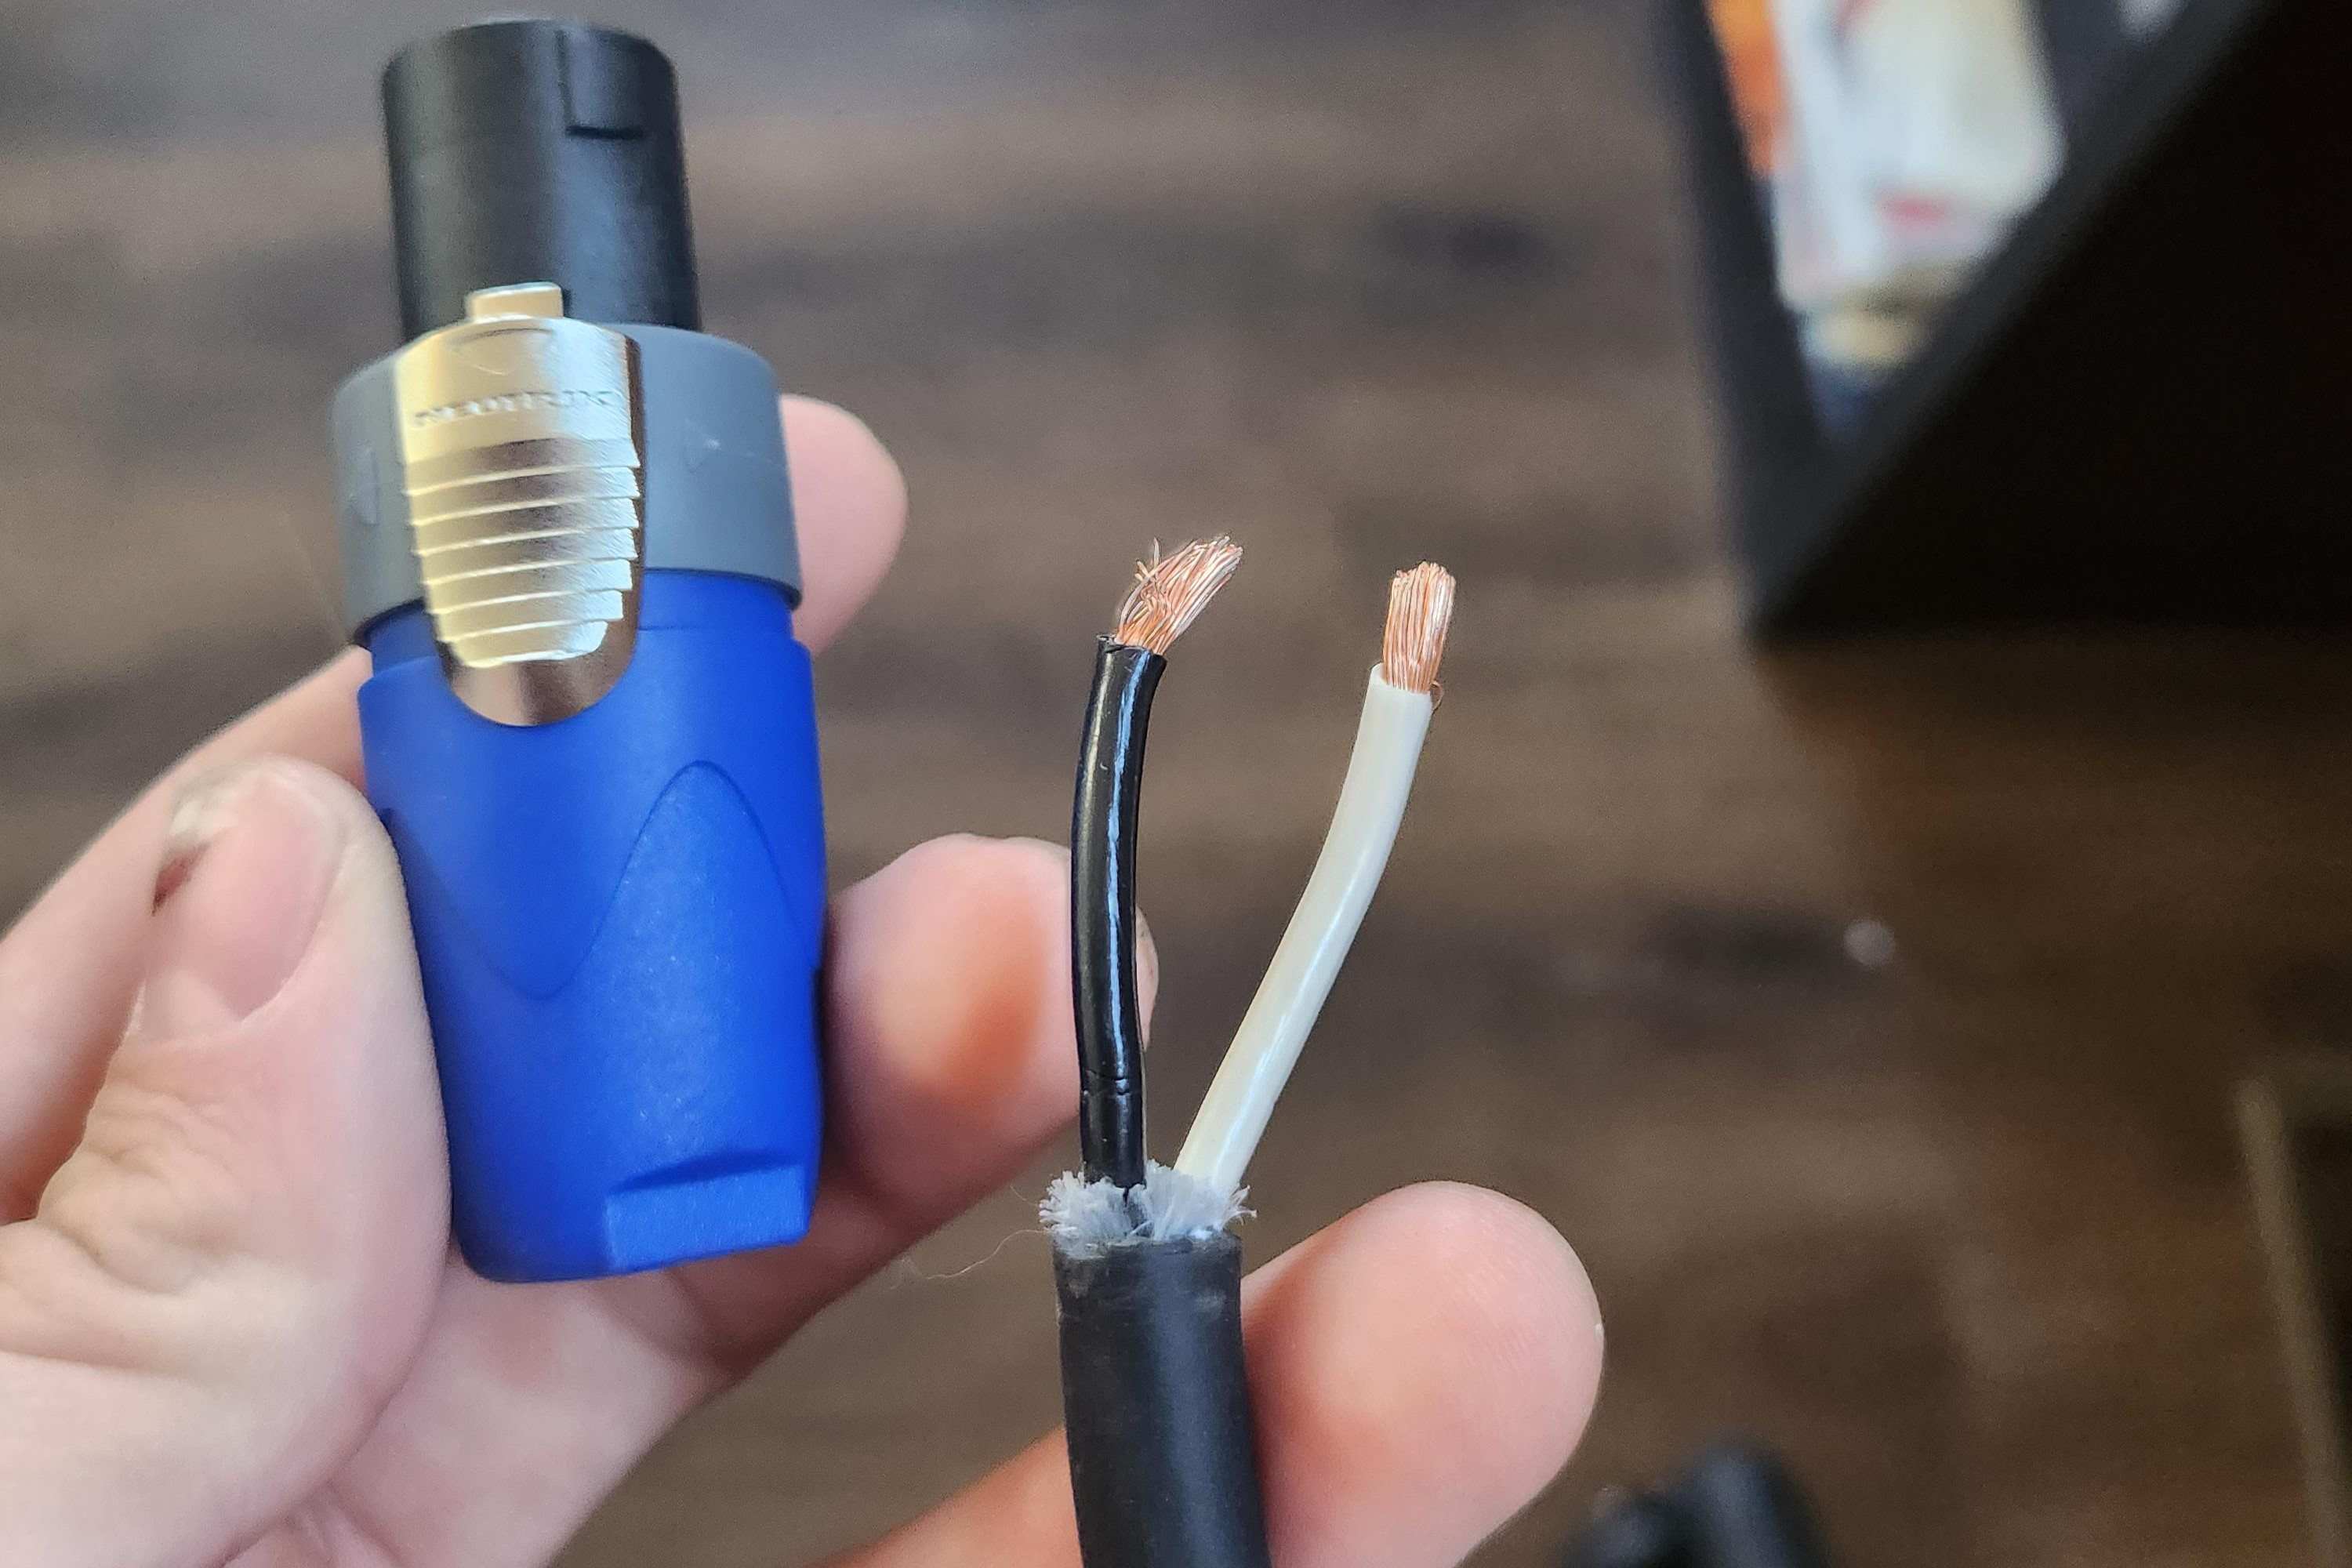
Stripping the Speaker Cable
Stripping the speaker cable is a critical step in the process of wiring a Speakon connector, as it involves carefully removing the insulation to expose the conductors for secure and reliable connections. Properly stripped cables ensure optimal electrical conductivity and minimize the risk of signal loss or interference within the audio system.
The following steps outline the process of stripping the speaker cable:
- Select the Appropriate Tool: Choose a pair of wire strippers that are suitable for the gauge of the speaker cable. It’s essential to use the correct tool to avoid damaging the conductors during the stripping process.
- Measure and Mark: Determine the length of insulation to be removed from the cable, typically based on the specifications provided by the Speakon connector manufacturer. Use a marker or labeling tape to mark the designated stripping point on the cable, ensuring uniformity across all conductors.
- Secure the Cable: Hold the cable firmly in place, ensuring stability and preventing unnecessary movement during the stripping process. A stable and secure grip minimizes the risk of accidental damage to the conductors or uneven stripping.
- Strip the Insulation: Carefully position the wire strippers at the marked stripping point and apply gentle pressure to the tool, gripping the insulation without cutting into the conductors. Slowly rotate the strippers around the cable to create a clean and precise incision in the insulation.
- Remove the Insulation: Once the insulation has been incised, gently pull it away from the cable, revealing the underlying conductors. Take care to remove the insulation in a controlled manner, avoiding any abrupt movements that could potentially damage the conductors or leave behind residual insulation.
- Inspect the Exposed Conductors: After stripping the cable, inspect the exposed conductors to ensure that they are clean, undamaged, and free from any stray strands or debris. Any irregularities or damage should be addressed before proceeding to the next stage of the wiring process.
By meticulously stripping the speaker cable, you pave the way for seamless and secure connections within the Speakon connector. Attention to detail during this process contributes to the overall integrity and performance of the audio system, ensuring consistent and reliable signal transmission.
Wiring the Speakon Connector
Wiring the Speakon connector is a pivotal stage in the process of establishing a secure and reliable connection between the speaker cable and the audio system. Properly wiring the connector ensures optimal electrical conductivity and minimizes the risk of signal loss or interference, contributing to the overall performance of the audio setup.
The following steps outline the process of wiring the Speakon connector:
- Identify the Connector Pins: Before proceeding with the wiring, familiarize yourself with the layout of the Speakon connector and identify the corresponding pins for the conductors. The connector will typically feature markings or indicators to denote the positive and negative connections, as well as the channel assignments for stereo configurations.
- Prepare the Conductors: If the speaker cable consists of multiple conductors, ensure that they are neatly organized and separated to facilitate individual connection to the appropriate pins on the Speakon connector. Maintaining clear distinctions between the positive and negative conductors is essential for accurate wiring.
- Insert the Conductors: Carefully insert the prepared conductors into the designated terminals on the Speakon connector, ensuring that the positive and negative connections align with the corresponding pins as per the manufacturer’s specifications. Apply gentle pressure to seat the conductors securely within the terminals.
- Secure the Connections: Depending on the type of Speakon connector, use a screwdriver or hex key to tighten the terminal screws, securing the conductors in place. It’s crucial to achieve a firm and stable connection without over-tightening, which could potentially damage the conductors or the connector.
- Verify the Polarities: Double-check the polarity of the connections to ensure that the positive and negative conductors are correctly aligned with the corresponding pins. Maintaining the correct polarities is essential for the accurate transmission of audio signals and the prevention of phase issues within the system.
- Inspect the Connections: After wiring the Speakon connector, visually inspect the connections to confirm that the conductors are securely seated and that there are no loose strands or potential points of contact between adjacent conductors. A thorough inspection ensures the integrity of the connections.
By meticulously wiring the Speakon connector, you establish a solid foundation for the transmission of audio signals within the audio system. Attention to detail at this stage contributes to the overall reliability and performance of the connections, setting the stage for optimal audio output and minimal signal loss.
Testing the Connection
After wiring the Speakon connector, it is crucial to conduct thorough testing to ensure the integrity of the connections and the seamless transmission of audio signals within the system. Testing the connection not only validates the accuracy of the wiring but also identifies any potential issues that may impact the overall performance of the audio setup.
The following steps outline the process of testing the Speakon connector connection:
- Visual Inspection: Begin by visually inspecting the wired Speakon connector and the connected speaker cable. Ensure that the conductors are securely seated within the connector and that there are no visible signs of damage, loose strands, or irregularities that could compromise the connections.
- Continuity Testing: Use a multimeter set to the continuity or resistance mode to verify the integrity of the connections. By probing the positive and negative conductors at both ends of the cable, you can confirm that the wiring within the Speakon connector is accurately transmitting the electrical signals without interruptions or short circuits.
- Signal Transmission Test: With the audio system powered off, connect the Speakon connector to the corresponding amplifier or powered speaker. Gradually power on the audio equipment and play a test audio signal through the connected speaker. Verify that the audio output is clear, balanced, and free from any distortions or anomalies that could indicate wiring issues.
- Stress Testing: Subject the wired connection to gentle movements and manipulations to simulate real-world usage scenarios. This stress testing helps identify any potential points of weakness or instability in the connections, ensuring that the wiring can withstand typical handling and movement without compromising the signal transmission.
By conducting comprehensive testing of the Speakon connector connection, you can confidently ascertain the reliability and performance of the wired assembly. Attention to detail during the testing process not only validates the accuracy of the wiring but also provides assurance of consistent and high-quality audio transmission within the system.