
Benefits of Embedding Videos in PowerPoint
Embedding videos in PowerPoint presentations can greatly enhance the overall impact of your presentation. Here are some key benefits of incorporating videos directly into your slides:
- Enhanced visual experience: Videos can visually engage your audience, keeping them interested and attentive throughout your presentation. By embedding videos directly into your PowerPoint slides, you ensure a seamless transition between the content and the video, creating a more immersive experience.
- Increased information retention: Including videos in your presentation can help convey complex information more effectively. Visual and auditory elements complement traditional textual content, making it easier for your audience to understand and remember the key points you are trying to communicate.
- Demonstration of processes or concepts: Videos are a powerful tool for demonstrating step-by-step processes or concepts that may be difficult to explain only through text or static images. Through the use of embedded videos, you can showcase product demonstrations, tutorials, or simulations, allowing your audience to have a clearer understanding of the subject matter.
- Improved storytelling: Videos can add a storytelling element to your presentation, making it more engaging and captivating. By incorporating relevant videos, you can create a narrative that connects with your audience on a deeper level, effectively conveying your message and leaving a lasting impression.
- Reduced dependency on external factors: When you embed videos in PowerPoint, you eliminate the need for an internet connection during your presentation. This can be particularly beneficial if you are presenting in a location with limited or unreliable internet access. By embedding videos directly, you ensure that your presentation runs smoothly, regardless of external factors.
Overall, embedding videos in PowerPoint presentations allows you to create a dynamic and multi-dimensional experience for your audience. It enhances the visual appeal of your slides, improves information retention, enables effective demonstrations, adds storytelling elements, and reduces dependency on external factors. Considering these benefits, embedding videos can be a valuable addition to your PowerPoint presentations.
Drawbacks of Embedding Videos in PowerPoint
While embedding videos in PowerPoint can elevate your presentations, it’s essential to consider the potential drawbacks associated with this approach. Here are some key points to keep in mind:
- Increased file size: Embedding videos in PowerPoint can significantly increase the file size of your presentation. Large file sizes can make it challenging to share the presentation electronically or via email. Additionally, if you’re using a shared network to store or transfer the file, it may take longer to upload or download.
- Compatibility issues: Different versions of PowerPoint and operating systems may handle embedded videos differently, leading to compatibility issues. If your audience doesn’t have the appropriate software or codecs to play the embedded video, it may not function as expected or lead to playback errors.
- Loss of video quality: Embedding videos in PowerPoint may result in a loss of video quality. This is particularly true if the video file is compressed to reduce the overall file size of the presentation. The lower resolution or compressed video can affect the overall viewing experience, especially if the video contains critical visual details or fine text.
- Increased risk of file corruption: Embedding videos in PowerPoint increases the complexity of the presentation file. This can potentially make the file more susceptible to corruption. If the presentation file becomes corrupted, you may risk losing both the embedded video and other content within the PowerPoint presentation.
- Limited editing capabilities: Once a video is embedded in PowerPoint, making edits or modifications to the video becomes more challenging. If you need to trim or adjust the video length, add captions or annotations, or make any other changes, you may need to edit the video externally and re-embed it into the presentation.
It’s important to consider these drawbacks before making a decision to embed videos in your PowerPoint presentations. Evaluate the file size implications, potential compatibility issues, video quality concerns, risks of file corruption, and limitations in editing capabilities. By understanding these drawbacks, you can make an informed choice regarding whether or not to embed videos in your PowerPoint presentations.
How to Embed a Video in PowerPoint
Embedding a video in your PowerPoint presentation is a straightforward process. Follow these steps to successfully embed a video:
- Open PowerPoint: Launch PowerPoint and open the slide where you want to embed the video.
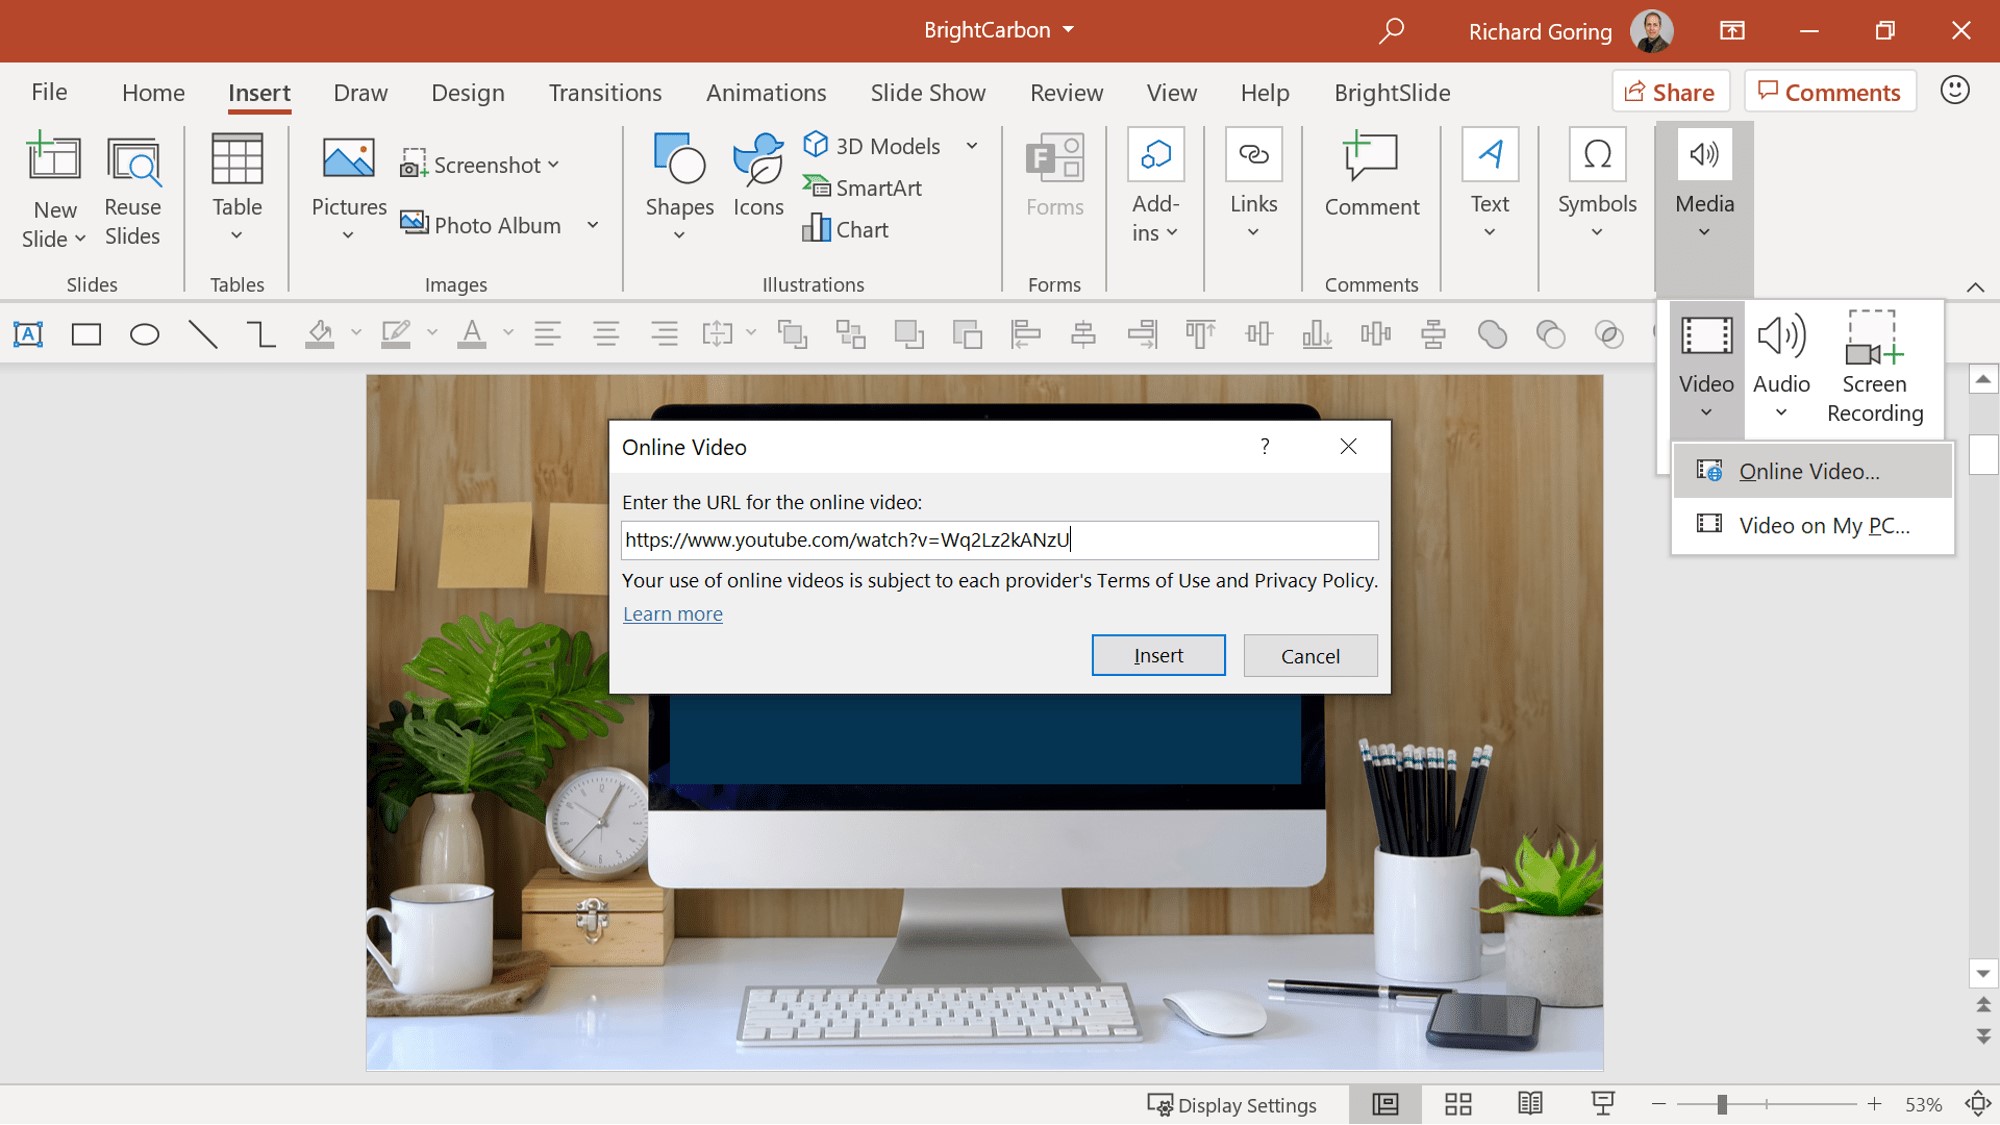
- Insert a video placeholder: Go to the “Insert” tab in the PowerPoint ribbon and click on “Video” in the Media group. Select “Video on My PC” or “Online Video” depending on the video source.
- Choose a video: If you selected “Video on My PC,” browse your computer to locate the video file you want to embed. If you selected “Online Video,” you can search for a video from online sources or input the URL of the video.
- Embed the video: Once you have selected the video, click “Insert” to embed it into the slide. The video will be added to the slide, and you can resize and reposition it as desired.
- Customize video playback: By clicking on the video, you will see the “Format” and “Playback” tabs on the PowerPoint ribbon. Use these tabs to adjust video settings, such as volume, start and end times, autoplay, and looping options.
- Test the video: Before presenting, make sure to play the video within PowerPoint to ensure it is working correctly. Check the playback, audio, and video quality to ensure a smooth viewing experience.
Note that the specific steps may vary slightly depending on the version of PowerPoint you are using. However, the general process remains the same across versions.
Following these steps enables you to embed a video seamlessly into your PowerPoint presentation. Utilize this functionality to incorporate engaging and informative videos that enhance your overall presentation.
Benefits of Linking Videos in PowerPoint
Linking videos in PowerPoint presentations provides several advantages that can enhance your overall presentation experience. Here are the key benefits of using linked videos:
- Reduced file size: By linking videos instead of embedding them, you can significantly reduce the file size of your PowerPoint presentation. Since the video is not directly inserted into the file, it does not contribute to the overall size. This makes sharing the presentation easier, especially if you need to send it via email or upload it to a shared network.
- Flexibility to update videos: Linking videos gives you the flexibility to update or replace them without modifying the PowerPoint presentation itself. If you need to make edits or enhancements to the video content, you can replace the existing video file with a newer version, ensuring that your presentation stays up-to-date.
- Easy access to external videos: Linking videos allows you to include content from external sources, such as video streaming platforms or your organization’s media library. This gives you access to a vast array of video resources, ensuring that you can incorporate the most relevant and high-quality content into your presentation.
- Improved playback control: Linking videos provides greater control over the playback settings of the video. You can set specific parameters, such as starting and ending times, looping options, and autoplay settings. This control allows you to fine-tune the video playback to align it with your presentation flow, maximizing its impact on the audience.
- Reduced risk of file corruption: Since the video is not embedded directly into the PowerPoint file, there is a lower risk of file corruption. This is particularly advantageous when transferring or editing the presentation, as any issues with the linked video do not affect the integrity of the PowerPoint file itself.
Considering these benefits, linking videos in PowerPoint presentations provides you with greater flexibility, reduced file size, improved playback control, easy access to external content, and reduced risk of file corruption. These advantages make linking videos a valuable option for incorporating multimedia elements into your presentations.
Drawbacks of Linking Videos in PowerPoint
While there are several benefits to linking videos in PowerPoint presentations, it’s important to also consider the potential drawbacks associated with this approach. Here are the key drawbacks of using linked videos:
- Dependency on external video sources: Linking videos means that your presentation relies on external sources for the video content. If the video source becomes unavailable or the link breaks, it can disrupt the flow of your presentation. This is especially true if you are presenting in an environment with limited or unstable internet connectivity.
- Compatibility issues: Linking videos may introduce compatibility issues. If your presentation is accessed on a different system or device, it may not have access to the same video sources, resulting in playback errors. Additionally, different video formats or codecs may not be supported on all platforms, limiting the accessibility of your presentation.
- Limited editing capabilities: Unlike embedded videos, linked videos cannot be edited directly within PowerPoint. If you need to make changes to the video, such as trimming, adding captions, or applying effects, you will have to edit the video externally and re-link it in the presentation. This can be time-consuming and may require additional software or technical expertise.
- Increased risk of presentation inconsistencies: Linking videos introduces the possibility of presentation inconsistencies. If you share the presentation with others or move it to a different location, the video links may break if the file paths or directory structures change. This can lead to missing or broken videos, negatively impacting the overall presentation experience.
- Loss of control over video quality: When you link a video, you rely on the original video source for quality. If the source video resolution, encoding, or compression is not optimal, it can affect the quality of the video playback in your presentation. This can be a concern if you require high-quality videos to convey your message effectively.
Considering these drawbacks, it’s essential to weigh the potential issues of linking videos in PowerPoint presentations against the benefits. Evaluate the dependencies on external sources, potential compatibility issues, limited editing capabilities, risks of presentation inconsistencies, and potential loss of control over video quality. This will help you determine whether linking videos is the most suitable approach for your specific presentation needs.
How to Link a Video in PowerPoint
Linking a video in your PowerPoint presentation allows you to access external video content seamlessly. Here are the steps to successfully link a video:
- Open PowerPoint: Launch PowerPoint and open the slide where you want to link the video.
- Insert a video placeholder: Go to the “Insert” tab in the PowerPoint ribbon and click on “Video” in the Media group. Select “Video on My PC” or “Online Video” depending on the video source.
- Choose a video: If you selected “Video on My PC,” browse your computer to locate the video file you want to link. If you selected “Online Video,” you can search for a video from online sources or input the URL of the video.
- Link the video: Instead of clicking “Insert,” click on the small arrow next to the “Insert” button. From the drop-down menu, select “Link to File” or “Insert Link.” This option will link the video rather than embedding it directly into the presentation.
- Specify the video file location: If you chose to link to a video on your computer, specify the file location by browsing to the video file. If you chose to link to an online video, paste the URL you obtained from the video source.
- Customize video playback: Just like with embedded videos, you can customize the playback settings of the linked video. Use the “Format” and “Playback” tabs on the PowerPoint ribbon to adjust settings such as start and end times, auto-play, and looping options.
- Test the video: Before presenting, make sure to test the linked video within PowerPoint to ensure that it plays correctly. Check the playback, audio, and video quality to ensure a smooth viewing experience.
Note that the specific steps may vary slightly depending on the version of PowerPoint you are using. However, the general process remains the same across versions.
By following these steps, you can easily link videos in your PowerPoint presentations. Take advantage of this functionality to incorporate compelling and relevant external video content that enhances your overall presentation.
Factors to Consider when Deciding to Embed or Link Videos in PowerPoint
When deciding whether to embed or link videos in your PowerPoint presentations, it’s important to consider various factors that can impact the overall effectiveness and usability of your presentation. Here are some key factors to consider:
- File size: Consider the size restrictions or limitations for sharing your PowerPoint presentation. Embedding videos can significantly increase the file size, making it difficult to share via email or on platforms with file size restrictions. Linking videos, on the other hand, keeps the presentation file size small, ensuring easy sharing and distribution.
- Accessibility and offline access: Evaluate the accessibility requirements of your presentation. If you are presenting in an environment with limited or unreliable internet connectivity, embedding videos may be a more feasible option as it eliminates the need for an internet connection. However, if internet access is not a concern, linking videos can provide easy access to external sources and allow for real-time updates.
- Editing capabilities: Consider how often you may need to edit or update the video content in your presentation. If you anticipate regular changes to the video content, embedding videos may require more effort as you would need to replace and re-embed the updated video each time. Linking videos offers more flexibility, allowing you to update the original video file without modifying the PowerPoint presentation.
- Compatibility: Evaluate the compatibility requirements of your PowerPoint presentation. Embedding videos may limit compatibility across different versions of PowerPoint or operating systems. On the other hand, linking videos can provide more flexibility in terms of compatibility, as long as the required video codecs are available on the devices where the presentation will be viewed.
- Content control: Consider the level of control you need over the video content during the presentation. If you want precisely timed playback, specific start and end points, or interactive elements, embedding videos offers greater control. Linking videos may limit your ability to control video playback, relying on the external video source’s settings and controls.
By considering these factors, you can make an informed decision on whether to embed or link videos in your PowerPoint presentations. Assess the file size constraints, accessibility needs, editing requirements, compatibility considerations, and desired content control. This will ensure that you choose the most suitable approach to incorporate videos into your presentation, enhancing its overall impact and effectiveness.
Best Practices for Embedding or Linking Videos in PowerPoint
When incorporating videos into your PowerPoint presentations, it’s essential to follow some best practices to ensure a seamless and engaging experience for your audience. Here are some key best practices for embedding or linking videos in PowerPoint:
- Optimize file formats: Use video file formats that are widely supported across different platforms and versions of PowerPoint, such as MP4 or WMV. These formats offer a good balance between file size and video quality.
- Consider video resolution: Choose video resolutions that are appropriate for the screen on which your presentation will be displayed. Higher resolutions may result in larger file sizes and potential playback issues on certain devices.
- Compress video files: Compress video files to reduce their size without compromising too much on video quality. This will help keep your presentation file size manageable, especially when embedding videos.
- Optimize video playback: Set the appropriate playback options for your videos, such as auto-play, looping, and volume controls. Make sure the playback settings align with your presentation flow and enhance audience engagement.
- Ensure audio compatibility: If your video contains audio, ensure that the audio settings are correct and compatible with the devices and venues where your presentation will be played. Test the audio to ensure it is clear and audible.
- Use meaningful thumbnails: Assign visually appealing and relevant thumbnails to your videos. This helps your audience quickly identify the content of the video and builds anticipation for the upcoming video playback.
- Test video playback: Before presenting, thoroughly test the video playback within your PowerPoint presentation. Check for any issues with the video, such as compatibility, quality, or synchronization, to ensure a smooth viewing experience.
- Ensure consistent file paths: If you choose to link videos, maintain consistent file paths for the video files. This ensures that the links remain intact even when transferring or sharing the presentation with others.
- Consider backup options: Always have a backup plan in case there are issues with video playback. For embedded videos, keep a copy of the original video files separately. For linked videos, have alternative video sources or backup copies available in case the original sources become unavailable.
By following these best practices, you can ensure smooth and effective integration of videos into your PowerPoint presentations. Optimize file formats and resolutions, compress videos when necessary, set appropriate playback options, test video playback, maintain consistent file paths for linked videos, and have backup options in place. These practices will enhance the overall quality and impact of your presentations.
Alternative Solutions for Presenting Videos in PowerPoint
While embedding or linking videos in PowerPoint presentations is a common way to incorporate multimedia content, there are alternative solutions that you can consider. These options provide different ways to present videos and may be more suitable depending on your specific needs. Here are a few alternative solutions:
- Screen recording: Instead of embedding or linking pre-recorded videos, you can record your screen during a live demonstration or presentation. Screen recording allows you to capture the exact actions and content you want to show, providing a more dynamic and interactive experience for your audience.
- Video playback software: Instead of relying solely on PowerPoint’s built-in video capabilities, consider using specialized video playback software. These software tools offer advanced features for video playback, such as custom video effects, synchronized animations, and interactive elements, which can help make your video presentations more engaging and interactive.
- Third-party video hosting platforms: Instead of embedding or linking videos directly in PowerPoint, you can upload your videos to third-party video hosting platforms like YouTube or Vimeo. Then, you can embed the videos in your PowerPoint slides by using the video embed codes provided by these platforms. This approach allows for easy updating of videos and ensures consistent playback across different devices and environments.
- Hyperlinks to external video sources: Instead of embedding or linking videos within the PowerPoint file, you can include hyperlinks to external video sources. When you click on a hyperlink, it opens the video in a separate browser window or in a dedicated video player, providing a more seamless playback experience. This approach is particularly useful when you want to leverage video content from popular platforms like YouTube or TED Talks.
- Video thumbnails with external playback: Another option is to use video thumbnails in your PowerPoint slides that, when clicked, open the video in an external media player. This allows you to showcase a preview or teaser of the video content within your presentation, and the audience can view the full video using the external player. This approach provides more flexibility and control over the video playback experience.
Consider these alternative solutions based on your specific presentation requirements. Screen recording can be effective for live demonstrations, specialized video playback software offers advanced features, third-party video hosting platforms provide easy updating and consistent playback, hyperlinks to external sources allow for seamless playback, and video thumbnails with external playback offer more control over the viewing experience. Choose the solution that best suits your needs and enhances the overall impact of your video presentations.