
Enable File Sharing
To set up file sharing on your Mac, you’ll need to enable the file sharing feature. This will allow other devices to access and interact with the files and folders on your Mac.
Here’s how you can enable file sharing:
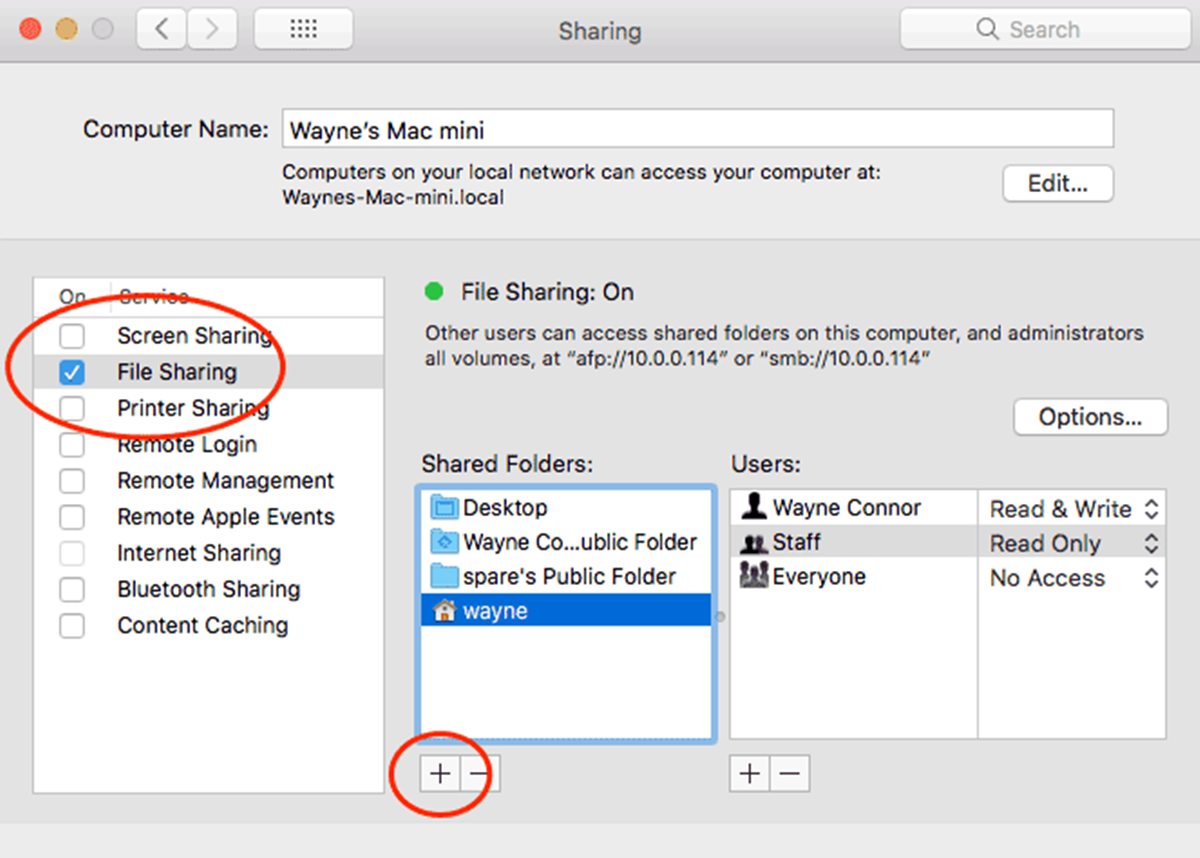
- Open the System Preferences on your Mac.
- Select “Sharing” from the preferences pane.
- In the left sidebar, check the box next to “File Sharing”.
- Click on the “Options” button.
- Select the folders or drives that you want to share by checking the respective boxes.
- Choose the level of access you want to grant to other users.
- Click “Done” to save the changes.
Enabling file sharing on your Mac will allow you to easily share files and folders with other devices on your local network. It is an essential feature if you want to collaborate with others or access your files from different devices.
Once you have enabled file sharing, it’s time to set up sharing permissions to control who can access and modify your shared files and folders.
Set up Sharing Permissions
When sharing files and folders on your Mac, it’s important to set up sharing permissions to control who can access and modify the shared content. By configuring these permissions, you can ensure the security and privacy of your files.
Here’s how you can set up sharing permissions on your Mac:
- Open the System Preferences and go to “Sharing”.
- In the left sidebar, select “File Sharing”.
- Click on the “Options” button.
- Ensure that the “Share files and folders using SMB” option is checked for Windows users, or “Share files and folders using AFP” for Mac users.
- Click on “Done” to save the changes and exit the options menu.
- Select the shared folder or drive that you want to set permissions for.
- Click on the “Add” button (+) to add specific users or groups for sharing.
- Choose the desired level of access for each user or group: Read Only, Read & Write, or No Access.
- Click “Done” to save the sharing permissions.
By setting up sharing permissions, you can determine who has access to your shared files and what actions they can perform on them. This allows you to maintain control over your data and ensure that only authorized individuals can modify or view the shared content.
Now that you have enabled file sharing and set up sharing permissions on your Mac, it’s time to share a specific folder or drive with other devices on your network.
Share a Folder
Sharing specific folders on your Mac allows you to grant access to specific files or directories, making collaboration and file sharing a breeze. Here’s how you can share a folder on your Mac:
- Open Finder on your Mac.
- Navigate to the folder you want to share.
- Right-click on the folder and select “Get Info”.
- In the Info window that appears, click on the “Sharing & Permissions” section.
- Click on the lock icon in the bottom right corner and enter your administrator password.
- Click on the “+” button.
- Select the user or group that you want to share the folder with.
- Choose the desired level of access for the user or group: Read & Write, Read Only, or No Access.
- Click on the “Apply to enclosed items” checkbox if you want to apply the same sharing permissions to all items inside the folder.
- Click on the lock icon again to save the changes.
Once you have successfully shared a folder, it will be accessible to the specified users or groups on your local network. They can now view, edit, or copy files from the shared folder, depending on the permissions you have set.
You can repeat this process for any other folders you want to share on your Mac. Remember to review and update the sharing permissions as needed to ensure the security of your shared content.
Now that you know how to share a folder on your Mac, let’s explore how to access shared folders from other devices on your network.
Access Shared Folders on Another Mac
If you want to access the shared folders on another Mac within your network, follow these steps:
- Open a Finder window on the Mac you want to access the shared folders from.
- In the sidebar of the Finder window, you will see a section called “Shared”.
- Click on the Mac that is sharing the folders you want to access.
- You will see a list of shared folders and drives from that Mac.
- Double-click on the folder you want to access, and you will be able to view and interact with its contents.
By following these steps, you can easily access shared folders on another Mac within your local network. This is useful for collaborating with others or accessing files from a different device without the need for physically transferring them.
Next, let’s explore how to access shared folders from a Windows PC.
Access Shared Folders from a Windows PC
If you have a Windows PC and want to access shared folders on your Mac, you can follow these steps:
- Ensure that both your Mac and Windows PC are connected to the same network.
- On your Windows PC, open the File Explorer.
- In the address bar, type in the IP address or hostname of your Mac, preceded by “\\.”
- Press Enter, and you will see a list of shared folders and devices on your Mac.
- Double-click on the shared folder you want to access.
- You may be prompted to enter your Mac’s username and password.
- Once authenticated, you will be able to view and interact with the files and folders in the shared folder.
Following these steps will allow you to access shared folders from a Windows PC on the same network as your Mac. This makes it easy to transfer files between your Mac and PC or collaborate on shared projects across different operating systems.
Now let’s explore how to access shared folders from an iOS device.
Access Shared Folders from an iOS Device
If you have an iOS device such as an iPhone or iPad and want to access shared folders on your Mac, you can use the Files app. Here’s how:
- Ensure that both your Mac and iOS device are connected to the same network.
- On your iOS device, open the Files app.
- Tap on the “Browse” tab at the bottom of the screen.
- Scroll down and tap on “Locations”.
- Under the “Shared” section, you should see the Mac that is sharing folders.
- Tap on the Mac to view the shared folders and drives.
- Tap on the folder you want to access, and you will be able to browse and open its contents.
With the Files app, accessing shared folders from your iOS device becomes effortless. It allows you to quickly access and manage files stored on your Mac, whether it’s for work, personal, or collaborative purposes.
Now, let’s explore how you can connect to a shared folder automatically at startup on your Mac.
Connect to a Shared Folder Automatically at Startup
If you frequently need to access a specific shared folder on your Mac, you can configure it to connect automatically at startup. This way, the shared folder will be readily accessible every time you boot up your Mac. Here’s how you can set it up:
- Open System Preferences on your Mac.
- Click on “Users & Groups”.
- Select your user account from the left sidebar.
- Click on the “Login Items” tab.
- Click on the “+” button to add a new login item.
- Navigate to the shared folder you want to connect to.
- Select the shared folder and click on the “Add” button.
- Ensure that the checkbox next to the shared folder is ticked.
- Close the System Preferences.
By following these steps, the shared folder will be automatically mounted and connected at startup, making it easily accessible without manual intervention. This is particularly useful if you regularly work with files stored in a shared folder or need quick access to collaborative projects.
Next, let’s explore how to access shared folders on a Mac using a different Apple ID.
Access Shared Folders on a Mac using a Different Apple ID
If you want to access shared folders on a Mac using a different Apple ID than the one currently signed in, you can do so by following these steps:
- Open the Finder on your Mac.
- From the menu bar, click on “Go” and select “Connect to Server”.
- In the Server Address field, enter afp:// followed by the IP address or hostname of the Mac you want to connect to.
- Click on the “+” button to add the server to your list of favorites.
- Click “Connect” to establish the connection.
- You will be prompted to enter the Apple ID and password associated with the Mac you’re trying to access.
- Enter the credentials for the different Apple ID you want to use and click “Connect”.
- You will now be able to access the shared folders on the Mac using the different Apple ID.
By following these steps, you can access shared folders on a Mac using a different Apple ID, providing you with flexibility and convenience if you have multiple Apple IDs or need to access different shared resources under different accounts.
With these instructions, you can now enable file sharing, set up sharing permissions, share folders, and access shared folders on your Mac from different devices and Apple IDs. These features facilitate seamless collaboration, efficient file management, and easy access to your shared content across your network.