
Understanding Lock Screen Security
The lock screen on your iPhone 12 serves as the initial line of defense against unauthorized access to your device. It acts as a barrier, preventing prying eyes from accessing your personal information and sensitive data. Understanding the various aspects of lock screen security is crucial for safeguarding your privacy and ensuring the integrity of your device.
Importance of Lock Screen Security
The lock screen is your device's first line of defense, protecting your personal information from unauthorized access. It prevents unauthorized individuals from gaining access to your emails, messages, photos, and other sensitive data. By understanding the significance of lock screen security, you can take proactive measures to enhance the protection of your device and personal information.
Lock Screen Passcode and Biometric Authentication
The primary methods of securing the lock screen on the iPhone 12 include using a passcode, Face ID, or Touch ID. A passcode is a numeric or alphanumeric code that must be entered to unlock the device. Face ID utilizes facial recognition technology to authenticate the user, while Touch ID relies on fingerprint recognition. These biometric authentication methods provide a convenient and secure way to access the device while ensuring that only authorized users can unlock it.
Privacy Protection
Beyond preventing unauthorized access, the lock screen also plays a crucial role in safeguarding your privacy. It conceals sensitive information and notifications, ensuring that they are not readily accessible to anyone who glances at your device. This feature is especially important in public settings, where maintaining privacy is essential.
Secure Access to Notifications
The lock screen allows you to preview incoming notifications without unlocking the device fully. This feature provides a convenient way to stay informed while maintaining security. However, it's important to be mindful of the sensitivity of the information displayed on the lock screen and adjust notification settings accordingly to prevent unauthorized access to sensitive data.
Understanding the intricacies of lock screen security empowers you to make informed decisions about how to best protect your device and personal information. By leveraging the available security features and customizing settings to align with your privacy preferences, you can ensure that your iPhone 12 remains secure and your data remains private.
This comprehensive understanding of lock screen security forms the foundation for effectively managing and customizing the lock screen settings on your iPhone 12.
Accessing Lock Screen Settings on iPhone 12
Accessing the lock screen settings on your iPhone 12 is a straightforward process that allows you to customize various aspects of your device's security and privacy. By navigating to the settings menu, you can conveniently manage and configure the lock screen settings to align with your preferences.
To access the lock screen settings on your iPhone 12, start by unlocking your device and locating the "Settings" app on the home screen. The settings app is represented by a gear icon and serves as the central hub for adjusting various configurations on your device.
Once you have accessed the settings app, scroll down and tap on the "Touch ID & Passcode" or "Face ID & Passcode" option, depending on the authentication method you have set up. You will be prompted to enter your passcode or use biometric authentication to proceed.
After authenticating, you will gain access to a range of options related to lock screen security. Here, you can customize the passcode settings, enable or disable biometric authentication methods, and manage the visibility of notifications on the lock screen.
Furthermore, within the "Touch ID & Passcode" or "Face ID & Passcode" settings, you can configure additional security features such as the "Erase Data" option, which automatically erases all data on the device after ten failed passcode attempts, providing an added layer of protection against unauthorized access.
In addition to managing biometric authentication and passcode settings, you can also customize the visibility of notifications on the lock screen. By navigating to the "Notifications" section within the settings app, you can select individual apps and adjust their notification settings, including whether they are displayed on the lock screen.
Moreover, the "Emergency SOS" feature, which can be accessed from the "Emergency SOS" settings, allows you to configure emergency contact information and enable the automatic dialing of emergency services by pressing the side button five times in quick succession from the lock screen.
By accessing the lock screen settings on your iPhone 12, you can tailor the security and privacy configurations to suit your specific needs, ensuring that your device remains secure while providing convenient access to essential features and notifications.
In summary, accessing the lock screen settings on your iPhone 12 empowers you to take control of your device's security and privacy, allowing you to customize settings that align with your preferences and enhance the overall user experience.
Customizing Lock Screen Notifications
Customizing lock screen notifications on your iPhone 12 enables you to manage the visibility of incoming alerts and tailor the information displayed on the lock screen to align with your privacy preferences. By accessing the notification settings, you can exert control over which notifications are displayed on the lock screen, ensuring that sensitive information remains private while still allowing essential alerts to be easily accessible.
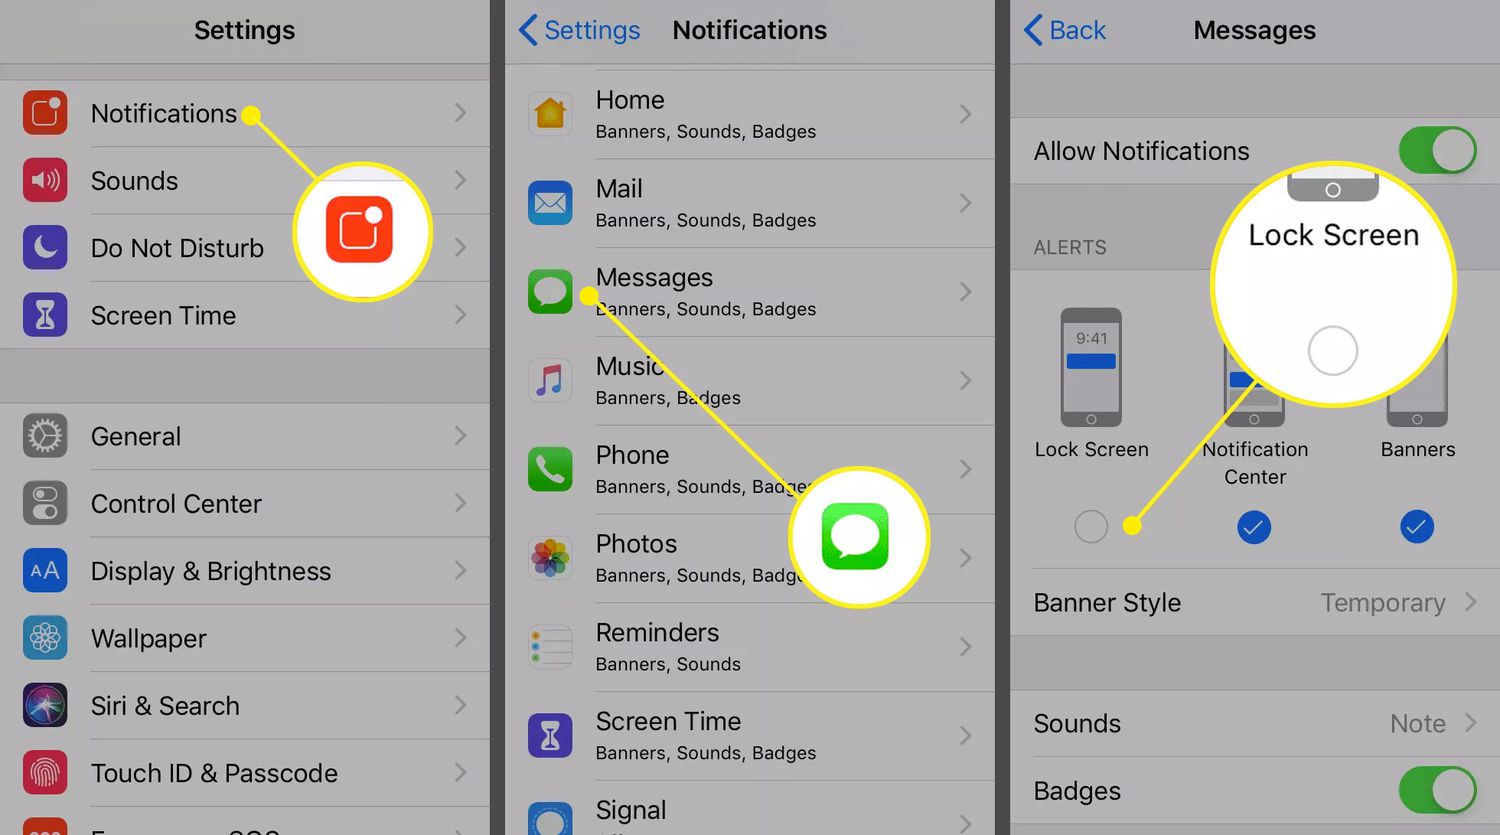
To customize lock screen notifications, navigate to the "Settings" app on your iPhone 12 and select "Notifications." Within the Notifications settings, you will find a list of installed apps, each accompanied by individual notification customization options. By tapping on a specific app, you can adjust its notification settings, including whether notifications are displayed on the lock screen.
For each app, you have the flexibility to choose from several notification display options. These options typically include "Lock Screen," "Notification Center," "Banners," and "Badges." To customize lock screen notifications, simply toggle the "Lock Screen" option to enable or disable the display of notifications from the selected app on the lock screen.
Furthermore, you can refine the level of detail displayed within lock screen notifications by adjusting the notification style for each app. Depending on the app's capabilities, you may have the option to choose between different notification styles, such as "Banners" or "Alerts," each offering varying levels of information visibility on the lock screen.
In addition to managing individual app notifications, you can also utilize the "Show Previews" feature within the Notifications settings to control the level of detail displayed in notifications on the lock screen. This feature allows you to choose between "Always," "When Unlocked," and "Never," providing granular control over the visibility of notification content on the lock screen.
By customizing lock screen notifications, you can strike a balance between staying informed and protecting your privacy. Tailoring the visibility of notifications ensures that sensitive information remains concealed from prying eyes while still allowing important alerts to be easily accessible when needed.
In summary, customizing lock screen notifications on your iPhone 12 empowers you to manage the flow of information displayed on the lock screen, enhancing your privacy and user experience. By leveraging the notification customization options, you can curate a personalized lock screen notification experience that aligns with your individual preferences and privacy requirements.
Setting up Face ID or Touch ID for Lock Screen
Setting up Face ID or Touch ID for the lock screen on your iPhone 12 provides a seamless and secure method of authentication, allowing you to effortlessly unlock your device while ensuring that only authorized users can access its contents. Whether you opt for facial recognition with Face ID or fingerprint authentication with Touch ID, the process of configuring these biometric security features is straightforward and can be completed within the device settings.
To set up Face ID, navigate to the "Settings" app on your iPhone 12 and select "Face ID & Passcode." You will be prompted to enter your device passcode to proceed. Next, tap on "Set Up Face ID" and follow the on-screen instructions to position your face within the designated frame. The device will capture facial data from various angles, enabling Face ID to accurately recognize and authenticate your face. Once the setup process is complete, Face ID will be enabled for the lock screen, allowing you to unlock your device simply by looking at it.
Alternatively, if you prefer to use Touch ID for lock screen authentication, you can configure this biometric feature by accessing the "Settings" app and selecting "Touch ID & Passcode." After entering your device passcode, you can proceed to add your fingerprint by tapping on "Add a Fingerprint." Follow the prompts to place your finger on the Touch ID sensor, allowing the device to capture and store the unique fingerprint data. Once the setup is finished, Touch ID will be activated for the lock screen, enabling you to unlock your device with a simple touch of the sensor.
Both Face ID and Touch ID offer a convenient and secure means of accessing your iPhone 12 while maintaining the integrity of its lock screen security. These biometric authentication methods provide a layer of defense against unauthorized access, enhancing the overall protection of your device and personal information.
By setting up Face ID or Touch ID for the lock screen on your iPhone 12, you can streamline the authentication process and enjoy the peace of mind that comes with advanced biometric security. These features not only enhance the user experience but also contribute to the robust security measures that safeguard your device and sensitive data.
Enabling and Configuring Emergency SOS
Enabling and configuring Emergency SOS on your iPhone 12 is a critical aspect of ensuring personal safety and preparedness for unforeseen emergencies. This feature provides a swift and discreet method of contacting emergency services and notifying designated contacts in urgent situations, offering peace of mind and enhanced security for users.
To enable Emergency SOS, navigate to the "Settings" app on your iPhone 12 and select "Emergency SOS." Here, you can activate the "Call with Side Button" option, allowing you to quickly initiate an emergency call by pressing the side button five times in rapid succession from the lock screen. This streamlined activation process ensures that help can be summoned swiftly, even in high-stress scenarios where time is of the essence.
In addition to enabling Emergency SOS, you can configure the feature to automatically contact emergency services and notify your emergency contacts when activated. By toggling on the "Auto Call" option within the Emergency SOS settings, your iPhone 12 will automatically dial the local emergency services number after the side button is pressed five times, ensuring that immediate assistance is summoned without the need for manual intervention.
Furthermore, the "Set Up Emergency Contacts in Health" option allows you to designate specific contacts to be notified when Emergency SOS is activated. By accessing the Health app and selecting the Medical ID tab, you can add emergency contacts and specify individuals who should be alerted in the event of an emergency. This ensures that your trusted contacts are promptly informed of the situation, enabling them to provide assistance or support as needed.
Configuring Emergency SOS on your iPhone 12 empowers you to proactively prepare for unexpected emergencies, ensuring that you have a reliable mechanism for summoning help and notifying your trusted contacts when time is of the essence. By customizing the settings to align with your specific safety requirements, you can enhance the effectiveness of this vital feature and bolster your overall personal security.
In summary, enabling and configuring Emergency SOS on your iPhone 12 is a proactive step toward bolstering personal safety and preparedness. By leveraging this feature's capabilities and customizing its settings, you can establish a robust safety net that provides swift access to emergency services and notifies designated contacts in times of need.
Managing Lock Screen Widgets
Managing lock screen widgets on your iPhone 12 allows you to curate a personalized and efficient user experience, granting quick access to essential information and app functionalities directly from the lock screen. Widgets offer a dynamic and interactive way to interact with apps and receive at-a-glance updates, enhancing productivity and convenience. By customizing and organizing lock screen widgets, you can tailor your device's lock screen to align with your specific needs and preferences.
To manage lock screen widgets, begin by unlocking your iPhone 12 and navigating to the home screen. Swipe right to access the Today View, where a collection of widgets is displayed. These widgets provide snippets of information and quick actions for various apps, offering a convenient way to stay informed and access app features without unlocking the device.
To add new widgets to the lock screen, scroll to the bottom of the Today View and tap the "Edit" button. This will reveal a list of available widgets that can be added to the lock screen. By tapping the "+" icon next to a widget, you can incorporate it into the lock screen, enabling quick access to its associated information or functionality without the need to unlock the device.
Furthermore, you can customize the arrangement and organization of lock screen widgets to suit your preferences. By tapping and holding on a widget, you can enter "jiggle mode," allowing you to rearrange the widgets by dragging them to your desired positions. This flexibility enables you to prioritize the display of specific widgets and ensure that the most relevant information is readily accessible from the lock screen.
In addition to adding and organizing widgets, you can also remove or disable widgets that are no longer needed. By entering the "Edit" mode in the Today View, you can tap the "-" icon next to a widget to remove it from the lock screen. This streamlined process allows you to declutter the lock screen and maintain a focused and efficient widget layout.
Moreover, some apps offer customizable widgets that provide tailored information and quick actions. By exploring the available widget options for your installed apps, you can enhance the lock screen with widgets that deliver personalized updates and functionalities, further optimizing the user experience.
By effectively managing lock screen widgets on your iPhone 12, you can create a tailored and efficient lock screen experience that aligns with your specific information and app accessibility needs. This customization empowers you to leverage the full potential of widgets, enhancing productivity and convenience directly from the lock screen.
In summary, managing lock screen widgets on your iPhone 12 offers a versatile and personalized approach to accessing information and app functionalities, enriching the lock screen experience and streamlining interactions with essential apps and updates.