
Why are there extra breaks in your Word document?
Extra breaks in Word documents can be frustrating and disrupt the overall formatting and flow of your content. There are a few reasons why these extra breaks may appear:
1. Formatting issues: Sometimes, when copying and pasting content from different sources, the formatting may not be compatible, resulting in extra breaks. This can also happen when importing content from other applications or when using different versions of Word.
2. Hidden formatting characters: Word documents contain hidden characters such as line breaks, paragraph marks, and spacing codes. These characters can contribute to the appearance of extra breaks in your document.
3. Default settings: Word has default settings that automatically insert extra breaks in certain situations. For example, when pressing Enter at the end of a paragraph, Word may automatically insert a blank line, causing an unnecessary break.
4. Accidental keystrokes: It’s possible to accidentally insert extra breaks while working on your document. This can occur when you press Enter multiple times, use shortcut keys incorrectly, or unintentionally insert additional line or page breaks.
Understanding the reasons behind extra breaks can help you effectively remove them and ensure your Word document looks clean and professional. In the following sections, we’ll explore different methods to manually remove these extra breaks and prevent them from occurring in the future.
The consequences of having extra breaks
Having extra breaks in your Word document may seem like a minor issue, but it can have several negative consequences that affect both the visual appearance and readability of your content. Here are some of the main consequences:
1. Disrupted formatting: Extra breaks can disrupt the overall formatting and layout of your document. They can create uneven spacing between paragraphs or sections, making your document appear unprofessional and disorganized.
2. Inconsistent visual presentation: Extra breaks can lead to inconsistencies in the visual presentation of your document. For instance, if some paragraphs have extra spacing while others do not, it creates an unbalanced and disjointed look.
3. Reduced readability: Extra breaks can make it harder for readers to comprehend your content. Excessive spacing between paragraphs can break the logical flow and disrupt the continuity of your text, making it more difficult for readers to follow along.
4. Increased document length: Extra breaks contribute to an unnecessary increase in the length of your document. This can be problematic when you have strict word or page limits to adhere to, such as in academic or professional contexts. It can also make it more challenging to fit your content within a specific document format.
5. Time-consuming formatting fixes: Removing extra breaks from a document can be a time-consuming task, especially if you have a lengthy document with multiple instances of extra breaks. This can result in wasted time that could have been better spent on other productive tasks.
6. Negative impact on SEO: If you’re publishing your Word document online or converting it to a web page, extra breaks can have a negative impact on search engine optimization (SEO). Search engines may interpret these extra breaks as additional content, potentially diluting the relevance and value of your main content.
Overall, having extra breaks in your Word document detracts from the professional appearance and readability of your content. It’s essential to remove these extra breaks and ensure a clean, consistent, and easy-to-read document for your audience.
How to manually remove extra breaks in Word documents
Manually removing extra breaks in your Word document can help restore the formatting and improve the readability of your content. Here are several methods you can use:
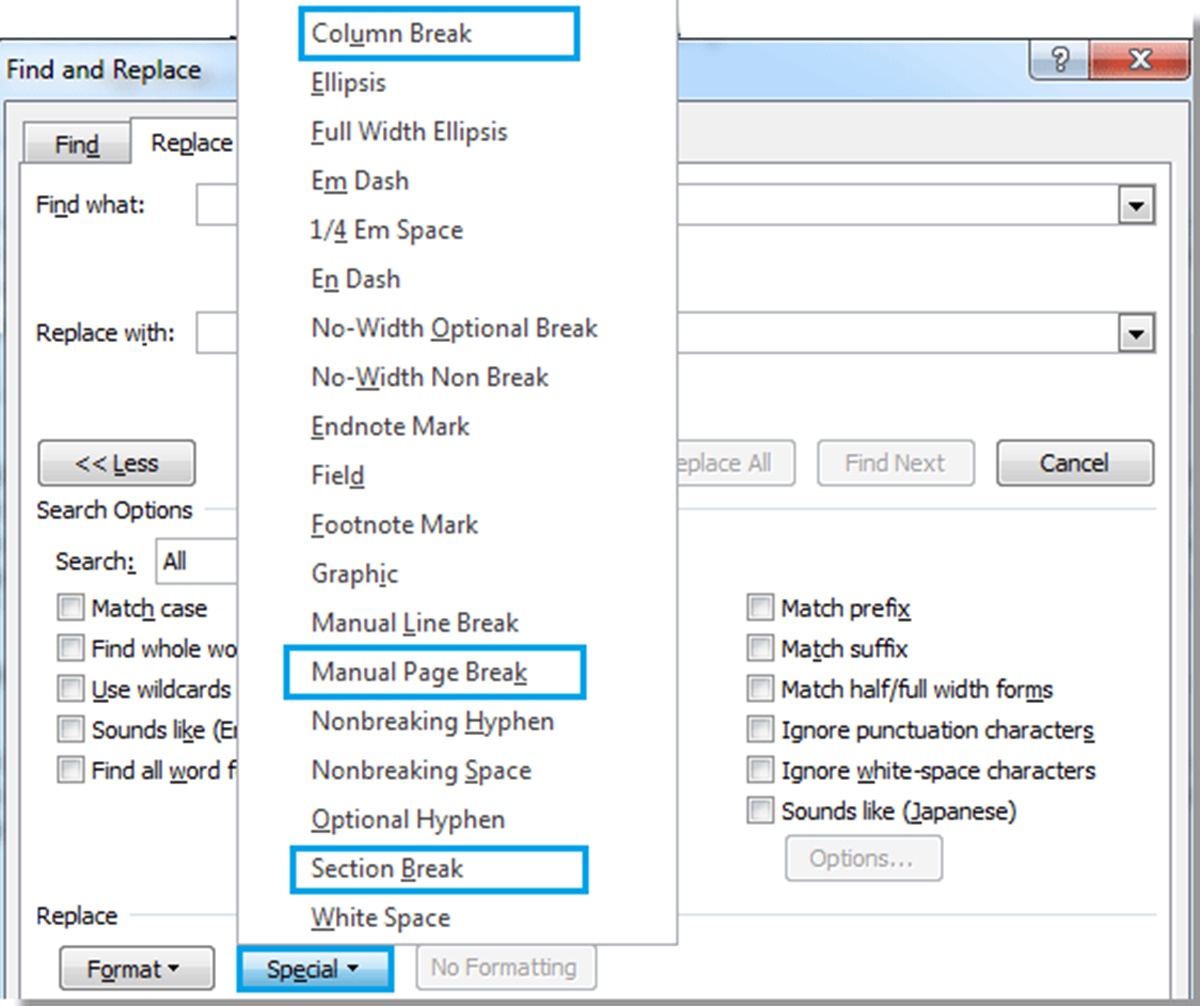
1. Using Find and Replace: This method is useful when you have a specific pattern of extra breaks throughout your document. Press Ctrl + H to open the Find and Replace dialog box. In the Find field, enter “^p^p” to search for double paragraph breaks. Leave the Replace field empty or enter a single paragraph break “^p” to replace the double breaks. Click “Replace All” to remove the extra breaks.
2. Using the Show/Hide feature: Enable the Show/Hide feature in Word by pressing Ctrl + Shift + 8 or clicking the “¶” icon in the Home tab. This reveals hidden formatting characters. Locate the extra breaks marked as paragraph marks (¶) and delete them manually. Ensure to only remove the extra breaks and not any necessary paragraph breaks.
3. Using Paragraph settings: Select the paragraph(s) with extra breaks and access the Paragraph settings dialog box by right-clicking and selecting “Paragraph” or by clicking the “Paragraph” dialog box launcher in the Home tab. In the “Spacing” section, adjust the “After” value to zero or a desired spacing. This removes the extra breaks by modifying the paragraph spacing.
4. Using a macro: If you have extensive extra breaks throughout your document, consider creating a macro to automate the removal process. You can record a macro that searches for and deletes extra breaks based on your specific requirements. Assign the macro to a shortcut key for easy access.
5. Tips to prevent extra breaks in future Word documents:
- Stick to a consistent formatting style when copying and pasting content from different sources.
- Avoid using excessive line breaks or multiple Enter keystrokes.
- Check your settings and modify default options that may insert extra breaks automatically.
- Regularly check your document using the Show/Hide feature to identify and address any hidden formatting issues.
- Use paragraph styles and formatting options effectively to control spacing between paragraphs.
By using these manual methods to remove extra breaks and implementing preventive measures, you can ensure that your Word documents are free from unnecessary breaks and maintain a clean and professional appearance.
Using Find and Replace to remove extra breaks
One efficient method to remove extra breaks in your Word document is by utilizing the Find and Replace feature. This feature allows you to search for specific patterns and replace them with desired content. Here’s how to use Find and Replace to remove extra breaks:
- Open your Word document and press
Ctrl + Hto open the Find and Replace dialog box. - In the Find field, enter
^p^p. This will search for double paragraph breaks. - Leave the Replace field empty or enter a single paragraph break
^pto replace the double breaks with a single break. - Click on “Replace All” to remove the extra breaks throughout the document.
This method is particularly useful when you have a consistent pattern of extra breaks that need to be removed. By replacing the double paragraph breaks with single breaks, you can ensure a proper and consistent spacing between paragraphs.
It’s important to note that while using Find and Replace, you need to be cautious to avoid inadvertently removing necessary paragraph breaks. Carefully review each replacement before clicking “Replace All” to ensure that it only removes the extra breaks and not any required spacing within the document.
Using Find and Replace saves you time and effort by quickly removing extra breaks throughout your document. However, it may not be suitable if your document contains variations in the number and placement of extra breaks. In such cases, you may need to consider other methods, such as manually deleting the breaks using the Show/Hide feature or adjusting paragraph settings.
Remember to always save a backup of your document before making extensive changes using Find and Replace. This way, you can revert to the original version if any unintended modifications occur.
Using the Show/Hide feature to identify and remove extra breaks
The Show/Hide feature in Microsoft Word is a handy tool that allows you to reveal hidden formatting characters, including extra breaks, in your document. By enabling this feature, you can easily identify and remove unnecessary breaks. Follow these steps to use the Show/Hide feature:
- Open your Word document and locate the “Paragraph” group in the “Home” tab of the ribbon.
- In the “Paragraph” group, click on the ¶ button or press
Ctrl + Shift + 8on your keyboard. This will display the hidden formatting characters, including paragraph marks (¶), in your document. - Scan through your document and look for the paragraph marks (¶) that appear as extra breaks.
- Select and delete the paragraph marks (¶) corresponding to the extra breaks.
When using the Show/Hide feature, it’s crucial to identify and remove only the extra breaks without deleting necessary paragraph breaks. Take a careful look at the document’s formatting and ensure that you are only removing the breaks that are causing the issue.
By visually identifying the extra breaks using the paragraph marks (¶), you can precisely remove them, thereby restoring the proper formatting and spacing in your document. This method is especially useful when the extra breaks are present in specific locations within the document or when they are not in a consistent pattern that can be easily addressed using other methods.
Remember to disable the Show/Hide feature when you have finished editing your document, as leaving it enabled may cause confusion for others who view or edit the document in the future.
Using the Show/Hide feature alongside other methods, such as adjusting paragraph settings or using Find and Replace, can help you effectively remove extra breaks and achieve a clean and well-formatted Word document.
Using Paragraph settings to remove extra breaks
An effective way to remove extra breaks in your Word document is by utilizing the Paragraph settings. By adjusting the paragraph spacing, you can eliminate unnecessary breaks and achieve a clean and balanced layout. Here’s how you can use the Paragraph settings:
- Select the paragraph or paragraphs containing the extra breaks that you want to remove.
- Right-click on the selected text and choose “Paragraph” from the context menu. Alternatively, you can click on the small arrow in the “Paragraph” group in the “Home” tab of the ribbon to open the Paragraph settings dialog box.
- In the open Paragraph settings dialog box, navigate to the “Spacing” section.
- Adjust the value in the “After” field to zero or to the desired spacing. This will remove the extra breaks between the paragraphs.
- Click “OK” to apply the changes.
Using the Paragraph settings is especially useful when the extra breaks occur between specific paragraphs or sections of your document. By adjusting the spacing, you can ensure a consistent and visually pleasing layout without any unnecessary breaks.
It’s important to note that modifying the paragraph settings will affect the spacing between all paragraphs with the same style. Therefore, consider applying the changes to a specific style rather than individual paragraphs if you want the formatting to be consistent throughout the document.
By using the Paragraph settings, you have the flexibility to customize the spacing according to your preferences. You can experiment with different values to find an optimal setting that eliminates the extra breaks while maintaining an appropriate amount of space between paragraphs.
Remember to review your document after adjusting the Paragraph settings to ensure that the removal of the extra breaks hasn’t impacted the overall readability and flow of your content.
Using the Paragraph settings in combination with other methods, such as using Find and Replace or the Show/Hide feature, can help you effectively remove extra breaks and achieve a clean and professional appearance for your Word document.
Using a macro to remove extra breaks
If you have a large Word document with numerous instances of extra breaks, using a macro can be a time-saving solution to remove them. A macro is a sequence of specific instructions that can be recorded and played back to automate repetitive tasks. Here’s how you can use a macro to remove extra breaks:
- Open your Word document and navigate to the “View” tab on the ribbon.
- Click on “Macros” in the “Macros” group. This will open the “Macros” dialog box.
- Enter a unique name for your macro in the “Macro name” field and click “Create” to open the Visual Basic for Applications (VBA) editor.
- In the VBA editor, you’ll see two sections: “Sub [Your Macro Name]()” and “End Sub”.
- Between these two sections, insert the following code:
Sub RemoveExtraBreaks()
Selection.Find.ClearFormatting
Selection.Find.Replacement.ClearFormatting
With Selection.Find
.Text = “^p^p”
.Replacement.Text = “^p”
.Forward = True
.Wrap = wdFindContinue
.Format = False
.MatchCase = False
.MatchWholeWord = False
.MatchWildcards = False
.MatchSoundsLike = False
.MatchAllWordForms = False
End With
Selection.Find.Execute Replace:=wdReplaceAll
End Sub
- Close the VBA editor to return to your Word document.
- Select the content where you want to remove the extra breaks.
- Go back to the “Macros” dialog box by clicking on “Macros” in the “View” tab.
- Select the macro you created (in step 3) from the list of available macros and click “Run”.
The macro will execute the Find and Replace operation, replacing any double paragraph breaks with single breaks throughout the selected content. This effectively removes the extra breaks.
Using a macro to remove extra breaks can significantly speed up the process, especially when dealing with extensive documents or recurring patterns of extra breaks. By automating the task, you can save time and effort that can be better utilized for other aspects of your document editing.
Make sure to review your document after running the macro to ensure that the desired modifications have been applied correctly and there are no unintended changes.
Remember to save a separate backup of your Word document before running the macro, as a precaution in case any unexpected issues arise during the process.
Using a macro to remove extra breaks is a powerful tool that can streamline your workflow and help you maintain clean and consistent formatting in your Word document.
Tips to prevent extra breaks in future Word documents
Preventing extra breaks in your Word documents can save you time and effort in the long run. By following these tips, you can maintain a clean and cohesive appearance while avoiding the hassle of removing unnecessary breaks:
- Stick to consistent formatting: When copying and pasting content from different sources, make sure to review and adjust the formatting to match your document. Consistency in formatting helps reduce the likelihood of incompatible spacing and extra breaks.
- Avoid excessive line breaks: Instead of using multiple line breaks or pressing “Enter” repeatedly, utilize paragraph breaks to separate content logically. This ensures that each paragraph stands on its own while maintaining proper formatting.
- Review default settings: Take some time to explore and modify Word’s default settings. For example, you can adjust the automatic spacing options to prevent Word from inserting extra breaks when you press “Enter” at the end of a paragraph.
- Regularly check using the Show/Hide feature: Utilize the Show/Hide feature in Word to reveal hidden formatting characters and identify any excess line breaks or unnecessary paragraph marks that contribute to extra breaks. Regularly checking your document in this way can help you catch and address formatting issues early on.
- Use paragraph styles effectively: Make use of paragraph styles in Word to ensure consistent spacing and formatting throughout your document. By creating and applying paragraph styles with appropriate line spacing, you can minimize the chances of unintentional extra breaks.
By implementing these preventive measures, you can maintain a professional and well-formatted Word document without unnecessary breaks that disrupt the overall appearance and readability.
Remember to consider the specific requirements of each document and adjust the formatting accordingly. Pay attention to any guidelines or style preferences provided by your intended audience or target publication to ensure compliance and consistency.
By incorporating these tips into your document creation process, you can develop a good habit of producing clean and organized Word documents, saving you time and effort in the future.