
Enabling the Show/Hide Button
To reveal formatting marks and codes in Microsoft Word, you first need to enable the Show/Hide button. This button allows you to toggle the display of formatting marks on and off, giving you a visual representation of the hidden elements in your document.
To enable the Show/Hide button, follow these simple steps:
- Open your Word document.
- Go to the “Home” tab in the ribbon.
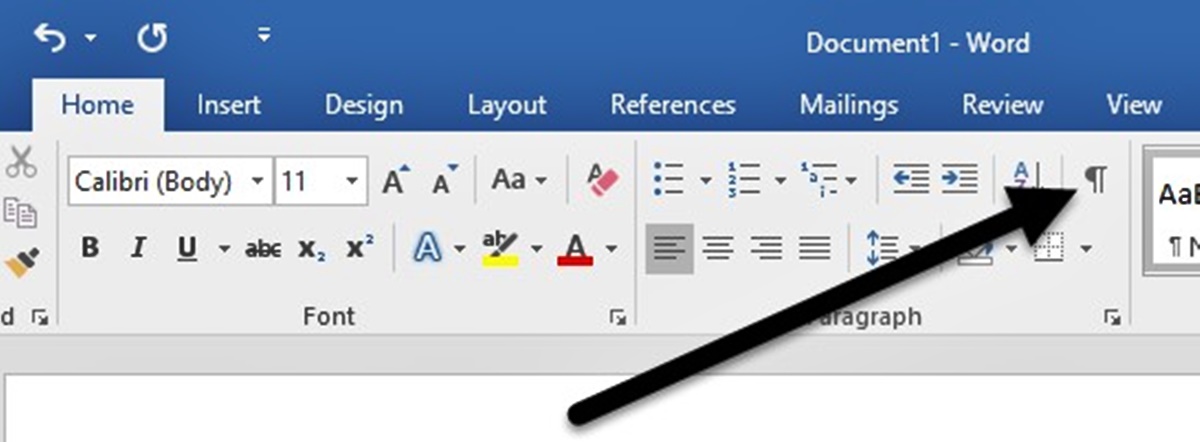
- In the “Paragraph” section, look for the “Show/Hide” button. It looks like a paragraph symbol (¶) and is located right next to the “Sort” button.
- Click on the “Show/Hide” button to activate it.
Once you have enabled the Show/Hide button, you will see a variety of formatting marks and codes displayed in your document. These marks represent elements such as spaces, tabs, line breaks, paragraph breaks, and other nonprinting characters. Understanding what each of these marks signifies can help you manipulate your document’s formatting and troubleshoot any layout issues.
By utilizing the Show/Hide button, you can see the invisible elements that are typically hidden from view and gain better control over the overall appearance and structure of your document. It also makes it easier to identify and correct any formatting errors or inconsistencies.
Understanding the Formatting Marks
Once you have enabled the Show/Hide button in Microsoft Word, you will notice various formatting marks that appear in your document. These marks provide valuable insights into the structure and layout of your text, allowing you to make precise formatting adjustments. Understanding what each mark represents is essential for efficiently working with formatting codes.
Here are some common formatting marks that you may encounter:
- Paragraph Mark (¶): This symbol represents a paragraph break, indicating where a new paragraph begins in your document.
- Space: Spaces between words are denoted by a small dot. This mark helps you identify extra spaces or spacing inconsistencies.
- Tab Character (→): Tabs are represented by an arrow pointing to the right. They indicate the location of tab stops and can be adjusted to align text in a specific manner.
- Nonbreaking Space ( ): Nonbreaking spaces prevent words from being divided at the end of a line. They are useful for maintaining the integrity of elements such as URLs or hyphenated words.
- Em Dash (—): An em dash is a longer dash used to indicate breaks in thought or emphasis. It is represented by a horizontal line.
- Section Break: Section breaks signify the end of one section and the beginning of another. They help separate content and formatting within a document.
By familiarizing yourself with these formatting marks, you can identify and correct formatting issues more efficiently. They also facilitate collaboration with others, as they can quickly visualize and understand the formatting choices made in the document.
Remember, these formatting marks are nonprinting characters, which means they won’t appear when you print the document. They exist solely to provide visual cues for editing and formatting purposes.
Revealing Formatting Codes
In Microsoft Word, formatting codes play a crucial role in determining how your document looks and behaves. By revealing these codes, you gain insight into the underlying structure and formatting applied to your text. This knowledge empowers you to make precise adjustments and troubleshoot formatting issues effectively.
To reveal formatting codes, follow these steps:
- Make sure the Show/Hide button is enabled. If it’s not, refer back to the previous section on how to enable it.
- Select the text that you want to inspect the formatting for. If you want to see the codes for the entire document, press Ctrl+A on your keyboard to select all.
- In the ribbon, go to the “Home” tab.
- Locate the “Font” group and click on the small arrow in the lower-right corner.
- A dialog box will appear. In the “Font” tab of the dialog box, check the box that says “Hidden” under the “Effects” section. Then click “OK”.
Once you have completed these steps, you will now see the formatting codes displayed within your selected text or entire document. These codes encompass a wide range of formatting elements, including font styles, sizes, colors, alignment, indentation, and much more.
By examining the formatting codes, you can identify any inconsistencies or unintended formatting that may affect the appearance of your document. For example, you might discover that a particular section has a different font size or style, explaining why it stands out from the rest of the text.
Revealing formatting codes is particularly useful when collaborating with others on a document. It allows you to understand and modify the formatting applied by different contributors, ensuring consistency throughout the document.
Remember to disable the display of formatting codes when you no longer need them visible. Simply repeat the steps above but uncheck the “Hidden” box in the Font dialog box.
Identifying Spaces and Tabs
In Microsoft Word, spaces and tabs are essential elements for formatting and aligning text. Sometimes, however, they can cause issues if used inconsistently or excessively. By identifying spaces and tabs in your document, you can ensure proper alignment and eliminate any unwanted spacing gaps or inconsistencies.
When you have the Show/Hide button enabled, spaces are represented by a small dot between words. This visual cue allows you to easily spot the presence of extra spaces or spacing inconsistencies. By identifying these areas, you can remove excessive spaces to create a more visually pleasing and professional-looking document.
Tabs, on the other hand, are indicated by right-pointing arrows (→) aligned vertically. Tabs are useful for aligning text at specific points, such as when creating columns or lists. They can be adjusted by manipulating tab stops, which determine the position of the tab character.
By identifying tabs in your document, you can ensure proper alignment and adjust them as necessary. This is especially important when collaborating with others, as differing tab settings can result in misaligned content.
To identify spaces and tabs in your Word document:
- Enable the Show/Hide button as explained in the previous section.
- Review your document and locate the spaces and tabs represented by the visual cues mentioned above.
- Make any necessary adjustments to ensure consistent spacing and alignment throughout the document.
By paying attention to spaces and tabs, you can maintain a clean and organized document layout. Consistent spacing and alignment contribute to the readability and professionalism of your content.
Remember that excessive spaces and misaligned tabs can affect the overall appearance of your document. Taking the time to identify and correct these formatting issues will result in a polished and visually appealing document.
Working with Line Breaks
Line breaks in Microsoft Word serve as a way to start a new line without creating a new paragraph. They are useful for situations where you want to maintain a consistent flow of text but need to visually separate certain lines or elements.
When the Show/Hide button is enabled, line breaks are represented by a symbol that looks like an arrow pointing downwards (↵). These symbols appear whenever a line break is used in your document.
Working with line breaks allows you to control the layout and spacing of your text effectively. Here are a few ways you can utilize line breaks:
- Add space within a paragraph: By inserting a line break within a paragraph, you can create additional vertical space between lines without starting a new paragraph. This can be helpful for emphasizing specific information or improving the readability of dense text.
- Create a list: Line breaks can be used to create visually appealing lists, such as when you want to present a series of items or steps.
- Separate sections: If you have distinct sections within your document, you can use line breaks to visually separate them, making it easier for readers to identify different parts of the content.
- Format poetry or song lyrics: Line breaks are essential for preserving the structure and format of poetic lines or song lyrics, ensuring that they are displayed correctly as intended by the author.
Working with line breaks gives you greater control over the layout and organization of your text. However, it’s important not to overuse line breaks, as excessive line breaks can lead to a cluttered and disjointed appearance. Remember to use line breaks purposefully and strategically to enhance the readability and visual flow of your document.
By understanding how to work with line breaks effectively, you can format your content in a way that best suits your needs and ensures optimal readability for your readers.
Viewing Paragraph and Section Breaks
In Microsoft Word, paragraph and section breaks are essential for organizing and structuring your document. They provide a way to control the flow and layout of your content, allowing you to create divisions or breaks between paragraphs or sections.
When the Show/Hide button is enabled, paragraph breaks are represented by the familiar paragraph symbol (¶) that appears at the end of each paragraph. These breaks indicate where one paragraph ends and the next one begins. By viewing paragraph breaks, you can easily identify the structure of your document and make adjustments as needed.
Section breaks, on the other hand, indicate the end of one section and the beginning of another. They enable you to apply different formatting or page layout settings within a single document. Section breaks are displayed as thick, dotted lines on the page when the Show/Hide button is enabled.
Viewing paragraph and section breaks are particularly useful when working with long or complex documents. Here are a few scenarios where understanding and managing these breaks is crucial:
- Formatting headers and footers: Section breaks allow you to have different headers and footers within your document. By understanding where they are located, you can ensure that the appropriate content is displayed in each section.
- Creating different page orientations or margins: Section breaks enable you to have pages with different orientations or margins within the same document. By viewing the section breaks, you can verify that the formatting is applied correctly and adjust it if necessary.
- Applying different numbering or formatting: Section breaks allow you to apply unique numbering, formatting styles, or other settings to different sections of your document. By identifying the breaks, you can confirm that the desired formatting is correctly applied.
By understanding and actively viewing paragraph and section breaks, you have greater control over the structure and formatting of your document. It allows you to clearly identify where changes or adjustments need to be made and ensures that your content is presented in a consistent and coherent manner.
Remember that paragraph and section breaks are invisible when printing or publishing your document, making it crucial to enable the Show/Hide button to visualize their presence and locations.
Dealing with Nonprinting Characters
In Microsoft Word, nonprinting characters are symbols and codes that are not visible but play a significant role in formatting and document structure. While these characters do not appear when you print or publish your document, they can affect its layout and formatting. Understanding and dealing with nonprinting characters is essential for maintaining the integrity and consistency of your document.
Nonprinting characters include symbols such as spaces, tabs, paragraph marks (¶), line breaks, and more. These characters can sometimes create unexpected formatting issues, especially when copied and pasted from external sources.
To deal with nonprinting characters, follow these steps:
- Enable the Show/Hide button to reveal nonprinting characters. This button is located in the “Paragraph” section of the “Home” tab.
- Identify and address any nonprinting characters that may affect your document’s formatting or layout.
- Remove any excessive spaces or tabs that may cause irregular spacing or alignment.
- Ensure consistent usage of paragraph marks (¶) and line breaks for proper paragraph and line spacing.
- Clean up any unnecessary nonprinting characters that may have been copied from external sources.
By dealing with nonprinting characters, you can avoid issues such as inconsistent spacing, misaligned content, or unexpected line breaks. It ensures that your document maintains a professional appearance and is easy to read.
In some cases, you may want to retain specific nonprinting characters for formatting or special purposes. However, it is critical to use them purposefully and understand their effect on the document’s layout.
Regularly checking for nonprinting characters and cleaning up unnecessary ones is an essential part of maintaining a well-formatted and visually pleasing document. It can save you time and frustration when dealing with layout issues or when collaborating with others on the same document.
Remember to disable the display of nonprinting characters when you no longer need them visible. Simply click on the Show/Hide button again to deactivate it.
Customizing the Display of Formatting Marks
Microsoft Word offers you the flexibility to customize the display of formatting marks according to your preferences. By modifying the settings, you can control which formatting marks are visible and how they are represented in your document.
To customize the display of formatting marks, follow these steps:
- Click on the “File” tab in the ribbon to access the Backstage view.
- In the Backstage view, click on “Options” to open the Word Options dialog box.
- Select the “Display” category on the left-hand side of the dialog box.
- Under the “Always show these formatting marks on the screen” section, choose the specific marks you want to display by checking their respective boxes. You can customize the display of marks such as spaces, tabs, paragraph marks, and more.
- Click “OK” to apply the changes.
After customizing the display of formatting marks, your document will reflect the chosen settings. This allows you to focus on the specific marks that are most relevant to your workflow.
Customizing the display of formatting marks can be particularly helpful in scenarios such as:
- Working with a specific type of formatting: If you frequently use certain formatting elements, such as tabs or paragraph marks, you can choose to display them consistently. This allows you to easily identify and modify the formatting as needed.
- Ensuring document consistency: By customizing the display of formatting marks across different documents, you can ensure a consistent and familiar layout. This is especially useful when collaborating with others who may have different default settings.
- Reducing visual clutter: If you find certain formatting marks to be distracting, you can choose to hide them from the display. This allows you to focus solely on the visible content without unnecessary visual distractions.
Customizing the display of formatting marks provides you with greater control over your document’s appearance and allows you to work more efficiently. Experiment with different settings to find the configuration that best suits your needs and preferences.
Remember that customizing the display of formatting marks is a personal choice. You can modify the settings at any time to adapt to different tasks or document requirements.
Using the Reveal Formatting Pane
In Microsoft Word, the Reveal Formatting pane provides a convenient way to view and analyze the formatting applied to specific text within your document. This feature allows you to quickly identify the formatting details and properties of selected text, making it easier to troubleshoot and fine-tune your document’s formatting.
To access the Reveal Formatting pane and utilize its functionality, follow these steps:
- Select the text that you want to analyze or modify the formatting for.
- Go to the “Home” tab in the ribbon.
- In the “Styles” group, click on the small arrow at the bottom-right corner to open the Styles pane.
- Click on the “Style Inspector” button at the bottom of the Styles pane. This will open the Reveal Formatting pane on the right side of your document window.
- In the Reveal Formatting pane, you will see detailed information about the formatting applied to the selected text. This includes font styles, sizes, colors, paragraph settings, and more.
The Reveal Formatting pane not only displays the current formatting but also provides options to modify it. You can click on the “Modify” button within the pane to make adjustments to the selected text’s formatting based on your specific requirements.
The use of the Reveal Formatting pane can enhance your document formatting workflow in several ways:
- Identifying and troubleshooting formatting issues: By using the pane, you can quickly identify any inconsistencies or unexpected formatting that may be present in the selected text. This allows you to take corrective action and ensure consistent and coherent formatting throughout your document.
- Applying consistent formatting: The Reveal Formatting pane enables you to ensure that specific sections or elements within your document share the same formatting properties. You can modify the formatting of the selected text and then apply it consistently across other relevant sections.
- Understanding complex formatting: For text with multiple formatting applied, the Reveal Formatting pane breaks down the details, making it easier to understand and modify complex formatting scenarios.
By utilizing the Reveal Formatting pane, you can have better control over the formatting of your text, troubleshoot issues efficiently, and maintain consistency throughout your documents.
Remember to use this feature as a handy tool to evaluate and adjust the formatting of selected text, enhancing the overall visual appeal and clarity of your documents.
Understanding the Purpose of Formatting Marks and Codes
Formatting marks and codes in Microsoft Word serve a crucial purpose in determining the layout, structure, and appearance of your documents. These invisible elements play a significant role in indicating formatting choices, organizing content, and ensuring consistent styling throughout your text.
Here are the key purposes of formatting marks and codes:
- Visualizing formatting decisions: Formatting marks provide a visual representation of invisible elements such as spaces, tabs, line breaks, and paragraph breaks. They reveal how your text is structured and help you visualize the formatting decisions made in the document.
- Identifying and correcting formatting errors: By understanding formatting codes, you can identify and rectify any inconsistencies or errors in your document layout. You can troubleshoot issues such as excessive spaces, misaligned tabs, or unintended line breaks.
- Maintaining consistency: By using formatting codes consistently throughout your document, you can ensure a uniform and professional appearance. Uniform formatting enhances readability and creates a cohesive look across your text.
- Collaboration and communication: Formatting marks facilitate collaboration with others by providing a visual guide to the formatting choices made in the document. It allows collaborators to understand and align with the established styling and organization.
- Efficient troubleshooting: When faced with formatting challenges or inconsistencies, understanding formatting marks and codes helps you identify the root cause of the problem quickly. You can then make targeted modifications to resolve the issue effectively.
Formatting marks and codes serve as valuable tools that enable you to analyze, manipulate, and refine the formatting of your text. By embracing the understanding of these elements, you gain greater control over the visual layout, readability, and consistency of your documents.
It’s essential to remember that formatting marks and codes are nonprinting characters, meaning they are not visible when you print or publish your document. They exist solely to assist in the editing and formatting process, ensuring that your text is presented accurately and aesthetically.
By appreciating the purpose of formatting marks and codes, you can leverage them effectively to enhance the quality, professionalism, and visual appeal of your Microsoft Word documents.