
Overview of iCloud Storage and Its Cost
iCloud storage is a cloud-based storage service provided by Apple, designed to store and sync data across Apple devices. It offers users a convenient way to store files, documents, and media, including photos. While iCloud provides a certain amount of free storage, additional storage capacity comes at a cost.
When it comes to storing photos, iCloud offers a seamless experience for Apple users. By uploading photos to iCloud, users can access their photos from any Apple device, eliminating the need to transfer files manually. With iCloud, you can enjoy the benefits of automatic photo backup, synchronization, and sharing across all your Apple devices.
Understanding the cost structure of iCloud storage is crucial to managing your storage needs efficiently. iCloud storage plans vary based on the amount of storage capacity you require. Apple offers various pricing tiers, ranging from 5 GB of free storage to larger paid options.
The free iCloud storage plan provides 5 GB of space, which is often not enough to store a significant number of photos. For users with larger photo libraries, it’s necessary to consider upgrading to a higher storage plan to accommodate their needs.
iCloud storage plans start at 50 GB, offering a more reasonable option for storing photos. With this plan, you can easily backup and store a substantial number of photos without worrying about running out of space. As your photo library grows over time, you may need to consider upgrading to a larger storage plan, such as 200 GB or 2 TB, to accommodate your expanding photo collection.
It’s essential to consider your storage needs before choosing an iCloud storage plan. Assessing factors like the size of your photo library, frequency of photo uploads, and the need for additional storage for other data files is crucial in making an informed decision about the right storage plan for you.
By understanding the cost structure of iCloud storage and the amount of storage you require, you can effectively manage your photo storage needs while staying within your budget.
Understanding How iCloud Stores Photos
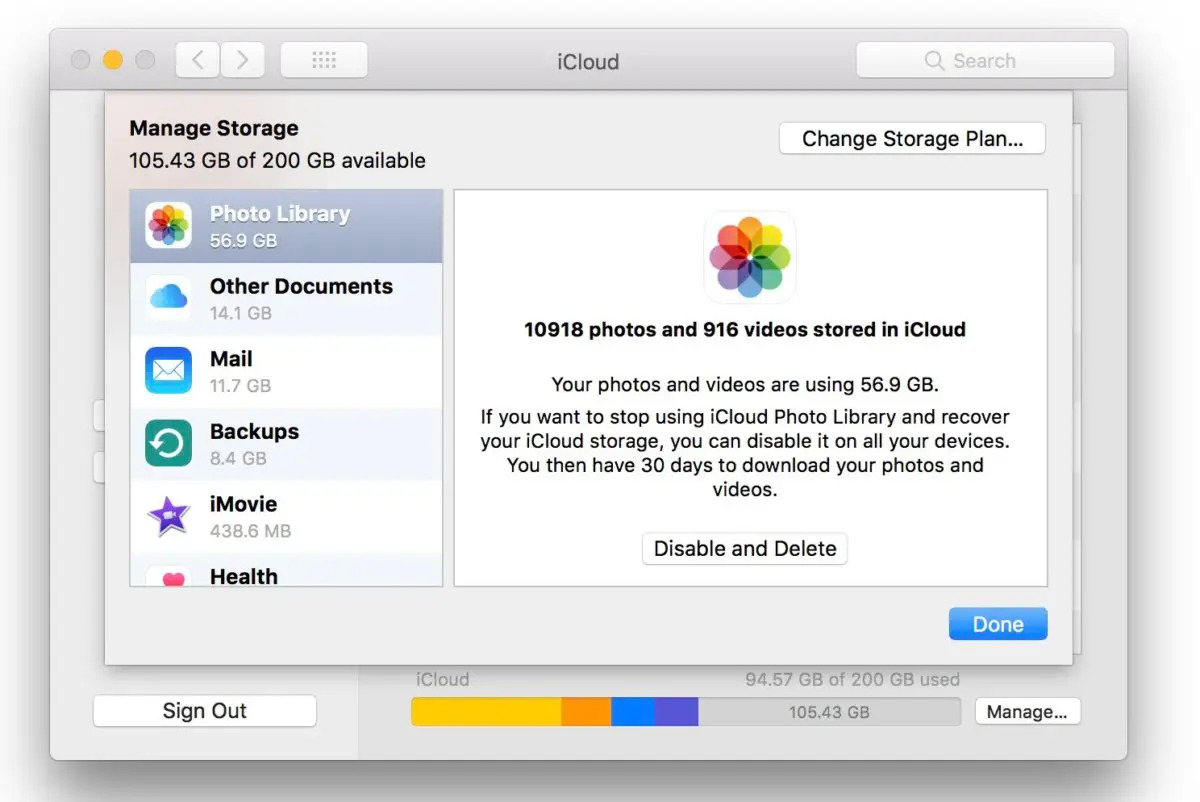
iCloud simplifies the process of storing and managing photos by offering seamless integration across Apple devices. When you upload photos to iCloud, they are stored in the cloud and accessible from any Apple device that is signed in with your iCloud account.
By default, iCloud uses a technology called “optimized storage” to store photos. This means that the full-size images are not stored on your device to conserve storage space. Instead, thumbnails and lower-resolution versions of your photos are stored locally, and the full-size images are stored in the cloud.
When you open a photo on your device, iCloud automatically downloads the high-resolution version of that photo for you to view. This allows you to have access to all your photos without taking up a significant amount of storage on your device.
One of the key advantages of iCloud storage for photos is the ability to enable the iCloud Photos feature. With iCloud Photos, you can keep your entire photo library synchronized across all your devices. When you take a photo on your iPhone, for example, it will automatically appear in the Photos app on your iPad and Mac.
iCloud Photos also offers a feature called “Shared Albums,” which allows you to create albums and share them with friends and family. You can invite people to contribute their own photos to these albums, creating a collaborative and shared photo collection.
In addition to iCloud Photos, it’s worth mentioning the “My Photo Stream” feature. This feature automatically uploads your most recent photos from all your devices to the cloud and makes them accessible across your devices for 30 days. However, it’s important to note that My Photo Stream does not count towards your iCloud storage limit.
To make the most of iCloud storage for photos, it’s recommended to have a stable internet connection. Uploading and syncing photos can be time-consuming if you have a large photo library, especially if you are on a slower internet connection.
Overall, understanding how iCloud stores photos can help you make the most of this convenient storage solution. By utilizing iCloud Photos and optimizing your storage settings, you can ensure that your photo collection is easily accessible across all your Apple devices while minimizing the amount of local storage used on each device.
The Limitations of Using a Single Photo Library in iCloud
While iCloud provides a convenient way to store and access your photos, using a single photo library in iCloud does have its limitations. Understanding these limitations can help you make informed decisions about organizing and managing your photo collection.
One of the main limitations is the lack of flexibility in organizing your photos. With a single photo library, all your photos are stored together in one place. This can become problematic if you want to categorize or separate your photos based on different events, trips, or themes. It becomes challenging to maintain organization and find specific photos when they are all stored together.
Another limitation is the risk of exceeding your iCloud storage capacity. As your photo library grows, it can consume a significant amount of storage space. With a single photo library, all your photos are stored together, regardless of their size or importance. This can lead to a situation where your photo library takes up a large portion of your iCloud storage, leaving limited space for other files and data.
In addition, if you have multiple Apple devices linked to the same iCloud account, all these devices will download and store the entire photo library. This can quickly consume storage on each device, especially if they have limited capacity. It can also lead to slower performance and reduced device functionality due to the burden of managing and synchronizing a large photo library.
Furthermore, privacy and sharing options may be limited when using a single photo library. With a single library, all photos are accessible by default to all devices linked to the iCloud account. This may not be desirable if you want to have more control over which photos are accessible on specific devices or shared with others.
Lastly, managing duplicates and deleting unwanted photos becomes more challenging with a single library. If you accidentally import duplicates or want to remove specific photos, it requires navigating through the entire library to find and delete them. This process can be time-consuming and can result in unintentional deletions or loss of important photos.
To overcome these limitations, it is worth considering the use of multiple photo libraries in iCloud. Creating separate libraries can allow for better organization, efficient storage management, and more control over privacy and sharing. In the following sections, we will explore the benefits of using multiple photo libraries in iCloud and how to create and manage them.
Benefits of Using Multiple Photo Libraries in iCloud
Utilizing multiple photo libraries in iCloud provides several benefits that can enhance your photo management experience and address the limitations of using a single photo library. Let’s explore some of the key advantages:
Organization: With multiple photo libraries, you have the flexibility to organize your photos based on different categories or themes. Whether it’s separating personal and professional photos, organizing photos by year or event, or creating libraries for specific projects, you can keep your photo collection well-structured and easily accessible.
Storage Management: Creating separate photo libraries allows you to have better control over your iCloud storage usage. You can distribute your photos across different libraries based on their importance or size. This enables you to allocate storage space more efficiently and avoid exceeding your storage capacity.
Device Optimization: Multiple photo libraries can improve the performance and functionality of your Apple devices. By having separate libraries, you can choose which libraries to sync with each device, reducing the burden of managing and synchronizing a large photo library across all devices. This can free up storage space and enhance device performance.
Privacy and Sharing: Having multiple photo libraries offers more privacy and sharing options. You can choose which photos to include in each library, providing better control over which photos are accessible on specific devices. Additionally, you can selectively share specific libraries with others, ensuring that sensitive or personal photos remain private.
Streamlined Editing and Organization: With multiple photo libraries, you can streamline your editing and organization processes. You can focus on specific libraries for editing or organizing tasks, allowing you to work more efficiently and effectively. This can be particularly useful if you have professional or creative projects that require dedicated attention.
Reduced Clutter and Duplication: Multiple photo libraries help minimize clutter and duplication. If you accidentally import duplicates or have unwanted photos, it’s easier to manage and delete them within specific libraries without affecting the entire photo collection. This simplifies the process of cleaning up your photo library and ensures that each library remains well-organized.
By utilizing multiple photo libraries in iCloud, you can unlock these benefits and optimize your photo management experience. In the following sections, we will explore how to create and manage multiple photo libraries in iCloud.
Creating Multiple Photo Libraries in iCloud
If you want to take advantage of the benefits of multiple photo libraries in iCloud, you can easily create and manage them within your Apple ecosystem. Here’s how:
1. Mac: On your Mac, open the Photos app and go to the menu bar. Click on “Photos” and then select “Preferences.” In the Preferences window, go to the “General” tab and click on the “Use System Photo Library” checkbox to uncheck it. Once unchecked, you can create a new library by holding down the Option key and clicking on the Photos app. From there, choose “Create New…,” name your new library, and select a location to store it.
2. iPhone or iPad: Unfortunately, creating multiple libraries directly on an iPhone or iPad is not possible. However, once you have created additional libraries using the Photos app on your Mac, you can choose which libraries to sync with your iPhone or iPad by going to “Settings,” selecting your name, and then tapping on “iCloud.” From there, you can enable or disable the syncing of specific libraries.
3. iCloud.com: Creating multiple photo libraries on iCloud.com is also not possible. The web version of iCloud Photos only displays your system photo library. However, you can still access and manage your additional libraries on your Mac or synced devices.
By creating multiple photo libraries, you can organize your photos based on different categories, projects, or themes. This allows for efficient management and customization of your photo collection across your Apple devices.
It’s worth mentioning that while you can switch between different photo libraries, you can only have one library set as the “System Photo Library” at a time. This is the library that automatically syncs with iCloud and receives photos from other devices. However, you can manually upload and download photos between different libraries if needed.
Remember to consider your storage needs when creating multiple libraries. Each library consumes storage space in your iCloud storage capacity. It’s important to monitor your storage usage and ensure it aligns with your chosen iCloud storage plan.
Overall, creating multiple photo libraries in iCloud provides a powerful tool to organize and manage your photo collection. With a bit of organization upfront, you can unlock the full potential of iCloud and enjoy a more tailored and streamlined photo management experience.
Moving Photos Between Different Photo Libraries
If you have multiple photo libraries in iCloud and want to move photos between them, Apple provides a straightforward method to accomplish this. Whether you want to consolidate photos into a single library or distribute them across different libraries, here’s how you can move photos:
1. Mac: On your Mac, open the Photos app and select the library that contains the photos you want to move. Next, select the photos you wish to transfer by holding down the Command key and clicking on each photo. Once selected, drag and drop the photos to the library where you want to move them. The photos will be copied to the new library and removed from the original library.
2. iPhone or iPad: Unfortunately, directly moving photos between different libraries on an iPhone or iPad is not possible. However, you can achieve a similar result by exporting the photos from the source library and importing them into the destination library. Open the Photos app, select the photos you want to move, tap the Share button, and choose the “Save [number] Images” option to save the photos to your device. Then, open the destination library’s Photos app, tap the Add button, and select the recently saved photos to import them into the new library.
By following these steps, you can transfer photos between different photo libraries in iCloud. However, it’s important to note that moving photos between libraries does not delete the original copies from iCloud. The photos will still be stored in the original library and take up storage space. If you want to free up storage, make sure to delete the photos from the original library after transferring them to the new library.
Additionally, keep in mind that moving photos between libraries can affect the organization and synchronization of your photo collection. Depending on your iCloud settings, the movement of photos may trigger uploads or downloads across devices. It’s important to allow time for the synchronization process to complete, especially if you have a large number of photos to transfer.
Lastly, before moving photos, it’s always a good practice to back up your photo libraries to ensure your precious memories are safely preserved. You can use external storage devices, cloud backup services, or utilize Apple’s Time Machine feature to create backups of your photo libraries.
Overall, with the ability to move photos between different photo libraries, you have the flexibility to organize and manage your photo collection in a way that suits your preferences. Whether you want to consolidate, distribute, or organize your photos across libraries, this feature empowers you with greater control over your iCloud photo storage.
Managing iCloud Storage Costs with Multiple Photo Libraries
Using multiple photo libraries in iCloud can be an effective strategy for managing your storage costs and staying within your allocated storage limit. Here are some tips to help you optimize your iCloud storage costs:
1. Allocate storage based on importance: Assign storage space to each library based on the importance of the photos it contains. Libraries with photos that hold significant value or sentimental importance should have a larger portion of your storage allocation, while libraries with less crucial or temporary photos can have smaller allocations.
2. Regularly clean up and delete unwanted photos: Periodically review your photo libraries to identify and delete any unwanted or redundant photos. Removing unnecessary photos not only helps declutter your libraries but also frees up storage space in your iCloud account. Consider using smart album features or manual sorting to identify duplicates, blurry shots, or screenshots that can be safely deleted.
3. Optimize iCloud Photos settings: Adjust the settings in the Photos app to optimize storage usage. Enable the “Optimize [Device] Storage” option, which automatically manages the size of photos on your device by keeping lower-resolution versions locally and storing the full-resolution versions in iCloud. This helps reduce the amount of local storage your photos consume.
4. Use external storage solutions: Consider using external storage solutions, such as hard drives or network-attached storage (NAS), to store less frequently accessed photos or libraries. You can manually transfer older or less important photos to these storage devices while keeping the most recent and frequently accessed photos in your iCloud libraries.
5. Keep an eye on your storage usage: Regularly monitor your iCloud storage usage to stay aware of your storage consumption. This allows you to proactively manage your storage allocation and make necessary adjustments based on your needs. You can view your storage usage in the settings of your iCloud account on your Apple device.
6. Customize storage plans: Evaluate your photo storage needs and consider upgrading or downgrading your iCloud storage plan accordingly. If you find that your photo libraries are consistently exceeding your storage limit, upgrading to a higher storage plan may be necessary. Conversely, if you have unused storage capacity, downgrading to a lower plan can help reduce costs.
7. Consider alternate photo management solutions: Explore other cloud-based photo storage and management solutions that may offer more cost-effective options for your needs. Compare different providers’ storage plans, features, and pricing to determine if there are alternatives that better align with your budget and requirements.
By implementing these strategies, you can effectively manage your iCloud storage costs while enjoying the benefits of multiple photo libraries. Remember to regularly assess your storage usage and make adjustments as needed to ensure you’re optimizing your storage allocation in the most cost-efficient manner.
Choosing the Right iCloud Storage Plan for Your Needs
When it comes to selecting the right iCloud storage plan, it’s essential to evaluate your specific needs and consider factors such as the size of your photo library, storage requirements for other files, and budget. Here are some considerations to help you make an informed decision:
1. Assess your storage needs: Start by assessing the size of your photo library and the estimated growth rate. Consider how many photos and videos you expect to capture in the future. Additionally, take into account the amount of storage required for other files, such as documents, backups, and app data. This assessment will give you a baseline understanding of your storage requirements.
2. Evaluate the free storage: iCloud offers 5 GB of free storage, which may be sufficient for users with smaller photo libraries or minimal storage requirements. Determine if the free allocation can accommodate your current needs or if you need additional storage.
3. Consider the paid storage options: Apple offers various paid iCloud storage options, including 50 GB, 200 GB, 2 TB, and more. Carefully consider the size and growth rate of your photo library to determine the appropriate paid plan. Keep in mind that your storage needs may change over time, so choose a plan that allows room for growth without unnecessary overages.
4. Review pricing and budget: Take into account the pricing structure of each storage plan and consider your budget. Determine how much you are willing to invest in iCloud storage and choose a plan that provides the necessary storage capacity without breaking the bank. It’s important to strike a balance between adequate storage and value for money.
5. Explore bundle options: Apple offers bundle options, such as the Apple One subscription, which includes iCloud storage along with other Apple services like Apple Music, Apple TV+, Apple Arcade, and Apple News+. If you already use or plan to use these services, bundling them with your iCloud storage can offer cost savings and convenience.
6. Look for promotional deals: Keep an eye out for any promotional offers or discounts that Apple may periodically offer on iCloud storage plans. Taking advantage of these deals can help you save money while getting access to the storage capacity you need.
7. Flexibility and upgrade options: Consider the flexibility of each storage plan and the ease of upgrading or downgrading. iCloud allows you to change your storage plan at any time, ensuring you can adjust as your needs evolve. Flexibility is crucial, as it allows you to adapt your storage capacity as your photo library and storage requirements change over time.
By carefully considering these factors, you can choose the right iCloud storage plan that aligns with your storage needs, budget, and future growth. Regularly reassess your storage requirements and make adjustments as necessary to ensure you have adequate storage capacity for your photos and other files.