
Use iCloud Storage Optimization
Does your iCloud storage constantly run out of space? Fret not, as there are several ways to efficiently manage and reduce your iCloud storage usage. One of the most effective methods is to utilize the iCloud Storage Optimization feature. This feature automatically optimizes the storage on your iOS and macOS devices, ensuring that you have ample space for your essential files and data.
Enabling iCloud Storage Optimization allows your device to store smaller, optimized versions of photos and videos locally, while keeping the full-resolution versions safely stored in iCloud. This helps free up a significant amount of storage on your device without compromising the quality of your media files.
To enable iCloud Storage Optimization on your iPhone or iPad:
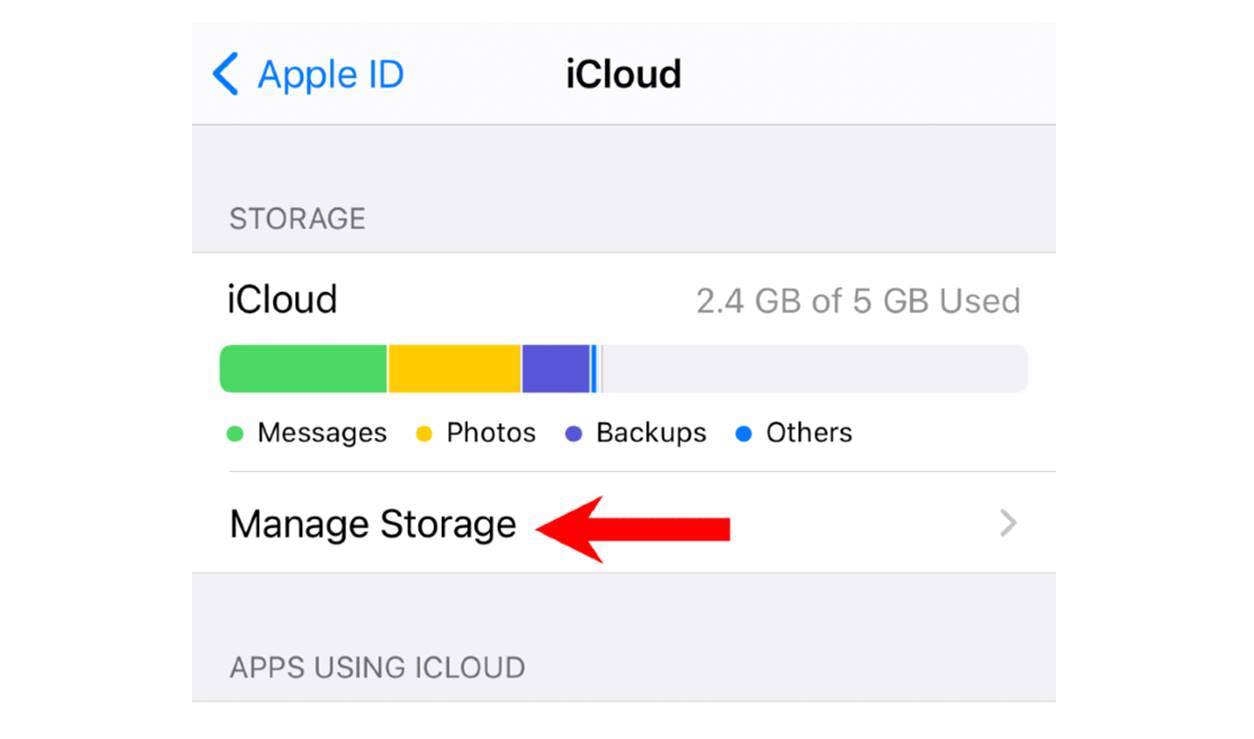
- Go to Settings, select your Apple ID, and tap on iCloud.
- Tap on Photos and toggle on the “Optimize iPhone Storage” option.
On your Mac, follow these steps:
- Select the Apple menu, go to System Preferences, and click on iCloud.
- Click on the “Options” button next to Photos.
- Check the box that says “Optimize Mac Storage.”
Once enabled, iCloud Storage Optimization will intelligently manage your device’s storage, automatically removing local copies of photos and videos as needed to free up space. The original files will remain securely stored in iCloud and can be accessed when needed.
It is important to note that iCloud Storage Optimization may take some time to optimize your media library, especially if you have a large amount of data stored. Be patient, as the process will progressively optimize your files based on your device’s available storage.
By utilizing iCloud Storage Optimization, you can effectively reduce your iCloud storage usage without losing access to your precious memories. Give it a try and enjoy more space on your device for important files and applications.
Delete Unnecessary Files and Data
Over time, our iCloud storage can become cluttered with unnecessary files and data, taking up valuable space. By regularly reviewing and deleting these files, you can effortlessly reduce your iCloud storage usage. Here are some effective ways to accomplish this:
- Delete unused apps: Identify apps that you no longer use and delete them from your iCloud storage. This will remove both the app itself and associated app data, freeing up space.
- Clean up backups: Assess your device backups and delete any old backups that are no longer needed. Often, we accumulate multiple backups of the same device, which consume a significant amount of iCloud storage.
- Manage photos: Review your photo library and delete any duplicate, blurry, or unwanted photos. Additionally, consider backing up your photos to a local storage device or external hard drive to free up even more space in iCloud.
- Clear out email: Regularly delete unnecessary emails, including spam and junk mail. You can also set up email filters to automatically clean up your inbox and reduce the overall size of your iCloud Mail storage.
- Remove unused documents: Go through your iCloud Drive and delete any documents or files that are no longer necessary. Ensure that you have local copies or backups of important files before removing them from iCloud Drive.
Remember to exercise caution when deleting files and data from your iCloud storage. Be certain that you have backups or local copies of any important files to avoid permanent loss.
By regularly clearing out unnecessary files and data from your iCloud storage, you can optimize its usage and make room for the files that truly matter. Implement these steps as part of your routine maintenance to ensure that your iCloud storage remains efficient and clutter-free.
Delete Old Backups
One of the most effective ways to free up iCloud storage space is by deleting old device backups. Over time, multiple backups of the same device can accumulate and consume a significant portion of your available storage. By managing and removing unnecessary backups, you can reclaim valuable space. Here’s how to do it:
- Identify and assess backups: Go to your iCloud settings and navigate to the “Manage Storage” section. Here, you will find a list of all the devices that have backups stored in iCloud. Take the time to review these backups and identify the ones that you no longer need.
- Delete old backups: Once you have identified the backups that you want to remove, select them and tap on the “Delete Backup” option. Confirm your decision when prompted.
- Keep the most recent backup: It’s crucial to retain the latest backup of your device to ensure you have a recent copy of your data. Make sure to keep the most recent backup while deleting the older ones.
Deleting old backups not only helps free up storage space in iCloud but also ensures that you have a clean slate for future backups. You can rely on this method to keep your iCloud storage organized and efficient.
Keep in mind that once you delete a backup, it cannot be recovered. Therefore, before deleting any backups, ensure that you have alternative backup options in place, such as local backups to a computer or external hard drive. This will provide an extra layer of protection and ensure that your data remains accessible even if you no longer have it stored on iCloud.
Regularly review and delete old backups to maintain an optimized iCloud storage experience. By managing your backups efficiently, you can make the most of your available space and ensure that your important data is backed up securely.
Remove Photos from iCloud
Photos and videos can quickly consume a significant amount of iCloud storage space. If you find yourself running out of storage, removing photos from iCloud can help free up space without losing your precious memories. Here are some methods to remove photos from iCloud:
- Disable iCloud Photo Library: If you have iCloud Photo Library enabled, your entire photo library is stored in iCloud. Disabling this feature will prevent your photos from syncing to iCloud, effectively removing them from your iCloud storage. However, be aware that this will only remove them from iCloud, not from your device.
- Delete individual photos or albums: If you want to remove specific photos or albums from iCloud, you can do so from your device. Open the Photos app, select the photos or albums you want to delete, and tap the trash bin icon. This will remove the selected items from your iCloud storage.
- Manage iCloud Photo Library settings: Another option is to configure your iCloud Photo Library settings to optimize your photo storage. You can choose to only keep smaller, lower-resolution versions of your photos on your device while storing the full-resolution versions in iCloud. This helps save space on your device without permanently deleting the photos.
- Use third-party photo storage solutions: Consider utilizing alternative photo storage services, such as Google Photos or Dropbox, to back up and store your photos. These services often offer free storage options and can help reduce your reliance on iCloud for photo storage.
Before removing any photos from iCloud, it’s crucial to back them up locally or using another cloud-based storage solution. This ensures that you have copies of your photos in a separate location and minimizes the risk of losing them permanently.
By selectively removing photos from iCloud, you can optimize your storage space and ensure that only the most important and meaningful photos are stored there. Remember to regularly review and manage your photo library to maintain an efficient iCloud storage experience.
Disable iCloud Photo Library
If you’re looking to free up space in your iCloud storage, disabling iCloud Photo Library can be an effective solution. By turning off this feature, you can prevent your photos and videos from syncing to iCloud, thereby reducing your storage usage. Here’s how to disable iCloud Photo Library:
- On iPhone or iPad:
- Open the Settings app on your device and tap on your name at the top.
- Select “iCloud” and then tap on “Photos”.
- Toggle off the “iCloud Photo Library” option.
- On Mac:
- Click on the Apple menu and select “System Preferences”.
- Choose “iCloud” and click on the “Options” button next to “Photos”.
- Deselect the “iCloud Photo Library” option and click “Done”.
Once you’ve disabled iCloud Photo Library, your photos and videos will no longer be automatically uploaded and stored in iCloud. Instead, they will only be stored on your device.
It’s important to note that disabling iCloud Photo Library will not delete any photos or videos that have already been uploaded to iCloud. However, any changes you make to your photo library, such as edits or deletions, will not sync across your devices.
If you decide to disable iCloud Photo Library, it’s recommended to back up your photos and videos before doing so. You can use other cloud-based storage solutions or transfer them to your computer to ensure they are safely stored elsewhere.
By disabling iCloud Photo Library, you can regain control over your iCloud storage usage and have more control over your photo library. Consider your storage needs and preferences before making this change, and remember to regularly manage and backup your photos to keep them organized and secure.
Turn off iCloud Drive
If you’re looking to reduce your iCloud storage usage, disabling iCloud Drive can be an effective strategy. iCloud Drive allows you to store files and documents in the cloud, but it can take up a significant amount of space. Disabling iCloud Drive will prevent new files from being stored in iCloud, freeing up storage for other important data. Here’s how to turn off iCloud Drive:
- On iPhone or iPad:
- Open the Settings app on your device and tap on your name at the top.
- Select “iCloud” and then tap on “iCloud Drive”.
- Toggle off the “iCloud Drive” option.
- Choose whether to keep a local copy of your iCloud Drive files or remove them from your device.
- On Mac:
- Click on the Apple menu and select “System Preferences”.
- Choose “Apple ID” and then click on “iCloud” in the sidebar.
- Deselect the “iCloud Drive” option.
- Choose whether to keep a local copy of your iCloud Drive files or remove them from your device.
Once you’ve turned off iCloud Drive, new files will be stored locally on your device rather than in iCloud. It’s important to note that this will not delete any existing files stored in iCloud Drive, but it will prevent any changes or additions from being synced across your devices.
Before turning off iCloud Drive, it’s crucial to have an alternative storage solution in place for your files. Consider utilizing external hard drives, computer storage, or other cloud-based services to ensure your important documents are safely backed up and accessible.
If you decide to turn off iCloud Drive, regularly review and delete files from your iCloud storage to ensure you have enough space available for other data. Additionally, consider uploading large files or less frequently used files to external storage solutions to further optimize your iCloud storage usage.
By disabling iCloud Drive, you can better manage your storage and allocate it to more essential data, helping to optimize your iCloud experience.
Delete and Restore Deleted Emails
If you’re experiencing storage constraints in your iCloud Mail, deleting unnecessary emails can help free up space. Additionally, iCloud Mail offers a safety net for accidentally deleted emails, allowing you to restore them within a limited timeframe. Here’s how to delete and restore deleted emails in iCloud Mail:
Delete Emails:
- Open the Mail app or visit iCloud Mail in your web browser.
- Select the emails you want to delete by clicking on the checkboxes next to them.
- Click on the trash bin icon or press the delete key on your keyboard to delete the selected emails.
- Deleted emails will be moved to the Trash folder.
- To permanently delete emails from the Trash folder, right-click on the folder and choose “Erase Deleted Items”.
Restore Deleted Emails:
- Go to the Mail app or iCloud Mail in your web browser.
- Open the Trash folder.
- Find the deleted email you want to restore.
- Click on the email and drag it back to the desired folder in your mailbox, such as the Inbox or a specific folder.
- The restored email will be moved back to its original location.
It’s important to note that deleted emails remain in the Trash folder for a certain period of time before being permanently deleted. The timeframe may vary, so it’s advisable to check your settings or consult the email provider for specific details.
Regularly deleting unwanted emails and emptying the Trash folder will help optimize your iCloud storage usage. It’s also a good practice to set up filters and rules to automatically delete or organize incoming emails to prevent unnecessary clutter.
Remember to be cautious when deleting emails, as permanently deleting them may lead to irretrievable loss. Consider backing up important emails locally or using email archiving solutions for added protection.
By efficiently managing and deleting emails in iCloud Mail, you can reclaim storage space and ensure that your mailbox remains organized and optimized for efficient usage.
Manage iCloud Mail Storage
If you’re running out of storage space in your iCloud account, managing your iCloud Mail storage can significantly alleviate this issue. By implementing a few simple strategies, you can optimize your email storage and ensure that you have enough space for important emails and attachments. Here are some tips to effectively manage your iCloud Mail storage:
- Regularly delete unwanted emails: Review your mailbox and delete any unnecessary or spam emails. Be mindful of large attachments, as they can consume a significant amount of storage space. Deleting these emails will free up space in your iCloud Mail storage.
- Empty the Trash folder: Deleted emails are moved to the Trash folder, where they continue to occupy storage space. Make it a habit to regularly empty the Trash folder to permanently delete these emails and reclaim the storage space they were using.
- Manage your Sent folder: Sent emails also contribute to your iCloud Mail storage usage. Consider deleting unnecessary emails from your Sent folder or create local backups for important conversations and attachments.
- Use email archiving: Instead of storing all your emails in iCloud, consider archiving old emails locally or using third-party email archiving solutions. Archiving allows you to preserve important emails while reducing the storage burden on your iCloud account.
- Utilize email filters and rules: Set up filters and rules to automatically organize or delete incoming emails based on specific criteria. This can help prevent your mailbox from being cluttered and reduce the amount of storage space consumed by unnecessary emails.
It’s important to note that managing your iCloud Mail storage involves finding a balance between maximizing storage efficiency and preserving important emails and attachments. Regularly review and evaluate your email storage needs to ensure that you optimize your available storage space.
If you find that your iCloud Mail storage is consistently reaching its limit, upgrading to a larger storage plan may be worth considering. This will provide you with more space for your emails, attachments, and other iCloud services.
By implementing these strategies and taking proactive measures to manage your iCloud Mail storage, you can keep your mailbox organized and ensure that you have sufficient storage space for your email needs.
Delete Unnecessary App Data
Deleting unnecessary app data is a crucial step in optimizing your iCloud storage usage. Many apps store data in iCloud, including documents, settings, and backups. By identifying and removing unnecessary app data, you can free up valuable storage space. Here’s how to delete unnecessary app data:
- Identify apps using the most storage: Go to your device’s Settings and navigate to “General” -> “iPhone/iPad Storage” or “Storage” -> “Manage Storage”. This will provide you with a list of apps sorted by the amount of storage they use in iCloud.
- Review app data: Select the app you want to manage and examine the app data stored in iCloud. This may include documents, backups, and cache.
- Delete app data: Within the app settings, look for options to delete specific files or data. For example, you can delete old documents or remove unnecessary backups.
- Turn off iCloud backup for certain apps: If an app is using significant storage for backups and you do not need them, you can disable iCloud backup for that specific app. Go to your device’s Settings and select “Apple ID” -> “iCloud” -> “Manage Storage” -> “Backups”. Choose the app and toggle off the backup option.
It’s crucial to exercise caution when deleting app data, as it may lead to the loss of important information or settings. Ensure that you have backups or alternative ways to restore data before deleting app-specific documents or disabling backups.
Regularly reviewing and deleting unnecessary app data will help optimize your iCloud storage and ensure that space is allocated efficiently. Additionally, consider exploring the settings of other apps to manage their individual iCloud storage usage.
Remember that apps differ in terms of storing data in iCloud, and not all apps have features to manage data directly. In such cases, you may need to contact the app developer for guidance on managing storage usage for their specific app.
By deleting unnecessary app data and optimizing storage settings, you can make the most of your available iCloud storage and ensure that it is utilized efficiently for the apps that matter most to you.
Disable iCloud Backups for Certain Apps
If you want to conserve storage space in your iCloud account, disabling iCloud backups for specific apps can be an effective method. While backups are crucial for preserving your data, not all apps require regular backups. By selecting which apps to exclude from iCloud backups, you can optimize your storage usage. Here’s how to disable iCloud backups for certain apps:
- On iPhone or iPad:
- Open the Settings app on your device and tap on your name at the top.
- Select “iCloud” and then “Backup”.
- Under the “Apps Using iCloud” section, toggle off the switch for the apps you want to exclude from backups.
- On Mac:
- Click on the Apple menu and select “System Preferences”.
- Choose “Apple ID” and then click on “iCloud” in the sidebar.
- Click on “Manage” next to “Backups”.
- Uncheck the box for the apps you want to exclude from backups.
By disabling iCloud backups for certain apps, you can save storage space in your iCloud account for more critical data while still ensuring other apps are backed up.
It’s important to note that when you disable iCloud backups for an app, its data will not be included in future backups, and you will not be able to restore that app’s data from iCloud. However, app data may still be stored locally on your device and backed up through other means, if applicable.
Consider the importance of each app’s data before disabling iCloud backups. For some apps, the data they generate may be easily recoverable or synchronized with the app’s servers. For others, losing the backup may result in permanent data loss.
If you disable iCloud backups for an app but later decide to re-enable it, simply follow the same steps and toggle the backup option back on.
Regularly reviewing and adjusting iCloud backup settings for your apps brings greater control over your storage usage. Through this, you can strike a balance between preserving essential data and optimizing your iCloud storage for other critical files.
Reduce iCloud Photo Library Size
If your iCloud storage is running low and photos are a significant contributor to the storage usage, reducing the size of your iCloud Photo Library can be a great way to free up space. By optimizing your photo storage, you can continue to capture and store memories while keeping your iCloud storage usage in check. Here are some methods to reduce the size of your iCloud Photo Library:
- Enable Optimize iPhone Storage: On your iPhone or iPad, go to Settings, tap on your Apple ID, then select iCloud > Photos and enable the “Optimize [Device] Storage” option. This setting allows your device to store smaller, optimized versions of photos while keeping the full-resolution versions in iCloud, saving valuable space on your device.
- Use “Recently Deleted” Album: When you delete a photo from your device, it is moved to the “Recently Deleted” album, where it remains for 30 days before being permanently deleted. To free up space sooner, go to the album and manually delete photos you no longer need.
- Remove Unwanted Photos: Review your iCloud Photo Library and delete any duplicate, blurry, or unwanted photos. This will not only reduce the storage size but also help keep your photo library organized.
- Transfer Photos to Local Storage: Consider transferring older or less frequently accessed photos to a local storage solution, such as an external hard drive or computer. This way, you can remove them from iCloud Photo Library while still having access to them when needed.
It’s essential to note that when you optimize your photo storage or delete photos from iCloud Photo Library, the changes will be reflected across all devices connected to the same iCloud account.
Before deleting any photos or making changes to your iCloud Photo Library, ensure you have backups of your important images. This way, you won’t risk losing cherished memories inadvertently.
By incorporating these methods and consistently managing your iCloud Photo Library, you can strike a balance between storing your photos and optimizing your iCloud storage usage. Enjoy capturing moments without worrying about storage limitations!
Delete iCloud Documents and Data
Deleting unnecessary documents and data from iCloud is an effective way to free up storage space and optimize your iCloud usage. Over time, documents from various apps can accumulate and contribute to the overall storage consumption. Deleting these files will not only help reclaim space but also ensure that your iCloud storage is efficiently utilized. Here are the steps to delete iCloud documents and data:
- Identify the app and its associated data: Review the list of apps using iCloud storage on your device. Identify the apps that have the largest storage footprint and are no longer relevant or necessary.
- Delete documents and data: Open the app and navigate to its settings. Look for options to manage or delete documents and data stored in iCloud. This may involve individually selecting and deleting specific files or using a bulk delete feature, if available.
- Repeat for other apps: Go through the list of apps using iCloud storage and repeat the process for each app you no longer need or want to clear data from.
It’s important to exercise caution when deleting documents and data from iCloud. Ensure that you have backups or alternative storage methods in place for any important files before removing them from iCloud.
Regularly reviewing and deleting unnecessary documents and data from iCloud will help keep your storage usage optimized, allowing you to make the most of your available iCloud storage.
Remember that deleting documents and data from iCloud may affect the availability of those files on other devices connected to the same iCloud account. Therefore, it’s crucial to assess the impact of deleting each file and consider whether it’s necessary to keep the data accessible across multiple devices.
By managing your iCloud documents and data diligently, you can maintain a clutter-free iCloud storage and ensure that your important files and data are organized and accessible when you need them.
Clear Cache and Temporary Files
Clearing cache and temporary files is a simple yet effective way to optimize your iCloud storage. These files are generated by various apps and services to enhance performance and provide a smoother user experience. However, over time, cache and temporary files can accumulate and consume a significant amount of storage space. Clearing them can free up valuable storage and help improve the overall performance of your device. Here’s how to clear cache and temporary files:
- Safari Browser: Open the Settings app on your device and scroll down until you find “Safari”. Tap on it and select “Clear History and Website Data”. This will remove website data, cookies, and cache stored by Safari.
- Other Apps: Many apps, such as social media apps and messaging platforms, store cache and temporary files. To clear them, open the app’s settings and look for options related to cache or storage. Some apps may have a dedicated cache-clearing feature, while others may require uninstalling and reinstalling the app.
- Third-party Cleaning Apps: Alternatively, you can use third-party cleaning apps available on the App Store. These apps can identify and clear cache and temporary files across multiple apps, making the process more convenient.
Clearing cache and temporary files does not delete essential data or documents but rather removes temporary files that can be recreated if needed. It’s safe to clear cache and temporary files, and doing so will not affect the functionality of your apps or compromise your data.
Regularly clearing cache and temporary files can help keep your device running smoothly and ensure that storage space is efficiently utilized. It’s a good habit to incorporate into your routine maintenance to maintain optimal performance and maximize available iCloud storage.
Keep in mind that cache and temporary files may accumulate again over time as you use your device and apps. Therefore, it’s beneficial to periodically clear cache and temporary files to maintain an optimal storage environment.
By regularly clearing cache and temporary files, you can optimize your iCloud storage and enjoy better performance on your device, ensuring that you have ample space for your important files and data.
Remove Unused Devices from iCloud
Removing unused devices from your iCloud account is a smart way to maintain an organized and efficient iCloud storage. When you connect a device to iCloud, it syncs data and settings across all your devices. However, if you no longer use certain devices, they can take up unnecessary space and increase your iCloud usage. By removing these unused devices, you can free up storage and streamline your iCloud experience. Here’s how to remove unused devices from iCloud:
- On iPhone or iPad:
- Go to Settings and tap on your name at the top of the screen.
- Select “iCloud” and then tap on “Manage Storage”.
- Under the “Backups” section, tap on the device that you want to remove from iCloud.
- Tap “Delete Backup” and confirm the action when prompted.
- On Mac:
- Click on the Apple menu and select “System Preferences”.
- Choose “Apple ID” and then click on “iCloud” in the sidebar.
- Click on “Manage” next to “Backups”.
- Select the device that you want to remove from iCloud and click “Delete”.
Removing an unused device from iCloud will delete its associated backup, thereby freeing up storage space. However, it’s important to note that this action cannot be undone, and you will no longer have access to the backup for that device.
If you plan to sell or give away an unused device, it’s advisable to sign out of iCloud before removing it. Signing out ensures that your personal data is securely removed from the device and prevents unauthorized access to your iCloud account.
By regularly removing unused devices from iCloud, you can optimize your storage usage and ensure that your iCloud account remains efficient and clutter-free. This, in turn, provides you with more available space for data and files across your active devices.
Remember to review your list of connected devices periodically to ensure that only active and relevant devices have access to your iCloud account.
By managing your connected devices efficiently, you can maintain a streamlined and organized iCloud storage, maximizing the available space and ensuring that it is allocated to the devices you actively use.
Delete Unnecessary Bookmarks and History
If you’re looking to free up storage in your iCloud account and maintain a clutter-free browsing experience, deleting unnecessary bookmarks and history is essential. Bookmarks and browsing history can accumulate over time, taking up valuable storage space. By removing unnecessary bookmarks and clearing your browsing history, you can optimize your iCloud storage and improve browsing performance. Here’s how to delete unnecessary bookmarks and history:
- Clearing Browsing History:
- Safari Browser on iPhone or iPad: Open the Settings app, scroll down and tap on “Safari”. Then, click on “Clear History and Website Data” to remove your browsing history.
- Safari Browser on Mac: In the Safari menu, click on “Clear History” and choose the desired time range for clearing your browsing history.
- Removing Bookmarks:
- Safari Browser on iPhone or iPad: Open the Safari app, tap on the bookmarks icon (icon with an open book), and select “Edit”. From there, you can delete individual bookmarks or entire bookmark folders.
- Safari Browser on Mac: In the Safari menu, click on “Bookmarks” and choose “Edit Bookmarks”. From there, you can delete individual bookmarks or entire bookmark folders.
Deleting bookmarks and clearing browsing history is a simple yet effective way to optimize your iCloud storage usage. Removing unnecessary bookmarks not only provides more available storage space but also keeps your bookmarks organized and relevant.
Regularly reviewing and managing your bookmarks and browsing history is a good practice to maintain a clutter-free browsing experience. Consider deleting old or unused bookmarks and clearing your browsing history periodically to keep your iCloud storage optimized.
It’s worth noting that removing bookmarks and clearing browsing history from iCloud does not affect these data on localized devices. Each device’s bookmarks and browsing history remain independent unless you choose to sync them across devices.
By taking the time to delete unnecessary bookmarks and clear browsing history, you can optimize your iCloud storage, improve browsing performance, and ensure a clean and organized browsing experience.
Disable iCloud Keychain
If you’re looking to manage your iCloud storage and privacy settings, disabling iCloud Keychain can help optimize your storage usage and provide you with more control over your sensitive information. iCloud Keychain is a convenient feature that securely stores your passwords, credit card information, and other confidential data. However, if you no longer require its services, disabling iCloud Keychain can free up space and streamline your iCloud experience. Here’s how to disable iCloud Keychain:
- On iPhone or iPad:
- Go to Settings and tap on your Apple ID at the top of the screen.
- Select “iCloud” and then tap on “Keychain”.
- Toggle off the switch for “Keychain”.
- On Mac:
- Click on the Apple menu and select “System Preferences”.
- Choose “Apple ID” and then click on “iCloud” in the sidebar.
- Click on “Options” next to “Keychain” and deselect the “Keychain” option.
When you disable iCloud Keychain, the stored passwords and other sensitive information will no longer be synced across your devices via iCloud. This action can help reduce the storage used by iCloud Keychain, especially if you have a large number of passwords or credit card entries.
Before you disable iCloud Keychain, make sure to have alternative password management strategies in place. Consider using a reputable password manager app or system to ensure the security and accessibility of your passwords.
It’s important to note that disabling iCloud Keychain only removes the synchronization of keychain data. Existing keychain data will remain on your devices, allowing you to access it locally. If you want to delete all the keychain data, you can do so manually within the settings of each device.
By disabling iCloud Keychain, you can optimize your iCloud storage, enhance your privacy control, and choose alternative password management methods that better suit your needs.
Delete Old Messages and Attachments
If you’re looking to free up storage space in your iCloud account, deleting old messages and attachments is a practical solution. Messages and their associated attachments, such as photos, videos, and documents, can quickly accumulate and consume a significant amount of storage. By regularly reviewing and deleting old messages and attachments, you can optimize your iCloud storage and ensure that space is available for more critical data. Here’s how to delete old messages and attachments:
- Delete Messages on iPhone or iPad:
- Open the Messages app on your device and navigate to the conversation that contains the messages you want to delete.
- Long-press on a message bubble, then tap “More” to select multiple messages.
- Tap the trash bin icon to delete the selected messages.
- Delete Messages on Mac:
- Open the Messages app on your Mac and select the conversation containing the messages you want to delete.
- Highlight the messages you wish to remove, then right-click and choose “Delete” or press the delete key on your keyboard.
- Delete Attachments:
- Attachments include photos, videos, voice recordings, and documents received or sent through messages.
- Within the Messages app, navigate to the conversation that contains the attachments you want to delete.
- Tap on the “i” icon or the contact’s name at the top of the conversation, then scroll down to find the “Attachments” section.
- Select and delete the attachments you no longer need.
It’s crucial to note that deleting messages and attachments permanently removes them from your iCloud storage and devices. Ensure you have made any necessary backups or saved important attachments before deleting them.
Regularly reviewing and clearing out old messages and attachments helps keep your iCloud storage organized and optimized. By deleting outdated or unnecessary content, you create more space for important data and ensure a smoother messaging experience.
Consider adjusting your device settings to automatically remove messages and attachments after a certain period, which can prevent storage accumulation in the future.
By managing your messages and attachments effectively, you can maximize your iCloud storage and ensure that it is allocated to the data that matters most to you.
Review and Delete Large Attachments in Messages
If you’re looking to reclaim storage space in your iCloud account, reviewing and deleting large attachments in Messages is a practical approach. Messages often contain photos, videos, and other files that can take up a significant amount of storage. By identifying and removing large attachments, you can optimize your iCloud storage and make room for more important data. Here’s how to review and delete large attachments in Messages:
- On iPhone or iPad:
- Open the Messages app and navigate to the conversation that you want to review.
- Tap on the person’s name at the top of the conversation, then scroll down to find the “Info” button.
- Tap on “Info” and then select “See All Photos” or “See All Attachments”. This will display all the photos and attachments exchanged in that conversation.
- Review the list of attachments and identify the ones consuming significant storage.
- To delete an individual attachment, tap on it and select “Delete”.
- If you want to remove multiple attachments, tap on “Select” at the top right, choose the attachments, and tap on the trash bin icon to delete them.
- On Mac:
- Open the Messages app on your Mac and select the conversation with the attachments you want to review.
- Click on the person’s name or group name at the top of the conversation, then select “Details”.
- Click on the “Attachments” tab to view all the attachments shared in that conversation.
- Similar to the iPhone or iPad, you can choose individual attachments and press the delete key or use the right-click menu to delete them.
Reviewing and deleting large attachments in Messages helps optimize your iCloud storage and declutter your conversations. This is particularly helpful if you frequently exchange media files or if you have conversations with substantial data usage.
It’s important to note that deleting attachments in Messages permanently removes them from both your device and iCloud. Make sure to back up any important attachments before deleting them.
By regularly reviewing and clearing out large attachments, you can create more space in your iCloud storage for essential data and ensure optimal performance of your device.
Consider enabling the “Auto-Delete” feature in Messages settings to automatically remove attachments after a certain period, preventing them from accumulating and taking up unnecessary storage.
By efficiently managing your attachments in Messages, you can make the most of your iCloud storage and ensure that it is used for the messages and content that matter most to you.
Manage iCloud Storage for Family Sharing
When it comes to iCloud storage, managing it for Family Sharing can be beneficial to ensure that each family member has sufficient storage for their needs. With Family Sharing, you can share a single iCloud storage plan among multiple family members, allowing for more efficient utilization of the available storage. Here’s how to manage iCloud storage for Family Sharing:
- Select a storage plan:
- One family member, preferably the organizer, should choose an appropriate iCloud storage plan that caters to the collective needs of the family.
- Go to Settings, tap on your name at the top, select “Family Sharing”, and then click on “Set Up Your Family” to set up Family Sharing if you haven’t already.
- Under “Sharing Your Plan”, select “Share Your Existing iCloud Storage” to share your existing storage plan.
- Invite family members:
- As the organizer, you can invite family members to join your Family Sharing group and access the shared iCloud storage.
- Send invitations through the Family Sharing settings or by going to Settings, tapping on your name, selecting “Family Sharing”, and then clicking on “Add Family Member”.
- Once invited, family members should accept the invitation and follow the prompts to join Family Sharing and access the shared iCloud storage.
- Assign storage to family members:
- As the organizer, you can assign storage to each family member based on their individual needs and usage.
- Go to Settings, tap on your name, select “Family Sharing”, and then click on “iCloud Storage” to manage the shared storage for your family members.
- Allocate storage to each family member by adjusting the storage distribution as needed.
- Monitor and adjust storage allocation:
- Regularly review the storage usage of each family member by visiting the iCloud Storage settings.
- If necessary, make adjustments to storage allocation to ensure that everyone has sufficient storage for their needs.
By managing iCloud storage for Family Sharing, you can effectively allocate storage among family members, prevent unnecessary duplication, and ensure that everyone has access to enough storage to meet their requirements.
Keep in mind that the shared iCloud storage plan covers various aspects, including device backups, photos, iCloud Drive, and more. Collaborate with your family members to determine the most efficient way to utilize and distribute the shared storage for everyone’s benefit.
Remember that as the organizer, you are responsible for managing the shared iCloud storage plan. Regularly monitor usage, communicate with family members, and make adjustments to ensure that the storage remains adequately allocated.
By efficiently managing iCloud storage for Family Sharing, you can promote collaboration, reduce storage costs, and optimize the collective use of iCloud storage among your family members.