
How to Access the Safari App on iPhone 11
The Safari app on your iPhone 11 is a gateway to a world of information, entertainment, and connectivity. Accessing the Safari app is a simple yet essential step to harnessing the power of the internet on your device. Whether you're looking to browse the web, conduct research, or simply stay updated with the latest news, accessing the Safari app is the first step towards unlocking a wealth of digital resources.
To access the Safari app on your iPhone 11, follow these straightforward steps:
-
Locate the Safari Icon: The Safari app icon is easily recognizable, featuring a compass-like design with blue and white hues. It is typically located on the home screen of your iPhone 11. If you don't see it on the home screen, you can swipe down on the home screen and use the search bar to type "Safari" to locate the app.
-
Tap the Safari Icon: Once you've located the Safari app icon, simply tap on it to launch the app. Upon tapping the icon, the Safari app will open, presenting you with a clean and intuitive interface ready to facilitate your web browsing experience.
-
Explore the Features: Upon accessing the Safari app, take a moment to familiarize yourself with its features. You'll find the address bar at the top, where you can enter web addresses or conduct searches. Below the address bar, you'll find buttons to navigate between web pages, access bookmarks, and open new tabs for multitasking.
-
Enjoy Seamless Browsing: With the Safari app now accessible on your iPhone 11, you can seamlessly browse the internet, access your favorite websites, and discover new content with ease.
By following these simple steps, you can effortlessly access the Safari app on your iPhone 11, empowering yourself with the ability to explore the vast expanse of the digital realm at your fingertips.
Steps to Clear Search History on Safari
Clearing your search history on Safari is a fundamental aspect of managing your privacy and maintaining a clutter-free browsing experience on your iPhone 11. Whether you're looking to remove traces of your online activity for security reasons or simply seeking to declutter your browsing history, the process of clearing search history on Safari is straightforward and can be accomplished in just a few simple steps.
-
Open Safari App: Begin by launching the Safari app on your iPhone 11. The Safari app icon, featuring a distinctive compass-like design, can typically be found on your device's home screen. Tap on the Safari icon to open the app and access its features.
-
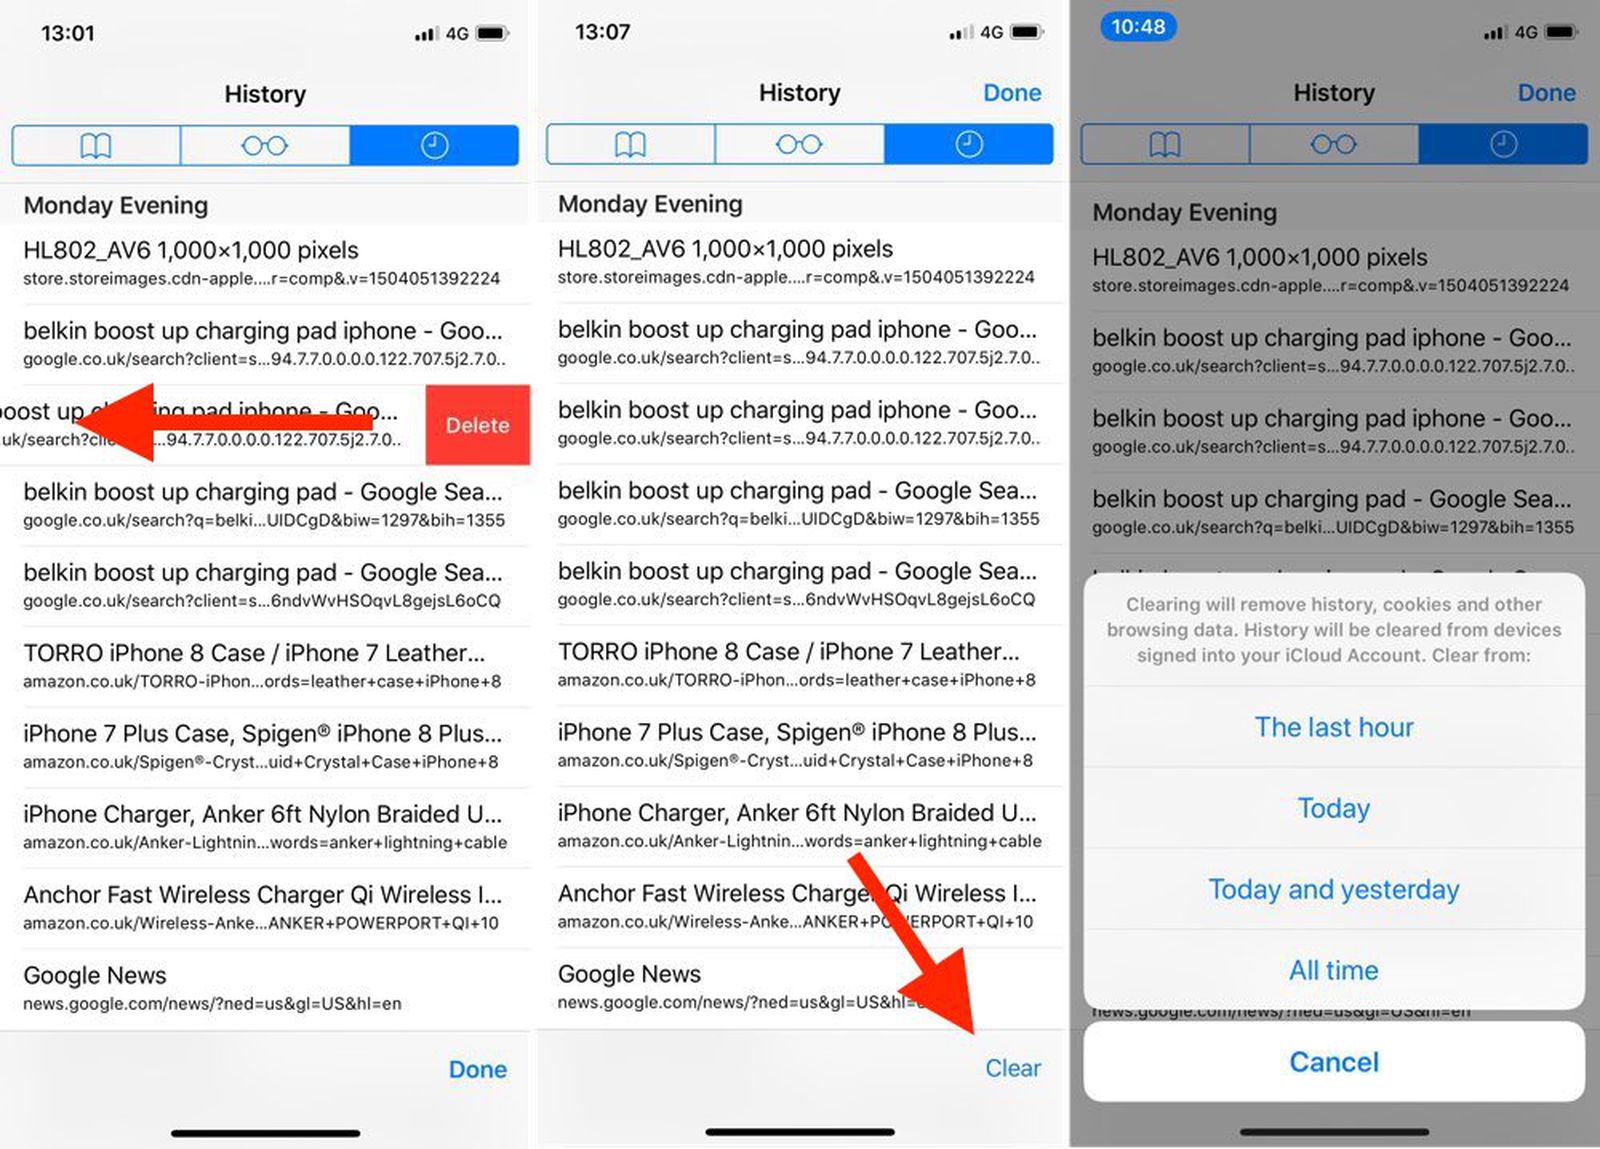
Access History: Once the Safari app is open, tap on the book icon located at the bottom of the screen. This will open a new window, presenting you with various options, including bookmarks, reading lists, and history. Tap on the clock icon labeled "History" to proceed to the next step.
-
Clear History: Upon accessing your browsing history, tap on the "Clear" button located at the bottom right corner of the screen. A prompt will appear, offering you the option to clear your browsing history from a specific time range, such as the last hour, today, today and yesterday, or all time. Select the desired time range or "All Time" to clear your entire browsing history.
-
Confirm Clearing: After selecting the time range, a confirmation prompt will appear, asking if you're sure you want to clear your history. Tap "Clear History" to confirm and initiate the clearing process.
-
Verification: To ensure that your search history has been successfully cleared, you can revisit the history section to verify that no previous searches or browsing activities are listed. This step provides reassurance that your browsing history has been effectively cleared from the Safari app on your iPhone 11.
By following these steps, you can efficiently clear your search history on Safari, empowering yourself with the ability to manage your privacy and maintain a clutter-free browsing experience on your iPhone 11. This simple yet essential process allows you to take control of your digital footprint and enjoy a more streamlined and private web browsing experience.
Using Private Browsing Mode on Safari
Private Browsing mode, also known as "Incognito" mode in some browsers, offers a valuable layer of privacy and discretion when engaging in online activities. When activated, this mode allows you to browse the web without the browser storing your search history, cookies, or other browsing data. On the Safari browser of your iPhone 11, accessing Private Browsing mode is a straightforward process that empowers you to explore the internet with enhanced privacy and anonymity.
To initiate Private Browsing mode on Safari, follow these simple steps:
-
Open Safari App: Begin by launching the Safari app on your iPhone 11. The Safari app icon, featuring a distinctive compass-like design, can typically be found on your device's home screen. Tap on the Safari icon to open the app and access its features.
-
Activate Private Browsing: With the Safari app open, tap on the tab icon located at the bottom-right corner of the screen. This will reveal your open tabs and the option to create a new tab. To initiate Private Browsing mode, tap on "Private" located at the bottom-left corner of the screen. This action will prompt Safari to switch to Private Browsing mode, indicated by the dark interface and a message confirming that you are now browsing privately.
-
Explore Privately: Once Private Browsing mode is activated, you can proceed to browse the web with the assurance that your browsing history, cookies, and other browsing data will not be stored on your device. This mode is particularly useful when you wish to conduct research, access sensitive information, or simply explore the web without leaving a trail of your online activities.
-
End Private Browsing: To exit Private Browsing mode, simply tap on the tab icon again and select "Private" to switch back to regular browsing mode. This seamless transition allows you to effortlessly switch between private and regular browsing modes based on your specific browsing needs.
By utilizing Private Browsing mode on Safari, you can enjoy a heightened level of privacy and discretion while engaging in online activities on your iPhone 11. This feature empowers you to explore the web with peace of mind, knowing that your browsing history and related data are not being stored on your device. Whether you're conducting confidential research, accessing sensitive information, or simply seeking a more private browsing experience, Private Browsing mode on Safari offers a valuable tool for managing your digital footprint and safeguarding your online privacy.
Managing Search History through Settings App
Managing your search history through the Settings app on your iPhone 11 provides a comprehensive approach to maintaining privacy and controlling your digital footprint. By accessing the Settings app, you can delve into the intricate details of your device's browsing data, including search history, cookies, and website data. This level of control empowers you to customize your privacy settings and manage your online activities with precision and confidence.
To manage your search history through the Settings app, follow these steps:
-
Open Settings: Begin by locating the Settings app on your iPhone 11. The Settings app icon, featuring a gear-like design, is typically found on the home screen. Tap on the Settings icon to open the app and access its array of customizable options.
-
Navigate to Safari Settings: Within the Settings app, scroll down and locate the section labeled "Safari." Tap on "Safari" to access a range of settings and preferences specifically tailored to the Safari browser on your iPhone 11.
-
Access Privacy & Security Settings: Within the Safari settings, you'll find various options related to privacy, security, and browsing data. Tap on "Privacy & Security" to delve into the specific settings that govern your search history and browsing data.
-
Manage Search History: Under the "Privacy & Security" settings, you'll find the option to manage your search history. Tap on "Clear History and Website Data" to initiate the process of clearing your browsing history, cookies, and other website data stored on your device.
-
Confirm Clearing: Upon tapping "Clear History and Website Data," a confirmation prompt will appear, asking if you're sure you want to clear your browsing history and website data. Confirm the action to proceed with clearing your search history and related browsing data.
-
Verification: After clearing your search history and website data, you can revisit the Safari settings to verify that your browsing history has been effectively cleared. This step provides reassurance that your privacy settings have been updated and your browsing data has been managed according to your preferences.
By managing your search history through the Settings app on your iPhone 11, you gain a deeper understanding of your digital footprint and exercise precise control over your privacy settings. This proactive approach empowers you to maintain a clean and secure browsing environment, ensuring that your online activities are managed in alignment with your privacy preferences.