
Prerequisites
Before you begin the process of viewing Ledger Nano accounts, there are a few prerequisites you should fulfill. These requirements ensure that you have all the necessary tools and information to successfully access and manage your crypto assets. Here are the key prerequisites:
1. Ledger Nano Device: You need to own a Ledger Nano hardware wallet. This device acts as the secure vault for your cryptocurrencies and allows you to view and manage your accounts. If you don’t have one yet, you can purchase it from the official Ledger website or authorized resellers.
2. Computer or Mobile Device: You will need a computer or a mobile device to connect and interact with your Ledger Nano. The Ledger Live application, which is used for managing your accounts, is available for Windows, Mac, Linux, iOS, and Android platforms.
3. Ledger Live Software: Ledger Live is the official software provided by Ledger. It serves as the interface between your Ledger Nano and the computer or mobile device you are using. To view your Ledger Nano accounts, you need to install and set up Ledger Live on your chosen device.
4. Internet Connection: Ensure that you have a stable internet connection for connecting your Ledger Nano to the Ledger Live application. This is necessary to synchronize and update your accounts with the blockchain network.
5. Knowledge of PIN and Recovery Phrase: It is essential to have your PIN and recovery phrase ready. These are the security features of your Ledger Nano and are required during the setup process. Make sure to keep them safe and confidential.
By meeting these prerequisites, you will be well-prepared to view your Ledger Nano accounts and actively manage your crypto assets in a secure and efficient manner.
Connect Your Ledger Nano Device
Before you can view your Ledger Nano accounts, you need to connect your Ledger Nano device to your computer or mobile device. Follow these steps to establish the connection:
- Connect the USB Cable: Take the USB cable that came with your Ledger Nano device and plug it into the USB port of your computer or use the appropriate adapter for your mobile device. Ensure that the cable is securely connected on both ends.
- Power On Your Ledger Nano: Press the power button on your Ledger Nano device to turn it on. You will see the Ledger logo and a message prompting you to select the PIN code.
- Enter Your PIN Code: Use the buttons on your Ledger Nano device to enter your PIN code. The PIN code is a security feature that protects access to your device and accounts. Make sure to enter it correctly.
- Unlock Your Ledger Nano: Once you have entered the correct PIN code, your Ledger Nano device will be unlocked and ready for use.
- Open Ledger Live: On your computer or mobile device, open the Ledger Live application. If you haven’t installed it yet, make sure to download and install the latest version from the official Ledger website.
- Select Your Ledger Nano: In the Ledger Live application, you will be prompted to select your Ledger Nano device. Click on the appropriate option to ensure that the application recognizes your device.
Once you have successfully connected your Ledger Nano device to your computer or mobile device, you are ready to proceed with viewing your Ledger Nano accounts. The connection ensures that the Ledger Live application can communicate with your device and access the information stored on it securely.
Install Ledger Live
In order to view your Ledger Nano accounts, you need to install the Ledger Live application on your computer or mobile device. Ledger Live is the official software provided by Ledger, and it serves as the interface for managing your accounts. Follow these steps to install Ledger Live:
- Visit the Ledger Website: Open your web browser and go to the official Ledger website. You can find it at www.ledger.com.
- Navigate to the Ledger Live Page: Once you are on the Ledger website, navigate to the “Products” or “Apps” section and find the Ledger Live application. Click on it to access the Ledger Live download page.
- Select Your Device: On the Ledger Live download page, you will see options for different operating systems. Choose the appropriate option based on your computer or mobile device’s operating system (Windows, Mac, Linux, iOS, or Android).
- Download Ledger Live: Click on the download link provided for your operating system. The Ledger Live installation package will start downloading to your device.
- Run the Installation Package: Once the download is complete, locate the Ledger Live installation package on your device. Double-click on it to run the installer. Follow the on-screen prompts to install Ledger Live.
- Launch Ledger Live: After the installation is complete, you can launch Ledger Live from your computer’s applications or your mobile device’s app drawer.
Now that you have successfully installed Ledger Live, you are one step closer to viewing and managing your Ledger Nano accounts. The Ledger Live application provides a user-friendly interface that allows you to easily navigate and access your crypto assets.
Open Ledger Live
Now that you have installed the Ledger Live application on your computer or mobile device, it’s time to open it and get ready to view your Ledger Nano accounts. Follow these steps to open Ledger Live:
- Locate the Ledger Live Application Icon: On your computer, look for the Ledger Live icon either on your desktop or in your applications folder. If you are using a mobile device, you can find the Ledger Live app icon on your home screen or in your app drawer.
- Launch Ledger Live: Double-click on the Ledger Live icon on your computer or tap on it on your mobile device to launch the application.
- Allow Necessary Permissions: Depending on your device’s operating system, you may be prompted to allow certain permissions for the Ledger Live application, such as accessing your camera or storage. Grant the necessary permissions to ensure smooth operation of the application.
- Sign In to Ledger Live: If this is your first time opening Ledger Live, you will be prompted to sign in or create a new account. Follow the on-screen instructions to complete the sign-in process, providing any required information such as your email address and password.
- Unlock Your Ledger Nano: To establish a connection between Ledger Live and your Ledger Nano device, you will need to unlock your device by entering your PIN code on the Ledger Nano itself. Follow the instructions on the Ledger Live interface to initiate the device unlocking process.
- Connected and Ready: Once Ledger Live recognizes and connects to your Ledger Nano device, you will see a confirmation message on the screen. At this point, Ledger Live is open and ready for you to view and manage your Ledger Nano accounts.
Congratulations! You have successfully opened Ledger Live and established a connection to your Ledger Nano device. You can now explore the various features and options within Ledger Live to access and manage your crypto assets with ease.
Add an Account
Once you have opened Ledger Live and established a connection with your Ledger Nano device, the next step is to add an account. Adding an account allows you to view and manage specific crypto assets associated with that account. Here’s how you can add an account:
- Open the Accounts Tab: In the Ledger Live interface, navigate to the “Accounts” tab. This tab will display a list of your existing accounts as well as provide options for adding new accounts.
- Click the “Add Account” Button: To add a new account, click on the “Add Account” button on the Accounts page. This will initiate the process of adding a new account to Ledger Live.
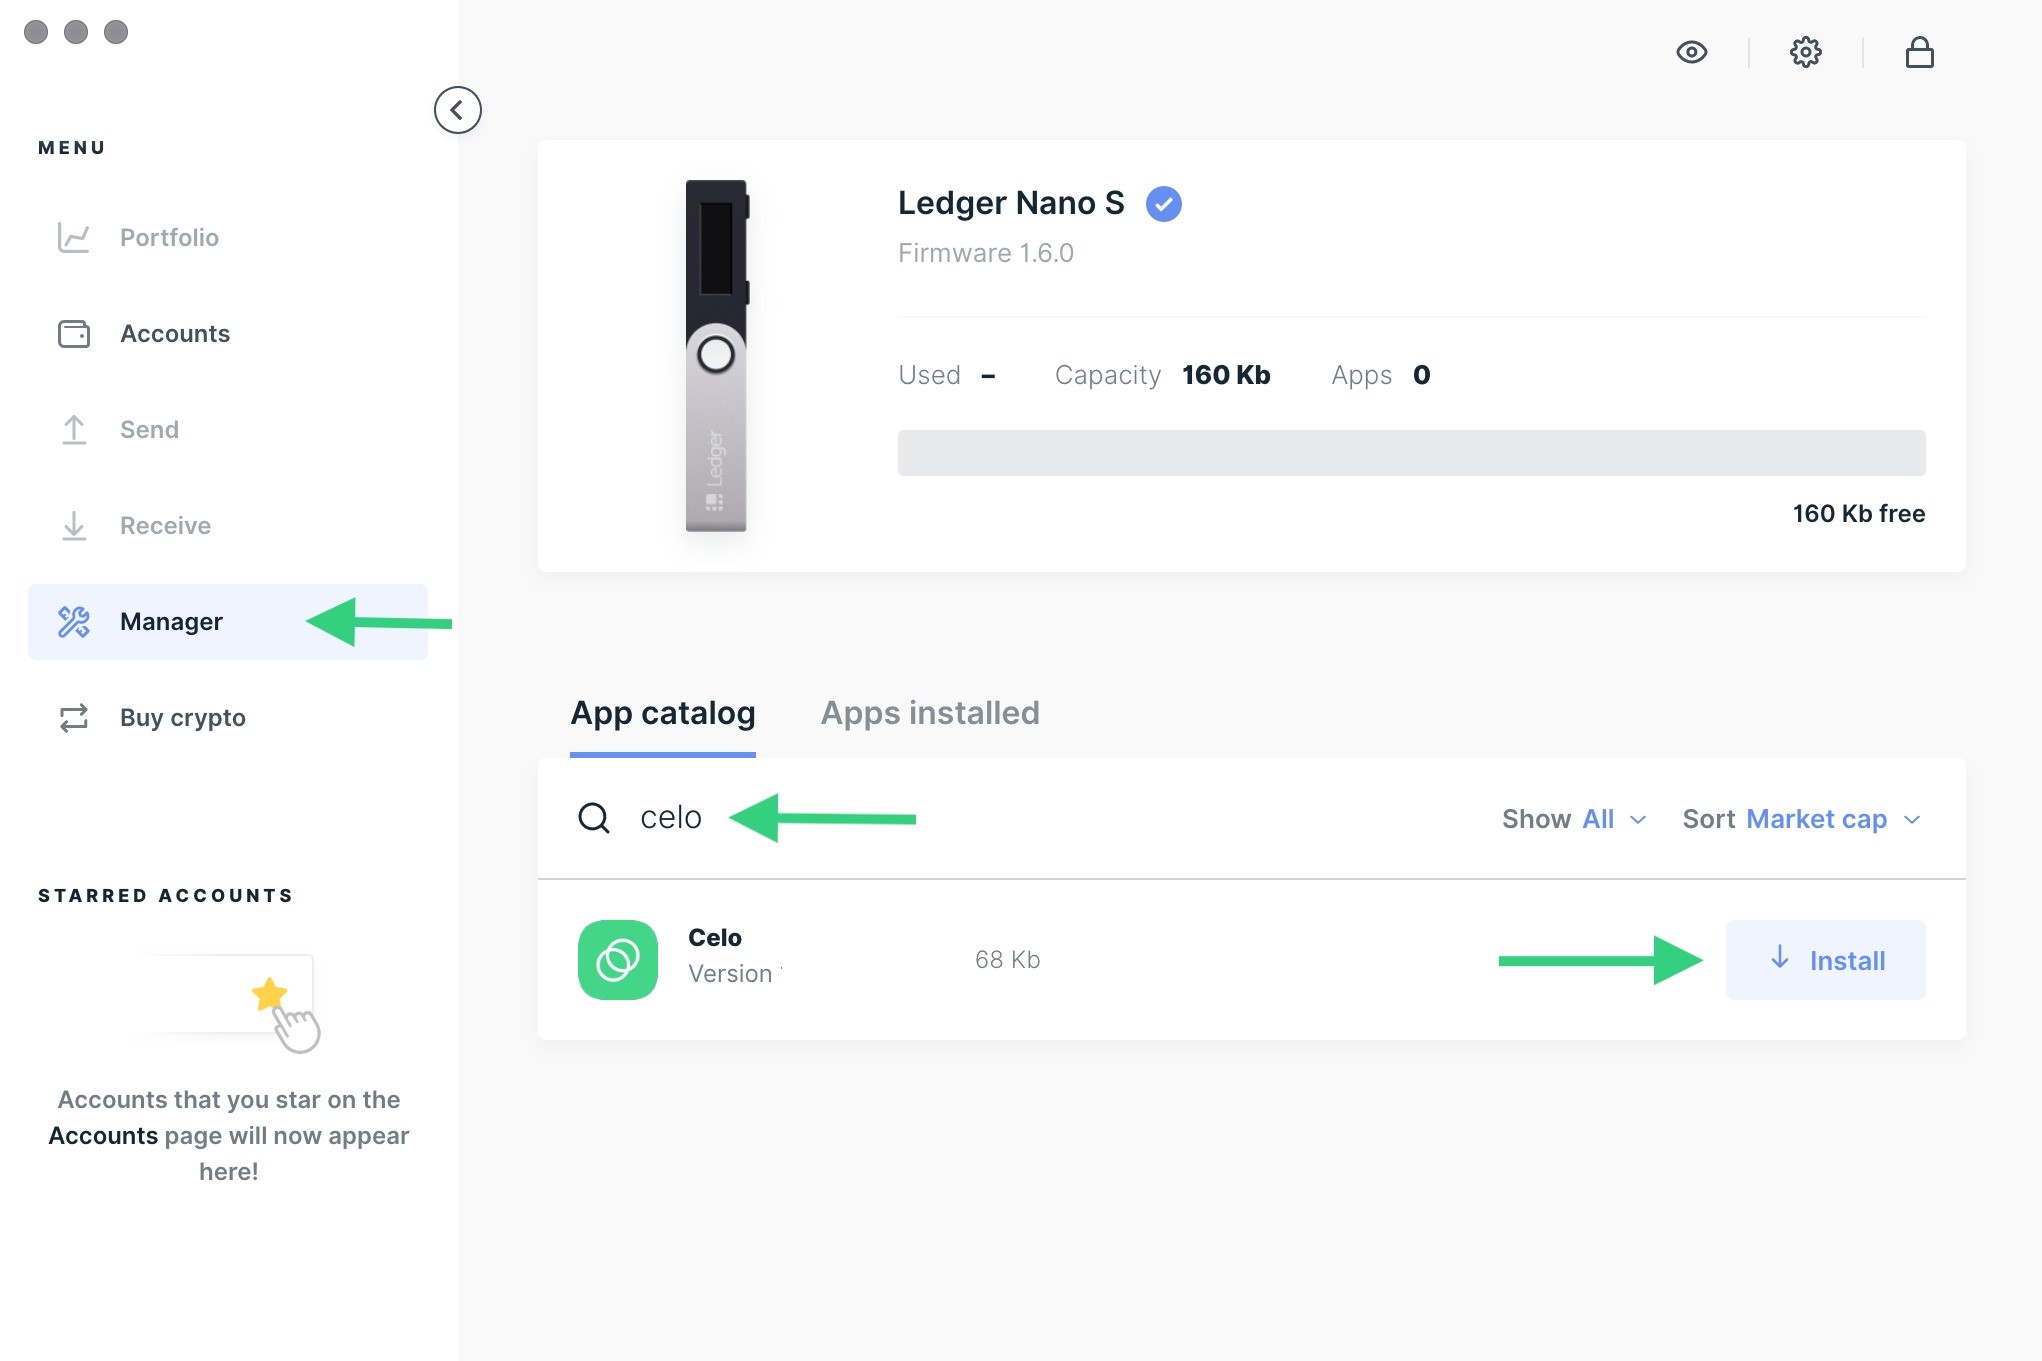
- Select the Crypto Asset: A list of supported cryptocurrencies will appear on the screen. Choose the specific crypto asset that you want to add an account for. Ledger Live supports a wide range of cryptocurrencies, so you should be able to find the one you are interested in.
- Follow the On-Screen Instructions: Ledger Live will guide you through the process of adding the selected crypto asset account. Depending on the cryptocurrency, you may need to perform certain actions on your Ledger Nano device, such as confirming the account creation or verifying the account details.
- Account Added: Once you have completed the necessary steps and followed the instructions, the new account will be added to your Ledger Live interface. You will now be able to view the balance, transaction history, and manage the specific crypto asset associated with that account.
Repeat these steps for each additional account you wish to add to Ledger Live. By adding accounts for different crypto assets, you can conveniently monitor and manage all your cryptocurrency holdings in one centralized location.
Choose a Crypto Asset
After adding your Ledger Nano accounts to Ledger Live, you can now choose a specific crypto asset to view and manage. Ledger Live supports a wide variety of cryptocurrencies, allowing you to streamline your crypto asset management within a single interface. Follow these steps to select a crypto asset:
- Open the Accounts Tab: In the Ledger Live interface, navigate to the “Accounts” tab. This tab displays a list of your added accounts and their associated crypto assets.
- Review Available Accounts: Take a moment to review the list of accounts and their respective crypto assets. Each account will be labeled with the corresponding crypto asset it represents.
- Select the Desired Crypto Asset: Identify the specific crypto asset you want to view and manage. Click on the account label or the crypto asset name to select it.
- View Account Details: Ledger Live will now display the account details for the selected crypto asset. This includes the current balance, transaction history, and additional options for managing the account.
- Explore Available Features: Take the time to explore the various features and options available for the selected crypto asset. Ledger Live provides tools for sending and receiving funds, managing account settings, and staying informed about the latest market trends.
By choosing a specific crypto asset within Ledger Live, you can focus on managing your investments and transactions for that particular cryptocurrency. This simplifies the process and allows you to stay organized as you navigate your crypto portfolio.
Verify Your Ledger Nano Account
Verifying your Ledger Nano account is an essential step to ensure the accuracy and security of your crypto assets. By verifying your account, you can confirm that the account you added to Ledger Live matches the information stored on your Ledger Nano device. Here’s how you can verify your Ledger Nano account:
- Select the Desired Account: In the Ledger Live interface, navigate to the “Accounts” tab. Locate and select the account that you want to verify.
- Initiate the Verification Process: Within the account details section, look for the option to verify your account. This option could be labeled as “Verify” or “Check Account.”
- Follow the On-Screen Instructions: Ledger Live will guide you through the verification process step by step. The instructions may include specific actions to perform on your Ledger Nano device, such as confirming the account details or comparing the displayed account address on the device with the one shown in Ledger Live.
- Verify Account Address: One of the important aspects of verification is to compare the account address displayed on your Ledger Nano device with the address shown in Ledger Live. Ensure that the account addresses match to confirm that you have added the correct account.
- Complete the Verification: Once you have followed the necessary steps and confirmed the accuracy of your Ledger Nano account, Ledger Live will provide a confirmation message. This indicates that your account has been successfully verified.
Verifying your Ledger Nano account adds an extra layer of security to your crypto assets by confirming the integrity of the account information. It ensures that you have added the correct account and reduces the risk of any potential errors or unauthorized access. It is recommended to periodically verify your accounts, especially when adding new ones or after any significant changes.
Manage Multiple Accounts
If you have multiple Ledger Nano accounts added to Ledger Live, you can easily manage and switch between them within the application. Managing multiple accounts allows you to keep track of different crypto assets and perform transactions as needed. Here’s how you can effectively manage multiple accounts:
- Open the Accounts Tab: In the Ledger Live interface, navigate to the “Accounts” tab. This will display a list of all the accounts you have added.
- Review Account List: Take a moment to review the list of accounts and their respective crypto assets. Each account will be labeled with the corresponding crypto asset it represents.
- Switch Between Accounts: To manage a particular account, simply click on the account in the list. This will open the account details, where you can view the balance, transaction history, and perform various actions related to that specific account.
- Perform Actions: While managing an account, Ledger Live offers a range of actions you can perform. These actions include sending and receiving funds, managing account settings, and reviewing account-specific information.
- Add New Accounts: If you have additional Ledger Nano accounts that you want to manage, you can easily add them by following the steps outlined in the “Add an Account” section. This allows you to expand your crypto asset portfolio within Ledger Live.
- Keep Track of Balances: Ledger Live provides a total portfolio balance, which gives you an overview of the combined value of all your accounts. This helps you keep track of your overall crypto assets without having to manually calculate individual balances.
By effectively managing multiple accounts in Ledger Live, you can conveniently navigate and take action on your various crypto assets. Whether you want to send, receive, or monitor transactions, Ledger Live provides the necessary tools and functionality to streamline your account management process.
Remove an Account
If you no longer need to manage a specific Ledger Nano account in Ledger Live, you can easily remove it from the application. Removing an account helps you maintain a clean and organized interface by decluttering unnecessary accounts. Here’s how you can remove an account:
- Open the Accounts Tab: In the Ledger Live interface, navigate to the “Accounts” tab. This tab displays a list of all your added accounts.
- Select the Account to Remove: Locate the account that you want to remove from the list. Take a moment to ensure that you have selected the correct account.
- Access Account Settings: Right-click on the account or look for the options menu (usually represented by three dots or a gear icon) next to the account. Click on it to access the account settings.
- Choose “Remove Account”: From the account settings menu, select the option to “Remove Account” or a similar option that indicates the removal process.
- Confirm the Account Removal: Ledger Live will prompt you to confirm the removal of the account. Review the confirmation message and proceed if you are certain about removing the account.
- Account Successfully Removed: Ledger Live will provide a confirmation message, indicating that the account has been successfully removed from the application.
It is important to note that removing an account from Ledger Live does not affect the actual account on your Ledger Nano device. The removal process simply removes the account from Ledger Live, preventing it from being displayed in the application. To restore the account in the future, you would need to add it again following the “Add an Account” process.
By efficiently removing accounts you no longer need to manage, you can keep your Ledger Live interface organized and easily navigate through your active accounts.