
Understanding Wi-Fi Hotspot
A Wi-Fi hotspot is a feature on your Android phone that allows you to share your mobile data connection with other devices. It essentially turns your phone into a portable wireless router, providing internet access to laptops, tablets, and other devices in its vicinity. This can be incredibly convenient in situations where there is no accessible Wi-Fi network or when you want to connect multiple devices to the internet simultaneously.
When you enable the Wi-Fi hotspot on your Android phone, it creates a network with a unique name (SSID) and password. Other devices can then connect to this network just like they would to any other Wi-Fi network. Your phone acts as the access point, providing a bridge between the connected devices and the internet.
It is important to note that using your Android phone as a Wi-Fi hotspot consumes your mobile data. This means that any data used by the connected devices will be deducted from your cellular plan. So, if you have a limited data plan, it is important to keep track of your usage to avoid exceeding your limits and incurring additional charges.
Keep in mind that the quality of the Wi-Fi connection and the speed of the internet will depend on the strength of your cellular signal. If you have a weak signal or are in an area with poor network coverage, the performance of the Wi-Fi hotspot may be affected.
Additionally, using your Android phone as a Wi-Fi hotspot can drain your battery faster than usual. This is because your phone is not just handling its regular functions, but also acting as a wireless router. It is a good idea to keep your phone plugged in while using it as a hotspot, especially if you plan on extended usage.
Now that you have a basic understanding of what a Wi-Fi hotspot is and its potential implications, it is time to check if your Android phone is compatible and learn how to enable and configure the hotspot feature.
Checking Compatibility
Before you can use your Android phone as a Wi-Fi hotspot, it is important to check if your device supports this feature. Most Android smartphones have the ability to act as a hotspot, but it may vary depending on the manufacturer and model.
To check if your phone is compatible, follow these steps:
- Go to the Settings app on your Android phone. You can usually access it by swiping down from the top of the screen and tapping the gear icon.
- Scroll down and look for the “Network & internet” or “Connections” option. Tap on it to access the network settings.
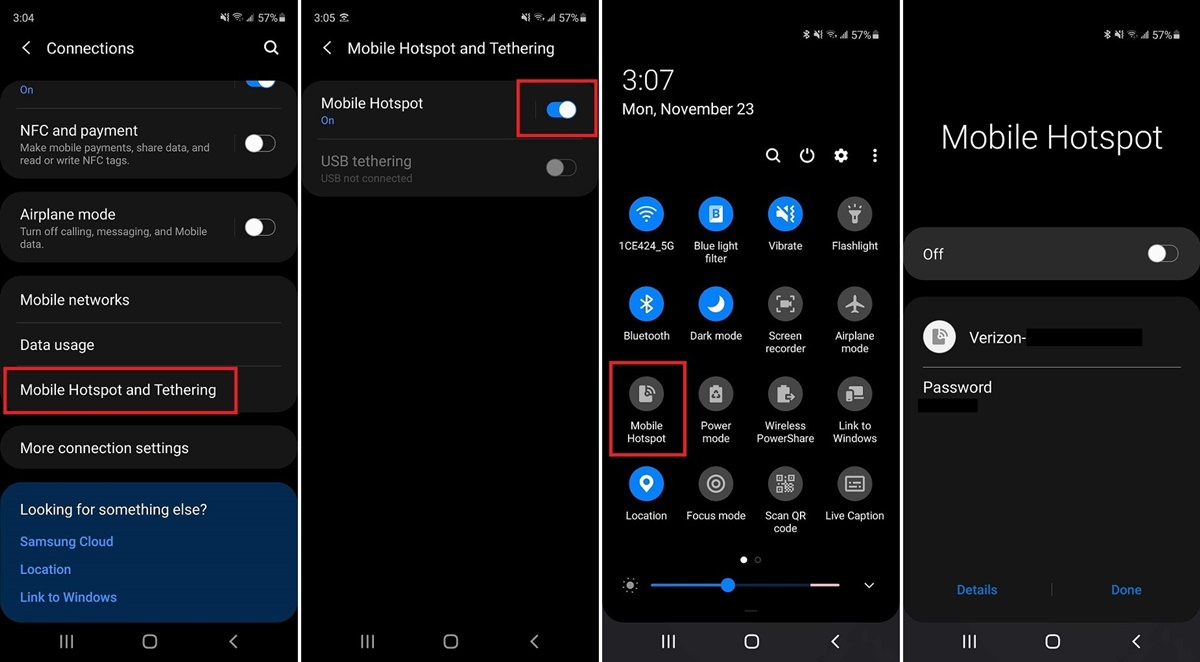
- You should see a “Hotspot & tethering” or “Mobile hotspot” option. Tap on it to open the hotspot settings.
- If you see the “Mobile hotspot” option, it means that your phone supports Wi-Fi hotspot functionality. You can proceed to the next section to learn how to enable and configure the hotspot. If you don’t see this option, it is likely that your device does not support hotspot feature.
Keep in mind that the names and locations of these settings may vary slightly depending on the Android version and the customization done by the manufacturer. If you are unable to find the hotspot settings, you can also try searching for “hotspot” or “tethering” in the Settings app’s search bar.
If your device does not have the built-in hotspot feature, don’t worry! There are alternative options available. You can consider using a third-party app from the Google Play Store that allows you to create a Wi-Fi hotspot on your Android phone.
It is also worth noting that some carriers may restrict or charge extra for using the hotspot feature. Make sure to check your mobile carrier’s terms and conditions or contact their customer support to understand any limitations or additional fees associated with using the Wi-Fi hotspot functionality.
Now that you have confirmed the compatibility of your Android phone, it’s time to move on to the next section and learn how to enable and configure the Wi-Fi hotspot.
Enabling Wi-Fi Hotspot on Android
Once you have confirmed that your Android phone supports the Wi-Fi hotspot feature, you can proceed to enable it and start sharing your mobile data connection. The process may slightly vary based on your phone’s manufacturer and Android version, but generally, the steps are as follows:
- Open the Settings app on your Android phone by tapping on the gear icon in the quick settings panel or by accessing it from your app drawer.
- Scroll down and locate the “Network & internet” or “Connections” option. Tap on it to access the network settings.
- Look for the “Hotspot & tethering” or “Mobile hotspot” section. Tap on it to access the hotspot settings.
- Find the “Mobile hotspot” toggle switch or the “Set up Wi-Fi hotspot” option and tap on it to enable the hotspot.
- You may be asked to set a name (SSID) and password for your hotspot network. Enter the desired name and password or leave the default values if you prefer.
- Once you have set the name and password, save the settings. Your Android phone hotspot is now enabled and ready to be connected to other devices.
Keep in mind that some Android versions may have additional options to configure the hotspot settings, such as choosing the Wi-Fi band (2.4 GHz or 5 GHz), setting a timeout for inactivity, or enabling the hotspot to turn off automatically when no devices are connected. Feel free to explore these options and adjust them according to your preferences.
Now that you have successfully enabled the Wi-Fi hotspot on your Android phone, it’s time to move on to the next section and learn how to configure the hotspot settings to optimize your experience.
Configuring Wi-Fi Hotspot Settings
After enabling the Wi-Fi hotspot on your Android phone, you have the option to configure various settings to enhance your hotspot experience and ensure optimal connectivity. Here are some key settings you can consider adjusting:
- Name (SSID) and Password: The name of your hotspot network (SSID) and the password are essential for other devices to connect. You can change the default values to something memorable and secure. To modify these settings, go to the hotspot settings and locate the options for changing the network name and password.
- Security Type: Most Android phones offer the option to choose the security type for your hotspot network. It is recommended to use WPA2-PSK (AES) for better security. This option can usually be found under the hotspot settings or advanced settings.
- Wi-Fi Band: If your phone supports dual-band Wi-Fi (2.4 GHz and 5 GHz), you can choose the desired Wi-Fi band for your hotspot. The 5 GHz band is less crowded and usually offers faster speeds, but the range may be shorter compared to the 2.4 GHz band. Look for the Wi-Fi band option in the hotspot or advanced settings.
- Data Usage Control: Some Android phones allow you to monitor and control the data usage of connected devices. You can set limits, enable alerts, or even block certain devices to manage your mobile data effectively. Check for data usage control options in the hotspot or advanced settings.
- Timeout Settings: To save battery and prevent accidental hotspot usage, you can set a timeout for inactivity. This will automatically turn off the hotspot if no device is connected for a certain period of time. Look for timeout settings in the hotspot or advanced settings.
Remember to save your configuration changes after adjusting the settings to ensure they take effect. Feel free to explore other available options in the hotspot settings to customize your experience further, such as enabling or disabling tethering over USB or Bluetooth if your device supports it.
By configuring these Wi-Fi hotspot settings on your Android phone, you can create a personalized and secure network that meets your specific requirements. Now that you have configured the hotspot settings, it’s time to learn how to connect devices to your Wi-Fi hotspot in the next section.
Connecting Devices to Wi-Fi Hotspot
Now that you have set up and configured your Wi-Fi hotspot on your Android phone, it’s time to connect other devices to it. Whether it’s a laptop, tablet, or another smartphone, the process of connecting to a Wi-Fi hotspot is straightforward. Here’s how to do it:
- On the device you want to connect to the Wi-Fi hotspot, open the Wi-Fi settings. This can usually be found in the Settings app or by tapping on the Wi-Fi icon in the status bar.
- You will see a list of available Wi-Fi networks. Look for the name (SSID) of your Android phone’s hotspot network and tap on it.
- If you have set a password for your hotspot network, you will be prompted to enter it. Type in the correct password and tap “Connect” or “Join.”
- Once the device successfully connects to the Wi-Fi hotspot, you will see a confirmation message or the Wi-Fi icon will change to indicate a successful connection.
It is important to note that some devices may require additional steps, such as accepting the Wi-Fi network’s security certificate or configuring proxy settings, depending on the device’s operating system. Refer to the device’s user manual or online resources for specific instructions on connecting to a Wi-Fi hotspot.
Keep in mind that the number of devices that can connect to your Wi-Fi hotspot at the same time may be limited. This limitation is usually set by your phone’s hardware capabilities or by your mobile carrier. If you experience any difficulties connecting a device, try disconnecting any unused devices or check if there is a limit on the number of connected devices.
Once a device is connected to your Wi-Fi hotspot, it will have access to the internet through your mobile data connection. The connected devices will function as if they are connected to a regular Wi-Fi network, enabling them to browse the web, stream videos, or use any internet-dependent services.
If you no longer need a device to be connected to your Wi-Fi hotspot, you can either manually disconnect it from the device’s Wi-Fi settings or disable the hotspot on your Android phone.
Now that you know how to connect devices to your Wi-Fi hotspot, it’s time to learn how to manage the connected devices and ensure the security of your hotspot in the next section.
Managing Connected Devices
Once you have devices connected to your Wi-Fi hotspot, it’s important to have control over the connected devices and manage them efficiently. Managing connected devices allows you to monitor their activity, prioritize certain devices, and ensure the security and performance of your Wi-Fi hotspot. Here are some tips for managing connected devices:
- View Connected Devices: Check your Android phone’s hotspot settings to see a list of devices currently connected to your Wi-Fi hotspot. This list will typically display the device name, IP address, and MAC address of each connected device. It’s a good practice to review this list periodically to ensure that only authorized devices are connected.
- Change Wi-Fi Password: If you suspect unauthorized access to your Wi-Fi hotspot or you simply want to change the password for security reasons, you can do so in the hotspot settings of your Android phone. After changing the password, reconnect all your authorized devices using the new password.
- Limit Bandwidth: Some Android phones offer the option to limit the bandwidth for each connected device. This can help optimize the overall performance of your Wi-Fi hotspot, especially if you have multiple devices connected simultaneously. Explore the options in the hotspot settings to find bandwidth control or QoS (Quality of Service) settings.
- Disconnect Devices: If you want to disconnect a specific device from your Wi-Fi hotspot, you can either do it directly from the device’s Wi-Fi settings or use the hotspot settings on your Android phone. This can be useful in situations where you want to free up bandwidth or terminate the connection of an unauthorized device.
- Manage Data Usage: Keep an eye on the data usage of connected devices if you have limited mobile data. Some Android phones allow you to monitor the data usage of each device individually. This feature can be found in the hotspot settings or data usage control settings.
By effectively managing the connected devices on your Wi-Fi hotspot, you can ensure a secure and optimal experience for all users. Regularly reviewing the connected devices and taking necessary actions to maintain security and regulate bandwidth can help you make the most out of your Wi-Fi hotspot connection.
In the next section, we will discuss how to secure your Wi-Fi hotspot connection to protect yourself and your connected devices from potential threats or unauthorized access.
Securing Your Wi-Fi Hotspot Connection
Securing your Wi-Fi hotspot connection is crucial to protect your personal data, maintain the privacy of your network, and prevent unauthorized access. By implementing the following security measures, you can ensure a safe and secure Wi-Fi hotspot experience:
- Change the Default Password: When setting up your Wi-Fi hotspot, always change the default password to a strong and unique one. Avoid using easily guessable passwords such as “password” or “123456.” A strong password should contain a combination of letters, numbers, and special characters.
- Enable Network Encryption: Most Android phones offer options to encrypt the data transmitted between the connected devices and the hotspot. It is highly recommended to enable encryption to prevent eavesdropping and unauthorized access. Select the WPA2-PSK (AES) security type for better encryption.
- Disable Network Sharing: To enhance security, disable network sharing on your Android phone while using it as a Wi-Fi hotspot. This prevents connected devices from sharing files or accessing each other’s data without permission.
- Keep Your Android Phone Up to Date: Regularly update your Android phone’s operating system and security patches. Manufacturers release updates to fix vulnerabilities and strengthen security. Ensuring your phone is up to date helps protect against potential security threats.
- Use a Firewall: Consider using a firewall app on your Android phone to monitor and control network traffic. Firewalls can block suspicious incoming connections and provide an additional layer of security for your Wi-Fi hotspot.
- Be Aware of Suspicious Connections: Regularly check the list of connected devices in the hotspot settings of your Android phone. If you notice any unfamiliar devices connected to your network, it could indicate unauthorized access. Take immediate action by changing the Wi-Fi password and disconnecting the suspicious device.
Implementing these security measures strengthens the protection of your Wi-Fi hotspot connection. However, it’s important to note that no security measure is 100% foolproof. Therefore, it is always recommended to exercise caution and be mindful of the information you transmit over a public Wi-Fi hotspot, especially when dealing with sensitive data.
Now that you have secured your Wi-Fi hotspot connection, it’s time to discuss common troubleshooting steps for resolving Wi-Fi hotspot issues in the next section.
Troubleshooting Wi-Fi Hotspot Issues
Even though setting up and using a Wi-Fi hotspot on your Android phone is generally a straightforward process, you may encounter occasional issues. If you’re experiencing problems with your Wi-Fi hotspot, here are some common troubleshooting steps you can try:
- Restart Your Android Phone: A simple restart can often resolve minor software glitches that may be causing issues with your Wi-Fi hotspot. Turn off your phone, wait a few seconds, and then turn it back on.
- Check Your Mobile Data Connection: Ensure that your mobile data connection is active and working properly. If there are issues with your cellular network, it can affect the performance of your Wi-Fi hotspot. Make sure you have a stable mobile data connection before enabling the hotspot.
- Verify Compatibility with Connected Device: If you’re having trouble connecting a specific device to your Wi-Fi hotspot, check if the device is compatible with the network type or security settings of your hotspot. Some older devices may have limitations in connecting to newer Wi-Fi standards.
- Reset Network Settings: Resetting your network settings on your Android phone can help resolve network-related issues. Go to the settings, find the “System” or “General Management” option, and look for the “Reset” or “Reset Network Settings” option. Note that this will reset all network settings, including Wi-Fi, Bluetooth, and VPN configurations.
- Update Firmware: Make sure your Android phone’s firmware is up to date. Manufacturers occasionally release firmware updates that address software bugs and improve performance. Check for available updates in the settings and install any pending updates.
- Reset Wi-Fi Hotspot Settings: If you have made modifications to the hotspot settings and are experiencing issues, you can try resetting the hotspot settings to their default values. Find the “Reset” or “Reset Network Settings” option in the hotspot settings on your Android phone.
- Factory Reset: If you have exhausted all other troubleshooting options and are still experiencing persistent issues, you can consider performing a factory reset on your Android phone. This will revert all settings and configurations back to their original state. However, make sure to backup your data before performing a factory reset as it will erase all data on your phone.
If none of these steps resolve your Wi-Fi hotspot issues, you may want to contact your phone’s manufacturer or your mobile carrier for further assistance. They can provide more specific troubleshooting steps or determine if there may be a hardware-related issue with your device.
By following these troubleshooting steps, you can resolve common Wi-Fi hotspot issues and ensure a smooth and uninterrupted connectivity experience.