
Enable Quick Settings Menu
The Quick Settings menu on Android devices provides convenient access to frequently used settings and features. By enabling this menu, you can easily toggle various options without navigating through multiple menus. Here’s how to enable the Quick Settings menu on your Android device:
-
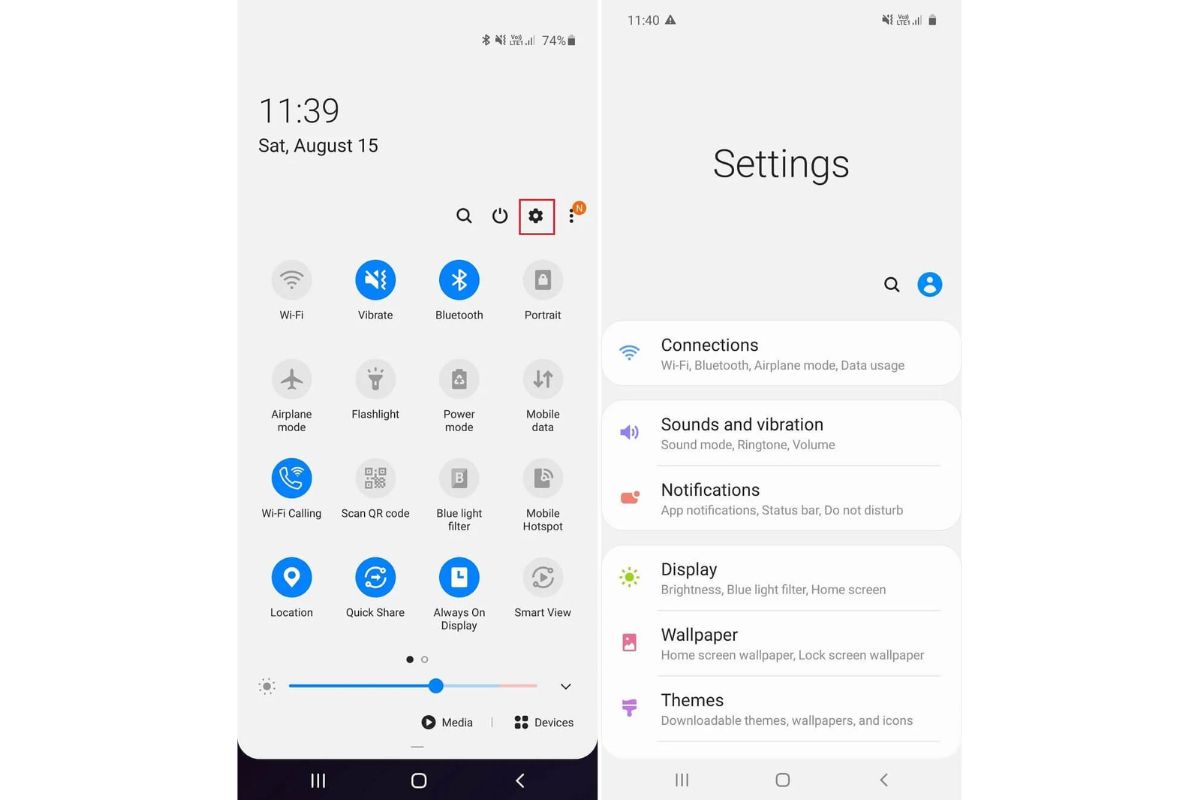
Swipe down from the top of your device screen to open the Notification Shade.
-
Look for a small gear icon labeled “Settings” in the top right or bottom right corner of the shade and tap on it. This will open the Settings app.
-
Scroll down and find the “System” or “Device” section in the settings menu.
-
Tap on “Advanced” or “Additional settings” (depending on your device).
-
Look for and select “Quick Settings” or “Quick Settings Menu” option.
-
Toggle on the switch next to “Enable Quick Settings” to activate the Quick Settings menu.
Once enabled, you can now access the Quick Settings menu by swiping down from the top of your device screen. It will appear as a panel of toggle buttons, allowing you to quickly adjust various settings and access commonly used features.
Enabling the Quick Settings menu provides a convenient way to make quick changes to your device settings without the need to navigate through multiple menus. It can save you time and increase your productivity by providing easy access to essential settings and features.
Accessing the Quick Settings Menu
The Quick Settings menu on your Android device allows you to access commonly used settings and features with just a swipe. Here’s how to access the Quick Settings menu:
-
Swipe down from the top of your device screen with one finger. This will open the Notification Shade.
-
At the top of the Notification Shade, you will see a row of small icons representing notifications. Look for a larger row of icons, typically in the shape of a grid, which represents the Quick Settings menu.
-
Swipe down again with two fingers to fully expand the Quick Settings menu. This will display all the available quick settings tiles.
In the Quick Settings menu, you will find a range of toggle buttons and shortcuts that allow you to quickly access and control various settings and features on your device.
By default, the Quick Settings menu offers common settings such as Wi-Fi, Bluetooth, Screen Rotation, Brightness, and Sound profiles. You can customize this menu and add or remove tiles according to your preferences, which we will discuss in the following sections.
Accessing the Quick Settings menu provides a convenient way to manage your device settings without the need to navigate through different menus. It gives you quick access to frequently used features, saving you time and making it easier to control your device’s settings on the go.
Managing Quick Settings Tiles
The Quick Settings menu on your Android device allows you to customize the tiles displayed for quick access to settings and features. Here’s how you can manage the Quick Settings tiles:
Adding Tiles to the Quick Settings Menu:
-
Swipe down from the top of your device screen to open the Quick Settings menu.
-
Scroll to the bottom of the Quick Settings menu and tap on the “Edit” or “Pencil” icon. This will open the Quick Settings edit mode.
-
From the list of available tiles, drag and drop the desired tiles into the active tiles section. These will be added to your Quick Settings menu.
-
Once you have added the desired tiles, tap on the “Back” or “Done” button to save the changes and exit the edit mode.
Removing Tiles from the Quick Settings Menu:
-
Swipe down from the top of your device screen to open the Quick Settings menu.
-
Scroll to the bottom of the Quick Settings menu and tap on the “Edit” or “Pencil” icon to enter edit mode.
-
Drag and drop the desired tiles from the active tiles section to the available tiles section. This will remove them from your Quick Settings menu.
-
Once you have removed the desired tiles, tap on the “Back” or “Done” button to save the changes and exit the edit mode.
Reordering Tiles in the Quick Settings Menu:
-
Swipe down from the top of your device screen to open the Quick Settings menu.
-
Scroll to the bottom of the Quick Settings menu and tap on the “Edit” or “Pencil” icon to enter edit mode.
-
Long-press on a tile and drag it to the desired position in the quick settings menu. Release your finger to drop the tile into the new position.
-
Repeat the previous step for other tiles you want to reorder.
-
Once you have reordered the tiles, tap on the “Back” or “Done” button to save the changes and exit the edit mode.
By managing the Quick Settings tiles, you can personalize the options available in the Quick Settings menu, making it more convenient for you to access the settings and features that matter most to you. Experiment with different combinations of tiles to find the layout that suits your needs.
Adding Tiles to the Quick Settings Menu
The Quick Settings menu on your Android device allows you to add tiles for quick access to settings and features that are important to you. Here’s how you can add tiles to the Quick Settings menu:
-
Swipe down from the top of your device screen to open the Quick Settings menu.
-
Scroll to the bottom of the Quick Settings menu and tap on the “Edit” or “Pencil” icon. This will enable the edit mode.
-
Now, you will see a list of available tiles that can be added to the Quick Settings menu.
-
Touch and hold a tile that you want to add.
-
Drag the tile to your desired position in the active tiles section.
-
Continue adding other tiles in the same manner.
-
Once you have added all the desired tiles, tap on the “Back” or “Done” button to save the changes and exit the edit mode.
This process allows you to customize the Quick Settings menu by adding tiles for features like Wi-Fi, Bluetooth, flashlight, screen brightness, and more. You can also add tiles for specific app functionalities or shortcuts to quickly access your favorite apps.
Adding tiles to the Quick Settings menu provides you with convenient access to essential settings and features. It allows you to tailor the menu according to your preferences and ensures that the most frequently used options are just a swipe away.
Experiment with different combinations of tiles to create a Quick Settings menu that suits your needs and enhances your device’s usability. This customization feature allows you to make the most out of the Quick Settings menu on your Android device.
Removing Tiles from the Quick Settings Menu
The Quick Settings menu on your Android device allows you to customize the tiles for quick access to settings and features. If you no longer need a specific tile or want to declutter your Quick Settings menu, you can remove tiles easily. Here’s how:
-
Swipe down from the top of your device screen to open the Quick Settings menu.
-
Scroll to the bottom of the Quick Settings menu and tap on the “Edit” or “Pencil” icon to enter edit mode.
-
In the edit mode, you will see all the active tiles displayed.
-
Touch and hold the tile that you want to remove.
-
Drag the tile from the active tiles section to the available tiles section. The tile will be removed from the Quick Settings menu.
-
Continue removing other tiles in the same manner.
-
Once you have removed all the desired tiles, tap on the “Back” or “Done” button to save the changes and exit the edit mode.
By removing unnecessary or less frequently used tiles from the Quick Settings menu, you can streamline the interface and make it more personalized to your needs. It allows you to focus on the settings and features that are most important to you without cluttering the menu.
Keep in mind that removing a tile does not disable the associated functionality or setting. It simply removes the tile from the Quick Settings menu. You can still access those settings and features through other means, such as the Settings app or dedicated shortcuts on your home screen.
Take some time to review and customize your Quick Settings menu by removing tiles that you rarely use. This will help you declutter the menu and create a more streamlined and efficient user experience on your Android device.
Reordering Tiles in the Quick Settings Menu
The Quick Settings menu on your Android device allows you to customize the order of tiles for quick access to settings and features. If you prefer a specific arrangement of tiles or want to prioritize certain options, you can easily reorder them. Here’s how:
-
Swipe down from the top of your device screen to open the Quick Settings menu.
-
Scroll to the bottom of the Quick Settings menu and tap on the “Edit” or “Pencil” icon to enter edit mode.
-
In the edit mode, you will see all the active tiles displayed.
-
Touch and hold the tile you want to move.
-
Drag the tile to the desired position in the Quick Settings menu.
-
Continue reordering other tiles in the same manner.
-
Once you have rearranged the tiles to your liking, tap on the “Back” or “Done” button to save the changes and exit the edit mode.
By reordering the tiles in the Quick Settings menu, you can prioritize the settings and features that you use most frequently. This allows for quick and efficient access to your preferred options without the need for extensive scrolling or searching.
Take some time to consider your usage patterns and customize the order of tiles accordingly. For example, you may want to place Wi-Fi and Bluetooth at the top if you frequently toggle between connections, or prioritize screen brightness adjustment if you frequently adjust it throughout the day.
Remember that the exact steps for reordering tiles may vary slightly depending on your device’s manufacturer or software version. However, the general process involves entering the edit mode, dragging and dropping the tiles into the desired positions, and saving the changes.
Keep in mind that the Quick Settings menu is meant to provide quick access to essential settings and features. By arranging the tiles in a way that aligns with your preferences, you can optimize the usability and convenience of your Android device.
Customizing Quick Settings Layout
The Quick Settings menu on your Android device not only allows you to add, remove, and reorder tiles, but also provides the option to customize the layout. This allows you to tailor the appearance and functionality of the Quick Settings menu to suit your preferences. Here’s how you can customize the Quick Settings layout:
-
Swipe down from the top of your device screen to open the Quick Settings menu.
-
Scroll to the bottom of the Quick Settings menu and tap on the “Edit” or “Pencil” icon to enter the edit mode.
-
In the edit mode, you can see all the active tiles.
-
Look for the three-dot menu icon, usually located in the top right corner of the screen, and tap on it.
-
A drop-down menu will appear, showing options for customizing the Quick Settings layout.
-
From the options available, you can choose to either display the tiles in a grid layout or a list layout based on your preference.
-
Select your desired layout option, and the Quick Settings menu will update accordingly.
-
Once you have made your choice, tap on the “Back” or “Done” button to save the changes and exit the edit mode.
Customizing the Quick Settings layout gives you the flexibility to choose the visual presentation that suits your style and preference. The grid layout allows you to see a larger number of tiles at once, making it ideal if you have a lot of options. On the other hand, the list layout displays tiles vertically, providing a more compact view if you prefer a streamlined appearance.
Experiment with both grid and list layouts to see which one you prefer. You can always switch between the two and find the layout that offers the best balance of accessibility and visual appeal for your Quick Settings menu.
Remember that the specific steps to customize the Quick Settings layout may vary slightly depending on your device’s manufacturer or software version. However, the general process involves entering the edit mode, accessing the menu options, selecting your desired layout, and saving the changes.
By customizing the Quick Settings layout, you can maximize the functionality and aesthetics of your Android device. Tailoring the layout to suit your preferences ensures an optimized user experience when navigating through the Quick Settings menu.
Adjusting Quick Settings Grid Size
The Quick Settings menu on your Android device allows you to adjust the grid size, which determines the number of tiles displayed at once. By modifying the grid size, you can customize the density of the tiles and optimize the Quick Settings menu layout for your needs. Here is how you can adjust the Quick Settings grid size:
-
Swipe down from the top of your device screen to open the Quick Settings menu.
-
Scroll to the bottom of the Quick Settings menu and tap on the “Edit” or “Pencil” icon to enter the edit mode.
-
In the edit mode, observe the Quick Settings menu to see if there is a grid size adjustment option visible.
-
If you see a grid size adjustment option, tap on it to select the desired grid size.
-
If you don’t have a dedicated grid size adjustment option, try using two fingers to pinch in or out on the Quick Settings menu. This pinch-to-zoom gesture will adjust the grid size accordingly.
-
Continue adjusting the grid size until you find the optimal number of tiles displayed.
-
Once you have adjusted the grid size to your liking, tap on the “Back” or “Done” button to save the changes and exit the edit mode.
Adjusting the Quick Settings grid size allows you to customize the density of the tiles and determine the amount of information displayed at once. Increasing the grid size will result in more tiles visible, while decreasing it will display fewer tiles but with larger icons and text.
Customizing the grid size gives you the flexibility to optimize the Quick Settings menu based on your preferences and the available screen real estate on your device. If you have a larger display or prefer a more compact layout, you can increase the grid size to fit more tiles. Conversely, if you prefer larger icons and spacious tiles, you can decrease the grid size.
Please note that the grid size adjustment option may vary depending on your device’s manufacturer or software version. If you don’t see a specific grid size adjustment option in the edit mode, be sure to try the pinch-to-zoom gesture to resize the grid.
Experiment with different grid sizes to find the one that suits your preference and enhances your Quick Settings menu experience. By adjusting the grid size, you can personalize the layout of your Android device and create a Quick Settings menu that provides quick and convenient access to your most frequently used settings and features.
Editing the Quick Settings Menu
The Quick Settings menu on your Android device allows you to customize and edit the tiles displayed for quick access to settings and features. Whether you want to add new tiles, remove unnecessary ones, or rearrange their order, editing the Quick Settings menu is a simple process. Here’s how you can edit the Quick Settings menu:
-
Swipe down from the top of your device screen to open the Quick Settings menu.
-
Scroll to the bottom of the Quick Settings menu and look for the “Edit” or “Pencil” icon. Tap on it to enter the edit mode.
-
In the edit mode, you will see all the active tiles displayed.
-
To add new tiles, look for the available tiles section below the active tiles. Touch and hold a tile, then drag it to the desired position in the active tiles section.
-
To remove tiles, simply touch and hold a tile from the active tiles section, then drag it to the available tiles section. This will remove the tile from the Quick Settings menu.
-
To rearrange the order of tiles, touch and hold a tile in the active tiles section, then drag it to the desired position. Release your finger to drop the tile into the new position.
-
Continue adding, removing, or rearranging tiles until you are satisfied with the changes.
-
Once you have finished editing, tap on the “Back” or “Done” button to save the changes and exit the edit mode.
Editing the Quick Settings menu allows you to customize the tiles displayed based on your preferences and needs. You can add tiles for frequently used settings and features, remove tiles that are rarely used, and rearrange them for easier accessibility.
It’s important to note that the available options and customization features may vary depending on your device’s manufacturer or software version. Some devices may offer additional options, such as changing the grid size or customizing shortcuts within certain tiles.
Take some time to explore and experiment with the various editing options to create a Quick Settings menu that suits your workflow and style. By personalizing the Quick Settings menu, you can enhance the efficiency and convenience of accessing important settings and features on your Android device.
Toggling Quick Settings Options
The Quick Settings menu on your Android device allows you to quickly toggle various settings and features with just a tap. Whether you need to turn on or off Wi-Fi, Bluetooth, Airplane mode, or other commonly used options, the Quick Settings menu provides a convenient way to control these settings. Here’s how you can toggle Quick Settings options:
-
Swipe down from the top of your device screen to open the Quick Settings menu.
-
In the Quick Settings menu, you will see a list of tiles representing different options.
-
To toggle an option, simply tap on its respective tile.
-
For example, if you want to enable or disable Wi-Fi, tap on the Wi-Fi tile. This will turn Wi-Fi on or off accordingly.
-
If a tile has different states or modes, such as Airplane mode or Bluetooth, tapping on it will cycle through the different options or modes. For instance, tapping on the Bluetooth tile will toggle Bluetooth on or off, or switch between connected devices.
-
You can also tap and hold certain tiles to access additional controls or settings related to that particular option.
The Quick Settings options are designed to provide quick and easy access to frequently used settings and features. They offer a streamlined way to toggle various options without the need to navigate through multiple menus in the device settings.
Keep in mind that the available options in your Quick Settings menu may vary depending on your device’s manufacturer or software version. However, commonly available options include Wi-Fi, Bluetooth, Airplane mode, Screen Rotation, Do Not Disturb, and more.
Take full advantage of the Quick Settings menu by familiarizing yourself with the available options and using them to quickly control and adjust your device settings. By efficiently toggling Quick Settings options, you can enhance the usability and convenience of your Android device.
Using Quick Settings Shortcuts
The Quick Settings menu on your Android device not only provides convenient access to settings and features but also offers shortcuts to perform specific actions directly from the menu. These shortcuts allow you to quickly perform tasks like taking a screenshot, activating the flashlight, or opening the camera app without the need to navigate through multiple menus. Here’s how to use Quick Settings shortcuts:
-
Swipe down from the top of your device screen to open the Quick Settings menu.
-
Scroll through the tiles in the Quick Settings menu and look for any tiles that have small arrows or additional icons on them.
-
To use a shortcut, simply tap on the tile associated with the action you want to perform.
-
For example, if there is a shortcut for the flashlight, tapping on the tile will instantly turn on or off the flashlight.
-
Some shortcuts may have additional options or settings associated with them. To access these options, tap and hold the shortcut tile.
-
Once you have performed the desired action or accessed the necessary options, you can close the Quick Settings menu by swiping up or tapping the “Back” button.
Quick Settings shortcuts provide a convenient way to perform actions or access specific functions with just a tap. They can help you save time and effort by eliminating the need to search for the desired feature within various apps or menus.
While the available shortcuts may vary depending on your device’s manufacturer or software version, common examples include flashlight, screen recording, battery saver, airplane mode, camera, and more.
Explore the Quick Settings menu on your Android device to discover the available shortcuts and get familiar with their functions. Using Quick Settings shortcuts can significantly enhance your productivity and make it easier to perform certain tasks on your device.
Adjusting Quick Settings Visibility
The Quick Settings menu on your Android device provides a range of options for adjusting its visibility and accessibility. By customizing the visibility settings, you can determine how the Quick Settings menu appears and behaves on your device. Here’s how you can adjust Quick Settings visibility:
-
Swipe down from the top of your device screen to open the Quick Settings menu.
-
Look for the small gear icon labeled “Settings” in the upper right or bottom right corner of the Quick Settings menu. Tap on it to open the Settings app.
-
In the Settings app, scroll down and select “Display” or a similar option, depending on your device.
-
Look for “Quick Settings” or “Notification Shade” among the display settings.
-
Tap on “Quick Settings” to access the visibility options for the Quick Settings menu.
-
Depending on your device, you may find options such as “Make Quick Settings easier to access,” “Show all Quick Settings tiles,” or “Show Quick Settings when notification panel is open.”
-
Select the desired visibility option by toggling the switch or selecting the checkbox.
-
Once you have adjusted the visibility settings, tap on the “Back” button to exit the settings menu and save your changes.
Adjusting the Quick Settings visibility allows you to customize how and when the Quick Settings menu is accessible on your Android device. The available options may include making it easier to access by reducing the number of swipes required, showing all available Quick Settings tiles, or displaying the menu when the notification panel is open.
By adjusting the visibility settings to suit your preferences, you can enhance the usability and convenience of the Quick Settings menu. It ensures that the most frequently used settings and features are readily available for quick access without unnecessary steps or gestures.
Please note that the exact steps and available visibility options may vary depending on your device’s manufacturer or software version. However, most Android devices offer similar settings to adjust Quick Settings visibility within the Display or Notification settings.
Experiment with different visibility options to find the configuration that works best for you. By adjusting the visibility settings, you can streamline the accessibility of the Quick Settings menu and optimize your Android device’s user experience.
Accessing Advanced Quick Settings
On your Android device, the Quick Settings menu provides convenient access to commonly used settings and features. However, there are additional advanced options and settings that can be accessed within the Quick Settings menu, giving you even more control over your device. Here’s how you can access the advanced Quick Settings:
-
Swipe down from the top of your device screen to open the Quick Settings menu.
-
Scroll down the Quick Settings menu to the bottom.
-
Look for a small arrow or text indicating “Advanced” or “More” and tap on it.
-
By tapping on “Advanced” or “More,” an expanded menu will open, revealing additional settings and options.
-
Within the advanced Quick Settings, you may find options like Data Saver, Battery Optimization, NFC settings, Developer options, and more.
-
To access a specific advanced setting, simply tap on the respective tile or text associated with it.
-
Once you have made any necessary changes or adjustments to the advanced settings, you can close the advanced Quick Settings by swiping up or tapping the “Back” button.
Accessing the advanced Quick Settings allows you to fine-tune various settings and access additional options on your Android device. These advanced options provide you with greater control and customization possibilities beyond the basic settings available in the regular Quick Settings menu.
The specific advanced options and settings may vary depending on your device’s manufacturer or software version. Some common examples of advanced Quick Settings include battery optimization, power saving modes, network and connectivity settings, display settings, and developer options for advanced system tweaks.
Explore the advanced Quick Settings menu on your Android device to discover hidden settings and unleash the full potential of your device. However, remember to exercise caution when making changes to advanced settings, as it can affect your device’s performance or stability.
By accessing the advanced Quick Settings, you can personalize your Android device’s behavior, optimize performance, and tailor settings to your specific needs and preferences.
Resetting Quick Settings Menu
Resetting the Quick Settings menu on your Android device allows you to restore it to the default configuration, eliminating any customizations and returning it to its original state. If you have made changes to the Quick Settings menu and want to start fresh or if you’re experiencing any issues with the menu, you can easily reset it. Here’s how:
-
Swipe down from the top of your device screen to open the Quick Settings menu.
-
Scroll down to the bottom of the Quick Settings menu and look for the “Edit” or “Pencil” icon. Tap on it to enter edit mode.
-
Once you are in edit mode, look for a “Reset” or “Restore default” option usually located in the menu settings.
-
Tap on the “Reset” or “Restore default” option to reset the Quick Settings menu.
-
A confirmation dialog may appear asking if you want to proceed with the reset. Confirm your choice by tapping “Yes” or “Reset.”
-
The Quick Settings menu will now return to its default configuration, removing any customizations you previously made.
-
Exit the edit mode by tapping the “Back” or “Done” button to save the changes.
Resetting the Quick Settings menu can be useful if you want to start from scratch or if you encounter any issues with the menu not behaving as expected. It allows you to restore the default layout and settings of the Quick Settings menu, returning it to its original functionality.
However, please note that resetting the Quick Settings menu will remove any customizations you have made, including added tiles, removed tiles, and reordering of tiles. Make sure to take note of any changes you want to keep before resetting the menu.
The specific steps and options to reset the Quick Settings menu may vary depending on your device’s manufacturer or software version. If you can’t find a “Reset” or “Restore default” option within the edit mode, consult your device’s user manual or check the manufacturer’s support website for guidance.
By resetting the Quick Settings menu, you can ensure that it is in its original state and functioning as intended. It can help resolve issues and provide a fresh start for customizing the menu according to your preferences.