
Overview of Android’s Accessibility Features
Android offers a range of accessibility features that empower users with diverse abilities to navigate and interact with their devices more effectively. These features are designed to enhance the usability and accessibility of Android devices for individuals with visual, auditory, physical, and cognitive disabilities. By enabling these features, users can customize their devices to suit their unique needs, making technology more accessible and inclusive for everyone.
One of the key accessibility features on Android is TalkBack, a screen reader that provides spoken feedback for users with visual impairments. TalkBack assists in navigating the user interface, reading text aloud, and describing on-screen elements, enabling visually impaired users to effectively use their Android devices.
Another powerful accessibility feature is Voice Access, which allows users to control their devices hands-free using voice commands. With Voice Access, users can navigate through apps, open settings, and perform various functions by simply speaking commands, ensuring accessibility and ease-of-use for individuals with mobility impairments.
Android also offers a range of customization options to improve visibility. Users can adjust display settings, such as font size and color contrast, to make content more readable. Additionally, magnification gestures enable users to zoom in on specific areas on the screen, making it easier to read text or view images.
Furthermore, Android provides audio settings to enhance the experience for users with hearing impairments. Users can adjust volume settings, enable mono audio, and use sound amplification features to improve audio clarity. Additionally, the option of captions and subtitles for media playback ensures that individuals with hearing difficulties can enjoy multimedia content.
In addition to these core accessibility features, Android also includes a variety of other options in its Accessibility menu. These options include adjustable touch feedback, notification reminders, and even color inversion for users with specific visual needs. Android is continuously working to expand and improve its accessibility features to provide an inclusive experience for all users.
By embracing Android’s accessibility features, users can personalize their devices to accommodate their specific needs, fostering independence, productivity, and equal access to technology. Whether it’s for individuals with visual impairments, motor disabilities, or hearing difficulties, Android’s commitment to accessibility reinforces its mission to make technology accessible and inclusive for all.
How to Enable Accessibility Features on Android
Enabling accessibility features on Android is a straightforward process that allows users to tailor their devices to their specific needs. Android provides a centralized Accessibility menu where users can easily access and enable these features. Here’s how to enable accessibility features on your Android device:
- Open the Settings app on your Android device. You can usually find it in the app drawer or by swiping down from the top of the screen and tapping the gear icon.
- Scroll down and select the “Accessibility” option. It may also be labeled as “Accessibility & Dexterity” or something similar, depending on the Android version and device manufacturer.
- In the Accessibility menu, you’ll find a list of available accessibility features. Tap on the feature you want to enable.
- On the feature’s settings page, you’ll find a toggle switch at the top. Tap on the switch to turn the feature on or off.
- Adjust any additional settings or preferences for the feature if necessary. Some features may offer customization options such as text size, color themes, or gesture settings.
- Repeat the process for any other accessibility features you wish to enable.
Once you’ve enabled the desired accessibility features, your Android device will adapt to accommodate your specific needs. You can now take advantage of features like TalkBack, Voice Access, display customizations, audio enhancements, and more.
It’s important to note that the exact process of enabling accessibility features may vary slightly depending on the version of Android and the device manufacturer. However, the general steps outlined above should apply to most Android devices.
By enabling accessibility features, you can personalize your Android device to make it more accessible and usable for your specific needs. Android’s commitment to accessibility ensures that users with disabilities can fully enjoy the functionality and convenience of their devices, promoting inclusivity and equal access to technology.
Navigating with TalkBack
TalkBack is an invaluable accessibility feature available on Android that provides spoken feedback and navigation assistance for individuals with visual impairments. With TalkBack enabled, users can navigate through their device’s user interface, read text aloud, and interact with on-screen elements. Here’s how to navigate using TalkBack:
- Enable TalkBack: Go to the Accessibility menu in the Settings app and toggle on TalkBack. You may need to confirm your selection and follow the setup instructions.
- Navigation gestures: With TalkBack enabled, swipe a single finger in different directions to navigate through elements on the screen. For example, swipe right to move to the next element, swipe left to go back, and swipe up or down to scroll through lists or pages.
- Focus on elements: Double-tap anywhere on the screen to activate or “focus” on an element. Once focused, you can perform various actions, such as tapping to open an app or activate a button.
- Read text aloud: When you navigate to a block of text, TalkBack will automatically read it aloud. You can use a two-finger swipe up or down to navigate through paragraphs, headings, or other text elements.
- Explore by touch: If you’re unsure about an element on the screen, you can use the explore-by-touch feature. Place your finger on the screen, and TalkBack will announce the element under your finger. You can swipe around the screen to explore and hear descriptions of different elements.
- Customize TalkBack settings: Access the TalkBack settings to adjust the voice rate, volume, and other preferences. You can also enable additional navigation options like “local context menu” or “global context menu” for more advanced functionality.
TalkBack is continuously evolving, and Android devices offer additional navigation features and gestures specific to TalkBack. Familiarizing yourself with these gestures and exploring the TalkBack settings will empower you to navigate your Android device more effectively, ensuring a more accessible and user-friendly experience.
TalkBack is just one example of the many accessibility features that Android provides to make technology more inclusive and accessible for all users. By leveraging these features, individuals with visual impairments can confidently navigate their Android devices, access information, and enjoy the functionalities of technology.
Using Voice Access to Control Your Device
Voice Access is an innovative accessibility feature on Android that allows users to control their devices hands-free using voice commands. With Voice Access enabled, users can navigate through apps, open settings, perform actions, and even dictate text—all through voice commands. Here’s how to use Voice Access to control your Android device:
- Enable Voice Access: Go to the Accessibility menu in the Settings app and toggle on Voice Access. You may need to confirm your selection and follow the setup instructions.
- Activate Voice Access: To activate Voice Access, say “Ok Google” or “Hey Google” followed by the command “Voice Access.” Alternatively, you can use the device’s default activation phrase, if it’s been customized.
- Navigate through apps: Once Voice Access is enabled, you can simply say the name of the app you want to open. For example, say “Open Chrome” to launch the Chrome browser. Voice Access provides on-screen labels for various app elements, so you can say the label to interact with different buttons, menus, or links.
- Perform actions: Voice Access allows you to perform actions on your device using voice commands. For example, say “Take a screenshot” to capture the current screen, or say “Go back” to navigate back within an app.
- Dictate text: Voice Access makes it easy to dictate text whenever there’s a text input field. Just say “Type” or “Write” followed by your phrase, and Voice Access will convert your speech into text in the input field.
- Customize Voice Access: Access the Voice Access settings to personalize the voice commands and adjust other preferences such as verbosity or activation timeout.
Voice Access gives individuals with mobility impairments the freedom to control their Android devices without physical interaction. By using simple voice commands, users can perform various tasks, access information, and communicate effectively.
It’s important to note that Voice Access may not be available in all languages or on all Android devices, depending on the version of Android and the device manufacturer.
By utilizing Voice Access, users can utilize the power of their voice to control and interact with their Android devices, making technology more accessible and empowering individuals with limited mobility to fully utilize their devices.
Customizing Display Options for Improved Visibility
Android offers a range of display customization options that allow users to optimize their device’s appearance for improved visibility. These options are particularly helpful for individuals with visual impairments or those who prefer larger text or higher contrast. Here are some ways to customize display options on your Android device:
- Adjust Font Size: In the Display settings, you can easily increase or decrease the font size on your device to make text more legible. Simply go to Settings > Display > Font Size and choose your preferred size.
- Invert Colors or Enable Dark Mode: Android also provides the option to invert colors or enable a system-wide dark mode, which can reduce eyestrain and improve readability, especially in low-light environments. You can find these options under Settings > Display > Dark theme or Color inversion.
- Change Color Contrast: Android devices allow you to manually adjust color contrast for better visibility. In the Accessibility settings, navigate to Display > Color Adjustment and experiment with different contrast settings until you find the most comfortable and readable option.
- Zoom and Magnify: If you struggle with reading small text or distinguishing details, you can enable the magnification gesture on your Android device. This allows you to zoom in on specific areas of the screen by triple-tapping or using specific gestures. You can activate this feature in Settings > Accessibility > Magnification.
- Use High Contrast Themes: Android provides high contrast themes that emphasize color contrast to enhance visibility. You can enable these themes by going to Settings > Accessibility > High contrast text, or by using third-party accessibility apps that offer customizable high contrast themes.
- Enable Large Icons: Adjusting the size of icons on your Android device can make them more distinguishable and easier to tap. Head to Settings > Display > Icon size and choose a larger size that suits your needs.
By customizing display options, you can make your Android device more visually accessible and personalize it to meet your unique preferences. Whether it’s adjusting font sizes, inverting colors, enabling dark mode, or using high contrast themes, these settings empower users to tailor their devices for enhanced visibility and usability.
It’s worth noting that the exact settings and options may vary slightly between different Android devices and versions. However, accessibility settings related to display customization are typically available on most Android devices.
By leveraging these display customization options, users with visual impairments or those who simply prefer optimized visual settings can enjoy a more accessible and enjoyable experience on their Android devices.
Adjusting Audio Settings for Improved Hearing
Android devices offer various audio settings that allow users to enhance their listening experience and accommodate different hearing needs. By adjusting these settings, individuals with hearing difficulties can improve the clarity and volume of audio on their devices. Here are some ways to adjust audio settings for improved hearing on your Android device:
- Volume Control: Android provides a simple and intuitive volume control system. Use the physical volume buttons on your device to adjust the overall volume for ringtone, media, and notification sounds. You can also fine-tune individual volume levels within specific apps or settings.
- Mono Audio: Individuals with hearing impairments in one ear can enable the mono audio feature on their Android device. This feature combines audio channels, allowing both left and right channels to play through both earphones, ensuring no sound is missed. To enable mono audio, go to Settings > Accessibility > Mono audio.
- Sound Amplification: Android devices offer sound amplification options to boost the volume of audio output. This feature is particularly helpful for individuals with mild hearing impairments. In the Accessibility settings, navigate to Sound & vibration > Sound amplification and adjust the amplification level to your preference.
- Telecoil Compatibility: Some Android devices are equipped with telecoil capabilities, which allow users to pair their devices with compatible hearing aids or loop systems in public venues. Telecoil compatibility enhances the audio experience and reduces background noise in environments equipped with induction loops. Check your device’s specifications or consult your hearing aid provider for telecoil compatibility.
- Notification Reminders: Android devices offer notification reminders to ensure important alerts are not missed. By enabling this feature, your device will periodically remind you of unread notifications, allowing you to stay informed of important messages and events.
- Third-Party Accessibility Apps: There are numerous third-party apps available in the Play Store that cater specifically to individuals with hearing impairments. These apps offer features like sound amplification, customizable audio profiles, or even real-time captioning for phone calls or media playback.
By adjusting audio settings, users can significantly improve their listening experience and make their Android devices more accessible. Whether it’s adjusting volume levels, enabling mono audio, using sound amplification, or exploring third-party apps, these settings empower individuals with hearing difficulties to enjoy multimedia content, phone calls, and other audio-based interactions more comfortably.
It’s important to note that the availability of certain audio settings may vary depending on the Android device model and version. However, volume control and the option to enable mono audio are typically standard across most Android devices.
By taking advantage of these audio settings and features, individuals with hearing impairments can fully engage with their Android devices and enjoy a more inclusive and accessible user experience.
Using Captions and Subtitles for Media Playback
Android provides built-in support for captions and subtitles, allowing users to enjoy media content with text displayed on the screen. Captions and subtitles are particularly beneficial for individuals with hearing impairments or those who prefer to read the dialogue or narration while watching videos. Here’s how to use captions and subtitles for media playback on your Android device:
- Enable Captions/Subtitles: Open the video player app on your Android device and navigate to the playback settings. Look for the captions/subtitles icon, usually represented by the letter “CC” or a speech bubble. Tap the icon to enable captions or subtitles.
- Select Language and Style: Once you’ve enabled captions/subtitles, you can choose the language and style for the text display. Some video players may provide multiple language options, while others may allow you to customize the text color, font, and size.
- Captions/Subtitles Formats: Android supports various caption/subtitle formats, such as SubRip (.srt) and WebVTT (.vtt). Ensure that the captions or subtitles you’re using are in a compatible format with your video player.
- Third-Party Apps: In addition to default video players, there are also third-party media apps available on the Play Store that offer more advanced caption/subtitle settings. These apps may provide additional features such as customizable text appearance, syncing options, or even real-time translation.
- YouTube Captions: If you watch videos on YouTube, the YouTube app also supports captions and subtitles. Simply tap the video player screen while playing a video, tap the “CC” icon, and choose your preferred caption or subtitle language.
- Accessibility Settings: Android’s accessibility settings also allow users to customize the appearance of captions and subtitles. Head to Settings > Accessibility > Captions and adjust the settings according to your preferences, such as text size, color, or background opacity.
By utilizing captions and subtitles, individuals with hearing impairments can fully experience and enjoy multimedia content on their Android devices. Captions and subtitles not only provide access to dialogue and audio details but also enhance the overall comprehension and inclusivity of media content.
It’s important to note that the availability and functionality of captions and subtitles may vary depending on the specific video player or app you’re using. However, most popular video players on Android offer support for captions and subtitles.
Whether you’re enjoying movies, TV shows, or online videos, utilizing captions and subtitles ensures that individuals with hearing impairments can fully engage and understand the content, promoting inclusivity and equal access to media playback on Android devices.
Making Text and Images Easier to Read with Magnification Gestures
Android devices offer a helpful feature called magnification gestures that allow users to zoom in on text and images, making them easier to read and view. Whether you have visual impairments or simply prefer larger content, magnification gestures on Android can enhance the accessibility and readability of text and images. Here’s how to use magnification gestures on your Android device:
- Enable Magnification Gestures: Go to Settings > Accessibility > Magnification and toggle on the magnification gestures feature. You may need to confirm your selection and follow any setup instructions.
- Trigger Magnification: To activate magnification gestures, simply triple-tap on the screen with one finger. The screen will zoom in on the area you tapped.
- Pan and Zoom: Once in magnification mode, you can pan around the screen by dragging your finger. To zoom in further, use a two-finger pinch-in gesture, and to zoom out, use a two-finger pinch-out gesture.
- Temporary Zoom: If you need to temporarily zoom in on a specific area without enabling the full magnification mode, double-tap and hold on the screen, then drag your finger up or down to adjust the zoom level.
- Shortcut Zoom: Android also provides a quick way to access magnification gestures. Enable the “Accessibility shortcut” in Settings > Accessibility > Accessibility shortcut, and then triple-press the device’s Home or Power button to toggle magnification gestures on or off.
- Magnification Settings: Android offers additional customization options for magnification gestures. You can adjust settings such as magnification level, pan speed, and pan threshold. Access these settings in Settings > Accessibility > Magnification > Magnification settings.
Magnification gestures provide a convenient way to make text and images larger and more readable on Android devices. Whether you need to read small text in an app, view detailed images, or zoom in on specific elements, magnification gestures offer a versatile and accessible solution.
It’s worth noting that the exact steps and gestures for magnification may vary slightly depending on the Android device and version. However, the core functionality of magnification gestures and the ability to zoom in and out should be available on most Android devices.
By leveraging magnification gestures, users can personalize their Android device’s text and image display, making content more accessible and enjoyable to read, view, and interact with.
Using Gestures and Shortcuts for Improved Navigation
Android devices offer a variety of gestures and shortcuts that can significantly improve navigation, making it more efficient and accessible for users. By mastering these gestures and shortcuts, you can effortlessly navigate through your Android device and access various features with ease. Here’s how to use gestures and shortcuts for improved navigation on your Android device:
- Swipe Gestures: Android utilizes various swipe gestures for navigation. For example, swipe up from the bottom of the screen to access the app drawer or the recent apps overview. Swipe down from the top of the screen to view notifications and quick settings. These gestures provide quick access to essential features without needing to press physical buttons.
- Home Button Shortcut: On Android devices without physical home buttons, an on-screen home button is present. Double-tap this button to switch between your current app and the previously used app. This shortcut is a convenient way to multitask and navigate between recently used apps without needing to go through the recent apps overview.
- One-Handed Mode: On larger Android devices, using a one-handed mode can make navigation easier. Swipe diagonally from either bottom corner of the display to activate the one-handed mode, which shrinks the screen’s size for more comfortable one-handed operation.
- Navigation Bar Customization: Android allows you to customize the navigation bar at the bottom of the screen. In Settings > System > Gestures > System navigation, you can choose between gesture-based navigation or traditional navigation buttons. Adjusting these settings based on your preference can enhance navigation efficiency.
- Quick Settings Shortcuts: In the quick settings panel, you can access convenient shortcuts to frequently used settings. Swipe down from the top of the screen twice (or swipe down with two fingers) and tap on the desired setting to quickly toggle Wi-Fi, Bluetooth, screen brightness, and more.
- App-Specific Gestures: Android apps may have specific gestures for navigation or accessing certain features. For example, in some messaging apps, you can swipe right on a conversation to mark it as read or swipe left to delete it. These app-specific gestures can streamline navigation within specific apps.
By familiarizing yourself with these gestures and shortcuts, you can navigate through your Android device more efficiently and access essential features with ease. These features enhance accessibility, making it easier for individuals with mobility impairments or dexterity difficulties to interact with their devices.
It’s important to note that the availability of certain gestures and shortcuts may vary depending on the Android device model and version. However, most Android devices offer a range of intuitive and customizable navigation options.
By leveraging these gestures and shortcuts, Android users can navigate through their devices effortlessly, saving time and improving accessibility in the process.
How to Enable and Use Closed Captioning for Phone Calls
Android devices provide a closed captioning feature that allows users to read transcriptions of phone conversations in real-time. Closed captioning for phone calls can be incredibly useful for individuals with hearing impairments, ensuring clear and accessible communication. Here’s how to enable and use closed captioning for phone calls on your Android device:
- Enable Closed Captioning: Open the Phone app on your Android device and tap the three-dot menu icon in the top-right corner. Select “Settings” from the dropdown menu, then go to Call settings > Accessibility. Toggle on the “Caption calls” or “Real-time text” option.
- Make a Phone Call: Once closed captioning is enabled, make a phone call as you normally would.
- Access the Captioning Feature: During an active call, a small “CC” icon or “Caption” button may appear on the call screen. Tap this icon/button to access the captioning feature.
- Read the Captions: As the conversation progresses, you’ll begin to see real-time captions or transcriptions of the other person’s speech on the call screen. These captions allow you to read what the other person is saying during the call, enhancing clarity and comprehension.
- Adjust Caption Display: Android devices provide options to customize the display of captions during phone calls. You can adjust text size, color, and background settings according to your preferences. These settings are typically found in the Call settings > Accessibility menu.
- End the Call and Disable Captioning: When the call is complete, simply end the call as you normally would. Closed captioning for phone calls will be automatically disabled, allowing you to communicate with others without captions in subsequent calls.
It’s important to note that closed captioning for phone calls may not be available on all Android devices or in all regions. The option to enable this feature depends on the Android device model, carrier, and software version.
Closed captioning for phone calls on Android devices enhances accessibility and ensures that individuals with hearing impairments can engage in clear communication. By enabling and utilizing this feature, users can have meaningful conversations and fully participate in phone calls, regardless of their hearing abilities.
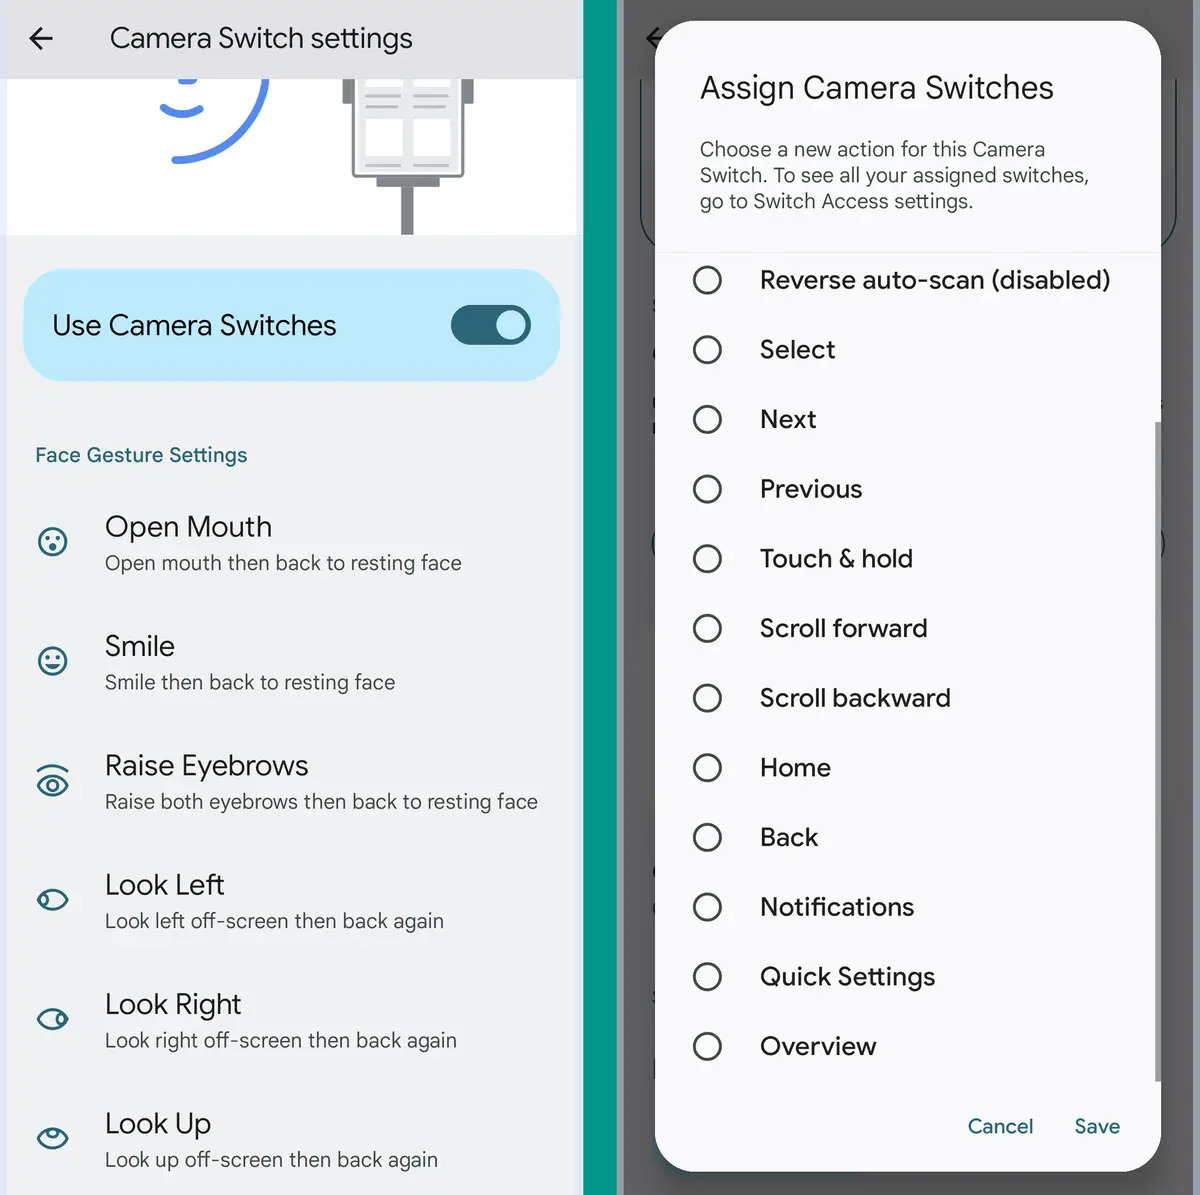
Using the Switch Access Feature for Physical Disabilities
Android devices offer a powerful accessibility feature called Switch Access that allows individuals with physical disabilities to navigate and control their devices using external switches or buttons. Switch Access is designed to provide an accessible and customizable way for users to interact with their Android devices, making technology more inclusive for everyone. Here’s how to use the Switch Access feature for physical disabilities:
- Enable Switch Access: Go to the Accessibility menu in the Settings app and toggle on Switch Access. You may need to confirm your selection and follow any setup instructions.
- Set Up Switches or Buttons: Connect external switches or buttons to your Android device using USB, Bluetooth, or other compatible methods. These switches are used to perform various functions on the device.
- Customize Switches: In the Switch Access settings, you can customize the functions assigned to each switch. You can map specific actions like navigation, selection, scrolling, or opening apps to different switches based on your preference and needs.
- Control Device with Switches: Once Switch Access is enabled and the switches are set up and customized, you can use the switches to navigate through the device’s user interface, select items, enter text, and perform other actions. For example, you can use a switch to move the cursor, another switch to select an option, and so on.
- Automate Tasks: Android’s Switch Access feature also supports task automation. You can create customized sequences of actions, called scanning patterns, to perform complex tasks using a set of switches. This feature helps users streamline their interactions and improve efficiency.
- Customize Timing and Feedback: In the Switch Access settings, you can adjust the timing between switch presses and customize the feedback options to ensure a comfortable and responsive user experience.
Switch Access opens up new possibilities for individuals with physical disabilities, allowing them to independently navigate and control their Android devices. Whether it’s using external switches for mobility limitations or other adaptive devices, this feature empowers users to interact with technology in a way that suits their needs.
It’s worth noting that the exact configuration and compatibility of switches may vary depending on the specific Android device and version. However, most Android devices support external switches and provide comprehensive configuration options for Switch Access.
By leveraging the Switch Access feature, individuals with physical disabilities can overcome barriers and independently utilize their Android devices, enhancing accessibility and promoting inclusivity in the digital world.
Using the Accessibility Shortcut for Quick Access to Features
Android devices offer an Accessibility Shortcut feature that allows users to quickly access and toggle accessibility features with a simple gesture or button press. This shortcut provides convenient and efficient access to important accessibility settings, making it easier for individuals with disabilities to customize their device according to their specific needs. Here’s how to use the Accessibility Shortcut for quick access to features on your Android device:
- Enable Accessibility Shortcut: Go to the Accessibility menu in the Settings app and scroll down to find the “Accessibility shortcut” option. Tap on it to open the settings.
- Choose Features: In the Accessibility Shortcut settings, you’ll see a list of available accessibility features. Select the features you want to include in the shortcut by toggling them on.
- Activate the Shortcut: Once you’ve enabled the desired accessibility features, you can activate the Accessibility Shortcut by performing a specific gesture or pressing a designated button combination. The default gesture is a long-press of the power button, but some devices may offer alternative options like double-tapping the screen or pressing a different physical button.
- Access Features: When you activate the Accessibility Shortcut, a floating menu or dialog box will appear on your screen, providing quick access to the enabled accessibility features. Tap on the desired feature to toggle it on or off.
- Customize Settings: Android devices also allow you to customize certain aspects of the Accessibility Shortcut, such as the gesture or button used to activate it. In the Accessibility Shortcut settings, you may have options to choose an alternate gesture or button combination according to your preference.
The Accessibility Shortcut feature on Android devices greatly simplifies the process of accessing important accessibility features. With a single gesture or button press, users can quickly enable or disable essential settings, providing efficient access to accessibility features and enhancing usability.
It’s worth noting that the availability and functionality of the Accessibility Shortcut may vary depending on the specific Android device model and version. However, most Android devices offer this convenient feature to improve accessibility.
By utilizing the Accessibility Shortcut, individuals with disabilities can easily access and toggle important accessibility features, allowing them to customize their Android devices to better suit their unique needs.
Exploring Additional Accessibility Options in the Accessibility Menu
Android devices offer a comprehensive range of accessibility options within the Accessibility menu. These additional accessibility settings allow users to further customize their Android devices, making them more accessible and user-friendly. By exploring these options, individuals with disabilities can find specific settings that cater to their unique needs. Here are some of the additional accessibility options you’ll find in the Accessibility menu:
- Text-to-Speech: Android provides a built-in text-to-speech (TTS) feature that converts text into spoken words. By enabling this option, users can have text read aloud to them, enhancing access to written content. In the Accessibility menu, you can find TTS settings to customize the voice, speed, and other preferences.
- Color Correction: Android offers various color correction options for individuals with color vision deficiencies. These settings adjust the display to make colors more distinguishable. You can enable color correction in the Accessibility menu and choose the appropriate correction mode according to your specific color vision impairment.
- Display Size and Magnification: In addition to magnification gestures, Android devices provide display size and magnification settings. Display size allows you to adjust the overall size of text and graphics on the screen, while magnification enhances specific areas. These options are particularly helpful for individuals with visual impairments.
- Haptic Feedback: Android devices offer haptic feedback options that provide vibration or tactile feedback when interacting with the touchscreen. Customizable haptic feedback settings allow users to choose vibration patterns for various actions or adjust the intensity of the feedback.
- Audio and Captioning: In the Accessibility menu, Android devices provide additional audio and captioning settings. These options include adjusting sound balance for users with hearing loss in one ear, enabling live captioning for real-time transcription of media playback, or even setting up custom vibrations for calls and notifications.
- Touch and Interaction: Android devices offer touch and interaction settings that allow users to customize how they interact with the touchscreen. These settings include adjusting touch sensitivity, enabling tap assistance for individuals with motor difficulties, or even controlling touch and hold delay times.
It’s important to explore the additional accessibility options in the Accessibility menu to discover settings that best suit your specific needs. The availability of these options may vary depending on the Android device model and version.
By leveraging these additional accessibility options, individuals with disabilities can further personalize their Android devices, ensuring a more accessible and tailored user experience.