
Enabling Auto-Save and Versions
One of the most convenient features on macOS is Auto-Save and Versions, which allows you to automatically save your work and access previous versions of your files. It provides peace of mind by ensuring that your unsaved changes are not lost and gives you the ability to revert to an earlier version if needed.
To enable Auto-Save and Versions, follow these simple steps:
- Open System Preferences from the Apple menu.
- Click on “General.”
- Check the box next to “Ask to keep changes when closing documents.”
- Close the System Preferences window.
With Auto-Save and Versions enabled, your documents will be automatically saved at regular intervals, ensuring that you never lose your progress. But what exactly does Auto-Save and Versions do? Let’s take a closer look.
Understanding Auto-Save and Versions
Auto-Save and Versions work together to provide a seamless and efficient workflow for managing your files on macOS.
Auto-Save ensures that your changes are automatically saved as you work, eliminating the need to manually save your documents. This feature greatly reduces the risk of losing valuable work in the event of a power outage or an unexpected system restart.
Versions, on the other hand, allows you to access and restore previous versions of your files. It creates snapshots of your documents at regular intervals or when significant changes are made. These versions are stored locally on your Mac, giving you the flexibility to revert to an earlier version if needed.
With Auto-Save and Versions, you can focus on your work without the worry of losing progress. It provides a safety net that allows you to experiment with different ideas and easily revert back if necessary.
Additionally, Auto-Save and Versions integrate seamlessly with other macOS features like iCloud Drive. This means that your files and their versions are synchronized across all your devices, giving you the freedom to access and work on your documents from anywhere.
Next, we will explore how to use Auto-Save to ensure that your work is continuously saved, providing you with peace of mind throughout your creative process.
Using Auto-Save
Auto-Save is a powerful feature that automatically saves your work while you’re working on a document. It ensures that your changes are constantly saved, reducing the risk of losing valuable progress. Here’s how to make the most of Auto-Save:
- Start by creating a new document or opening an existing one in an application like Pages, Numbers, or Keynote.
- Once you’ve made changes to the document, Auto-Save will automatically save your work.
- To verify that Auto-Save is enabled, look for the small circle with a checkmark in the top-left corner of the document’s window. This indicates that your changes are being automatically saved.
- You can also manually save your document by pressing Command + S or by clicking on the “File” menu and selecting “Save.”
- If you make a mistake or need to revert to a previous version of your document, you can access the Versions feature (we’ll cover this in more detail later).
Auto-Save works seamlessly in the background, eliminating the need for frequent manual saves. It provides a reliable and efficient way to ensure that your work is continuously saved, giving you more freedom and flexibility to focus on your tasks without interruption.
Now that you’re familiar with using Auto-Save, let’s explore how you can restore a deleted file using this helpful feature.
Restoring a Deleted File with Auto-Save
We’ve all been there – accidentally deleting a file that we later realize we needed. With Auto-Save, recovering a deleted file is a breeze. Here’s how you can restore a deleted file using this handy feature:
- Open the application where you originally created or last saved the deleted file.
- Click on the “File” menu and select “Open Recent.”
- A list of recently opened files will appear. Look for the deleted file in the list.
- If you see the deleted file, simply click on it to open it. Auto-Save will automatically restore the most recent saved version of the file.
- If the deleted file doesn’t appear in the “Open Recent” list, don’t worry! You can still retrieve it.
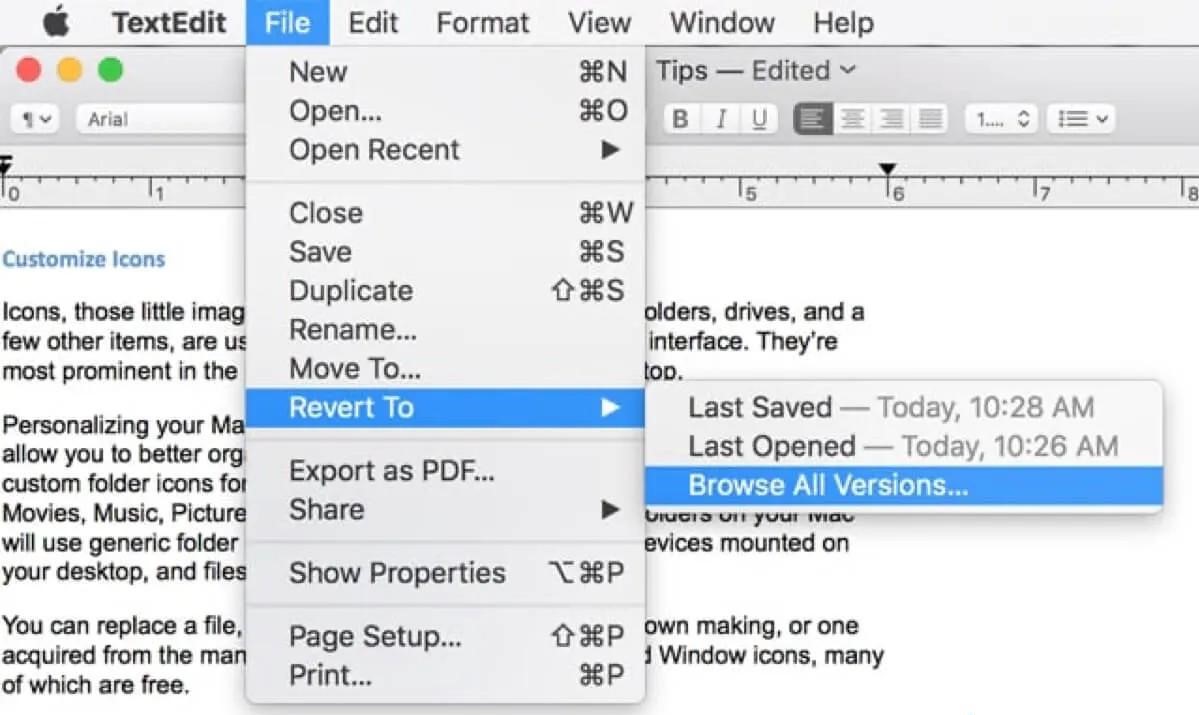
- Click on the “File” menu and select “Revert To.”
- A drop-down menu will appear, presenting you with the option to “Browse All Versions.”
- Click on “Browse All Versions” to access the Versions interface.
- In the Versions interface, you’ll see a timeline of snapshots of your document, including the deleted version.
- Select the deleted version of the file and click “Restore” to retrieve it.
Restoring a deleted file with Auto-Save is quick and effortless. Whether you accidentally deleted a file or changed your mind about deleting it in the first place, Auto-Save makes it easy to recover your work and get back to what you were doing.
Now that you know how to restore a deleted file, let’s delve into the capabilities of managing versions using the Auto-Save and Versions feature.
Managing Versions
The Auto-Save and Versions feature not only helps you automatically save your work and restore deleted files, but it also provides robust tools for managing versions of your documents. Let’s explore how you can effectively manage versions:
Opening a previous version of a file: To access previous versions of a document, click on the “File” menu and select “Revert To.” From the drop-down menu, choose “Browse All Versions.” This will open the Versions interface, where you can see a timeline of snapshots of your document. Simply select the desired version and click “Restore” to open it.
Comparing different versions of a file: In the Versions interface, you can compare different versions of a document side by side. Click on the timeline and select a version to view it. Use the arrow buttons or swipe gestures to navigate between versions and compare them. This allows you to easily identify changes and decide which version suits your needs.
Deleting unused versions: Over time, your document may accumulate multiple versions that you no longer need. To delete unused versions, open the Versions interface and hover over the version you want to delete. A small ‘X’ will appear in the top-left corner of the thumbnail. Click on the ‘X’ to delete the version. Be cautious, as this action is permanent and cannot be undone.
Managing versions gives you control over your document’s history and allows you to easily access, compare, and delete previous iterations. It provides a valuable tool for organizing your work and collaborating with others.
Now, let’s explore how you can disable Auto-Save and Versions if you no longer need to use these features.
Opening a Previous Version of a File
One of the key benefits of the Auto-Save and Versions feature on macOS is the ability to access and open previous versions of your files. This can be incredibly useful if you need to retrieve or refer to an earlier version of a document. Here’s how you can easily open a previous version of a file:
- Start by opening the file you want to access the previous versions for in the respective application.
- Click on the “File” menu located on the menu bar at the top of the screen.
- From the drop-down menu, select “Revert To.”
- In the submenu that appears, click on “Browse All Versions.”
- A Versions interface will open, displaying a timeline of snapshots of your document.
- Scroll through the timeline to find the specific version you want to open.
- Once you locate the desired version, click on it to open it for viewing.
Opening a previous version of a file allows you to review and access earlier iterations of your work. This can be helpful for various purposes such as comparing changes, retrieving lost content, or simply referencing previous versions of your document for specific information or data.
By providing easy access to previous versions, Auto-Save and Versions feature empower you to work with confidence, knowing that you always have the option to revert back to an earlier state of your document if needed.
Next, let’s take a look at how you can compare different versions of a file within the Versions interface.
Comparing Different Versions of a File
The Auto-Save and Versions feature on macOS provides a powerful tool for comparing different versions of a file. This feature allows you to easily identify changes between versions and make informed decisions. Here’s how you can compare different versions within the Versions interface:
- Open the file you want to compare in its respective application.
- Go to the “File” menu located on the menu bar at the top of the screen.
- Select “Revert To” from the drop-down menu.
- In the submenu, choose “Browse All Versions.”
- The Versions interface will appear, displaying a timeline of snapshots of your document.
- Click on the versions you want to compare to view them side by side.
- Use the arrow buttons or swipe gestures to navigate between the versions.
Comparing different versions of a file is particularly useful to pinpoint specific changes that have been made. It allows you to identify additions, deletions, modifications, and other revisions made over time. This can be especially handy when collaborating with others or when reviewing your own work.
By providing a visual representation of changes, the Auto-Save and Versions feature helps you make informed decisions, track the progress of your work, and ensure consistency and accuracy in your documents.
Now that you understand how to compare different versions, let’s move on to exploring how to delete unused versions to maintain a clutter-free Versions interface.
Deleting Unused Versions
Over time, your document may accumulate multiple versions, especially if you frequently make changes or save different iterations. To keep your Versions interface organized and clutter-free, you can delete unused versions. Follow these steps to delete unused versions:
- Open the file for which you want to delete versions.
- Click on the “File” menu located on the menu bar at the top of the screen.
- From the drop-down menu, select “Revert To.”
- In the submenu, choose “Browse All Versions.”
- The Versions interface will appear, displaying a timeline of snapshots of your document.
- Hover your cursor over the version you want to delete.
- A small ‘X’ icon will appear in the top-left corner of the thumbnail. Click on the ‘X’ to delete the version.
Be cautious when deleting versions, as this action is permanent and cannot be undone. Therefore, it is recommended to review the versions you want to delete to avoid accidentally removing important information or previous iterations that you may need later.
By deleting unused versions, you can keep your Versions interface organized and focused on the relevant snapshots of your document. This can help streamline your workflow and make it easier to navigate and manage the different versions of your files.
Now that you know how to delete unused versions, let’s move on to learn how to turn off Auto-Save and Versions if you no longer require these features.
Turning off Auto-Save and Versions
If you find that Auto-Save and Versions are not necessary for your specific workflow or if you prefer to manage your files manually, you have the option to turn off these features. Here’s how you can disable Auto-Save and Versions:
- Open System Preferences by clicking on the Apple menu in the top-left corner of the screen and selecting “System Preferences.”
- Click on “General” in the System Preferences window.
- Uncheck the box next to “Ask to keep changes when closing documents.”
- Close the System Preferences window.
By disabling Auto-Save and Versions, your changes will no longer be saved automatically, and you won’t have access to previous versions of your files.
It’s important to note that turning off these features means you will lose the benefits they provide, such as protection against data loss and the ability to revert to earlier versions. Therefore, it’s recommended to carefully consider your workflow and backup strategies before disabling Auto-Save and Versions.
If you change your mind and want to re-enable Auto-Save and Versions, you can follow the same steps and check the box next to “Ask to keep changes when closing documents.”
Now that you know how to turn off Auto-Save and Versions, you can tailor your macOS experience to suit your specific needs and preferences.