
What is Auto Wi-Fi Connecting?
Auto Wi-Fi connecting, also known as automatic Wi-Fi connection, is a feature found on various devices, including smartphones, laptops, and tablets. This feature allows these devices to automatically connect to a known Wi-Fi network without the need for manual intervention from the user.
When you enable auto Wi-Fi connecting, your device will search for and connect to Wi-Fi networks that it has previously connected to or networks that you have designated as trusted. The device will remember the network’s credentials, such as the network name (SSID) and password, and automatically establish a connection whenever it is within range.
This feature can be convenient as it saves you the hassle of manually connecting to your preferred Wi-Fi network each time you enter its coverage area. It ensures a seamless internet experience, allowing you to stay connected without interruptions.
Auto Wi-Fi connecting is particularly useful when you frequently move between different locations, such as homes, offices, or coffee shops, where Wi-Fi networks are available. It eliminates the need to select a network manually every time, allowing you to focus on your tasks at hand.
However, while auto Wi-Fi connecting can be convenient, it does come with its own set of drawbacks and concerns, which we will explore in the following sections.
Why You Might Want to Prevent Auto Wi-Fi Connecting
While auto Wi-Fi connecting offers convenience, there are several reasons why you might want to disable this feature on your devices:
- Privacy and Security: Automatically connecting to Wi-Fi networks can expose your device to potential security risks. Public Wi-Fi networks, for example, may not have adequate security measures in place, making it easier for hackers to intercept your data. By disabling auto Wi-Fi connecting, you have more control over the networks you connect to and can prioritize those that are secure.
- Data Usage: If your device connects to Wi-Fi networks automatically, it may unknowingly consume data even when you have a stable cellular connection. This can lead to unexpected data charges or depletion of your data plan. Disabling auto Wi-Fi connecting ensures that your device uses Wi-Fi only when you intentionally connect to a network.
- Battery Drain: Wi-Fi connectivity consumes battery power, especially when your device is constantly scanning for available networks. If you disable auto Wi-Fi connecting, you can conserve battery life by manually connecting only when needed.
- Network Preference: Auto Wi-Fi connecting may prioritize certain networks over others, leading to potential connectivity issues. Disabling this feature allows you to choose the network you prefer to connect to in situations where multiple networks are available.
By preventing auto Wi-Fi connecting, you have more control over your device’s Wi-Fi connections, prioritizing security, data usage, battery life, and network preferences according to your needs. However, it’s essential to remember that disabling this feature means you’ll need to manually connect to Wi-Fi networks each time, which may be less convenient in certain situations.
How to Prevent Wi-Fi from Connecting Automatically on Windows
If you want to disable auto Wi-Fi connecting on your Windows device, you can follow these steps:
- Open the Settings app by clicking on the Start button and selecting the Settings (gear) icon.
- In the Settings window, click on Network & Internet.
- In the left sidebar, click on Wi-Fi.
- Scroll down until you find the Advanced network settings section and click on the Manage known networks link.
- A list of previously connected Wi-Fi networks will appear. Select the network that you want to prevent from connecting automatically.
- Click on the Properties button.
- In the network properties window, toggle the Connect automatically when in range switch to Off.
- Click OK to save the changes.
By following these steps, you have successfully disabled auto Wi-Fi connecting for the specific network on your Windows device. Repeat these steps for each network you want to prevent from connecting automatically.
It’s important to note that these instructions may vary slightly depending on your version of Windows. If the steps above do not match your Windows version, refer to the official documentation or search online for specific instructions.
How to Prevent Wi-Fi from Connecting Automatically on Mac
If you’re using a Mac and want to disable auto Wi-Fi connecting, you can do so by following these steps:
- Click on the Wi-Fi icon located in the menu bar at the top right corner of your screen.
- From the drop-down menu, click on Open Network Preferences.
- In the Network preferences window, select the Wi-Fi network you want to prevent from connecting automatically.
- Click on the Advanced button.
- A list of Preferred Networks will appear. Select the Wi-Fi network you want to modify.
- Click on the – (minus) button to remove the network from the preferred list.
- Once removed, the network will no longer connect automatically.
- Click OK to save the changes and close the window.
By following these steps, you have successfully prevented the selected Wi-Fi network from connecting automatically on your Mac. Repeat these steps for any other networks you want to exclude from auto-connecting.
Please note that the steps provided are based on the latest version of macOS, and there may be slight variations depending on the version you are using. If you encounter any issues or the steps differ, consult the official macOS documentation or Apple Support website for accurate instructions related to your specific macOS version.
How to Prevent Wi-Fi from Connecting Automatically on Android
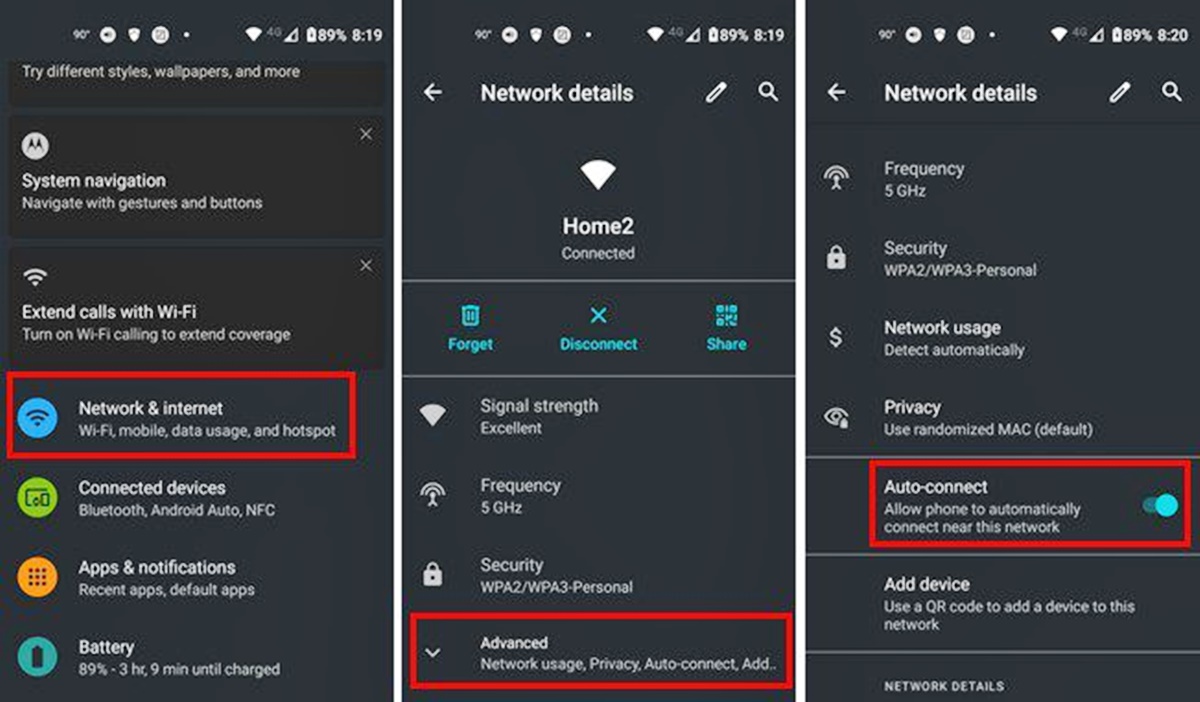
If you’re an Android user and want to disable auto Wi-Fi connecting on your device, you can do so by following these steps:
- Open the Settings app on your Android device.
- Scroll down and tap on Network & internet.
- Tap on Wi-Fi.
- Tap on the three-dot menu icon located at the top-right corner of the screen.
- From the drop-down menu, select Wi-Fi preferences or Advanced. (The exact name may vary depending on your Android version and device manufacturer.)
- Look for an option named Connect to open networks automatically or Auto-connect to Wi-Fi.
- Toggle the switch to Off or deselect the option to disable auto Wi-Fi connecting.
Once you’ve completed these steps, your Android device will no longer connect automatically to Wi-Fi networks in range. You’ll need to manually connect to a network when needed.
Note that the above steps are general guidelines, and the menu names and options may vary depending on your Android version, device manufacturer, and any customizations made to the operating system. If you’re having trouble finding the exact settings, consult your device’s user manual or the support documentation provided by the manufacturer.
How to Prevent Wi-Fi from Connecting Automatically on iOS
If you’re using an iOS device and want to disable auto Wi-Fi connecting, you can follow these steps:
- Open the Settings app on your iOS device.
- Tap on Wi-Fi.
- Find the Wi-Fi network that you want to prevent from connecting automatically and tap on the “i” icon next to it.
- In the network settings, you will see an option called Auto-Join. Toggle this switch to Off. This will prevent your device from automatically connecting to the selected Wi-Fi network.
- Repeat these steps for any other Wi-Fi networks that you want to exclude from auto-connecting.
By following these steps, you have successfully disabled auto Wi-Fi connecting for the selected networks on your iOS device. Your device will no longer automatically connect to these networks, and you will need to manually connect when you want to use them.
Please note that the menu options and steps provided here are based on the latest iOS version, and there may be slight variations depending on the version you are using. If you encounter any issues or the steps differ, consult the official Apple documentation or Apple Support website for accurate instructions related to your specific iOS version.
Other Considerations and Tips for Preventing Auto Wi-Fi Connecting
While following the steps mentioned earlier will help you disable auto Wi-Fi connecting on your devices, there are a few additional considerations and tips to keep in mind:
- Review Wi-Fi Connection Settings: Periodically review and update your Wi-Fi connection settings. Remove any networks that you no longer use or trust.
- Use VPN for Public Networks: When connecting to public Wi-Fi networks, consider using a reliable Virtual Private Network (VPN) to enhance security and protect your data from potential threats.
- Manually Forget Networks: If you want to completely remove a network from your device’s memory, you can manually forget the network. This prevents your device from connecting to it automatically in the future.
- Be Mindful of Automatic Updates: Some devices have settings that allow for automatic updates over Wi-Fi. Disable this feature if you want to prevent unexpected Wi-Fi connections during updates.
- Revisit Auto Wi-Fi Connecting as Needed: Assess your Wi-Fi connectivity needs over time. If your circumstances change, you can always revisit the settings and enable auto Wi-Fi connecting if it becomes more convenient.
- Consider App-Specific Settings: Some applications have their own Wi-Fi connection settings, separate from the device’s general settings. Review the options within individual apps to fine-tune auto Wi-Fi connecting preferences.
By considering these tips and remaining vigilant about your device’s Wi-Fi connectivity settings, you can better control when and how your device connects to Wi-Fi networks. This helps prioritize security, manage data usage, and optimize battery life, according to your specific preferences and needs.