
Inserting the Equation Editor in Google Docs
Google Docs is a versatile and powerful tool for creating and editing documents. With the Equation Editor feature, you can easily input mathematical equations and symbols into your Google Docs. The Equation Editor provides a user-friendly interface that allows you to create complex formulas and equations with ease.
To access the Equation Editor in Google Docs, simply follow these steps:
- Open a new or existing Google Docs document.
- Click on the “Insert” tab in the top menu.
- From the dropdown menu, select “Equation”.
Once you have accessed the Equation Editor, you will notice a toolbar with various options for building and editing equations. You can use the toolbar to insert mathematical symbols, fractions, exponents, and more.
Furthermore, the Equation Editor supports a wide range of mathematical symbols and characters, making it a valuable tool for writing scientific papers, math equations, and other technical documents.
It’s worth noting that the Equation Editor is also available in the mobile version of Google Docs. To access it on your mobile device, simply open the Google Docs app, tap the “+” button to create a new document, and then select “Equation” from the toolbar at the top of the screen.
With the Equation Editor in Google Docs, you can seamlessly integrate mathematical equations into your documents, making your work more professional and visually appealing. It’s a valuable feature for students, educators, researchers, and anyone else who needs to incorporate mathematical notation into their written work.
Creating Simple Equations
The Equation Editor in Google Docs allows you to create simple equations with just a few clicks. Whether you need to add basic arithmetic expressions or mathematical formulas, the Equation Editor makes it easy to input these equations into your documents.
Here’s how you can create simple equations in Google Docs:
- First, open the Equation Editor by following the steps outlined in the previous section.
- On the toolbar, you’ll find various options for building equations. You can select the desired mathematical symbols and operators by clicking on the corresponding buttons.
- For example, if you want to create a simple addition equation, you can click on the “+” symbol button in the toolbar. This will insert a placeholder for you to enter the numbers or variables you want to add.
- Once you’ve entered the numbers or variables, you can use the toolbar to format the equation and adjust the placement of symbols as needed.
Furthermore, you can also use the Equation Editor’s menu options to create more complex equations. For instance, you can insert fractions, exponents, square roots, and more.
It’s important to note that while the Equation Editor provides a simplified interface, it still follows standard mathematical conventions. You need to enter your equations using proper mathematical syntax to ensure accuracy and consistency.
By utilizing the Equation Editor in Google Docs, you can easily create equations for various applications. Whether it’s for solving mathematical problems, demonstrating algebraic concepts, or illustrating scientific formulas, the Equation Editor streamlines the process and helps convey your ideas effectively.
Adding Fractions and Exponents
The Equation Editor in Google Docs offers the functionality to add fractions and exponents to your equations. These features allow you to represent mathematical expressions involving division and powers with ease.
Here’s how you can add fractions and exponents in Google Docs:
- Open the Equation Editor by following the steps outlined earlier.
- To add a fraction, click on the “Fraction” button on the toolbar. This will display a numerator and denominator placeholder.
- Enter the desired values or variables for the numerator and denominator in the respective placeholders.
- You can also adjust the size and position of the fraction using the toolbar options.
To add an exponent, follow these steps:
- Click on the “Scripts” button on the toolbar.
- From the dropdown menu, select the “Superscript” option. This will create a smaller text box above the baseline where you can input the exponent.
- Type the desired value or variable into the exponent textbox.
- Use the toolbar options to customize the formatting of the exponent if needed.
The Equation Editor also provides other formatting options for fractions and exponents. You can resize them, adjust the baseline alignment, and apply additional styling as required.
With the ability to represent fractions and exponents accurately, the Equation Editor in Google Docs becomes a powerful tool for writing math equations, scientific formulas, and technical content. It simplifies the process of creating equations with complex exponentiation and fraction notation, allowing you to focus more on the content and less on formatting.
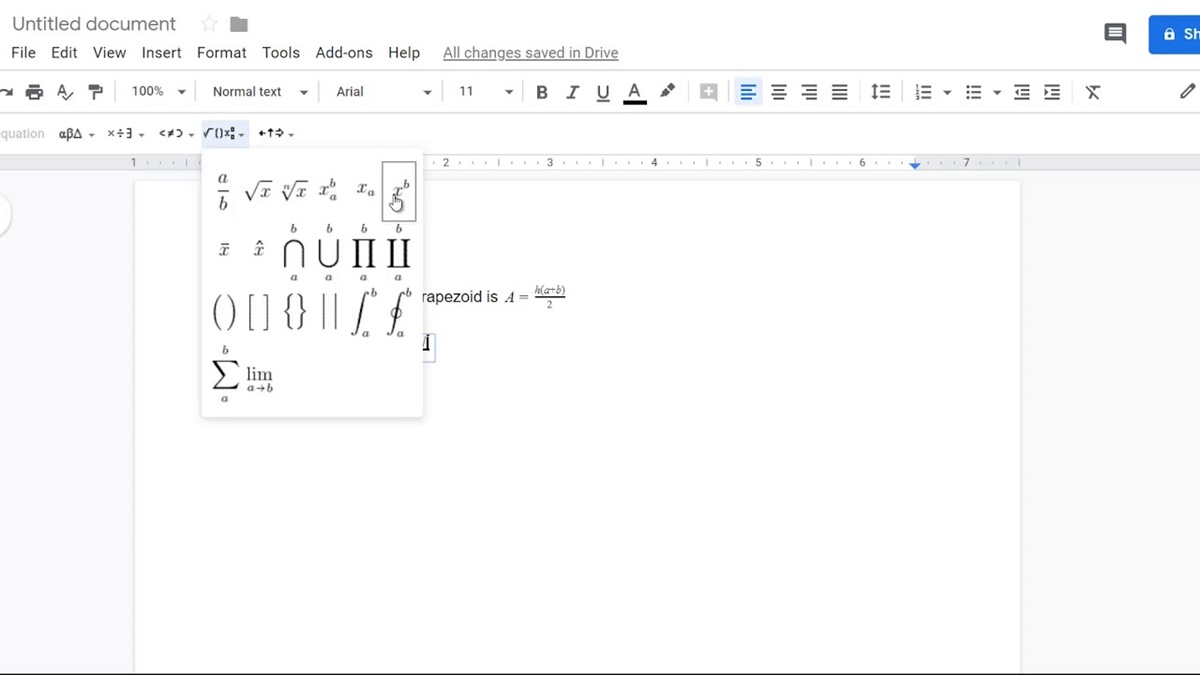
Using Symbols and Special Characters
The Equation Editor in Google Docs provides a vast array of symbols and special characters that you can incorporate into your equations. These symbols play a crucial role in mathematical notations, scientific formulas, and other technical writing.
Here’s how you can use symbols and special characters in Google Docs:
- Start by opening the Equation Editor in your Google Docs document.
- On the toolbar, you’ll find a variety of buttons representing different symbol categories, such as Greek letters, operators, arrows, and more.
- Click on the desired symbol category to access a dropdown menu containing various symbols and characters within that category.
- Select the symbol you want to use by clicking on it. It will be inserted into your equation at the cursor position.
- You can repeat this process to add as many symbols and special characters as needed.
In addition to the predefined symbols, you can also insert custom symbols using LaTeX notation. Simply select the “LaTeX” option from the symbol categories menu, and then enter the corresponding LaTeX code for the desired symbol. Google Docs will automatically convert the code into the appropriate symbol.
The ability to use symbols and special characters enhances the expressiveness and precision of your equations. Whether you’re working with mathematical notations, scientific formulas, or any other technical content, the Equation Editor in Google Docs empowers you to accurately represent complex concepts and ensure clear communication.
Furthermore, the Equation Editor in Google Docs also allows you to adjust the size, style, and placement of symbols and special characters. This ensures that your equations look polished and professional, enhancing the overall quality of your documents.
Adjusting the Font and Size
When using the Equation Editor in Google Docs, you have the flexibility to adjust the font and size of your equations. This feature allows you to customize the appearance of your mathematical expressions to match your document’s style and formatting.
To adjust the font and size of your equations in Google Docs, follow these steps:
- Access the Equation Editor by opening a Google Docs document and selecting “Equation” from the “Insert” tab.
- Once you’re in the Equation Editor, you’ll notice a toolbar with various formatting options.
- Click on the “Font” dropdown menu to choose a different font for your equations. Select the font that best suits your document’s visual style and readability.
- Next, click on the “Size” dropdown menu to adjust the font size of your equations. You can choose from a range of sizes to ensure that your equations are appropriately scaled within your document.
By adjusting the font and size of your equations, you can create visual consistency and enhance the overall aesthetic appeal of your document. This is particularly important when working with technical or scientific content where equations need to stand out and be easily distinguishable from the surrounding text.
In addition to font and size adjustments, the Equation Editor in Google Docs also allows you to modify other formatting attributes such as bold, italic, underline, and color. These options give you further control over the appearance of your equations, letting you emphasize certain elements or create visual cues.
Remember to strike a balance between readability and visual appeal when adjusting the font and size of your equations. Ensuring that your equations are clear and legible will ensure that your readers can easily understand and interpret their meaning.
Aligning Equations and Text in Google Docs
Aligning equations and text correctly is crucial to maintaining a professional and organized appearance in your Google Docs documents. Fortunately, the Equation Editor in Google Docs provides several options for aligning equations and controlling their placement within the text.
To align equations and text in Google Docs, follow these steps:
- Open the Equation Editor by selecting “Equation” from the “Insert” tab in a Google Docs document.
- Once you’re in the Equation Editor, you’ll notice a toolbar with alignment options.
- Click on the alignment buttons to choose how you want your equations to be aligned within the text. You can align equations to the left, center, or right.
By default, equations are aligned to the baseline of the surrounding text. This ensures that the equations are vertically aligned with the text and maintain consistency within the document.
In addition to alignment, you can also adjust the spacing between equations and text. The Equation Editor offers options to control the margins and spacing around equations, allowing you to fine-tune the layout to your preference.
Proper alignment of equations and text helps improve the readability and organization of your Google Docs document. Clear and logical placement of equations ensures that readers can easily follow the flow of information.
Furthermore, it’s important to maintain consistency in alignment throughout your document. By aligning equations consistently with the surrounding text, you can create a cohesive and professional appearance. This is especially crucial when working on technical or scientific documents that require precise formatting.
Take the time to experiment with different alignment options in the Equation Editor to find the configuration that best suits your document’s needs. Aligning equations and text appropriately will significantly enhance the visual appeal and readability of your Google Docs documents.
Importing Equations from Other Sources
The Equation Editor in Google Docs not only allows you to create equations within the application but also provides the capability to import equations from other sources. This feature saves time and effort by allowing you to leverage existing equations created in external tools or documents.
To import equations from other sources into Google Docs, follow these steps:
- Ensure that the equation you want to import is saved in a compatible file format that Google Docs supports, such as a LaTeX (.tex) file or an image (.png, .jpg, .svg).
- Open your Google Docs document and place the cursor where you want to insert the imported equation.
- Select “Insert” from the top menu and choose “Image”.
- In the dialog box that appears, select the option to upload the saved equation file from your computer or choose the option to import from a URL if the equation is hosted online.
- Click “Insert” to import the equation into your Google Docs document.
Once imported, you can resize, position, and adjust the formatting of the equation using the tools available in Google Docs.
Importing equations from other sources allows you to seamlessly integrate content created in external applications or tools into your Google Docs documents. This is especially useful when collaborating on documents or when you need to combine equations from different sources into a single document.
Whether you have equations stored in LaTeX files, images, or other compatible formats, Google Docs makes it easy to bring them into your document with just a few simple steps. This feature expands the capabilities of the Equation Editor, giving you more flexibility and convenience.
By importing equations from other sources, you can leverage the work you have done in other applications and include them seamlessly in your Google Docs documents, ensuring a smooth and efficient workflow.
Converting Equations to Images
In certain situations, you may need to convert your equations in Google Docs to images for various purposes. Converting equations to images ensures that the equations retain their formatting and appearance, regardless of the platform or application they are viewed on.
To convert equations to images in Google Docs, follow these steps:
- Select the equation or equations that you want to convert to images by clicking and dragging your cursor across them.
- Right-click on the selected equation(s) and choose “Save as Image” from the context menu.
- Specify the location on your computer where you want to save the image file and click “Save”.
The equation(s) will be saved as an image file (e.g., PNG or JPEG) that you can use in other applications, upload to websites, or insert into different types of documents.
This feature is particularly useful when you need to share your equations with others who may not have access to Google Docs or when you want to include equations in a presentation, publication, or online platform that does not support equation rendering.
By converting equations to images, you ensure that the equations are displayed exactly as intended, without any variation in formatting or rendering across different systems or platforms.
Additionally, converting equations to images provides a workaround for scenarios where equation rendering or compatibility may be limited. You can easily embed the image of the equation into various applications, such as word processors, presentation software, or even web pages, ensuring that the equation looks consistent and accurate regardless of the platform.
Remember to keep both the original Google Docs document with the editable equations and the converted image file for future reference, in case any modifications or updates are needed.
Converting equations to images in Google Docs offers a convenient way to preserve the appearance and formatting of equations, making them versatile for use in a wide range of applications and environments.
Tips and Tricks for Using the Equation Editor
The Equation Editor in Google Docs is a powerful tool for creating and formatting mathematical equations. Here are some tips and tricks to help you make the most out of this feature:
- Use keyboard shortcuts: To speed up your equation creation process, utilize keyboard shortcuts available in the Equation Editor. For example, you can press Ctrl+= (Windows) or Command+= (Mac) to instantly open the Equation Editor and start creating your equations.
- Explore the equation templates: Google Docs provides a variety of equation templates that you can use as a starting point. These templates offer preformatted equations for common mathematical notations, saving you time and ensuring accuracy.
- Master LaTeX notation: LaTeX is a powerful typesetting system commonly used for writing mathematical equations. If you’re already familiar with LaTeX syntax, you can enter equations using LaTeX notation in the Equation Editor by selecting the LaTeX option from the symbol categories menu.
- Group and align equations: When working with multiple equations, you can use the Equation Editor’s grouping and alignment options to create a cohesive and organized layout. Group related equations together and align them using the alignment buttons on the toolbar.
- Preview equations: To preview how your equations will look when printed or exported, use the “Preview” option available in the Equation Editor. This allows you to ensure that your equations appear as intended before finalizing your document.
- Collaborate with others: The Equation Editor in Google Docs supports real-time collaboration, allowing you to work on mathematical equations with others simultaneously. Take advantage of this feature to collaborate with colleagues, classmates, or teammates on math-related projects.
- Learn from LaTeX equation resources: Since Google Docs supports LaTeX notation, you can take advantage of the vast resources available online for learning and creating complex equations. There are LaTeX equation editors and online LaTeX equation tutorials that you can use to enhance your equation creation skills.
- Experiment with formatting options: The Equation Editor offers various formatting options, including font styles, size adjustments, color customization, and more. Take the time to experiment with different formatting options to achieve the desired visual representation of your equations.
- Practice and review: Like any skill, using the Equation Editor takes practice. Regularly review your equations for accuracy, readability, and consistency. Take note of any commonly used equations or symbols you may want to save as your own templates for future use.
By incorporating these tips and tricks into your equation creation process, you can maximize your productivity and create professional-looking mathematical equations in your Google Docs documents.
Saving and Sharing Equations in Google Docs
Google Docs provides convenient ways to save and share your equations, allowing you to collaborate with others and access your equations across different devices. Here’s how you can save and share your equations in Google Docs:
Saving Equations:
- As you work on your Google Docs document, the equations you create are automatically saved within the document itself. There’s no need to manually save each equation separately.
- If you want to reuse specific equations in the future, you can save them as templates. Simply select the equation, right-click, and choose “Save as new equation” from the context menu. Give your equation a name, and it will be available as a template in the Equation Editor for future use.
Sharing Equations:
- To share your Google Docs document with others, click on the “Share” button in the top-right corner of the document editor. You can enter the email addresses of the individuals you want to share the document with and choose their access permissions (view, comment, or edit).
- When you share a Google Docs document, the equations you’ve included will be visible and editable by the collaborators, provided they have the necessary permissions. They can make changes to the equations, add new ones, or use the Equation Editor to modify existing ones.
- If you want to share specific equations or a section that contains equations, you can use the “Suggesting” or “Comment” mode in Google Docs. This allows collaborators to provide feedback or make suggestions without directly modifying the equations.
- Remember that the Equation Editor in Google Docs allows for real-time collaboration. Multiple users can work on equations simultaneously, seeing each other’s changes in real-time. This makes it a powerful tool for collaborative math-related projects.
Saving and sharing equations in Google Docs ensures that your work is easily accessible and can be collaborated on with others. It streamlines the process of collaboration and allows for seamless integration of mathematical equations in your documents.
Whether you’re working on academic papers, technical reports, or collaborative projects, the ability to save and share equations in Google Docs ensures that you can collaborate efficiently and effectively with others, all while maintaining the accuracy and integrity of your mathematical notations.