
Setting up Split Screen on iPad
Split Screen is a useful feature on the iPad that allows you to multitask and view two apps side by side. It can greatly enhance your productivity and efficiency by eliminating the need to constantly switch between apps. If you’re wondering how to set up Split Screen on your iPad, follow these simple steps:
1. Update your iPad: Before you can use Split Screen, ensure that your iPad is running the latest version of iOS. To check for updates, go to Settings > General > Software Update.
2. Open the first app: Launch the app that you want to appear on one side of the Split Screen. This will be the primary app in Split Screen view.
3. Swipe up from the bottom: On iPad models with a Home button, swipe up from the bottom of the screen to reveal the Dock. On iPad models without a Home button, swipe up from the bottom edge of the screen to access the App Switcher.
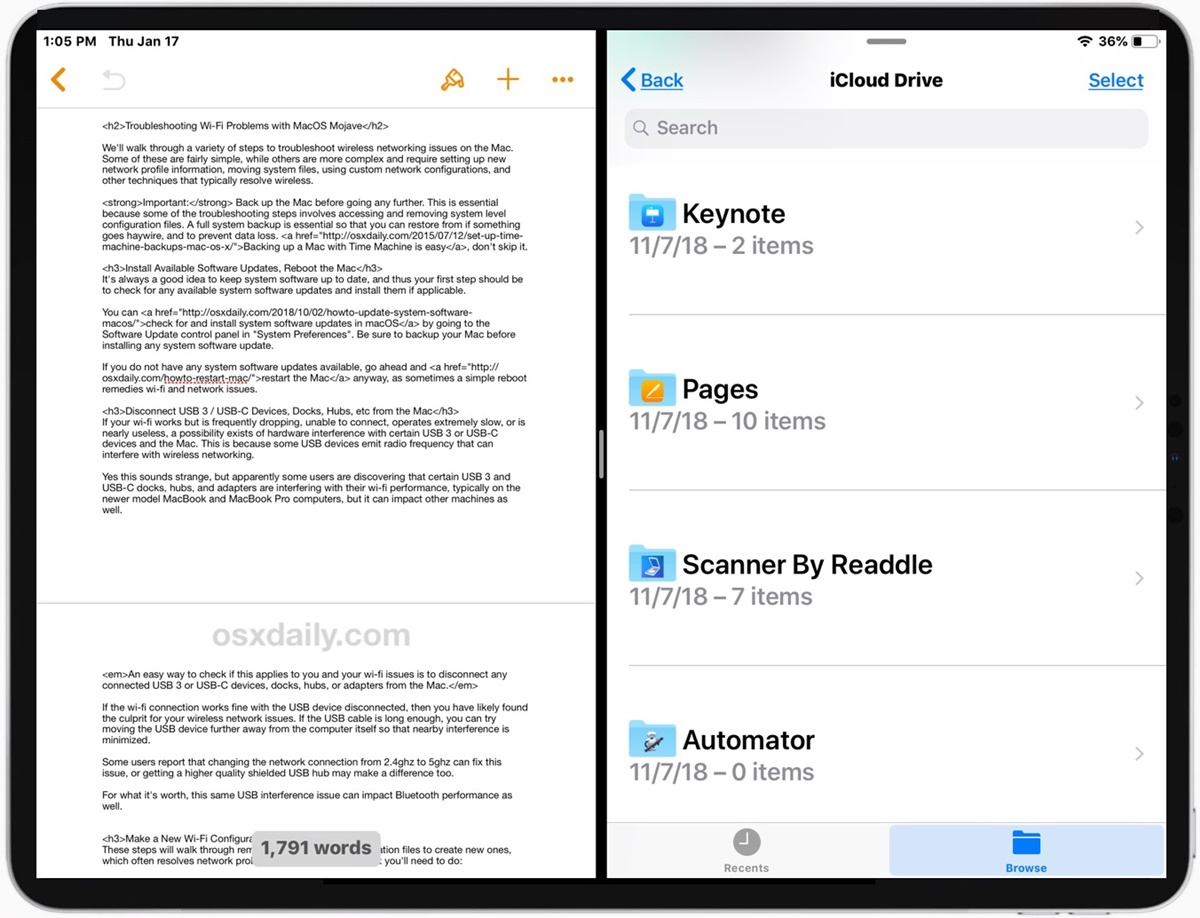
4. Drag the second app: In the Dock or App Switcher, locate the second app you want to use in Split Screen. Long-press on the app icon and drag it to the left or right edge of the screen until a green outline appears. Release your finger to open the app in Split Screen.
5. Adjust the Split Screen: To resize the two apps in Split Screen, use the vertical bar that separates them. Simply tap and drag the bar towards the center of the screen to make one app larger or smaller.
6. Switch between apps: To switch the primary app in Split Screen, swipe down on the top edge of the second app to reveal the Slide Over view. Tap on the app you want to make the primary app, and it will replace the current primary app.
That’s it! You have now successfully set up Split Screen on your iPad. You can enjoy the convenience of multitasking and increase your productivity by using two apps simultaneously. Experiment with different app combinations and discover the possibilities that Split Screen offers.
Using Split Screen with Safari
Safari, the default web browser on your iPad, is perfectly compatible with Split Screen. This allows you to browse the web while using another app side by side. Here’s how to use Split Screen with Safari:
1. Activate Split Screen: Follow the steps outlined in the previous section to set up Split Screen on your iPad.
2. Open Safari: Launch Safari as the primary app in Split Screen. You can access your favorite websites, search the web, or open multiple tabs for a seamless browsing experience.
3. Add a second app: Swipe up from the bottom to reveal the Dock or use the App Switcher to locate and open the second app alongside Safari. This could be anything from your email client to note-taking app or even a messaging app.
4. Work in Split Screen: Once you have Safari and the second app open, you can interact with both simultaneously. For example, you can read an article in Safari while taking notes in the second app, or reference a webpage while composing an email.
5. Adjust the Split Screen: If you want to make one app larger or smaller, simply tap and drag the vertical bar between the two apps. You can customize the size of each app according to your preference and the tasks at hand.
6. End Split Screen: To exit Split Screen and revert to using one app at a time, simply swipe the vertical bar all the way to the left or right until the app you no longer need disappears from the screen.
Using Split Screen with Safari allows you to maximize your web browsing experience while simultaneously multitasking with another app. Whether you’re doing research, responding to emails, or jotting down important information, Split Screen with Safari enhances your productivity on the iPad.
Using Split Screen with Mail
Managing your emails efficiently is crucial for staying organized and productive. With Split Screen, you can have your email client open alongside another app, making it easier to respond to messages or reference important information. Here’s how you can use Split Screen with the Mail app on your iPad:
1. Enable Split Screen: Follow the steps mentioned earlier to set up Split Screen on your iPad.
2. Launch the Mail app: Open the Mail app as the primary app in Split Screen. This will allow you to access your inbox, read and reply to emails, or compose new messages.
3. Add a second app: Swipe up from the bottom or use the App Switcher to select and open the second app alongside Mail. This could be a note-taking app, a calendar, or any other app that you need to reference while managing your emails.
4. Email multitasking: With Split Screen, you can read emails, reply to messages, and perform other email-related tasks while simultaneously interacting with the second app. For example, you can refer to a meeting invitation in Mail while checking your availability in the calendar app.
5. Resize the Split Screen: Adjust the vertical bar between the two apps to make one app larger or smaller. This flexibility allows you to customize the Split Screen view based on the priority and importance of each task.
6. Exit Split Screen: To exit Split Screen and switch back to using one app at a time, swipe the vertical bar to the left or right until the Mail app occupies the full screen.
Using Split Screen with the Mail app on your iPad streamlines your email management process by allowing you to view and interact with emails while simultaneously engaging with another app. This improved multitasking capability enhances your productivity and ensures that you can stay on top of your communication without missing a beat.
Using Split Screen with Notes
Notes are an essential tool for jotting down ideas, making to-do lists, and keeping track of important information. With Split Screen, you can have the Notes app open alongside another app, allowing for seamless note taking and multitasking. Here’s how you can use Split Screen with the Notes app on your iPad:
1. Activate Split Screen: Set up Split Screen on your iPad using the steps mentioned earlier.
2. Open the Notes app: Launch the Notes app as the primary app in Split Screen. Here you can start a new note, access existing notes, or organize your notes with folders.
3. Add a second app: Swipe up from the bottom or use the App Switcher to select and open the second app alongside Notes. This could be a web browser, a document editor, or any other app that complements your note-taking activities.
4. Take notes and multitask: With Split Screen, you can simultaneously take notes in the Notes app while interacting with the second app. For example, you can take notes during a web research session, refer to a document while writing a report, or even jot down ideas while reading an e-book.
5. Adjust the Split Screen: Customize the size of each app by dragging the vertical bar between them. This flexibility allows you to allocate more space to the app you’re currently focusing on or balance the screen real estate evenly between the two apps.
6. Exit Split Screen: To exit Split Screen and go back to using one app at a time, swipe the vertical bar to the left or right until the Notes app occupies the full screen.
Using Split Screen with the Notes app on your iPad enhances your productivity by providing a seamless environment for note-taking and multitasking. It allows you to stay organized, capture important information, and easily reference content from other apps, ensuring that you can keep your thoughts and tasks in order without any disruptions.
Using Split Screen with Calendar
Managing your schedule and staying organized are essential tasks, and Split Screen on your iPad can help you achieve both. By using Split Screen with the Calendar app, you can effortlessly view your events and appointments alongside another app, ensuring that you never miss an important meeting or task. Here’s how you can make the most of Split Screen with the Calendar app:
1. Enable Split Screen: Set up Split Screen on your iPad using the steps mentioned earlier.
2. Open the Calendar app: Launch the Calendar app as the primary app in Split Screen. Here you can view your daily, weekly, or monthly calendar, add new events, or edit existing ones.
3. Add a second app: Swipe up from the bottom or use the App Switcher to select and open the second app alongside Calendar. This could be your email client, a task manager, or any other app that complements your scheduling activities.
4. Manage schedule and multitask: With Split Screen, you can easily keep an eye on your calendar while simultaneously interacting with the second app. For example, you can refer to your calendar while composing an email to find a suitable meeting time or check your task manager to ensure that you’re not double-booking yourself.
5. Adjust the Split Screen: Customize the size of each app by dragging the vertical bar between them. This allows you to accommodate more information from either app or maintain a balanced view between the two.
6. Exit Split Screen: To exit Split Screen and return to using one app at a time, swipe the vertical bar to the left or right until the Calendar app occupies the full screen.
Using Split Screen with the Calendar app on your iPad enhances your scheduling and organization capabilities. Whether you’re managing your personal or professional schedule, Split Screen ensures that you can stay on top of your commitments while simultaneously engaging with another app, making your iPad a powerful productivity tool.
Using Split Screen with Messages
Keeping in touch with friends, family, and colleagues is a breeze with the Messages app on your iPad. With Split Screen, you can have the Messages app open alongside another app, allowing you to stay connected while multitasking. Here’s how you can use Split Screen with Messages on your iPad:
1. Activate Split Screen: Set up Split Screen on your iPad using the steps mentioned earlier.
2. Open the Messages app: Launch the Messages app as the primary app in Split Screen. Here you can send and receive text messages, engage in group chats, and even make video or audio calls.
3. Add a second app: Swipe up from the bottom or use the App Switcher to select and open the second app alongside Messages. This could be a web browser, a notes app, or any other app that complements your messaging activities.
4. Chat and multitask: With Split Screen, you can view and respond to messages while simultaneously interacting with the second app. For example, you can browse the web while having a conversation, take notes while referencing information shared in a message, or even check your calendar to propose a meeting time.
5. Resize the Split Screen: Customize the size of each app by dragging the vertical bar between them. This allows you to allocate more space to the app you’re currently focusing on or balance the screen real estate evenly between the two apps.
6. Exit Split Screen: To exit Split Screen and go back to using one app at a time, swipe the vertical bar to the left or right until the Messages app occupies the full screen.
Using Split Screen with the Messages app on your iPad allows you to stay connected and engaged with your contacts while multitasking. Whether you’re planning events, sharing important information, or simply staying in touch, Split Screen makes it easier than ever to manage your messages while using other apps simultaneously.
Using Split Screen with Reminders
Keeping track of tasks, appointments, and deadlines is made easier with the Reminders app on your iPad. With Split Screen, you can have the Reminders app open alongside another app, allowing you to stay organized and productive. Here’s how you can use Split Screen with Reminders on your iPad:
1. Enable Split Screen: Set up Split Screen on your iPad using the steps mentioned earlier.
2. Open the Reminders app: Launch the Reminders app as the primary app in Split Screen. Here you can create new reminders, set due dates, assign priority, and organize your tasks into different lists.
3. Add a second app: Swipe up from the bottom or use the App Switcher to select and open the second app alongside Reminders. This could be a web browser, a note-taking app, or any other app that complements your task management activities.
4. Manage tasks and multitask: With Split Screen, you can view and interact with your task list while simultaneously using the second app. For example, you can refer to a webpage or document while creating a reminder, check your calendar for scheduling conflicts, or take notes related to a particular task.
5. Resize the Split Screen: Customize the size of each app by dragging the vertical bar between them. This allows you to allocate more space to Reminders or the second app based on the priority and importance of your tasks.
6. Exit Split Screen: To exit Split Screen and go back to using one app at a time, swipe the vertical bar to the left or right until the Reminders app occupies the full screen.
Using Split Screen with the Reminders app on your iPad enhances your task management and organization capabilities. By easily accessing your task list alongside another app, you can stay on top of your to-dos, meet deadlines, and prioritize your work, increasing your productivity and reducing the chances of overlooking important tasks.
Using Split Screen with Files
Managing and accessing files is an essential part of productivity, and with Split Screen on your iPad, you can easily work with the Files app alongside another app. This allows you to seamlessly view, organize, and edit your files while multitasking. Here’s how you can make the most of Split Screen with the Files app:
1. Activate Split Screen: Set up Split Screen on your iPad using the steps mentioned earlier.
2. Open the Files app: Launch the Files app as the primary app in Split Screen. Here you can navigate your file hierarchy, access cloud storage services, and manage your documents, photos, and other files.
3. Add a second app: Swipe up from the bottom or use the App Switcher to select and open the second app alongside Files. This could be a document editor, a web browser, or any other app that complements your file management activities.
4. Work with files and multitask: With Split Screen, you can seamlessly interact with your files while simultaneously using the second app. For example, you can reference a document in Files while writing an email, drag and drop files between apps, or organize your files based on the information you gather from another app.
5. Resize the Split Screen: Customize the size of each app by dragging the vertical bar between them. This flexibility allows you to allocate more space to either Files or the second app, depending on the task at hand.
6. Exit Split Screen: To exit Split Screen and return to using one app at a time, swipe the vertical bar to the left or right until the Files app occupies the full screen.
Using Split Screen with the Files app on your iPad enhances your file management capabilities and streamlines your workflow. By easily accessing and working with your files alongside another app, you can stay organized, collaborate effectively, and seamlessly handle all your document-related tasks without the need to constantly switch between apps.
Adjusting the Split Screen View
One of the great features of Split Screen on your iPad is the ability to adjust the view to suit your preferences and tasks. Whether you want to focus on one app or have a more balanced display, here’s how you can adjust the Split Screen view:
1. Changing the app size: To resize the two apps in Split Screen, use the vertical bar that separates them. Simply tap and drag the bar towards the center of the screen to make one app larger or smaller. You can adjust the app size according to your needs and the content you’re working with.
2. Equalizing the app size: If you prefer a balanced view, double-tap the vertical bar between the two apps. This action automatically equalizes the app sizes, allowing for an even distribution of the available screen space.
3. Maximizing an app: If you want to temporarily focus on one app and hide the other, simply swipe the vertical bar all the way to the left or right until the secondary app disappears from the screen. This brings the primary app into full-screen mode, allowing you to work without distractions.
4. Resizing in Slide Over view: If you have multiple apps open in Slide Over view (activated by swiping up from the bottom and dragging an app to the right side of the screen), you can adjust the size of each app by dragging the horizontal bar between them.
5. Closing a Split Screen view: To close a Split Screen view and return to using one app at a time, simply swipe the vertical bar all the way to the left or right until the secondary app disappears from the screen. Alternatively, you can maximize one app as mentioned earlier, which automatically ends the Split Screen view.
With the ability to adjust the Split Screen view, you have the flexibility to customize your iPad experience based on the apps you’re using and the tasks you’re performing. Whether you prefer a dynamic and resizable view or want to focus on one app at a time, the Split Screen feature provides the versatility to meet your needs and enhance your productivity.
Troubleshooting Split Screen on iPad
While Split Screen on your iPad is a convenient feature for multitasking, there may be instances where you encounter issues or difficulties. If you’re having trouble with Split Screen, here are some troubleshooting tips to help you resolve common problems:
1. Ensure compatibility: Not all apps are compatible with Split Screen. Make sure the apps you’re trying to use support Split Screen functionality. If an app doesn’t work in Split Screen, try using a different app that offers similar features.
2. Update iOS: Ensure that your iPad is running the latest version of iOS. Updates often include bug fixes and improvements that can resolve issues with Split Screen. Go to Settings > General > Software Update to check for and install any available updates.
3. Restart your iPad: Sometimes, restarting your device can help resolve temporary glitches or errors. Press and hold the Power button until the Slide to Power Off slider appears. Slide it to turn off your iPad, then press and hold the Power button again to turn it back on.
4. Reset Split Screen settings: If Split Screen isn’t functioning as expected, you can try resetting the Split Screen settings. Go to Settings > General > Split Screen & Dock and toggle off the “Allow Multiple Apps” option. Restart your iPad, then toggle the option back on.
5. Check app permissions: Ensure that the apps you’re trying to use in Split Screen have the necessary permissions enabled. Go to Settings > [App Name] and check if the required permissions, such as accessing files or utilizing multitasking, are enabled.
6. Free up memory: Insufficient memory can prevent Split Screen from working properly. Close any unnecessary apps running in the background and clear out unused files or data to free up memory on your iPad.
7. Reset all settings: If none of the above steps resolve the issue, you can try resetting all settings on your iPad. Note that this will remove any personalized settings but won’t delete your data. Go to Settings > General > Reset > Reset All Settings.
If you’re still experiencing difficulties with Split Screen on your iPad after troubleshooting, it’s recommended to contact Apple support for further assistance. They can provide more specific guidance based on your device model and software setup to help resolve any persistent issues.