
Benefits of the iPad Split Keyboard
The iPad split keyboard is a unique feature that offers several benefits to users. Whether you are using your iPad for work, studying, or leisure activities, the split keyboard can greatly enhance your typing experience. Here are some of the key benefits it provides:
- Ergonomic Design: The split keyboard on the iPad is designed with ergonomics in mind. The division of the keyboard makes it easier to reach keys on both sides of the screen without straining your fingers or hands. This can help reduce the risk of repetitive strain injuries and make typing for extended periods much more comfortable.
- Increased Accuracy: With the split keyboard, your fingers have more space to navigate, resulting in improved accuracy while typing. The larger keys and increased separation between them minimize the chance of hitting the wrong keys, leading to fewer typing errors and faster typing speed.
- Enhanced Productivity: The split keyboard enables multitasking and efficient use of the iPad screen. By dividing the keyboard into two halves, you can type with your thumbs while holding the iPad with both hands, making it easier to use other apps simultaneously. This feature is especially useful when taking notes during meetings or editing documents on the go.
- Flexibility: The split keyboard on the iPad offers versatility to meet your preferences and needs. You can adjust the keyboard’s position, size, and layout to suit your typing style and hand size. This customization ensures a personalized and comfortable typing experience, allowing you to work at your optimal efficiency.
Overall, the iPad split keyboard provides a range of benefits, such as improved ergonomics, increased typing accuracy, enhanced productivity, and flexibility in customization. It is a valuable feature that harnesses the power of the iPad to optimize your typing experience and make your tasks more efficient.
How to Access the Split Keyboard
Accessing the split keyboard on your iPad is simple and only requires a few steps. Here’s how you can enable it:
- Open an app that requires keyboard input, such as an email client or a note-taking app.
- Tap on the text field where you want to enter text. This will bring up the keyboard on your screen.
- Tap and hold the keyboard control key, which is the small keyboard icon at the bottom-right corner of the standard keyboard.
- A pop-up menu will appear with options for the keyboard. From this menu, select “Split” to activate the split keyboard.
- The keyboard will now split into two halves, with each half positioned towards the edges of the iPad screen.
Once you have accessed the split keyboard, you can start typing with your thumbs or fingers. The split keyboard is especially useful when using your iPad in landscape orientation, as it allows for comfortable typing while holding the device with both hands.
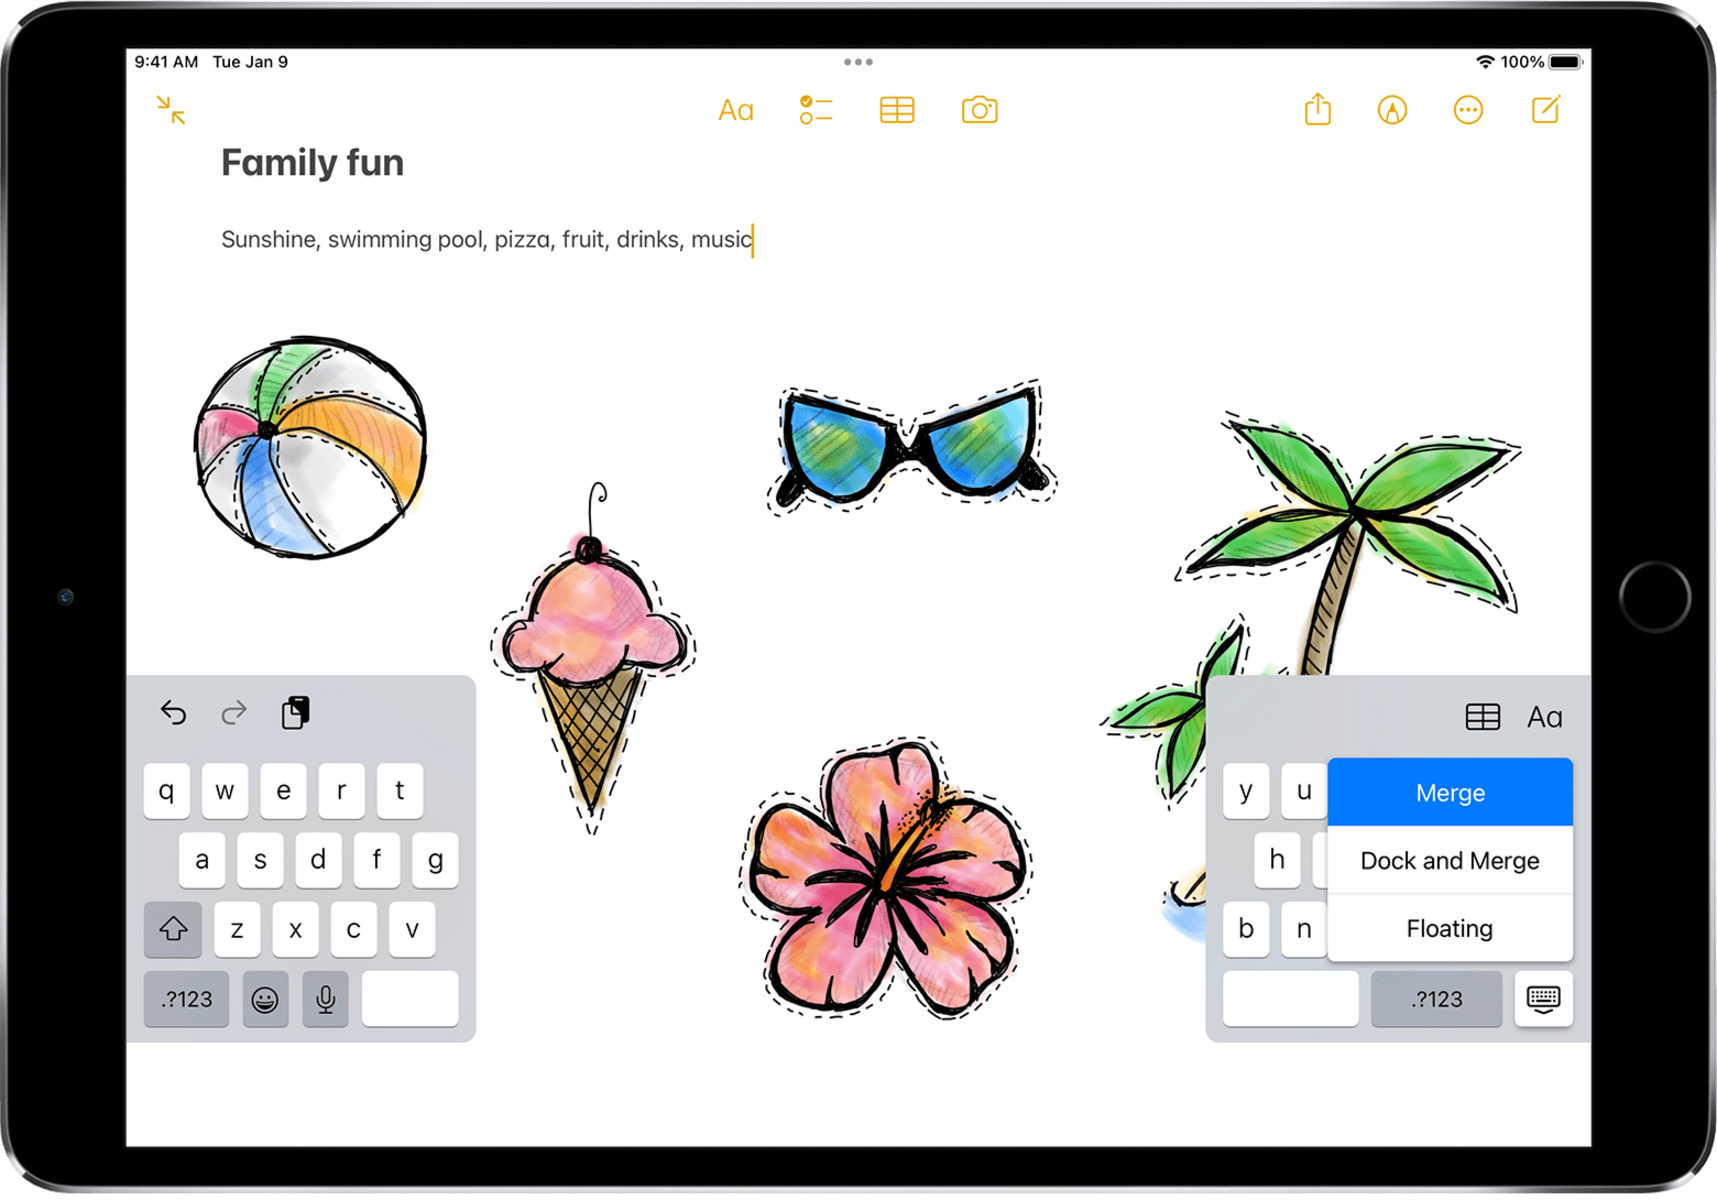
To switch back to the standard full-width keyboard, simply tap and hold the keyboard control key again and select “Dock and Merge” from the pop-up menu. This will merge the split keyboard back into a single, full-width keyboard.
By following these steps, you can easily access and switch between the split keyboard and the standard keyboard on your iPad, providing you with flexibility and convenience depending on your typing needs.
Adjusting the Split Keyboard
The split keyboard on your iPad offers customizable options to adjust its position and size, allowing you to optimize your typing experience. Here’s how you can adjust the split keyboard:
- Open an app that brings up the keyboard on your iPad screen.
- Tap and hold the keyboard control key, located at the bottom-right corner of the split keyboard.
- From the pop-up menu that appears, select “Undock”. This will detach the split keyboard from the bottom of the screen.
- Now, you can drag the split keyboard to reposition it anywhere on the screen that feels comfortable for you. To do this, place your finger in the middle of the split and drag it up or down.
- If you want to change the size of the split keyboard, pinch inward or outward on the keyboard with two fingers to make it smaller or larger, respectively. This allows you to adjust the keyboard size based on your preference and hand size.
- Once you have positioned and resized the split keyboard to your liking, tap the keyboard control key again and select “Dock”. This will anchor the split keyboard back to the bottom of the screen.
By adjusting the position and size of the split keyboard, you can find the most comfortable and ergonomic setup for your typing needs. Experiment with different positions and sizes to discover what works best for you and enhances your typing speed and accuracy.
It’s important to note that the adjustments you make to the split keyboard are temporary and will revert to the default settings when you switch to a different app or restart your iPad. However, you can always readjust the keyboard as needed whenever you activate the split keyboard feature.
Take some time to explore different positions and sizes until you find the optimal setup that suits your typing style and preferences. With the ability to customize the split keyboard, you can enjoy a comfortable and personalized typing experience on your iPad.
Changing the Keyboard Layout
The keyboard layout on your iPad split keyboard can be modified to suit your typing preferences and language requirements. Whether you need to type in a different language or prefer a specific layout, here’s how you can change the keyboard layout:
- Open the app that brings up the split keyboard on your iPad screen.
- Tap and hold the keyboard control key situated at the bottom-right corner of the split keyboard.
- From the pop-up menu, select “Keyboard Settings” to access the keyboard options.
- In the Keyboard Settings, tap on “Hardware Keyboard”. This will present you with various options related to the keyboard layout.
- Choose the desired layout or language from the available options. You can select from different layouts, such as QWERTY, AZERTY, QWERTZ, or custom layouts specific to different languages.
- After making your selection, close the Keyboard Settings.
Once you have changed the keyboard layout, the split keyboard will reflect the new layout you have chosen. This allows you to type comfortably and accurately in your preferred language or layout.
It’s important to note that the availability of different keyboard layouts may vary depending on your iPad model and the version of iOS you are using. Additionally, some custom layouts may need to be downloaded or enabled in the settings before they become accessible.
By changing the keyboard layout on your iPad split keyboard, you can customize your typing experience to better suit your language preferences and typing habits. Experiment with different layouts to find the one that enhances your productivity and makes typing on the split keyboard a breeze.
Customizing the Split Keyboard Settings
Customizing the split keyboard settings on your iPad gives you the ability to tailor the keyboard to your specific preferences and needs. Here are some of the key customization options you can explore:
- Keyboard Split: You can control how the keyboard is split on the iPad screen. By default, the split keyboard is divided evenly, but you can adjust the split point to favor one side more than the other. To do this, follow the steps mentioned in the “Adjusting the Split Keyboard” section, and position the split point closer to the side that you use more frequently.
- Undock Keyboard: When you undock the split keyboard, it becomes a floating keyboard that you can move around on the screen. To enable or disable this feature, follow the steps mentioned in the “Adjusting the Split Keyboard” section, and tap on “Undock” or “Dock” accordingly.
- Keyboard Transparency: You can adjust the transparency level of the split keyboard to make it more or less visible on the screen. This option allows you to find the right balance between visibility and screen real estate. To change the keyboard transparency, go to “Settings” > “General” > “Keyboard” > “Hardware Keyboard” and adjust the “Transparency” slider to your preference.
- Quickpath: Quickpath is a feature that enables swipe typing on the split keyboard. You can toggle this feature on or off based on your typing style and preferences. To enable or disable Quickpath, go to “Settings” > “General” > “Keyboard” and toggle the “Slide to Type” option.
Customizing the split keyboard settings allows you to tailor your typing experience to your liking. By adjusting the keyboard split, undocking the keyboard, changing its transparency, or enabling swipe typing, you can optimize your productivity and comfort while typing on your iPad.
Take some time to explore these customization options and find the configuration that works best for you. Everyone’s preferences and typing habits are different, so don’t hesitate to experiment and make the split keyboard your own.
Tips for Typing on the Split Keyboard
Typing on the split keyboard of your iPad may feel different at first, especially if you’re accustomed to using a traditional keyboard. However, with a little practice and some helpful tips, you can become proficient in typing on the split keyboard. Here are some tips to enhance your typing experience:
- Thumb Typing: The split keyboard is designed for thumb typing, particularly when using your iPad in landscape orientation. To type efficiently, rest your hands comfortably on the sides of the screen, and use your thumbs to reach the keys on each side of the split keyboard.
- Use Predictive Text: Take advantage of the predictive text feature on your iPad. As you type, the keyboard will suggest words based on your input, allowing you to tap on the suggested word instead of typing the whole word. This can significantly speed up your typing process.
- Master Auto-Correction: The auto-correction feature on your iPad can help correct any typing errors as you go. However, it’s important to keep an eye on the suggested corrections and make sure they are accurate. Familiarize yourself with the common auto-corrections and adjust them in the keyboard settings if necessary.
- Practice Accuracy: The split keyboard provides more space between keys, which can help improve typing accuracy. Take the time to practice hitting the correct keys without looking down too often. With practice, you will develop muscle memory and become more accurate in your typing.
- Utilize Shortcuts: Familiarize yourself with the various keyboard shortcuts available on your iPad. These shortcuts can save you time and effort while typing. For example, you can use the spacebar to quickly insert a period followed by a space, or swipe down on a key to input its alternate character.
Remember, practice makes perfect. The more you use the split keyboard and implement these tips, the more comfortable and efficient you will become in typing on your iPad. Don’t get discouraged if it takes a bit of time to adjust. Soon enough, you’ll be typing like a pro on the split keyboard and enjoying the benefits it offers.
Troubleshooting the Split Keyboard
While the split keyboard on your iPad is designed to provide a seamless typing experience, you may encounter some issues or glitches from time to time. Here are some common troubleshooting tips to help you resolve any problems with the split keyboard:
- Keyboard not appearing: If the split keyboard doesn’t appear when you tap on a text field, make sure the split keyboard feature is enabled. Go to “Settings” > “General” > “Keyboard” and toggle on the “Split Keyboard” option. If it’s already enabled, try toggling it off and on again to see if that resolves the issue.
- Keyboard unresponsive: If the split keyboard becomes unresponsive or freezes, try closing the app you’re using and reopening it. If the issue persists, restart your iPad by holding down the power button until the “Slide to power off” slider appears, then power it back on. This can often resolve temporary glitches.
- Keyboard not splitting: If the split keyboard is not splitting when you tap and hold the keyboard control key, ensure that your iPad is in landscape orientation. The split keyboard is primarily designed for use in landscape mode, so it may not split in other orientations.
- Missing keyboard control key: If you can’t find the keyboard control key (the small keyboard icon) on the split keyboard, it’s possible that the option is hidden. To reveal it, go to “Settings” > “General” > “Keyboard” and make sure the “Show Keyboard Control Key” option is enabled.
- Software updates: Ensure that your iPad’s software is up to date. Software updates often include bug fixes and performance improvements, which may address any issues related to the split keyboard. Go to “Settings” > “General” > “Software Update” to check for any available updates.
If the troubleshooting tips provided above don’t resolve the issue with the split keyboard, you may consider contacting Apple Support for further assistance. They can provide specific guidance based on your iPad model and software version.
Remember, occasional issues with the split keyboard are not uncommon, but most can be resolved with simple troubleshooting steps. By following these tips, you can ensure a smooth and enjoyable typing experience on your iPad.
Frequently Asked Questions about the Split Keyboard
Here are some frequently asked questions about the split keyboard on the iPad:
- Can I use the split keyboard on any iPad model? Yes, the split keyboard is available on all iPad models running iOS 5 or later.
- Can I customize the size of the split keyboard? Yes, you can adjust the size of the split keyboard by pinching inward or outward on the keyboard with two fingers. This allows you to customize the keyboard size based on your preference and comfort.
- Is it possible to change the keyboard layout on the split keyboard? Yes, you can change the keyboard layout to suit your language or typing habits. Go to “Settings” > “General” > “Keyboard” > “Hardware Keyboard” and choose the desired layout or language.
- Can I use the split keyboard with one hand? While the split keyboard is primarily designed for thumb typing using both hands, it is possible to use it with one hand by gently tapping on the keys on one side of the screen. However, it may take some practice to become proficient in one-handed typing on the split keyboard.
- Will the split keyboard settings stay the same across different apps? The split keyboard settings are temporary and may revert to the default settings when you switch to a different app or restart your iPad. However, you can always readjust the keyboard as needed whenever you activate the split keyboard feature.
- Can I use the split keyboard in portrait mode? The split keyboard is primarily designed for use in landscape mode, as it provides a more comfortable typing experience. However, some iPad models support a narrower version of the split keyboard in portrait mode. To enable it, go to “Settings” > “General” > “Keyboard” > “Split Keyboard” and toggle on the “Allow Full Split” option.
If you have any further questions or issues related to the split keyboard on your iPad, refer to Apple’s support documentation or reach out to their customer support for assistance. They can provide you with additional guidance and troubleshooting steps tailored to your specific iPad model.
The split keyboard is a versatile feature that allows for more comfortable and efficient typing on your iPad. By understanding how to use and customize the split keyboard, you can enhance your typing experience and increase productivity on your iPad.