
Opening and Saving Images
Preview, the default image viewer and editor on Mac, offers a convenient and efficient way to open and save images. Whether you need to quickly view a photo or make basic edits, Preview has got you covered.
To open an image in Preview, simply double-click on the image file or right-click and select “Open With” -> “Preview.” Alternatively, you can launch Preview from your Applications folder and use the “File” menu to open an image file. This versatile tool supports various image formats, including JPEG, PNG, TIFF, and more.
Once you’ve opened an image in Preview, you can easily navigate through multiple images by using the “Previous” and “Next” buttons in the toolbar. This makes it convenient for reviewing and editing a series of images without the need to open each one individually.
Saving your edited images in Preview is a breeze. After making the necessary adjustments, go to the “File” menu and choose “Save” or “Save As.” Selecting “Save” will overwrite the current file, while “Save As” allows you to save the edited image as a new file, without altering the original.
Additionally, Preview provides a range of options when saving images. You can choose to save in various file formats, such as JPEG, PNG, TIFF, and PDF. This flexibility is particularly useful when you need to convert an image to a different format or optimize it for specific purposes, such as web publishing or printing.
Preview also allows you to adjust the image quality when saving in JPEG format. By adjusting the slider, you can find the perfect balance between file size and image quality, ensuring your images are optimized for both web usage and storage space.
Cropping and Resizing Images
Preview offers powerful tools for cropping and resizing images, allowing you to fine-tune the composition and dimensions of your photos.
Cropping an image in Preview is simple. First, select the “Rectangular Selection” tool from the toolbar. Then, click and drag over the area you want to keep. Once the selection is made, go to the “Tools” menu and choose “Crop.” The image will be cropped to the selected area, removing any unwanted parts.
Resizing an image is equally straightforward. Select the “Resize” tool from the toolbar and a bounding box will appear around the image. Click and drag the handles of the box to adjust the dimensions. You can manually enter specific values for width and height in the inspector pane to achieve precise resizing.
While resizing, Preview also offers the option to maintain the image’s aspect ratio. This ensures that the width and height are scaled proportionally, preventing any distortion. Simply hold down the Shift key while dragging the handles to maintain the original aspect ratio.
When resizing, it’s important to consider the resolution of the image. If you plan to use the image for printing, higher resolution is recommended for better quality. On the other hand, for web usage or sharing via email or social media, reducing the size and resolution can help optimize loading times and save bandwidth.
In addition to cropping and resizing, Preview also provides options to adjust the image’s orientation. You can rotate the image clockwise or counterclockwise by selecting “Rotate Left” or “Rotate Right” from the “Tools” menu. If you need to flip the image horizontally or vertically, choose the respective options from the same menu.
Whether you need to crop out unwanted elements, resize an image to fit a specific dimension, or adjust the orientation, Preview offers a user-friendly interface and robust features to handle these tasks efficiently.
Adjusting Colors and Exposure
With Preview, you can easily make adjustments to enhance the colors and exposure of your images. Whether you want to brighten up a dark photo or boost the vibrancy of colors, Preview provides a range of tools to help you achieve the desired results.
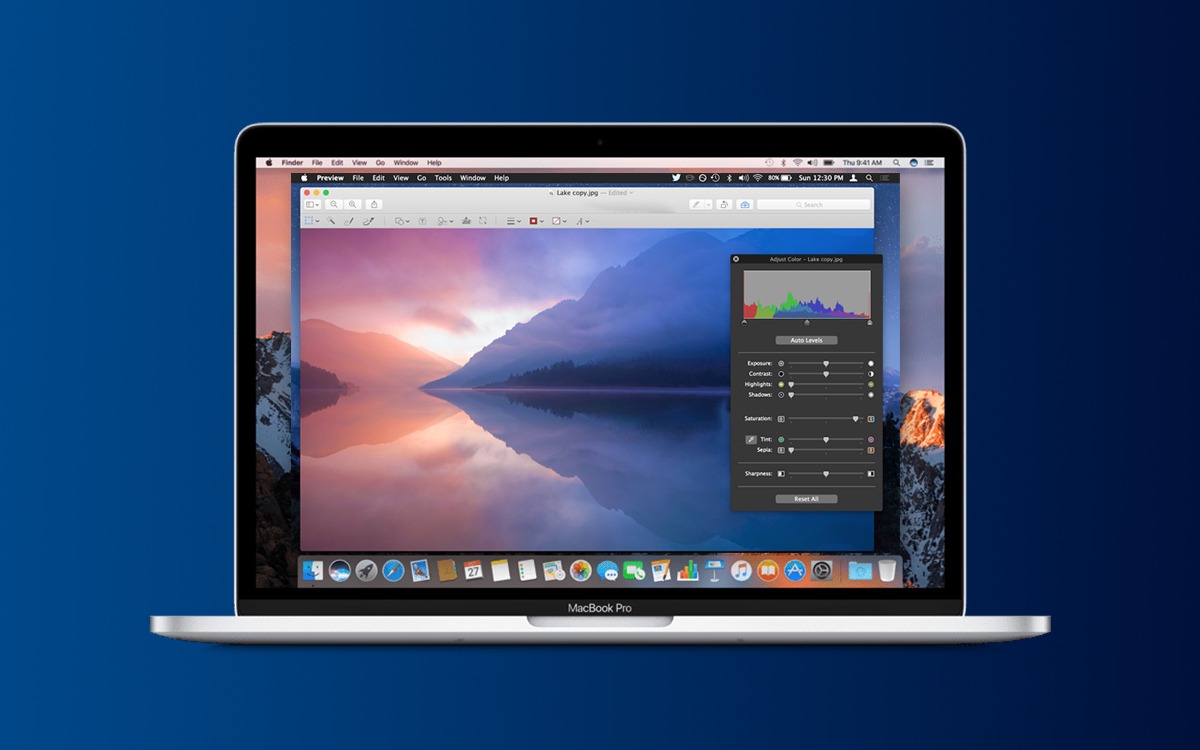
To make color adjustments, go to the “Tools” menu and select “Adjust Color.” This will open a sidebar with various options to fine-tune the image’s colors. You can adjust the brightness, contrast, saturation, temperature, and tint levels using the sliders provided. Experiment with these adjustments to find the perfect balance that enhances the overall look of your image.
If you need to correct the exposure of an image, Preview offers an “Auto Levels” feature that can automatically adjust the brightness and contrast for optimal results. Simply go to the “Tools” menu and click on “Auto Levels.” Preview will analyze the image and make adjustments to improve the overall exposure. You can further fine-tune the adjustments manually if needed.
Additionally, Preview provides a histogram tool that can help you visualize and analyze the distribution of brightness levels in your image. The histogram allows you to identify any areas of underexposure or overexposure, and make adjustments accordingly.
For more advanced color adjustments, Preview offers the “Adjustments” feature, which includes options like Levels, Curves, and White Balance. These tools provide finer control over tonal and color adjustments, allowing you to create more dramatic or precise changes to the image.
Preview also allows you to apply filters to your images to achieve different artistic effects or enhance specific tones. The “Filters” option in the “Tools” menu provides a variety of filters, such as Vivid, Noir, Sepia, and more. Apply these filters to experiment and add a creative touch to your images.
Whether you’re looking to correct color imbalances, enhance the vibrancy of your photos, or adjust the exposure, Preview offers a range of tools that make it easy to achieve the desired results.
Adding Text and Annotations
Preview provides a convenient way to add text and annotations to your images, allowing you to convey information or make explanatory notes directly on the image itself.
To add text, click on the “Text” tool in the toolbar, then click on the area of the image where you want to insert the text. A text box will appear, allowing you to type in your desired text. From the text editing options in the inspector pane, you can customize the font, size, color, and alignment of the text. You can also adjust the opacity to make the text more or less transparent, depending on your preference.
In addition to adding text, Preview offers a range of annotation tools to highlight or draw attention to specific areas of the image. The “Markup” toolbar provides options for drawing shapes, lines, arrows, and callouts. You can choose different colors and line styles for the annotations, making them stand out and provide clear visual context.
If you need to emphasize a particular area of the image, use the highlight or underline tools to add a colored overlay or underline to the desired area. This can be useful when providing feedback or indicating specific elements for reference.
Preview also allows you to add various shapes, such as rectangles, ellipses, and speech bubbles, to annotate your images. These shapes can be resized and rotated to fit your requirements. Use them to encircle important details or provide additional context.
Once you’ve added text and annotations, you can move or resize them by simply clicking and dragging. If you want to remove any added elements, select them and press the delete key or use the “Edit” menu to delete them.
Adding text and annotations in Preview is a quick and efficient way to enhance your images with informative text, highlights, and visual cues. Whether you’re adding captions, annotating screenshots, or providing feedback on a design, Preview has the tools you need to effectively communicate your message within the image itself.
Creating a Signature
Preview allows you to easily create and add your signature to documents, making it convenient to sign contracts, forms, or any other digital files that require your personalized signature.
To create a signature, open Preview and go to the “Tools” menu. Select “Annotate” and then choose “Signature” from the drop-down menu. You will be presented with options to create a signature using your trackpad, camera, or by scanning a physical signature.
If you choose to create a signature using your trackpad, simply sign your name on the trackpad using your finger or a stylus. Preview will convert your signature into a digital format that you can then place onto any document with a simple drag and drop.
If you prefer to use your camera, select the “Camera” option and hold a piece of paper with your signature up to the camera. Preview will capture an image of your signature and convert it into a digital format that can be used for signing documents.
Another option is to scan your physical signature using a scanner. Once scanned, save the signature as an image file, such as JPEG or PNG. Then, when adding a signature in Preview, select “File” and choose the scanned image of your signature. Preview will insert the signature onto your document, and you can resize and reposition it as needed.
Once you have created your signature in Preview, it will be saved and can be easily accessed for future use. This makes it convenient to add your signature to multiple files without having to recreate it each time.
When placing your signature on a document, Preview allows you to adjust the size and position to ensure it fits properly. You can also rotate or delete the signature if needed.
Adding your digital signature using Preview not only saves time and eliminates the need for printing and scanning documents, but it also provides a secure and legally recognized way to sign digital files.
Removing Backgrounds with Instant Alpha
Preview offers a handy feature called Instant Alpha that allows you to remove backgrounds or select specific parts of an image with a few simple steps. This is particularly useful when you want to isolate an object or remove a distracting background from a photo.
To remove a background using Instant Alpha, open the image in Preview and select the “Markup” toolbar. From the toolbar, choose the “Instant Alpha” tool, which looks like a wand with a dotted outline. Click and drag the tool over the area of the image you want to remove, and Preview will intelligently detect and remove the selected color or tone.
Preview provides a tolerance slider when using Instant Alpha, allowing you to adjust the sensitivity of the tool. Moving the slider to the right increases the range of colors or tones that will be affected, while moving it to the left narrows down the selection to only similar colors or tones.
After removing the background, you can either delete it entirely or replace it with a different background. To delete the background, simply press the delete key on your keyboard. If you want to replace the background, copy a new image or solid color and paste it behind the object.
For more precise background removal, you can use other selection tools, such as the “Lasso” or “Rectangular Selection” tools, to manually select the areas you want to keep or remove. Combine these tools with Instant Alpha to achieve more refined and detailed selections.
It’s important to note that Instant Alpha works best with images that have clearly defined edges between the object and the background. If the edges are blurry or not well-defined, you may need to use more advanced image editing software for more precise background removal.
By using Instant Alpha in Preview, you can quickly and easily remove backgrounds or isolate specific parts of an image, saving you time and effort in achieving the desired results.
Rotating and Flipping Images
Preview provides intuitive tools to rotate and flip images, allowing you to adjust the orientation of your pictures as needed.
To rotate an image in Preview, open the image and select the “Tools” menu. From there, choose “Rotate Left” or “Rotate Right” to rotate the image counterclockwise or clockwise, respectively. Each click will rotate the image by 90 degrees. If you need to make more precise rotations, you can use the “Custom” option in the “Rotate” submenu to specify the angle.
Preview also offers the option to flip an image horizontally or vertically. To flip the image horizontally, go to the “Tools” menu and choose “Flip Horizontal.” This will create a mirror image of the original, with the left side becoming the right side. Similarly, to flip the image vertically, select “Flip Vertical.” This will invert the image vertically, with the top becoming the bottom.
If you need to rotate or flip multiple images at once, you can select multiple images in the Preview window by holding down the Command key and clicking on the desired images. Once selected, use the rotation and flip options from the “Tools” menu to apply the changes to all the selected images simultaneously.
It’s worth noting that rotating and flipping an image in Preview is a non-destructive process. This means that the original image file remains unchanged, and the adjustments are only applied when viewing or exporting the image. If you ever want to revert to the original orientation, simply close and reopen the image, and it will return to its original state.
Rotating and flipping images in Preview is a quick and convenient way to adjust the orientation and perspective of your photos. Whether you need to straighten a crooked image, create a mirrored effect, or explore different artistic possibilities, Preview provides the tools you need to achieve the desired results with ease.
Converting Images to Different Formats
Preview allows you to easily convert images to different formats, providing flexibility and compatibility for various purposes. Whether you need to optimize an image for web usage, print it in high quality, or simply switch to a format that works better with specific software or devices, Preview has got you covered.
To convert an image to a different format in Preview, open the image and go to the “File” menu. From there, choose the “Export” option. A dialog box will appear, allowing you to choose the desired format for the exported image. Preview supports a wide range of formats, including JPEG, PNG, TIFF, PDF, GIF, and more.
When selecting a format, consider the intended use of the image. If you’re sharing the image on the web, JPEG or PNG formats are commonly used due to their broad compatibility and smaller file sizes. JPEG is suitable for photographs, while PNG is recommended for graphics and images with transparency.
If you’re preparing the image for professional printing, TIFF is often the preferred format as it maintains high quality and is widely supported in printing workflows. TIFF preserves all the details, color information, and layers, making it ideal for projects that require precise reproduction.
For document-oriented images, such as scanned documents or text-heavy graphics, PDF is a versatile format that retains the layout and text in a printable and universally readable form. It allows for easy sharing, archiving, and printing of documents without loss of quality.
In addition to selecting the format, Preview provides options to customize the export settings for each format. You can adjust the image quality, compression level, and other parameters according to your specific requirements. These settings can impact the file size and image quality, so it’s important to strike a balance that meets your desired outcome.
Preview also offers the feature to convert multiple images to the same format in one go. Simply select the images you want to convert, go to the “File” menu, choose “Export Selected Images,” and follow the same steps as mentioned earlier.
Converting images to different formats in Preview is a simple yet powerful feature that allows you to adapt your images for a wide range of purposes. Whether you’re optimizing images for web, print, or document purposes, Preview provides the tools and flexibility to ensure your images are in the right format for your specific needs.
Exporting Images for the Web
When it comes to sharing images on the web, it’s important to optimize them for faster loading times without compromising image quality. Preview offers several options to export images specifically tailored for web usage, ensuring optimal performance and visual appeal.
To export an image for the web in Preview, open the image and go to the “File” menu. From there, choose the “Export” option. In the export dialog box, select the desired format for web usage, such as JPEG or PNG.
If you choose the JPEG format, you can adjust the image quality using a slider, which determines the compression level. Higher compression results in a smaller file size but may reduce image quality. Find the right balance that maintains an acceptable level of quality while minimizing the file size.
For images with transparency or a requirement for lossless compression, consider exporting them in PNG format. PNG preserves image quality and supports transparency, making it suitable for graphics, logos, and images with sharp edges or non-photographic content.
In addition to selecting the format, it’s important to resize the image to an appropriate web resolution. Large image dimensions can significantly increase file size and negatively impact loading times. In Preview, you can easily resize images by selecting the “Tools” menu, choosing the “Adjust Size” option, and specifying the desired dimensions in pixels.
Another essential aspect of optimizing images for the web is ensuring the image file size is minimized. This can be achieved by using the “Export” options in Preview to adjust the image quality, as mentioned earlier. Additionally, you can experiment with other export settings such as disabling metadata, reducing color profiles, or disabling progressive loading, depending on your specific requirements and the nature of the image.
Preview also offers the ability to preview how the exported image will look before finalizing the export. Simply enable the “Preview” checkbox in the export dialog box to see the image quality and estimated file size based on the chosen settings.
By utilizing the export options in Preview and following best practices for web optimization, you can ensure that your images are properly prepared for web usage. This will result in faster loading times, improved user experience, and a visually appealing display on various web platforms.
Customizing the Preview Toolbar
Preview allows you to customize the toolbar, giving you quick access to the tools and features that are most important to you. This customization feature allows you to streamline your workflow, making it more efficient and tailored to your specific needs.
To customize the Preview toolbar, go to the “View” menu and select “Customize Toolbar.” A dialog box will appear, displaying a variety of available tools and features that can be added to or removed from the toolbar.
To add a tool or feature to the toolbar, simply drag and drop it from the dialog box onto the toolbar area. You can include commonly used tools like zoom, rotate, annotate, and more. By having these frequently used tools readily accessible, you can save time and effort by avoiding repeated navigation through menus.
If you want to remove a tool from the toolbar, click and drag it out of the toolbar area and back into the dialog box. This allows you to declutter the toolbar and keep it focused on the tools that you actually use.
In addition to rearranging and adding/removing tools, you can also adjust the size of the toolbar. To do this, place your cursor at the end of the toolbar until it transforms into a resize cursor. Click and drag to adjust the size according to your preference. This can be especially useful if you have a limited screen space or want to optimize the layout to fit your workflow.
Remember to save your toolbar customization by clicking on the “Done” button in the dialog box. This ensures that your personalized toolbar settings are maintained every time you open Preview.
Customizing the Preview toolbar allows you to create a workspace that is tailored to your specific needs and preferences. By including the tools and features that you use most frequently, you can streamline your workflow and improve your efficiency when working with images and documents in Preview.