
Check if your device has Google Assistant
Before you begin using Google Assistant to make appointments, you need to ensure that your device is compatible with this feature. Follow these steps to check if your device has Google Assistant:
- First, determine if your device is running on Android or iOS. Google Assistant is available on most Android devices running Android 5.0 and above, as well as on iOS devices with the Google Assistant app installed.
- If you have an Android device, check if Google Assistant is already installed by looking for the Google Assistant icon in your app drawer. If not, you can download it for free from the Google Play Store.
- For iOS users, visit the App Store and search for the Google Assistant app. Download and install the app on your device.
- Once you have Google Assistant installed, open the app and follow the setup instructions to complete the initial configuration.
- If you’re using a smart speaker or smart display with built-in Google Assistant, refer to the manufacturer’s instructions to set it up.
It’s worth noting that Google Assistant is constantly being updated and expanded to support more devices, so even if your device doesn’t have it now, it may become available in the future.
With Google Assistant, you can utilize its powerful voice recognition and natural language processing capabilities to make appointments and manage your schedule with ease. Whether you’re on Android or iOS, take a moment to check if your device is compatible and set up Google Assistant to unlock the full potential of this handy virtual assistant.
Set up Google Assistant
Before you can start using Google Assistant to make appointments, you’ll need to set it up on your device. The process may vary slightly depending on whether you’re using an Android or iOS device. Here’s how to set up Google Assistant:
If you’re using an Android device:
- Ensure that you have the latest version of the Google app installed on your device. You can download it for free from the Google Play Store if needed.
- Open the Google app and tap on the three horizontal lines in the bottom-right corner to open the menu.
- Select “Settings” from the menu, then tap on “Google Assistant.”
- From here, you can customize various settings, such as your preferred language and voice.
- Follow the on-screen prompts to activate Google Assistant. This may involve agreeing to the terms and conditions and granting necessary permissions.
If you’re using an iOS device:
- Ensure that you have the Google Assistant app installed on your device. You can download it for free from the App Store if you haven’t already.
- Open the Google Assistant app and sign in with your Google account.
- Grant necessary permissions to allow the app to access your device’s microphone and other relevant features.
- Follow the on-screen prompts to complete the setup process.
Additionally, if you’re using a smart speaker or smart display with built-in Google Assistant, consult the user manual or instructions provided by the manufacturer for assistance with setting it up.
Once you have set up Google Assistant, you’re ready to start using it to make appointments and manage your schedule effortlessly. The next steps will guide you on how to use voice commands or the Google Assistant app to make appointments, so you can stay organized and save time.
Use voice commands to make appointments
Thanks to the convenience of Google Assistant, you can make appointments using simple voice commands. Here’s how:
- Activate Google Assistant by saying the wake phrase, such as “OK Google” or “Hey Google.” Alternatively, you can long-press the home button on your Android device or the side button on your iOS device.
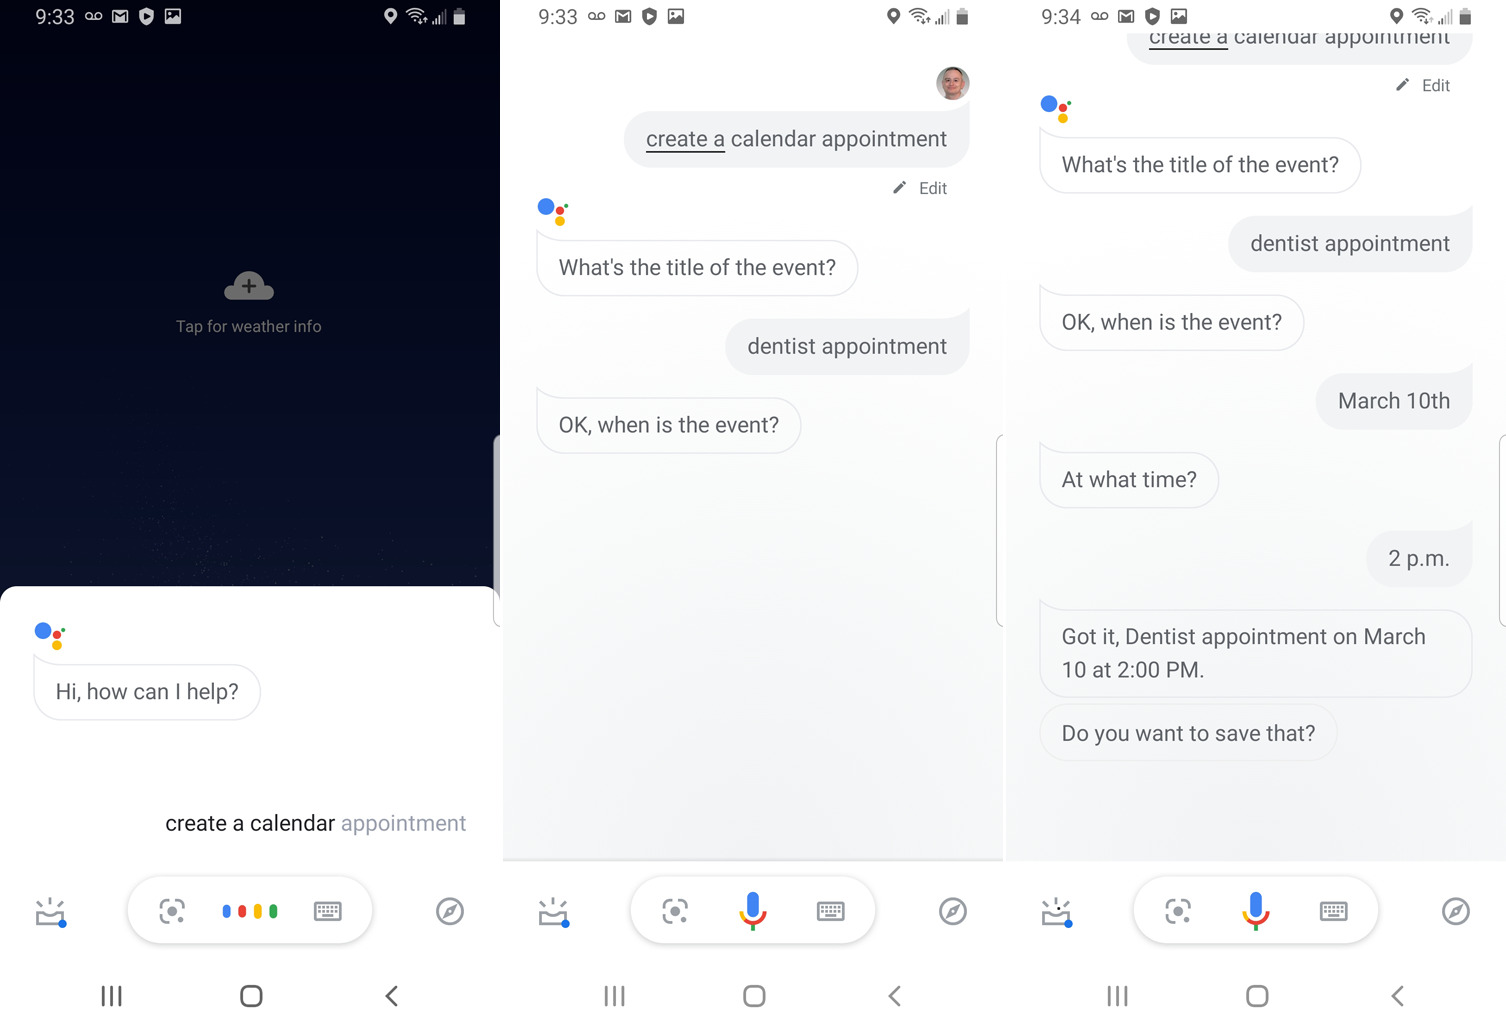
- Once Google Assistant is listening, you can say phrases like “Make an appointment on [date]” or “Schedule a meeting for [time] on [date].” Be sure to specify the necessary details, such as the event title, date, and time.
- If Google Assistant needs additional information, it will ask you to provide more details. Simply respond to the prompts to complete the appointment creation process.
- You can also ask Google Assistant to check your existing appointments by saying something like “What’s my schedule for tomorrow?” or “Tell me about my appointments on [date].”
Remember, the more specific you are with your voice commands, the more accurate Google Assistant can be in creating appointments. It’s recommended to speak clearly and double-check the details before confirming the appointment.
Additionally, Google Assistant can integrate with various calendar apps, such as Google Calendar, Outlook, and Apple Calendar. If you have multiple calendar apps installed on your device, make sure to specify which calendar you want to use when creating an appointment, such as “Add an event to my Google Calendar.”
Using voice commands to make appointments with Google Assistant is not only convenient but also allows for a hands-free experience. Whether you’re driving or busy with other tasks, simply speak your appointment details, and Google Assistant will take care of the rest.
Use the Google Assistant app to make appointments
If you prefer a more visual and interactive approach, you can also use the Google Assistant app on your device to make appointments. Here’s how:
- Open the Google Assistant app on your Android or iOS device.
- Tap on the microphone icon or the keyboard icon to activate the input method of your choice.
- Type or dictate a command such as “Make an appointment,” “Schedule a meeting,” or “Add an event.”
- Provide the necessary details for your appointment, including the event title, date, and time. You can also specify the duration and location if needed.
- Review the information and confirm the appointment creation.
- The Google Assistant app will then add the appointment to your linked calendar and send you a notification to confirm the successful creation.
The Google Assistant app provides a convenient interface for creating appointments, especially if you prefer typing or if you want to have a visual overview of your scheduled events. It also allows for easy editing or rescheduling of appointments, making it a versatile tool for managing your calendar.
Furthermore, you can use the Google Assistant app to view your existing appointments, edit them, or delete them if necessary. Simply navigate to the app’s main interface and access the calendar section to make any desired changes.
Keep in mind that you need to have your preferred calendar app, such as Google Calendar or Apple Calendar, linked to the Google Assistant app for seamless synchronization of appointments across devices.
The Google Assistant app offers a user-friendly way to make appointments, giving you full control over your schedule and ensuring that you don’t miss any important events. Whether you’re on the go or prefer a visual calendar interface, the Google Assistant app has you covered.
Link your calendar to Google Assistant
In order to fully utilize the appointment-making capabilities of Google Assistant, it’s important to link your preferred calendar app to the Google Assistant. This will ensure that your appointments are seamlessly synced across devices. Follow these steps to link your calendar to Google Assistant:
- Open the Google Assistant app on your device or activate Google Assistant by saying the wake phrase.
- Tap on your profile picture or initial in the top-right corner to access the Google Assistant settings.
- Scroll down and select “Services.”
- Under “Calendar,” you’ll find a list of compatible calendar apps. Select your preferred app, such as Google Calendar, Outlook, or Apple Calendar.
- Follow the on-screen prompts to authorize Google Assistant to access your calendar app.
- Once the authorization is complete, your calendar will be linked to Google Assistant.
With your calendar now linked, any appointments you make using Google Assistant will automatically appear in your calendar app. Likewise, any changes or updates you make in your calendar app will be reflected in Google Assistant.
It’s worth noting that Google Assistant supports multiple calendars, so if you have different calendars for work, personal, or other purposes, you can choose which calendar to add your appointments to. When creating an appointment, simply specify the desired calendar by saying something like “Add an event to my work calendar.”
Linking your calendar to Google Assistant not only ensures that your appointments are effortlessly synchronized but also allows for convenient management of your schedule. You can access and make changes to your appointments using voice commands or the Google Assistant app on your device, giving you full control over your calendar at any time.
Stay organized and never miss a beat by linking your calendar to Google Assistant. It’s a simple process that will revolutionize the way you manage your appointments and keep track of your schedule.
Customize your appointment settings
Google Assistant offers various customization options for your appointment settings, allowing you to tailor the experience to suit your preferences. Here are a few ways you can customize your appointment settings:
- Open the Google Assistant app on your device or activate Google Assistant by saying the wake phrase.
- Tap on your profile picture or initial in the top-right corner to access the Google Assistant settings.
- Scroll down and select “Services.”
- Under “Calendar,” you’ll find options to customize your appointment settings.
- Some of the customization options include setting the default calendar for new appointments, specifying reminder preferences, and controlling whether or not you want Google Assistant to automatically add appointments from emails.
- Adjust these settings according to your preferences and save your changes.
By customizing your appointment settings, you can streamline the appointment creation process and ensure that Google Assistant aligns with your scheduling preferences. For example, you can choose to receive reminders for upcoming appointments or disable the automatic addition of appointments from emails if you prefer more control over your calendar.
Additionally, you can customize the language and voice settings for Google Assistant to create a more personalized experience. This allows you to interact with Google Assistant in a way that feels natural and comfortable to you.
Remember to explore the various customization options available within the Google Assistant settings to fully optimize your appointment-making experience. Experiment with different settings and adjust them as needed to create an appointment workflow that best suits your needs.
With the ability to customize your appointment settings, Google Assistant becomes a highly versatile tool that adapts to your preferences and helps you stay organized in a way that works for you.
Troubleshooting common issues
While Google Assistant is designed to be user-friendly and reliable, you may encounter some common issues when using it to make appointments. Here are a few troubleshooting tips to help resolve these issues:
- Check your internet connection: Ensure that your device has a stable internet connection. Google Assistant requires an internet connection to function properly.
- Verify your language settings: Make sure that the language settings in both your device and the Google Assistant app align. If there’s a mismatch, it can affect the accuracy of voice commands and appointment creation.
- Update your Google Assistant app: If you’re using the Google Assistant app on your device, check for any available updates in the respective app store. Keeping the app updated ensures that you have access to the latest features and bug fixes.
- Restart your device: Sometimes, a simple restart can resolve temporary glitches or conflicts. Try restarting your device and then use Google Assistant again.
- Verify calendar app permissions: Ensure that the calendar app you’ve linked to Google Assistant has the necessary permissions enabled. This includes permissions for accessing your calendar and sending notifications.
- Clear cache and data: If you’re experiencing persistent issues, clearing the cache and data of the Google Assistant app can sometimes resolve them. Note that this process will remove any personalized settings or preferences, so proceed with caution.
- Contact support: If none of the above steps resolves your issue, consider reaching out to Google Assistant support for further assistance. They can provide specific troubleshooting guidance based on the nature of your problem.
By following these troubleshooting tips, you can resolve common issues and ensure smooth operation when using Google Assistant to make appointments. Remember, patience and persistence are key when troubleshooting, as it may take some trial and error to identify and resolve the underlying issue.
Keep in mind that Google Assistant is continuously evolving, and updates are released regularly to enhance its functionality and address any bugs or limitations. Therefore, staying up to date with the latest app versions and remaining vigilant regarding any troubleshooting tips or announcements can help you make the most of this powerful virtual assistant.
Tips for using Google Assistant to make appointments
To make the most out of Google Assistant when it comes to scheduling appointments, here are some useful tips to keep in mind:
- Be clear and specific: When giving voice commands or typing requests in the Google Assistant app, provide as much detail as possible. Clearly state the event title, date, time, and any other necessary information to ensure accurate appointment creation.
- Double-check before confirming: Before confirming an appointment, review the details provided by Google Assistant. Make sure the date, time, and other specifics are correct. This helps avoid any potential errors or miscommunications.
- Utilize natural language: Google Assistant understands natural language, so you don’t have to use rigid or robotic phrases. You can phrase your appointment requests as you would naturally speak, making the interaction more conversational and intuitive.
- Link multiple calendars: If you have multiple calendars for different purposes, link them to Google Assistant. This allows you to specify which calendar to add appointments to, keeping your work and personal schedules separate.
- Explore advanced features: Take the time to explore the advanced features offered by Google Assistant for appointment management. For example, you can set up recurring appointments, add reminders or notifications, or even invite others to your events.
- Sync with other devices: If you use Google Assistant on multiple devices, such as a smartphone, smart speaker, or smart display, ensure that all your devices are synced and connected to the same account. This ensures seamless access and synchronization of appointments across devices.
- Stay organized: Regularly review and manage your appointments within the Google Assistant app or your linked calendar app. Delete or reschedule any outdated or no longer relevant events to keep your schedule up to date.
- Take advantage of integrations: Google Assistant integrates with various productivity apps and services. Explore integrations that can enhance your appointment-making experience, such as linking to task management apps or enabling voice-controlled reminders.
By following these tips, you can optimize your experience with Google Assistant when it comes to making appointments. Whether you’re using voice commands or the Google Assistant app, these tips will help you stay organized, save time, and efficiently manage your schedule.
Keep in mind that Google Assistant is continually evolving, so don’t hesitate to explore new features and updates that may enhance your appointment-making experience even further. Experiment and find the methods and techniques that work best for you, and enjoy the time-saving benefits that Google Assistant brings to your scheduling workflow.