
Preparing Your Data
Before you start creating your Excel timeline, it’s important to gather and organize the data that you want to include. This will ensure that your timeline is accurate, informative, and visually appealing. Here are the steps to prepare your data:
- Identify the key events: Determine the specific events or milestones that you want to showcase on your timeline. This can be anything from project deadlines to historical dates or personal achievements.
- Gather relevant information: Collect all the necessary details for each event, such as the dates, descriptions, and any associated images or graphics.
- Create a timeline structure: Decide on the timeframe that your timeline will cover, whether it’s a week, a month, a year, or even longer. Establish the starting and ending points of your timeline to provide a clear structure.
- Order the events: Arrange the events in chronological order based on their dates. This will help you maintain a logical flow and make it easier for viewers to follow the timeline.
- Eliminate irrelevant information: Review your data and remove any unnecessary or duplicate entries. Keeping your timeline concise and focused will enhance its readability and impact.
By properly preparing your data, you will have a solid foundation for creating an effective Excel timeline template. This will save you time and ensure that your timeline accurately reflects the events you want to highlight.
Choosing a Timeline Template
Once you have your data prepared, the next step is to select the right timeline template in Excel. This will provide you with a pre-designed layout and structure that you can customize according to your needs. Here are some factors to consider when choosing a timeline template:
- Purpose: Determine the purpose of your timeline. Are you creating a project timeline, a historical timeline, or a personal timeline? Identifying the purpose will help you find a template that suits your specific requirements.
- Design: Look for a template that aligns with your desired style and aesthetics. Consider factors such as color schemes, font choices, and overall visual appeal. A visually appealing template will make your timeline more engaging and captivating.
- Layout: Choose a template with a layout that fits the amount of data you have. Templates with multiple rows or columns can accommodate a larger number of events, while simpler layouts work well for concise timelines.
- Flexibility: Consider whether the template allows for easy customization. Look for features such as editable dates, adjustable event positioning, and the ability to add or remove elements to tailor the timeline to your specific needs.
- Additional features: Some timeline templates may offer additional features like interactive elements, data visualization tools, or integration with other software. Assess whether these features are relevant to your project and can enhance the usability and functionality of your timeline.
Exploring different timeline template options will give you a better sense of the available designs and functionalities. Take your time to select a template that suits your preferences and aligns with the information you want to present.
Remember, your chosen timeline template will serve as the foundation for your Excel timeline, so it’s essential to make an informed decision. Once you have selected the template, you can start entering your data and customizing the timeline to create a visually stunning and informative representation of your events.
Entering Your Data
Now that you have chosen a timeline template, it’s time to enter your data into the Excel sheet. Follow these steps to input your information accurately:
- Open the timeline template: Launch Microsoft Excel and open the chosen timeline template. You will see predefined fields and placeholders where you can input your data.
- Data input: Start by entering the key details of each event, such as the event name, date, description, and any additional information you want to include. Make sure to enter the data in the correct columns or cells as per the template’s structure.
- Formatting text: Modify the text formatting to make it more visually appealing. You can use bold text, italics, underline, or different font sizes to highlight specific details or make the timeline more readable.
- Inserting images or graphics: If your timeline template allows it, consider adding relevant images or graphics to enhance the visual impact of your timeline. This can be logos, photos, or illustrations that represent each event.
- Review and revise: Double-check your data entry to ensure accuracy and consistency. Verify the event dates, spelling, and grammar of the descriptions. Make any necessary adjustments or edits to improve the overall quality of the timeline.
Entering your data correctly is crucial for the accurate representation of the timeline. Take your time to input the information meticulously, paying attention to details and maintaining consistency throughout.
Remember, the purpose of your timeline is to effectively communicate information, so make sure the data is clear, concise, and error-free. Once you have entered all your data, you are ready to proceed to the next step: customizing your timeline.
Customizing Your Timeline
After entering your data, it’s time to customize your timeline to make it visually appealing and aligned with your intended message. Here are some ways you can customize your Excel timeline:
- Adjusting timeline length: If your timeline needs to cover a different time span than the default template, you can resize and adjust the length of the timeline in Excel. Simply click on the timeline and drag the edges to extend or shorten its duration.
- Adding colors and styles: Customize the color scheme of your timeline to match your branding or personal preferences. Choose complementary colors and apply them consistently across the various elements of the timeline, such as events, labels, or background.
- Changing fonts and text styles: Experiment with different fonts and text styles to find the most suitable ones for your timeline. Consider using larger and bolder fonts for event names or headings, and a readable font for descriptions or smaller text.
- Grouping and categorizing events: If you have a large number of events, you can group them based on specific categories or themes. Use colors, labels, or additional columns to denote different event groups and make it easier for viewers to understand the timeline.
- Adding visuals and icons: Enhance the visual appeal of your timeline by incorporating relevant visuals, icons, or symbols. You can use shapes, arrows, or icons to indicate specific events, milestones, or important information.
- Adjusting event positioning: Modify the position of events on the timeline to create a more visually balanced layout. You can move events horizontally or vertically to ensure they are evenly spaced and aligned.
Customizing your timeline allows you to create a unique and visually engaging representation of your events. Experiment with different design elements and layouts until you achieve the desired look and feel.
Keep in mind that while customization is important, it’s essential to maintain clarity and readability. Avoid overcrowding the timeline with too many elements or excessive design elements that may distract from the main content.
Once you have customized your timeline to your satisfaction, the next step is to consider adding any additional elements that can enhance the overall presentation.
Adding Additional Elements
Besides the core events and information, you can further enhance your Excel timeline by including additional elements that provide context or supplementary details. Consider the following elements to add to your timeline:
- Annotations: Annotations are short notes or comments that provide additional explanations or insights for specific events on your timeline. You can add annotations as text boxes or callouts near the relevant event to provide more information.
- Hyperlinks: Utilize hyperlinks to direct viewers to external resources or related documents. You can link event names or descriptions to websites, articles, images, or supporting documents for further information.
- Images or photographs: Depending on the nature of your timeline, you can include relevant images or photographs to visually represent key events. Use images that are clear, high-quality, and directly related to the corresponding event.
- Data visualization: If your timeline contains quantitative data or statistics, consider incorporating charts or graphs to provide a visual representation of the data. Excel offers various chart types that can help highlight trends or comparisons within your timeline.
- Callout boxes: Callout boxes can be used to highlight important events or key moments within the timeline. Consider using colored boxes or borders to draw attention and make specific events stand out.
- Background images or patterns: Customize the background of your timeline with images or patterns that add visual interest and reinforce your theme. Ensure that the background doesn’t overshadow the content and maintains readability.
Adding these additional elements can provide a rich and dynamic experience for viewers, enabling them to engage with your timeline on a deeper level.
However, keep in mind that too many additional elements can overwhelm your timeline and potentially distract from the main information. Use discretion and ensure that any additional elements you include enhance the understanding and presentation of your timeline.
After adding these elements, it’s time to focus on the formatting of your timeline to ensure a polished and professional appearance.
Formatting Your Timeline
Formatting your timeline is an important step in creating a visually appealing and cohesive design. Paying attention to the overall appearance and style will make your Excel timeline more attractive and engaging. Here are some formatting tips to consider:
- Consistent styling: Ensure that your timeline maintains a consistent style throughout. Use the same fonts, colors, and formatting for event names, descriptions, and other elements to create a harmonious visual presentation.
- Gridlines and borders: Utilize gridlines and borders to provide structure and clarity to your timeline. Aligning events along consistent lines or grids helps create a neat and organized look.
- Whitespace: Incorporate whitespace strategically to improve readability and highlight important events or information. Allow enough space between events and sections to avoid cluttering and confusion.
- Font size and readability: Ensure that the font size and style you choose are legible and readable for viewers. Avoid using fonts that are too small or ornate, as they can hinder the understanding of the timeline.
- Alignment and spacing: Pay attention to the alignment and spacing of your events and text. Align elements consistently and evenly distribute them to maintain a balanced and visually pleasing layout.
- Consistent labeling: Create clear and concise labels for your timeline elements, such as event names or descriptions. Use a consistent labeling convention that is easily understandable for viewers.
- Data formatting: If your timeline includes numerical data, format it appropriately using Excel’s formatting options. This will ensure that your data is presented consistently and accurately.
Remember that formatting choices should enhance the readability and visual appeal of your timeline, not distract from the content. Strive for a clean and professional design that complements the information you are presenting.
Once you are satisfied with the formatting of your timeline, it’s time to consider the next steps: printing or sharing your timeline.
Printing or Sharing Your Timeline
Once you have finalized your Excel timeline, you have the option to print it out or share it electronically. Here are some considerations for printing or sharing your timeline:
- Printing your timeline: If you prefer a physical copy, you can print your Excel timeline. Before printing, ensure that your timeline fits on the chosen paper size without any content being cutoff. Adjust the printing settings to optimize the print quality and ensure that the colors and formatting appear as intended.
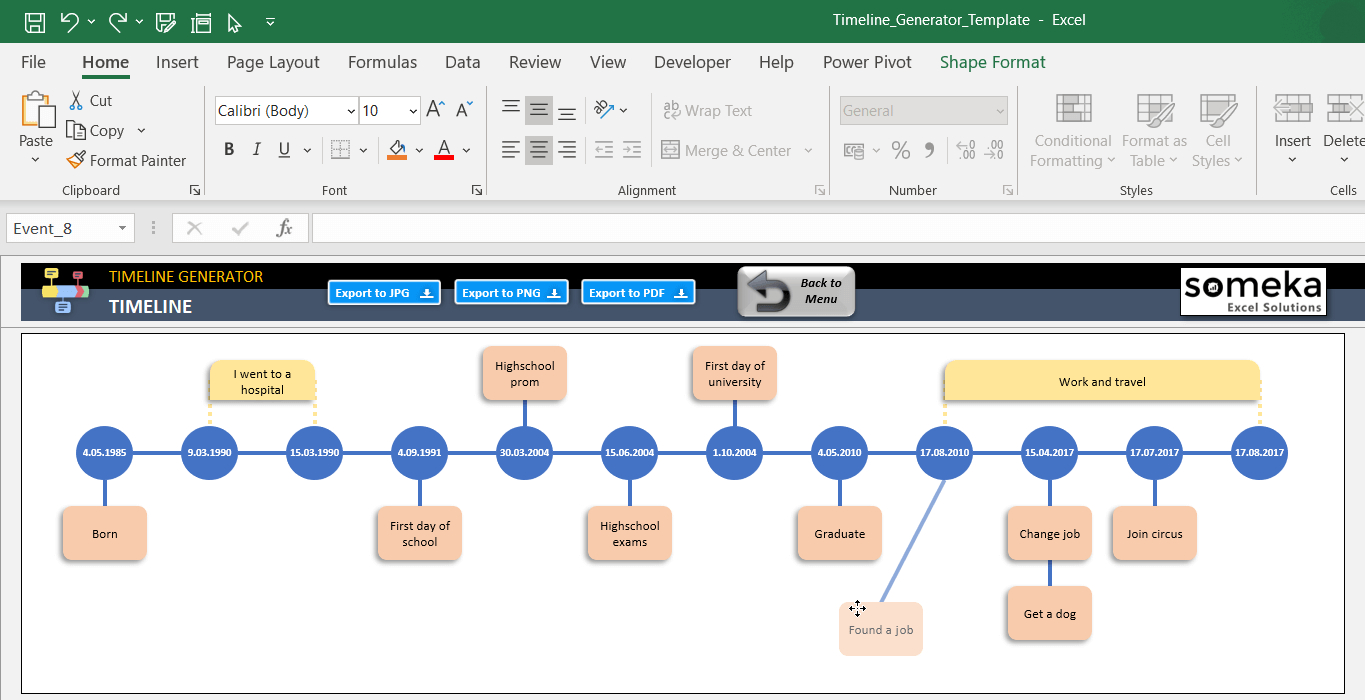
- Exporting as a PDF: If you want to share your timeline electronically while preserving the formatting, consider exporting it as a PDF. This ensures that the timeline will be displayed consistently across different devices and platforms. Check the PDF settings and options to ensure the quality of the exported file.
- Sharing electronically: You can also share your Excel timeline electronically in its original file format. Before sharing, verify that the recipients have the necessary software or tools to view and edit Excel files. If needed, consider saving your Excel file in a compatible format, such as CSV or XLSX, to ensure broad accessibility.
- Uploading to the cloud: To facilitate collaboration and easy access, you can upload your timeline to cloud storage platforms or collaboration tools. This allows team members or stakeholders to view, comment, and edit the timeline in real-time. Remember to set appropriate access permissions to protect the privacy and integrity of your timeline.
- Presenting in slideshows or presentations: If you want to incorporate your Excel timeline into a presentation or slideshow, consider copying and pasting the timeline as an image or embedding it directly into your presentation software. This ensures a seamless and visually engaging experience for your audience.
Consider the purpose and audience when deciding whether to print or share your timeline electronically. Choose the option that best suits your needs and enables effective communication of the timeline’s information.
Before sharing or printing, double-check the timeline for any errors or inconsistencies. Review the content, formatting, and layout to ensure that everything is accurate and visually appealing.
By leveraging the available options for printing or sharing, you can effectively distribute your Excel timeline to the relevant parties, whether it’s for project management, historical documentation, or personal reference.