
What is AirPlay?
AirPlay is a wireless streaming technology developed by Apple that allows you to wirelessly share content from your iPad to an AirPlay-enabled device, such as a TV, speakers, or Apple TV. It offers a convenient way to enjoy your favorite movies, music, photos, and more on a larger screen or through high-quality speakers.
With AirPlay, you can easily stream videos, music, or even mirror your entire iPad screen to compatible devices. Whether you want to watch a movie with friends, listen to your favorite playlist at a party, or show off your vacation photos on a big screen, AirPlay lets you do it all with just a few taps on your iPad.
One of the key features of AirPlay is its simplicity. You don’t need any additional cables or complicated setups to use it. As long as your iPad and the AirPlay device are connected to the same Wi-Fi network, you can begin streaming content seamlessly. It’s a hassle-free way to enjoy media on a larger scale without the need for physical connections.
Furthermore, AirPlay supports not only audio and video streaming but also screen mirroring. This means that you can replicate your iPad screen on a compatible device, allowing you to navigate your iPad and use apps with ease on a larger display. Whether you’re giving a presentation, playing games, or browsing the web, AirPlay makes it possible to extend your iPad experience beyond its small screen.
In addition to streaming media and mirroring, AirPlay allows you to control playback and volume directly from your iPad. This means you can conveniently adjust the volume, pause or resume playback, or skip to the next track without the need to handle the remote control or interact with the connected device.
AirPlay works seamlessly with many popular apps and services, including Apple Music, Netflix, YouTube, and more. This compatibility ensures that you can enjoy your favorite content from various sources and easily stream it to your desired AirPlay device.
Setting up AirPlay on your iPad
Setting up AirPlay on your iPad is a straightforward process that only requires a few simple steps. Here’s how you can get started:
- Ensure that your iPad and the AirPlay-enabled device are connected to the same Wi-Fi network. This is essential for them to communicate with each other.
- On your iPad, swipe down from the top-right corner of the screen (or swipe up from the bottom if you have an older iPad model) to access the Control Center.
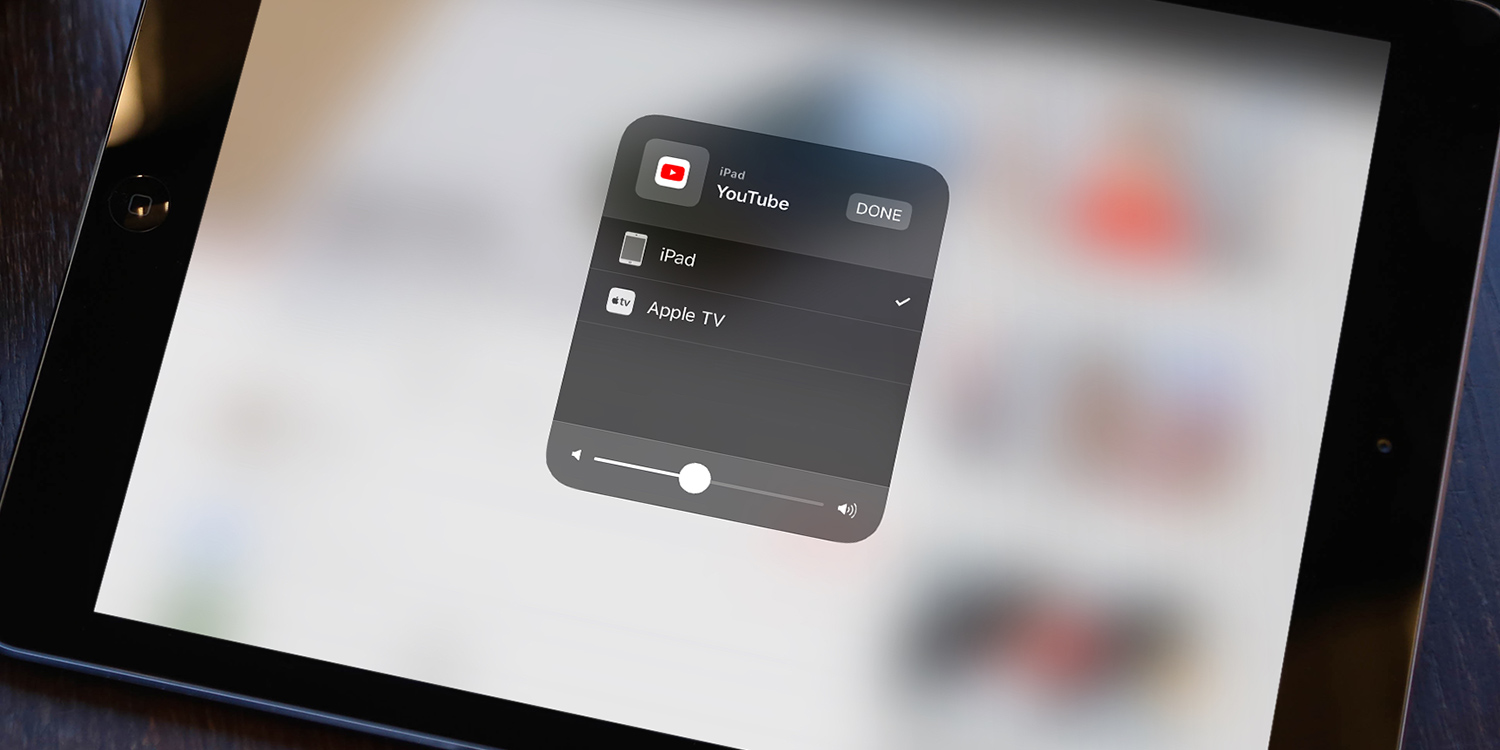
- In the Control Center, you will see a range of options. Look for the AirPlay icon, which resembles a rectangle with an arrow pointing upwards. Tap on this icon.
- A list of available AirPlay devices will appear on the screen. Select the device you want to connect to from the list. If the device doesn’t appear, make sure it is turned on and within range of your Wi-Fi network.
- Once you’ve selected the device, you can choose to either mirror your iPad screen by toggling the “Mirroring” option, or you can simply play media from your iPad to the AirPlay device without mirroring.
- To exit AirPlay mode, return to the Control Center and tap on the AirPlay icon again. From the list of devices, select “Stop Mirroring” or choose your iPad as the output device.
That’s all you need to do to set up AirPlay on your iPad. It’s a quick and easy process that allows you to start streaming or mirroring your iPad screen in no time. Enjoy the convenience of wireless sharing and take your media viewing experience to a whole new level with AirPlay.
Connecting to an AirPlay-enabled device
Once you have set up AirPlay on your iPad, connecting to an AirPlay-enabled device is a breeze. Follow these simple steps to establish a seamless connection:
- Ensure both your iPad and the AirPlay-enabled device are powered on and connected to the same Wi-Fi network. This is crucial for establishing a successful connection.
- Open the app or media you want to stream from your iPad. It could be a video, music, or even a photo slideshow.
- Look for the AirPlay icon within the app or media player. The icon typically resembles a rectangle with an upward-pointing arrow.
- Tap on the AirPlay icon to bring up a list of available AirPlay devices. Choose the desired device you wish to connect to.
- Depending on the app or media player, you may see additional options to adjust settings like audio output or screen size. Feel free to customize these settings according to your preferences.
- The content should now start streaming on the AirPlay-enabled device. If you’re mirroring your iPad’s screen, you’ll see an exact replica of your iPad display on the connected device.
- To stop streaming or mirroring, simply tap the AirPlay icon again and select “Stop Mirroring” or choose your iPad as the output device.
Keep in mind that not all apps or media players support AirPlay functionality. Make sure the app you’re using has AirPlay capabilities before attempting to connect to an AirPlay-enabled device. Also, ensure that the device you’re trying to connect to is AirPlay compatible and within range of your Wi-Fi network.
By following these steps, you can easily connect your iPad to an AirPlay-enabled device and enjoy your favorite content on a larger screen or through external speakers. Experience the convenience and flexibility that AirPlay offers for seamless wireless streaming.
Mirroring your iPad screen
One of the most powerful features of AirPlay is the ability to mirror your entire iPad screen onto a larger display. This is especially useful for presentations, gaming, or simply enjoying your iPad experience on a bigger screen. Follow these steps to mirror your iPad screen using AirPlay:
- Ensure your iPad and the AirPlay-enabled device you want to mirror to are connected to the same Wi-Fi network.
- Swipe down from the top-right corner of the screen (or swipe up from the bottom if you have an older iPad model) to open the Control Center.
- Tap the AirPlay icon, which looks like a rectangle with an upward-pointing arrow.
- In the list of available AirPlay devices, select the device you want to mirror your iPad screen to.
- Toggle the “Mirroring” option to the on position. This will mirror everything that appears on your iPad screen to the connected device.
- You will now see an exact replica of your iPad screen on the AirPlay-enabled device. Any action or interaction you perform on your iPad will be mirrored in real-time.
- To stop mirroring, go back to the Control Center, tap the AirPlay icon again, and turn off the “Mirroring” option.
Keep in mind that depending on the device you’re mirroring to, there may be a slight delay between your actions on the iPad and their display on the mirrored screen. This is normal and shouldn’t affect your overall experience.
Whether you’re giving a presentation to a larger audience, playing games on a TV, or simply browsing the web with the convenience of a bigger display, mirroring your iPad screen with AirPlay offers endless possibilities. Explore the full potential of your iPad and enjoy an immersive and enhanced viewing experience with the power of AirPlay.
Playing audio from your iPad to an AirPlay device
With AirPlay, you can easily stream audio from your iPad to an AirPlay-enabled device, such as speakers or a home theater system. Whether you want to enjoy your favorite music, listen to podcasts, or watch a movie with immersive sound, here’s how you can play audio from your iPad to an AirPlay device:
- Make sure your iPad and the AirPlay device are connected to the same Wi-Fi network.
- Open the app or media player from which you want to play audio on your iPad.
- Look for the AirPlay icon within the app or media player. It usually appears as a rectangle with an upward-pointing arrow.
- Tap on the AirPlay icon to see a list of available AirPlay devices.
- Select the AirPlay-enabled device you want to play audio through.
- The audio will now be streamed to the AirPlay device. You can control the volume and playback directly from your iPad or the AirPlay device, depending on the capabilities of the connected device.
- To stop streaming audio, tap the AirPlay icon again and select your iPad as the output device.
It’s important to note that not all apps or media players support AirPlay for audio streaming. However, most popular music streaming apps, podcast players, and video players are AirPlay compatible. Make sure the app you’re using has AirPlay capabilities before attempting to stream audio.
AirPlay also supports multi-room audio, allowing you to play audio simultaneously on multiple AirPlay devices throughout your home. This creates a seamless and immersive audio experience, perfect for parties or when you want to fill your space with music.
By following these simple steps, you can easily stream audio from your iPad to an AirPlay-enabled device. Enjoy high-quality sound and elevate your audio experience with AirPlay.
Adjusting AirPlay settings on your iPad
Your iPad offers flexibility in customizing your AirPlay settings to suit your preferences. You can adjust various settings related to AirPlay and enhance your streaming experience. Here’s how to access and modify AirPlay settings on your iPad:
- Open the Settings app on your iPad.
- Scroll down and tap on “General.”
- Tap on “AirPlay & Handoff.”
- In the AirPlay settings, you will find options to adjust the default audio and video output devices. This allows you to set a preferred device or speakers for audio playback and a preferred device for video playback.
- You can also enable or disable “Require Password” to secure your AirPlay connections with a password, providing an extra layer of security.
- Within the AirPlay settings, you can enable or disable “Allow Access” to control who can access your iPad for AirPlay connections. This can be set to “Everyone” or restricted to “Anyone on the Same Network” for added privacy.
- If you have multiple AirPlay devices, you can enable “Multiple Speakers” to play audio simultaneously on different devices.
- Under the “Handoff” section, you can enable or disable the feature that allows you to seamlessly transition audio or video playback between your iPad and other Apple devices, such as iPhone or Mac.
Exploring and adjusting these AirPlay settings gives you greater control over how you connect and stream content from your iPad. Experiment with different configurations to find the setup that works best for your needs and preferences.
Keep in mind that the available settings and options may vary depending on the version of iOS installed on your iPad. Additionally, the options for adjusting AirPlay settings may differ slightly depending on the specific iPad model you are using.
By customizing your AirPlay settings, you can optimize your streaming experience and make the most out of this powerful wireless technology. Enjoy the convenience and flexibility of AirPlay tailored to your preferences.
Troubleshooting common AirPlay issues
While AirPlay is generally a reliable and seamless technology, you may encounter occasional issues that can hinder its functionality. Here are some common AirPlay issues and troubleshooting steps to help resolve them:
1. Connection issues:
If you’re having trouble connecting your iPad to an AirPlay device, try the following:
- Ensure that both devices are connected to the same Wi-Fi network.
- Restart your iPad and the AirPlay device.
- Check if there are any software updates available for your iPad and the AirPlay device, and install them if needed.
2. Audio or video playback issues:
If you’re experiencing problems with audio or video playback over AirPlay, try these steps:
- Make sure the volume on both your iPad and the AirPlay device is turned up and not muted.
- Ensure that the app or media player you’re using supports AirPlay functionality.
- Check the audio and video cables connecting the AirPlay device to speakers or a TV, and ensure they’re securely connected.
3. Performance issues:
If you’re encountering performance issues or lag when using AirPlay, consider the following troubleshooting steps:
- Close unused apps on your iPad to free up system resources.
- Reduce the distance between your iPad and the AirPlay device to improve signal strength.
- Try restarting your Wi-Fi router to resolve any network-related issues.
4. Password or access issues:
If you’re having trouble with AirPlay password or access settings, try these troubleshooting steps:
- Ensure that you’re entering the correct password if your AirPlay connections require it.
- Check the AirPlay settings on your iPad and ensure that access is set to the desired level (e.g., “Everyone” or “Anyone on the Same Network”).
- Restart both your iPad and the AirPlay device to refresh their connections.
If none of these troubleshooting steps resolve your AirPlay issues, you may want to consider contacting Apple Support or referring to their online resources for further assistance. They can provide more specific guidance based on your device and software version.
By troubleshooting common AirPlay issues, you can overcome any technical challenges and enjoy the seamless wireless streaming experience that AirPlay offers.
Tips and tricks for using AirPlay on your iPad
AirPlay is a versatile technology that offers more than just wireless streaming. Here are some tips and tricks to help you get the most out of AirPlay on your iPad:
- Utilize multi-room audio: If you have multiple AirPlay-enabled devices, take advantage of the multi-room audio feature. Stream music or podcasts simultaneously to different devices throughout your home, creating a synchronized audio experience.
- Explore third-party apps: While many popular apps and media players support AirPlay, don’t limit yourself to just the built-in options. Explore third-party apps that offer AirPlay compatibility for a wider range of streaming and playback options.
- Create a wireless presentation setup: When giving a presentation, use AirPlay to mirror your iPad screen onto a larger display or projector. This eliminates the need for cables and allows you to move freely around the room while presenting.
- Stream photos to enhance your viewing experience: AirPlay isn’t just limited to videos and music. Stream your photos from the iPad to an AirPlay-enabled device, such as a TV, to showcase your photo albums with friends and family in a larger and more immersive format.
- Take advantage of gaming on a bigger screen: Use AirPlay to mirror your iPad screen to a TV or monitor for a better gaming experience. Play games with friends or enjoy the enhanced visuals on a larger display.
- Use AirPlay with Apple HomeKit: If you have a HomePod or other AirPlay-enabled smart speakers, you can integrate AirPlay with Apple HomeKit to control audio playback through voice commands using Siri or the Home app.
- Maximize audio quality: For the best audio experience, connect your iPad to speakers or a sound system that supports high-quality audio playback. This can significantly enhance the sound quality of your music, movies, and podcasts.
- Enable subtitles or closed captions: When streaming videos to an AirPlay-enabled TV, enable subtitles or closed captions directly from your iPad. This ensures that you can enjoy content with the added benefit of captions for better accessibility or language support.
- Use AirPlay while traveling: If you’re staying at a hotel that offers AirPlay-enabled TVs or audio systems, you can easily connect your iPad and enjoy your favorite media without the need for additional cables or devices.
By applying these tips and tricks, you can elevate your AirPlay experience and make the most out of this convenient wireless streaming technology on your iPad. Discover new ways to enjoy media, enhance your presentations, and create immersive audiovisual experiences with AirPlay.