
What is Bootloader?
A bootloader is a program that initiates the startup process of your Android phone or any other electronic device. It acts as a bridge between the hardware and the software, ensuring that the necessary instructions are executed correctly during the boot process.
When you power up your Android phone, the bootloader is the first thing that starts running. It initializes the hardware, performs essential checks, and then loads the operating system. In simple terms, the bootloader is responsible for loading the operating system on your device’s memory.
By default, Android devices come with locked bootloaders, which means they restrict you from making any unauthorized changes to the operating system. This is done by the device manufacturers to ensure the security and stability of the system. However, there are situations where you may want to unlock the bootloader.
Unlocking the bootloader gives you the ability to install custom ROMs, modify system files, and exercise more control over your Android device. It allows you to unleash the full potential of your phone and customize it according to your preferences. With an unlocked bootloader, you can explore a wide range of possibilities that are otherwise restricted on locked devices.
It’s important to note that unlocking the bootloader voids the warranty on most devices and may also expose your device to potential security risks. Therefore, it’s crucial to proceed with caution and understand the consequences before deciding to unlock the bootloader.
Why would you want to unlock the bootloader?
Unlocking the bootloader offers numerous benefits and opportunities for advanced customization on your Android phone. Here are some reasons why you might consider unlocking the bootloader:
- Custom ROMs: One of the main advantages of unlocking the bootloader is the ability to install custom ROMs. These modified versions of Android offer unique features, improved performance, and often come with a more customizable interface. Custom ROMs also provide access to the latest Android updates, even if your device is no longer officially supported.
- Root Access: Unlocking the bootloader allows you to gain root access to your device. Root access provides elevated privileges, giving you complete control over your phone’s operating system. With root access, you can remove bloatware, optimize system performance, and install powerful root-only apps that enhance functionality.
- Modifications and Tweaks: If you enjoy tinkering with your device, unlocking the bootloader enables you to make advanced modifications and tweaks. You can customize the look and feel of your device by installing custom themes, icon packs, boot animations, and more. Additionally, you can overclock or underclock your CPU, adjust system settings, and experiment with different kernels for improved performance.
- Advanced Backup and Recovery: Unlocking the bootloader allows you to use advanced backup and recovery tools. With a custom recovery, such as TWRP (Team Win Recovery Project), you can create full system backups, restore backups, and even perform more advanced operations like partitioning your device’s storage.
- Enhanced App and System Control: Unlocking the bootloader provides access to powerful apps and tools that require system-level access. For instance, you can use apps like Xposed Framework to customize the behavior of individual apps, install system-wide mods, and even change the functionality of your phone’s hardware buttons.
Unlocking the bootloader is not something every user needs to do. However, if you enjoy exploring the possibilities of advanced customization, want to experience the latest Android updates, or simply wish to have more control over your device, unlocking the bootloader can greatly enhance your Android experience.
Before you begin: Backup your data
Before proceeding with the bootloader unlocking process, it is essential to back up all your data to prevent any potential loss or corruption. Unlocking the bootloader involves wiping the device’s internal storage, which means that all your apps, settings, media, and personal files will be deleted. Here are some important steps to follow:
- Back up your contacts and messages: Ensure that your contacts and messages are backed up either to your Google account or any other cloud service. This will make it easier to restore them to your device once the bootloader unlocking process is complete.
- Transfer media and documents: Connect your phone to your computer and transfer any important photos, videos, documents, or other media files that you want to keep. You can use USB cables or cloud storage services to backup your files.
- Sync app data: For apps that store data locally on your device, make sure to back up their data as well. Some apps may offer built-in backup and restore functionality, while others may require third-party backup solutions.
- Note down important settings: Take note of any system settings, app preferences, Wi-Fi passwords, or any other customizations that you want to restore later. It’s helpful to have a checklist of all the settings you want to reapply after unlocking the bootloader.
- Backup app data: Some apps may have their own backup options that can be used to save their data. If you have any app-specific data that you wish to preserve, ensure that it is backed up before proceeding.
By taking the time to back up your data, you can minimize the risk of losing important information during the bootloader unlocking process. It is always better to be safe than sorry, as unlocking the bootloader involves irreversible changes to your device’s storage. Once you have successfully unlocked your bootloader and completed any desired modifications, you can then restore your data and settings, ensuring a seamless transition to your customized Android experience.
Step 1: Enable Developer Options
Before you can proceed with unlocking the bootloader on your Android phone, you need to enable the Developer Options. This hidden menu gives you access to advanced developer settings, including USB debugging and OEM unlocking. Here’s how to enable Developer Options:
- Go to Settings: Open the Settings app on your Android phone. You can usually find it in the app drawer or by swiping down from the top of the screen and tapping the gear icon.
- Scroll down and tap on ‘About phone’: Scroll down the Settings menu and look for the ‘About phone’ or ‘About device’ option. Tap on it to access the device information.
- Locate ‘Build number’: In the device information screen, look for the ‘Build number’ or ‘Software information’ section. The exact location of this option may vary depending on the device model or Android version.
- Tap on ‘Build number’ repeatedly: To enable Developer Options, tap on the ‘Build number’ multiple times. Keep tapping until you see a message that says, “You are now a developer!” or something similar.
- Go back to Settings: Once you have enabled Developer Options, go back to the main Settings menu. You should now see a new option called ‘Developer Options’ or ‘Developer settings’ listed.
- Open Developer Options: Tap on the ‘Developer Options’ or ‘Developer settings’ menu to access the developer settings.
Congratulations! You have successfully enabled Developer Options on your Android phone. This will now allow you to enable USB debugging and OEM unlocking, which are essential steps in unlocking the bootloader. In the next steps, we will guide you through enabling these options and the subsequent steps required to unlock your device’s bootloader.
Step 2: Enable USB Debugging
USB debugging is a crucial setting that needs to be enabled in order to communicate with your Android device from your computer. Enabling USB debugging allows you to transfer files, install apps, and execute commands using the Android Debug Bridge (ADB) tool. Here’s how to enable USB debugging:
- Go to Developer Options: Open the Settings app on your Android phone and navigate to the ‘Developer Options’ or ‘Developer settings’ menu. If you haven’t enabled Developer Options yet, refer to the previous step for instructions on how to do so.
- Find USB debugging: Scroll down the Developer Options menu and look for the ‘USB debugging’ option. It is usually located towards the top of the list.
- Toggle USB debugging: Tap on the toggle switch next to ‘USB debugging’ to enable it. You may see a warning message informing you about the potential risks associated with USB debugging. Simply confirm your decision to enable USB debugging.
- Grant permission: A popup may appear asking for your permission to authorize the computer you connect your device to. Confirm the prompt, as it allows ADB to communicate with your phone over USB.
- Connect your phone to your computer: Use a USB cable to connect your Android phone to your computer. Make sure that USB debugging is enabled before connecting the cable.
That’s it! You have successfully enabled USB debugging on your Android phone. Enabling this option allows your computer to establish a secure connection with your device, which is essential for performing bootloader unlocking and other advanced operations. In the next steps, we will guide you through the remaining process of unlocking the bootloader on your Android phone.
Step 3: Enable OEM Unlocking
Before you can proceed with unlocking the bootloader on your Android phone, you need to enable the OEM unlocking option. OEM stands for Original Equipment Manufacturer, and enabling this option allows the bootloader to be unlocked. Here’s how to enable OEM unlocking:
- Go to Developer Options: Open the Settings app on your Android phone and navigate to the ‘Developer Options’ or ‘Developer settings’ menu. If you haven’t enabled Developer Options yet, refer to the previous step for instructions on how to do so.
- Find OEM unlocking: Scroll down the Developer Options menu and look for the ‘OEM unlocking’ option. It is usually located towards the bottom of the list.
- Toggle OEM unlocking: Tap on the toggle switch next to ‘OEM unlocking’ to enable it. A warning message might appear, stating that enabling OEM unlocking will erase all data on your device. Confirm your decision to proceed.
- Enter your device password or PIN: To ensure that only the device owner can enable or disable OEM unlocking, you might be prompted to enter your device password or PIN to confirm the action. Enter the required information to proceed.
Great! You have successfully enabled OEM unlocking on your Android phone. This step is crucial for unlocking the bootloader because it ensures that you have the necessary permission to make changes to the device’s firmware. In the next steps, we will guide you through the process of installing the ADB and Fastboot tools on your computer, which are essential for unlocking the bootloader.
Step 4: Install ADB and Fastboot
In order to unlock the bootloader on your Android phone, you need to have ADB (Android Debug Bridge) and Fastboot installed on your computer. These tools allow you to communicate with your device and execute commands from the command prompt or terminal. Follow the steps below to install ADB and Fastboot:
- Download the ADB and Fastboot package: Visit the official Android Developer website or a trusted third-party source to download the ADB and Fastboot package for your operating system (Windows, Mac, or Linux).
- Extract the package: Once the package is downloaded, extract the contents to a location on your computer. Make sure to remember the path where you extracted the files, as you will need it for the next steps.
- Add ADB and Fastboot to your system’s PATH: To make ADB and Fastboot accessible from any location on your computer, you need to add their location to the system’s PATH variable. Instructions for adding to the PATH vary depending on your operating system:
- Windows: Open the Start menu, right-click on “Computer” or “This PC,” and select “Properties.” From the left-hand side, click on “Advanced system settings,” then click on the “Environment Variables” button. In the “System variables” section, find the “Path” variable, and click on “Edit.” Add the path to the folder where ADB and Fastboot are located, separating it from other paths with a semicolon (;).
- Mac and Linux: Open a terminal window and enter the following command to open the bash profile or bashrc file, respectively:
nano ~/.bash_profileornano ~/.bashrc
Add the following line at the end of the file:
export PATH="$PATH:/path/to/adb/fastboot"
Replace “/path/to/adb/fastboot” with the actual path to the folder where ADB and Fastboot are located. - Verify the installation: Open a command prompt or terminal and enter the following command to check if ADB and Fastboot are successfully installed:
adb version
If you see the version number displayed, then ADB is installed correctly. Repeat the command with “fastboot” instead of “adb” to check the Fastboot installation.
Congratulations! You have successfully installed ADB and Fastboot on your computer. These tools are now ready to be used to unlock the bootloader on your Android phone. In the next steps, we will guide you through connecting your phone to your computer and entering Fastboot mode.
Step 5: Connect your phone to your computer
In order to proceed with unlocking the bootloader on your Android phone, you need to establish a connection between your phone and your computer. Follow the steps below to connect your phone to your computer:
- Enable USB Debugging: On your Android phone, ensure that USB debugging is enabled. Refer to Step 2 for instructions on how to enable USB debugging in the Developer Options menu.
- Use a USB cable: Connect your Android phone to your computer using a compatible USB cable. Ensure that the cable is not damaged and is capable of data transfer.
- Swipe down the notification panel: On your Android phone, swipe down from the top of the screen to open the notification panel. Look for a USB option, such as “USB for charging” or “USB options”. Tap on it to access more USB settings.
- Select “File transfer” or “MTP”: In the USB options menu, select the “File transfer” or “MTP” option. This allows your computer to access files on your Android phone.
- Allow USB debugging: When you connect your phone to the computer for the first time, a dialog box may appear on your phone’s screen, asking you to authorize the computer to access your device. Tap “Allow” or “OK” to grant permission.
- Check the connection: On your computer, open a command prompt or terminal and enter the following command:
adb devices
This command will display a list of connected devices. If your device’s serial number is listed, then the connection is successful.
Great! You have successfully connected your Android phone to your computer. This connection is crucial for the remaining steps in the bootloader unlocking process. In the next step, we will guide you on how to boot your phone into Fastboot mode, which is necessary to proceed with unlocking the bootloader.
Step 6: Boot your phone into Fastboot mode
Fastboot mode is a special boot mode on Android devices that allows for communication between your phone and the computer. To unlock the bootloader, you need to boot your phone into Fastboot mode. Follow the steps below to enter Fastboot mode on your Android phone:
- Turn off your Android phone: Press and hold the power button on your phone until the power menu appears. Select the “Power off” or “Shutdown” option to turn off your device.
- Enter Fastboot mode: Once your phone is powered off, press and hold the specific key combination to enter Fastboot mode. The key combination varies depending on the device manufacturer and model. Here are some common key combinations:
- Nexus and Pixel devices: Press and hold the Power button and Volume Down button simultaneously.
- Samsung devices: Press and hold the Power button, Volume Down button, and Home button simultaneously.
- HTC devices: Press and hold the Power button and Volume Down button simultaneously.
- Sony devices: Press and hold the Power button and Volume Up button simultaneously.
- Other devices: Search online for the specific key combination for your device model.
- Connect your phone to your computer: While your phone is in Fastboot mode, connect it to your computer using a USB cable. Ensure that the cable is properly connected at both ends.
Well done! You have successfully booted your Android phone into Fastboot mode. Your phone is now ready to receive commands from your computer to unlock the bootloader. In the next step, we will guide you through verifying if your phone is recognized by Fastboot before proceeding with the bootloader unlocking process.
Step 7: Verify your phone is recognized by Fastboot
Before proceeding with the bootloader unlocking process, it’s important to ensure that your phone is properly recognized by Fastboot on your computer. This step allows you to confirm that your device is successfully connected and ready to receive Fastboot commands. Follow the steps below to verify your phone’s recognition by Fastboot:
- Open a command prompt or terminal: On your computer, open a command prompt (Windows) or terminal (Mac/Linux). This is where you will enter Fastboot commands to interact with your device.
- Change to the ADB and Fastboot directory: Navigate to the directory where you installed the ADB and Fastboot tools. If you followed the default installation path, you can use the following command:
cd path/to/adb/fastboot
Replace “path/to/adb/fastboot” with the actual path to the ADB and Fastboot directory on your computer. - Enter Fastboot mode: Make sure your Android phone is still in Fastboot mode. If it’s not, refer to Step 6 for instructions on how to enter Fastboot mode.
- Connect your phone to your computer: Ensure that your phone is connected to your computer via a USB cable.
- Check device recognition: In the command prompt or terminal, enter the following command:
fastboot devices
This command will display a list of connected devices in Fastboot mode. If your device’s serial number is listed, it means that Fastboot recognizes your phone.
Great! You have successfully verified that your phone is recognized by Fastboot. This confirmation ensures that you can proceed with the bootloader unlocking process without any connectivity issues. In the next step, we will guide you through the actual process of unlocking the bootloader on your Android phone.
Step 8: Unlock the bootloader
Now that you have successfully prepared your Android phone and computer, it’s time to unlock the bootloader. Keep in mind that this process will erase all data on your device, so make sure you have backup up your important files. Follow the steps below to unlock the bootloader:
- Open a command prompt or terminal: On your computer, open a command prompt (Windows) or terminal (Mac/Linux). This is where you will enter Fastboot commands to interact with your device.
- Change to the ADB and Fastboot directory: Navigate to the directory where you installed the ADB and Fastboot tools, using the command:
cd path/to/adb/fastboot
Replace “path/to/adb/fastboot” with the actual path to the ADB and Fastboot directory on your computer. - Enter Fastboot mode: Ensure that your Android phone is still in Fastboot mode. If not, refer to Step 6 for instructions on how to enter Fastboot mode.
- Connect your phone to your computer: Ensure that your phone is connected to your computer via a USB cable.
- Unlock the bootloader: In the command prompt or terminal, enter the following command:
fastboot oem unlock
This command will initiate the bootloader unlocking process on your phone. A warning message may appear on your device, confirming whether you want to unlock the bootloader. Use the volume keys to navigate and the power button to select “Yes.” - Wait for the process to complete: Once you confirm the bootloader unlock, your device will start the process. It may take a few seconds or minutes, during which your phone will reboot several times. Do not interrupt this process.
Congratulations! You have successfully unlocked the bootloader on your Android phone. This opens up a world of possibilities for customization and advanced modifications. In the next step, we will guide you on confirming the bootloader unlock on your device.
Step 9: Confirm bootloader unlock
After unlocking the bootloader on your Android phone, it’s essential to confirm the bootloader unlock status to ensure that the process was successful. Here’s how you can confirm the bootloader unlock on your device:
- Restart your phone: If your phone hasn’t automatically restarted after completing the bootloader unlock process, manually restart it by pressing and holding the power button until the power menu appears. Select the “Restart” option.
- Enter Fastboot mode: Refer to Step 6 for instructions on how to enter Fastboot mode on your Android phone.
- Connect your phone to your computer: Use a USB cable to connect your phone to your computer.
- Open a command prompt or terminal: On your computer, open a command prompt (Windows) or terminal (Mac/Linux).
- Change to the ADB and Fastboot directory: Navigate to the directory where you installed the ADB and Fastboot tools using the command:
cd path/to/adb/fastboot
Replace “path/to/adb/fastboot” with the actual path to the ADB and Fastboot directory on your computer. - Enter the Fastboot mode: Ensure that your Android phone is in Fastboot mode by following the instructions in Step 6.
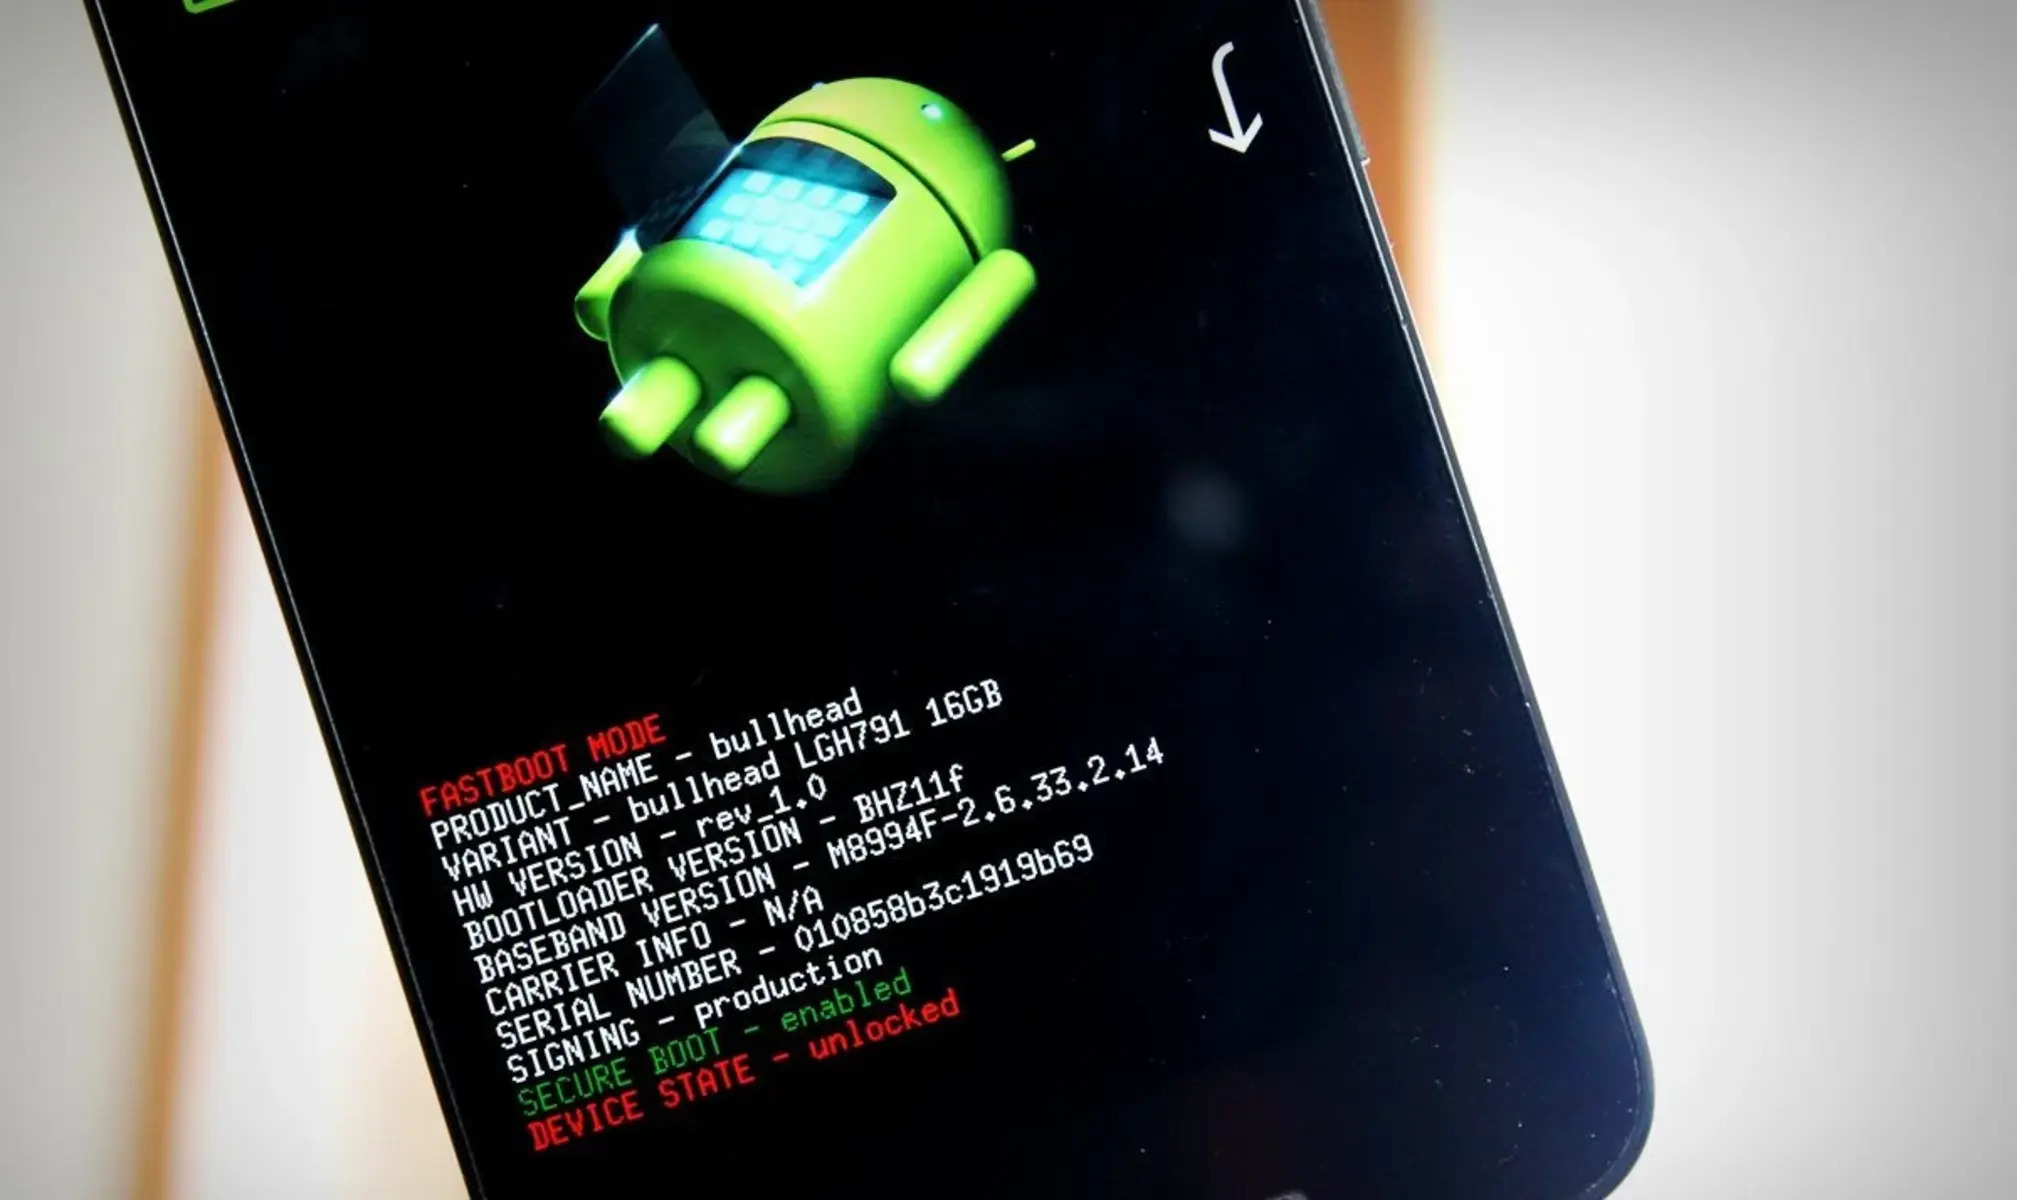
- Check bootloader status: In the command prompt or terminal, enter the following command:
fastboot getvar unlocked
This command will display the bootloader status on your phone. If the response shows “unlocked,” it means that the bootloader is successfully unlocked.
Fantastic! You have confirmed the bootloader unlock on your Android phone. This verifies that the bootloader unlocking process was successful and that your device is now ready for further customization and modifications. In the final step, we will guide you on rebooting your phone and provide some important considerations to keep in mind after unlocking the bootloader.
Step 10: Reboot your phone
After successfully unlocking the bootloader on your Android phone, it’s important to reboot your device to complete the process and ensure that all changes take effect. Here’s how you can reboot your phone:
- Exit Fastboot mode: If your phone is still in Fastboot mode, exit by pressing and holding the power button until your device restarts.
- Wait for the reboot: Give your phone a moment to reboot and fully initialize. This may take a few seconds or minutes.
- Enjoy your unlocked phone: Once your phone has restarted, you can start using it with the unlocked bootloader. Take advantage of the newfound freedom and customization options that come with an unlocked bootloader.
Congratulations! You have successfully rebooted your Android phone after unlocking the bootloader. Your device is now ready for you to explore custom ROMs, root access, advanced modifications, and more. Keep in mind that unlocking the bootloader may void your warranty and involve some risks. It’s essential to proceed with caution and ensure that you understand the potential consequences.
Before you dive into customizing your device, it’s important to note that unlocking the bootloader can also make your device more vulnerable to security risks. To mitigate these risks, make sure to:
- Only download ROMs and mods from trusted sources.
- Keep your phone’s system software up to date.
- Be cautious when granting root access to apps and only give permission to trusted applications.
- Maintain regular backups of your device’s data to safeguard against potential data loss.
With the bootloader unlocked, you have greater control over your Android phone and the ability to personalize your device’s functionality and appearance. Enjoy exploring the various possibilities that come with an unlocked bootloader and have fun customizing your Android experience!
Important considerations before unlocking the bootloader
Before proceeding with unlocking the bootloader on your Android phone, it’s crucial to understand the implications and potential risks involved. Here are some important considerations to keep in mind:
- Warranty void: Unlocking the bootloader typically voids the warranty provided by the manufacturer or carrier. This means that if any issues arise with your device after unlocking, you may not be eligible for warranty repairs or replacements.
- Security risks: Unlocking the bootloader can expose your device to additional security risks. It allows for the installation of custom ROMs and modifications, which may be developed by third-party sources and may not undergo the same level of security checks as official firmware.
- Data loss: Unlocking the bootloader requires wiping the device’s internal storage, which results in the loss of all data including apps, settings, and media. It’s essential to back up your important data before proceeding.
- Incompatibility and instability: Custom ROMs and modifications may not be fully optimized or compatible with your phone’s hardware or software. This can lead to stability issues, reduced performance, or certain features not functioning as intended.
- Updates and support: After unlocking the bootloader, your device may no longer receive official software updates or security patches from the manufacturer. You will need to rely on unofficial sources for updates, which may not be as timely or reliable.
It’s important to thoroughly research and understand the specific considerations and risks associated with your device model and the custom ROMs or modifications you plan to install. However, if you are willing to accept the trade-offs and want to explore the full potential of your Android phone, unlocking the bootloader can offer a wide range of customization and advanced modification options.
Keep in mind that each phone and manufacturer may have specific procedures and requirements for unlocking the bootloader. It’s recommended to refer to official documentation, forums, or trusted sources for device-specific instructions and support.
Once you have carefully considered these factors and made an informed decision, proceed with caution and follow the steps outlined in this guide to unlock the bootloader on your Android phone. Enjoy the freedom to customize and personalize your device to meet your unique needs and preferences.