
Checking for Updates in Firefox
Keeping your Firefox browser up to date is essential for optimal performance and security. To ensure you have the latest version installed, follow these steps:
- Open the Firefox browser on your Mac.
- Click on the three horizontal lines in the upper-right corner to open the menu.
- From the dropdown menu, select “Preferences”.
- In the Preferences window, click “General” from the left-hand sidebar.
- Scroll down to the “Firefox Updates” section.
- By default, Firefox automatically checks for updates and installs them. If you want to manually check for updates, click on the “Check for updates” button.
- If there are any available updates, Firefox will download and install them automatically.
- Once the updates are installed, you will be prompted to restart the browser to apply the changes. Click “Restart to update Firefox”.
It’s important to regularly check for updates as they often include bug fixes, security patches, and new features. By keeping your Firefox browser up to date, you can ensure a smooth browsing experience and safeguard against potential threats.
Remember that Firefox will notify you when updates are available. However, it’s a good practice to check for updates manually periodically to make sure your browser is always running the latest version.
Backing Up Bookmarks, History, and Other Data
Before uninstalling Firefox on your Mac, it’s important to back up your bookmarks, history, and other important data to ensure you don’t lose any valuable information. Here’s how you can back up this data:
- Open Firefox on your Mac.
- Click on the three horizontal lines in the upper-right corner to open the menu.
- From the dropdown menu, select “Library” and then “Bookmarks”.
- In the Library window, click on “Show All Bookmarks”.
- Click on “Import and Backup” and select “Export Bookmarks to HTML…”.
- Choose a location on your Mac to save the exported bookmarks file and give it a name.
- Click “Save” to export your bookmarks to an HTML file.
Additionally, if you want to back up your browsing history, you can follow these steps:
- Open Firefox on your Mac.
- Click on the three horizontal lines in the upper-right corner to open the menu.
- From the dropdown menu, select “Library” and then “History”.
- In the Library window, click on “Show All History”.
- Click on “Import and Backup” and select “Export History…”.
- Choose a location on your Mac to save the exported history file and give it a name.
- Click “Save” to export your browsing history to a file.
In addition to bookmarks and history, you may also have other data in Firefox that you want to back up, such as saved passwords, site logins, and preferences. To back up this data:
- Open Firefox on your Mac.
- Click on the three horizontal lines in the upper-right corner to open the menu.
- From the dropdown menu, select “Preferences”.
- In the Preferences window, click on “Privacy & Security” from the left-hand sidebar.
- Scroll down to the “Firefox Data” section.
- Click on “Saved Logins” and then “Export Logins…”.
- Choose a location on your Mac to save the exported logins file and give it a name.
- Click “Save” to export your saved logins to a file.
By backing up your bookmarks, history, and other important data, you can ensure that you have a copy of this information in case anything goes wrong during the uninstallation process. It’s always better to be safe than sorry and have a backup of your valuable data.
Dragging the Firefox Application to the Trash
One of the methods to uninstall Firefox from your Mac is by dragging the application to the Trash. Here’s how you can do it:
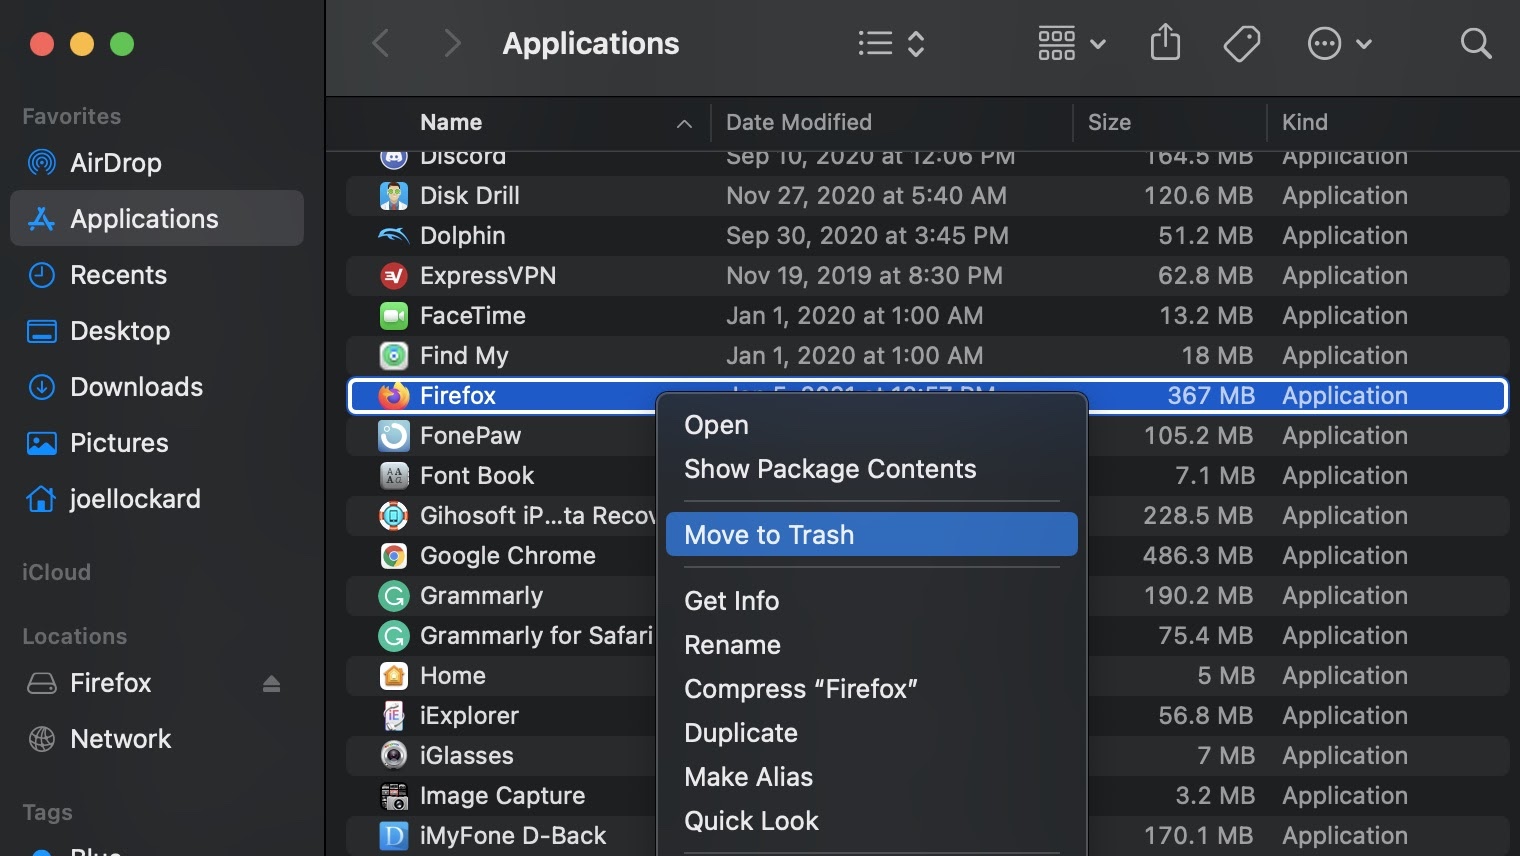
- Locate the Firefox application in your Applications folder. You can access the Applications folder by opening Finder and navigating to the “Applications” section in the sidebar.
- Click and hold the Firefox application icon and drag it to the Trash icon on your dock. Alternatively, you can right-click on the Firefox icon and select “Move to Trash”.
- A confirmation prompt will appear asking if you want to uninstall Firefox. Click on “Move to Trash”.
- Enter your administrator password if prompted.
Once you have moved the Firefox application to the Trash, you have successfully uninstalled it from your Mac. However, there are still some residual files and folders related to Firefox that you may need to remove for a complete uninstallation.
Before emptying the Trash, it’s important to note that any bookmarks, extensions, and preferences stored in your Firefox profile may still be on your computer. If you plan on reinstalling Firefox or using another browser, consider backing up this data or exporting it to ensure a smooth transition.
Keep in mind that using this method only removes the Firefox application itself. It doesn’t remove the user profile data, extensions, or other related files. If you want to completely uninstall Firefox from your Mac, you will need to remove these residual files as well.
Next, we will look at how to remove Firefox profiles and clear Firefox preferences to complete the uninstallation process.
Removing Firefox Profiles
When uninstalling Firefox from your Mac, it’s important to remove the Firefox profiles to ensure a clean and complete uninstallation. The Firefox profile contains user data, including bookmarks, history, extensions, and preferences. Here’s how you can remove Firefox profiles:
- Open Finder on your Mac.
- Click on the “Go” menu in the top menu bar and select “Go to Folder”.
- In the “Go to Folder” window, type “~/Library” (without the quotes) and press Enter.
- Navigate to the “Application Support” folder.
- Find the folder named “Firefox” and move it to the Trash.
- In the “Library” folder, navigate to the “Caches” folder.
- Find the folder named “Mozilla” and move it to the Trash.
- Go back to the “Library” folder and open the “Preferences” folder.
- Look for any files starting with “org.mozilla.firefox” or “org.mozilla.firefox.plist” and move them to the Trash.
By removing the Firefox profiles, you ensure that all user-specific data associated with Firefox is deleted from your Mac. This includes bookmarks, history, extensions, and other preferences. Removing the profiles is essential if you want to reinstall Firefox or switch to a different browser without any remnants of Firefox on your system.
After removing the profiles, it’s recommended to empty the Trash to permanently delete the files. However, double-check that you have backed up any important data before doing so.
In the next section, we will explore how to clear Firefox preferences to further clean up any residual settings.
Clearing Firefox Preferences
Clearing Firefox preferences is an important step when uninstalling Firefox from your Mac. Preferences are settings that control how Firefox behaves and stores data. Here’s how you can clear the Firefox preferences:
- Open Finder on your Mac.
- Click on the “Go” menu in the top menu bar and select “Go to Folder”.
- In the “Go to Folder” window, type “~/Library/Preferences” (without the quotes) and press Enter.
- Look for any files starting with “org.mozilla.firefox” or “org.mozilla” and move them to the Trash.
- If you have installed Firefox as a separate user, go to “Library/Preferences” under your User folder and repeat step 4.
Clearing the Firefox preferences ensures that all custom settings, including saved tabs, homepage preferences, and other personalized configurations, are removed from your Mac. This ensures a clean uninstallation of Firefox, leaving no traces of your previous settings.
It’s important to note that clearing the preferences will reset Firefox to its default settings. If you plan on reinstalling Firefox or using another browser, this step will ensure a fresh start without any lingering preferences from your previous installation.
Once you have cleared the Firefox preferences, you can proceed with removing any Firefox extensions and add-ons that may still be present on your Mac. We will discuss this in the next section.
Removing Firefox Extensions and Add-ons
When uninstalling Firefox from your Mac, it’s important to remove any extensions and add-ons that you may have installed. Removing these extensions ensures a clean uninstallation and prevents any conflicts or issues that may arise from leftover plugins. Here’s how you can remove Firefox extensions and add-ons:
- Open Firefox on your Mac.
- Click on the three horizontal lines in the upper-right corner to open the menu.
- From the dropdown menu, select “Add-ons”.
- In the Add-ons Manager tab, click on “Extensions” or “Themes” on the left-hand sidebar to view the installed extensions or themes.
- Click on the three dots next to the desired extension or theme and select “Remove” to uninstall it.
- Confirm the removal by clicking “Remove” in the confirmation prompt.
- Repeat steps 4-6 for each extension or theme you want to remove.
Removing extensions and add-ons not only ensures a clean uninstallation but also helps improve the overall performance of your browser. By removing unnecessary plugins, you can free up system resources and enhance the speed and responsiveness of your browsing experience.
After removing the extensions and add-ons, it’s recommended to restart your browser to apply the changes. This ensures that any related processes or settings are properly updated and that the uninstallation process is complete.
With the extensions and add-ons removed, you can now proceed with the final steps to completely uninstall Firefox from your Mac. We will discuss this in the next section.
Uninstalling Firefox Completely
To uninstall Firefox completely from your Mac, you need to go beyond simply removing the application and its associated files. Here are the steps to ensure a thorough and complete uninstallation:
- Follow the steps mentioned earlier to drag the Firefox application to the Trash.
- Empty the Trash to permanently delete the Firefox application.
- Open Finder on your Mac.
- Click on the “Go” menu in the top menu bar and select “Go to Folder”.
- In the “Go to Folder” window, type “~/Library/” (without the quotes) and press Enter.
- Locate the “Mozilla” folder and move it to the Trash.
- In the “Library” folder, navigate to the “Caches” folder and move the “Mozilla” folder to the Trash as well.
- Go back to the “Library” folder and open the “Application Support” folder.
- Find the “Firefox” folder and remove it by moving it to the Trash.
- Empty the Trash to permanently delete all Firefox-related files.
By following these steps, you ensure that all remaining files and folders associated with Firefox are removed from your Mac. This includes cache files, user data, and other residual files that may be stored in various locations.
Once you have completed the uninstallation process, you may choose to reinstall Firefox or opt for a different browser. If you decide to reinstall Firefox in the future, you’ll start with a fresh installation, allowing you to customize your preferences and install extensions from scratch.
With Firefox completely uninstalled from your Mac, you have successfully removed all traces of the browser from your system. You can now explore alternative browser options or reinstall Firefox as needed.
Cleaning Up Leftover Files and Folders
Even after completing the uninstallation process, there might still be some leftover files and folders related to Firefox on your Mac. To ensure a thorough cleanup and free up disk space, it’s important to remove these residual files. Here’s how you can do it:
- Open Finder on your Mac.
- Click on the “Go” menu in the top menu bar and select “Go to Folder”.
- In the “Go to Folder” window, type “~/Library/” (without the quotes) and press Enter.
- Look for any remaining files or folders related to Firefox such as “Mozilla” or “Firefox” and move them to the Trash.
- In the “Library” folder, navigate to the “Caches” folder and remove any Firefox-related cache files.
- Go back to the “Library” folder and open the “Preferences” folder.
- Remove any files starting with “org.mozilla.firefox” or “org.mozilla.firefox.plist”.
- Empty the Trash to permanently delete all the leftover files.
By cleaning up these leftover files and folders, you can ensure a complete removal of Firefox and reclaim valuable disk space on your Mac.
It’s important to note that manually deleting files and folders can be a sensitive process, and deleting the wrong files can cause unintended consequences. If you’re unsure about a certain file or folder, it’s always recommended to seek guidance or consult online resources.
With the leftover files and folders removed, you have completed the cleanup process and removed all remnants of Firefox from your Mac.
Reinstalling Firefox if Needed
If you decide to reinstall Firefox on your Mac, whether due to personal preference or a change of circumstances, you can do so by following these steps:
- Visit the official Mozilla Firefox website (https://www.mozilla.org/firefox/) using a different browser.
- Click on the “Download” button to download the latest version of Firefox for Mac.
- Once the download is complete, locate the downloaded file and double-click on it.
- Follow the on-screen instructions to install Firefox on your Mac.
- After the installation is complete, launch Firefox from your Applications folder or by clicking on its icon.
- During the initial setup process, you have the option to import bookmarks, history, and other data from a previous browser or a backup file.
- Customize your preferences and settings according to your preferences.
- Install any desired extensions or add-ons from the Firefox Add-ons store to enhance your browsing experience.
By reinstalling Firefox, you can enjoy all the features and benefits that come with using this popular web browser on your Mac. You’ll have a fresh installation, allowing you to start anew and customize your browser experience to your liking.
Additionally, by importing bookmarks, history, and other data from a previous browser or backup file, you can seamlessly transfer your important information and continue where you left off.
Remember to keep Firefox up to date by checking for updates regularly. This ensures that you have the latest security patches, bug fixes, and new features that Mozilla releases for the browser.
With Firefox successfully reinstalled on your Mac, you can once again enjoy a reliable and feature-rich browsing experience.