
Checking for Physical Issues
In some cases, the freezing of a MacBook Air may be caused by physical issues. Before exploring software-related solutions, it’s essential to ensure that there are no underlying hardware problems. Here are some steps you can take to check for physical issues:
- Inspect the power supply: Make sure that the power cable is securely plugged into both the MacBook Air and the power outlet. If you’re using a MagSafe power adapter, check for any damage or fraying on the cable and connector. Using a different power adapter or cable is advisable if you suspect that the current one is faulty.
- Check for overheating: Overheating can cause a MacBook Air to freeze. To prevent overheating, ensure that the laptop is placed on a hard and flat surface that allows for proper airflow. You can also use a cooling pad or raise the back of the laptop with a small book or stand to improve ventilation.
- Clean the keyboard and trackpad: Dust and debris stuck in the keyboard or trackpad may lead to unresponsive input or freezing issues. Use compressed air or a soft, lint-free cloth to clean the surface. Be gentle and avoid using excess force or liquid cleaners.
- Perform a physical inspection: Examine the MacBook Air for any visible signs of damage or loose connections, such as loose screws, cracked casing, or disconnected components. If you notice any issues, it’s recommended to take your device to an authorized service center for repair.
By going through these physical checks, you can rule out any potential hardware issues that may be causing your MacBook Air to freeze. If no physical problems are found, it’s time to explore software-related solutions to resolve the freezing problem.
Force Quitting Applications
One common cause of freezing in MacBook Air is an unresponsive or malfunctioning application. When an application becomes stuck or hangs, it can lead to overall system sluggishness or freezing. Here are steps to force quit applications on a MacBook Air:
- Press Command + Option + Esc: This keyboard shortcut opens the “Force Quit Applications” window.
- Select the frozen application: In the “Force Quit Applications” window, you’ll see a list of open applications. Click on the application that is not responding.
- Click “Force Quit”: After selecting the unresponsive application, click the “Force Quit” button.
- Relaunch the application: Once you’ve force quit the application, you can try reopening it to see if the freezing issue is resolved.
If force quitting the problem application doesn’t solve the freezing problem or if you’re unable to select the application in the “Force Quit Applications” window, you can try a couple of additional methods:
- Force quit using Activity Monitor: Open the Activity Monitor from the Utilities folder under Applications. Locate the unresponsive application in the list, select it, and click the “X” button in the toolbar to force quit it.
- Force restart the MacBook Air: If all else fails, you can perform a force restart by holding down the power button until the MacBook Air shuts down. Wait a few seconds, then press the power button again to turn it back on.
By force quitting applications that are causing freezing issues, you can regain control of your MacBook Air and prevent further disruptions. If the freezing problem persists, proceed to the next troubleshooting step.
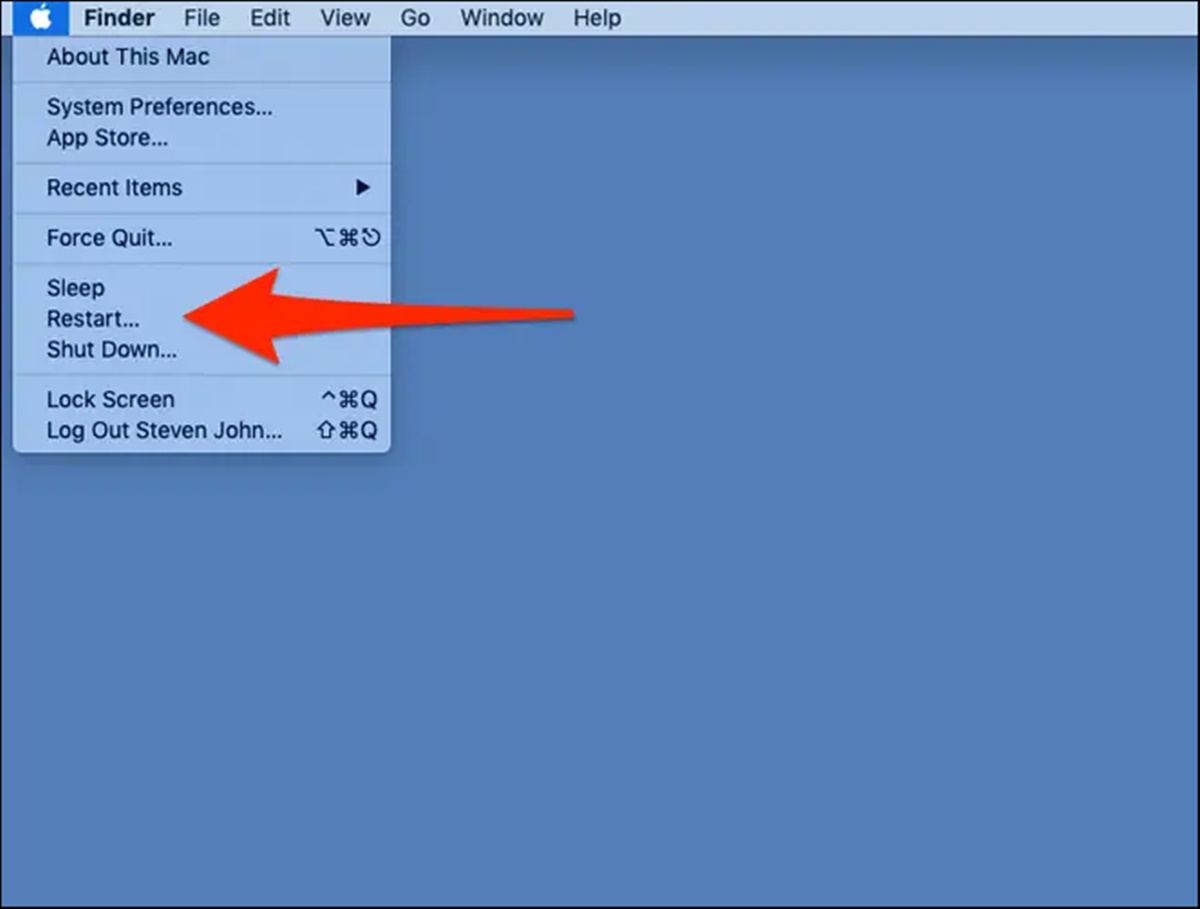
Restarting the MacBook Air
Restarting your MacBook Air is one of the simplest yet effective troubleshooting steps to resolve freezing issues. Here’s how you can do it:
- Save your work: Before restarting your MacBook Air, it’s essential to save any unsaved work in order to prevent data loss.
- Click on the Apple menu: Located in the top-left corner of the screen, click on the Apple menu.
- Select “Restart”: From the drop-down menu, select the “Restart” option. This will initiate the restart process.
- Wait for the MacBook Air to restart: Allow your MacBook Air some time to shut down and start up again. The entire process usually takes a minute or two.
Restarting your MacBook Air can help clear out any temporary glitches or errors that may be causing the freezing problem. It refreshes the system and allows it to start anew, potentially resolving the issue.
If the freezing issue continues even after restarting, it’s recommended to proceed to the next troubleshooting steps to further diagnose and fix the problem.
Clearing up Disk Space
A lack of available disk space can contribute to your MacBook Air freezing or running slowly. When the system’s storage is near capacity, it has difficulty performing tasks efficiently. To address this issue, you can take steps to clear up disk space:
- Review and delete unnecessary files: Start by going through your files and deleting any that are no longer needed. This includes old documents, downloads, and media files. You can also empty the Trash to permanently remove these files from your system.
- Remove unneeded applications: Uninstall applications that you no longer use. Go to the “Applications” folder, locate the application you want to remove, and drag it to the Trash. Additionally, consider using a third-party app uninstaller to ensure all associated files are deleted.
- Clear browser cache and cookies: Over time, your web browser accumulates data in the form of cache files and cookies. Clearing these can free up a significant amount of disk space. Each browser has a different method for clearing cache and cookies, so refer to the browser’s settings or preferences to find the appropriate option.
- Transfer files to an external storage device: Offloading large files and folders to an external hard drive or cloud storage service can help free up space on your MacBook Air. This includes photos, videos, music, and other files that you don’t need immediate access to.
By clearing up disk space, you create breathing room for your MacBook Air’s system resources to run smoothly. This can alleviate freezing issues caused by insufficient storage space. If the freezing problem persists, continue with the next troubleshooting step.
Running Disk Utility
Disk Utility is a built-in macOS tool that helps you manage and repair your MacBook Air’s disk drives and storage. Running Disk Utility can resolve various disk-related issues that may be causing your MacBook Air to freeze. Here’s how to use it:
- Open Disk Utility: Go to the Applications folder, then open the Utilities folder. From there, double-click on Disk Utility to launch the application.
- Select your disk drive: In the Disk Utility window, you’ll see a list of available disk drives on the left-hand side. Select the drive that corresponds to your MacBook Air’s internal storage.
- Click on the “First Aid” tab: Along the top of the Disk Utility window, you’ll find multiple tabs. Click on the “First Aid” tab, which allows you to verify and repair disk permissions and other potential disk issues.
- Click on the “Run” or “Repair Disk” button: If any issues are detected, Disk Utility will notify you. Click on the “Run” or “Repair Disk” button to begin the process of fixing these issues.
- Wait for the repair process to complete: Disk Utility will analyze and repair any disk-related problems it finds. This may take some time, so be patient and let the process finish.
Running Disk Utility can help fix disk-related errors or corruptions that may be causing freezing issues on your MacBook Air. After the repair process is complete, you can restart your MacBook Air and check if the freezing problem has been resolved.
If running Disk Utility doesn’t resolve the freezing problem, continue with the next troubleshooting step to further diagnose and fix the issue.
Resetting the SMC (System Management Controller)
The System Management Controller (SMC) is responsible for managing various hardware functions on your MacBook Air. Resetting the SMC can help resolve freezing issues and other problems related to power, battery, and other hardware components. Follow these steps to reset the SMC:
- Shut down your MacBook Air: Click on the Apple menu in the top-left corner of the screen and select “Shut Down” from the drop-down menu.
- Disconnect the power adapter: Unplug the power adapter from your MacBook Air.
- Hold down specific keys: Depending on the model of your MacBook Air, you will need to press and hold different key combinations. Refer to the Apple support website or the user manual for your specific model to find the correct combination.
- Press the power button: While still holding down the specific key combination, press the power button on your MacBook Air.
- Release the keys and power button: After a few seconds, release all the keys and the power button simultaneously.
- Connect the power adapter and turn on your MacBook Air: Plug in the power adapter back into your MacBook Air and turn it on as usual.
Resetting the SMC can help resolve freezing issues caused by abnormal power management or hardware conflicts. This process restores the default settings for the SMC, allowing it to properly manage the hardware components on your MacBook Air.
If resetting the SMC doesn’t fix the freezing problem, continue with the next troubleshooting step to further diagnose and fix the issue.
Resetting the PRAM/NVRAM (Parameter Random Access Memory/Non-Volatile Random Access Memory)
The PRAM (Parameter Random Access Memory) or NVRAM (Non-Volatile Random Access Memory) on your MacBook Air stores certain settings related to hardware and peripherals. Resetting the PRAM/NVRAM can help resolve freezing issues and restore default configurations. Follow these steps to reset the PRAM/NVRAM:
- Shut down your MacBook Air: Click on the Apple menu in the top-left corner of the screen and select “Shut Down” from the drop-down menu.
- Press the power button to turn on your MacBook Air: Press the power button and immediately hold down the following keys: Command + Option + P + R.
- Keep holding the keys down: Continue to hold down the keys until you hear the startup sound for the second time, or until the screen lights up and then goes black again.
- Release the keys: After the second startup sound or when the screen goes black again, release the keys simultaneously.
- Turn on your MacBook Air: Press the power button again to turn on your MacBook Air as you would normally.
Resetting the PRAM/NVRAM clears out certain settings that might be causing freezing issues. It can also fix problems related to display resolution, sound volume, time zone settings, and more.
If resetting the PRAM/NVRAM doesn’t resolve the freezing problem, proceed to the next troubleshooting step to further diagnose and fix the issue.
Refreshing macOS
When your MacBook Air is experiencing freezing issues, refreshing the macOS can help resolve software-related problems and restore the operating system to a stable state. Here’s how you can refresh macOS:
- Backup your data: Before proceeding with a macOS refresh, it’s crucial to back up your important files and data. You can use Time Machine or any other reliable backup method.
- Connect to the internet: Make sure your MacBook Air is connected to a stable internet connection. A reliable internet connection is necessary to download the necessary files.
- Restart your MacBook Air: Click on the Apple menu in the top-left corner, select “Restart” from the drop-down menu, and allow your MacBook Air to restart.
- Hold down Command + R: Immediately after restarting, hold down the Command + R keys on your keyboard until you see the Apple logo or a spinning globe.
- Select “Reinstall macOS” or “Reinstall OS X”: In the macOS Utilities window, choose the “Reinstall macOS” or “Reinstall OS X” option. Follow the on-screen prompts to proceed.
- Follow the installation steps: You will be guided through the installation process of macOS. Make sure to select your desired installation location and agree to the terms and conditions.
- Wait for the installation to complete: The installation process may take some time. Once it’s finished, your MacBook Air will restart, and you will be greeted with the macOS setup assistant.
- Restore your data: After refreshing macOS, you can restore your data from the backup you created earlier using Time Machine or other backup methods.
Refreshing macOS reinstalls the operating system without affecting your personal data. This can fix various software-related issues, including freezing problems, by replacing corrupted system files and settings. If refreshing macOS doesn’t resolve the freezing issue, proceed to the next troubleshooting step to further diagnose and fix the problem.
Updating the macOS
Keeping your macOS up to date is essential for optimal performance and stability on your MacBook Air. Updating the macOS can address software bugs, security vulnerabilities, and compatibility issues that may be causing freezing problems. Here’s how you can update your macOS:
- Connect to the internet: Ensure that your MacBook Air is connected to a stable internet connection for the update process.
- Check for updates: Click on the Apple menu in the top-left corner of the screen and select “System Preferences” from the drop-down menu. In the System Preferences window, click on “Software Update.”
- Download and install updates: If updates are available, you’ll see them listed in the Software Update window. Click on the “Update Now” button to start downloading and installing the updates. Follow the on-screen prompts to complete the process.
- Restart your MacBook Air: After the updates are installed, you may be prompted to restart your MacBook Air. It’s important to save your work before restarting.
- Enable automatic updates: To ensure that your macOS stays up to date, consider enabling automatic updates. In the Software Update window, check the box next to “Automatically keep my Mac up to date.” This will allow your MacBook Air to download and install updates in the background.
Regularly updating your macOS ensures that you have the latest features, bug fixes, and security enhancements. By staying up to date, you can minimize freezing issues and improve the overall performance of your MacBook Air.
If updating the macOS doesn’t resolve the freezing problem, proceed to the next troubleshooting step to further diagnose and fix the issue.
Reinstalling macOS
If previous troubleshooting steps haven’t resolved the freezing issue on your MacBook Air, reinstalling macOS may be necessary. Reinstalling macOS can help fix more complex software-related problems that are causing the freezing. Follow these steps to reinstall macOS:
- Backup your data: Before proceeding with a macOS reinstallation, it’s crucial to back up your important files and data. Use Time Machine or any other reliable backup method to ensure your data is safely stored.
- Create a bootable installer: Visit the Apple website and download the macOS installer for your MacBook Air. Follow Apple’s instructions to create a bootable installer on a USB drive.
- Restart your MacBook Air: Connect the bootable installer USB drive and restart your MacBook Air while holding down the Option key on your keyboard.
- Select the bootable installer: In the startup manager window, select the bootable installer USB drive as the startup disk and click “Continue.”
- Follow the installation prompts: The macOS installer will launch. Follow the on-screen prompts to reinstall macOS on your MacBook Air. You may be asked to format the startup disk, so be sure to back up all necessary data.
- Restore your data: After the macOS reinstallation is complete, you can restore your data from the backup using Time Machine or other backup methods.
Reinstalling macOS allows you to start fresh with a clean installation of the operating system. This can help resolve freezing issues by replacing corrupted system files and settings. Resetting the software environment can often provide a stable foundation for your MacBook Air to operate without encountering freezing problems.
If reinstalling macOS doesn’t solve the freezing issue, it’s recommended to seek further assistance from Apple Support or an authorized service provider.
Contacting Apple Support for Further Assistance
If you’ve exhausted all the troubleshooting steps mentioned above and your MacBook Air is still experiencing freezing issues, it may be time to seek further assistance from Apple Support. Apple Support is available to help diagnose and resolve more complex problems that may require expert attention. Here are the steps you can take to get in touch with Apple Support:
- Visit the Apple Support website: Go to the Apple Support website (support.apple.com) and navigate to the support section for MacBook Air.
- Choose your region and product: Select your region and choose MacBook Air as your product.
- Select the issue: Browse through the support articles or use the search function to find articles related to freezing issues on MacBook Air. Follow the recommended troubleshooting steps provided.
- Contact Apple Support: If the troubleshooting steps on the website don’t resolve the freezing problem, you can contact Apple Support by phone or request assistance through live chat. Follow the instructions provided on the website to get in touch with a support representative.
- Provide detailed information: When contacting Apple Support, be prepared to provide detailed information about the freezing issue, the steps you’ve already taken, and any error messages or symptoms you’ve encountered. This will help the support team better understand and diagnose the problem.
- Follow the guidance of Apple Support: Work with the Apple Support representative to troubleshoot the issue further. They may provide additional instructions or guide you through advanced troubleshooting steps.
Apple Support has the expertise to diagnose and resolve complex issues with your MacBook Air. They can provide personalized assistance and recommend the best course of action to resolve the freezing problem. Don’t hesitate to reach out to them for further assistance.