
What are Location Services on a Mac?
Location Services on a Mac is a feature that allows applications and system services to gather and utilize information about your location. It makes use of various technologies, such as GPS, Wi-Fi, and cellular network data, to determine your precise or approximate location.
This feature provides several benefits and functionalities in macOS. For instance, it enables mapping applications to provide accurate directions, helps weather apps deliver localized forecasts, and allows social media platforms to offer location-based check-ins. Additionally, Location Services can enhance the overall user experience by tailoring information and content to your specific geographic location.
When Location Services is enabled, your Mac periodically gathers data about your location and shares it with authorized applications. This data may include latitude, longitude, and altitude, as well as information about nearby Wi-Fi networks and cell towers. However, it is important to note that your personal identity and location data are not shared unless you give explicit permission to the applications.
Privacy is a significant concern when it comes to location-related data, and Apple has implemented robust security measures to protect your information. Location Services requires your explicit consent to access your location data and allows you to control which applications have access to this information.
Overall, Location Services is a powerful feature on your Mac that enhances various apps and services by providing tailored location-based information. It offers convenience, accuracy, and personalization, all while maintaining a strong focus on user privacy and security.
Why should you turn on Location Services?
Enabling Location Services on your Mac can greatly enhance your user experience and provide numerous benefits. Here are some compelling reasons why you should consider turning on Location Services:
1. Improved Navigation and Maps: With Location Services enabled, mapping applications such as Apple Maps or Google Maps can accurately pinpoint your location and provide turn-by-turn directions. This feature is incredibly helpful when you’re navigating through unfamiliar areas or trying to find the nearest restaurant or gas station.
2. Localized Information: Location Services allows apps to deliver personalized, location-specific information. For example, weather apps can provide real-time weather updates for your current location, ensuring you’re prepared for any conditions. Additionally, news apps can offer localized news stories and events happening in your area.
3. Geo-Tagging in Photos: When you take photos with your Mac, Location Services can tag each photo with the precise location where it was taken. This makes it easier to organize and find your photos later, especially if you have a large collection. It also adds an extra layer of context to your memories.
4. Location-Based Reminder: With Location Services enabled, you can set location-based reminders on your Mac. For example, you can set a reminder to pick up groceries when you’re near a specific supermarket. When you reach that location, you’ll receive a notification reminding you of the task.
5. Enhanced Security: Location Services can play a crucial role in helping you locate your Mac if it’s ever lost or stolen. By enabling Find My Mac, you can track its location and take necessary actions to retrieve it or protect your data remotely.
6. Streamlined Travel Planning: When planning a trip, Location Services can provide valuable assistance. Travel and booking apps can automatically suggest nearby hotels, restaurants, and tourist attractions based on your current location. This saves time and ensures you make the most of your travel experience.
7. Customized App Experiences: Many applications utilize Location Services to deliver tailored experiences based on your location. For instance, social media platforms can provide location-based check-ins, allowing you to share your whereabouts with friends and discover trending places in your vicinity.
By turning on Location Services, you unlock a range of features and functionalities that enhance your Mac usage. It’s important to remember that you have control over which apps have access to your location data, and Apple prioritizes user privacy and security in Location Services.
Step 1: Open System Preferences
To enable or customize Location Services on your Mac, you’ll need to access the System Preferences. Here’s how you can do it:
1. Click on the Apple menu: Located on the top-left corner of your screen, the Apple menu is represented by the Apple logo. Click on it to reveal a drop-down menu.
2. Select “System Preferences”: In the drop-down menu, you’ll find an option labeled “System Preferences.” Click on it to open the System Preferences window.
3. Choose the “Security & Privacy” option: Within the System Preferences window, you’ll see several categories of settings. Look for the icon labeled “Security & Privacy” and click on it to proceed.
4. Authenticate if necessary: Depending on your Mac’s security settings, you may be prompted to authenticate your actions. This ensures that only authorized users can make changes to the system settings. Enter your administrator password if required.
5. Access the “Privacy” tab: Within the “Security & Privacy” window, you’ll find several tabs at the top. Click on the tab labeled “Privacy” to view and modify privacy settings for your Mac.
6. Look for “Location Services”: On the left-hand menu of the “Privacy” tab, scroll down and locate the option labeled “Location Services.” Click on it to access the Location Services settings.
7. Check the lock icon: In the bottom-left corner of the “Location Services” window, you’ll find a lock icon. If it is locked, you need to unlock it to make changes to the Location Services settings.
8. Make necessary changes: Once the lock is unlocked, you can customize the Location Services settings based on your preferences. You can enable or disable Location Services for specific applications or adjust the settings for system services.
Opening the System Preferences is the first step towards accessing and modifying the Location Services settings on your Mac. This allows you to control how and when your location data is utilized by applications and services, ensuring a personalized and secure experience.
Step 2: Click on Security & Privacy
Once you have opened the System Preferences on your Mac, the next step to enabling or customizing Location Services is to click on the “Security & Privacy” option. Follow these simple instructions to proceed:
1. In the System Preferences window, locate and click on the “Security & Privacy” icon: It is represented by a padlock icon and can be found in the third row of icons within the System Preferences window.
2. Authenticate your actions if necessary: Depending on your Mac’s security settings, you may need to provide your administrator password to access the “Security & Privacy” settings. This ensures that only authorized users can make changes to the system’s security and privacy settings.
3. Enter your administrator password: A dialog box will appear requesting your administrator password. Simply enter your password and click “Unlock” to proceed. If you are not the designated administrator, you will need to consult with the administrator to make changes.
4. Make sure you are in the “Privacy” tab: By default, the “Security & Privacy” window will open with the “Privacy” tab selected. If not, click on the “Privacy” tab located at the top of the window.
5. Scroll down to find the “Location Services” option: Within the “Privacy” tab, look for the “Location Services” option listed on the left-hand side menu. It may take a moment to load the available options, especially if you have many applications installed.
6. Click on “Location Services” to access the settings: Once you have located the “Location Services” option, click on it to access the Location Services settings. This is where you can enable or disable Location Services for specific applications and system services.
Clicking on the “Security & Privacy” option in the System Preferences is the crucial second step in configuring Location Services according to your preferences. By accessing this section, you can ensure that your Mac is securely handling your location data and that it is only shared with authorized applications and services.
Step 3: Go to the Privacy Tab
After clicking on the “Security & Privacy” option in the System Preferences window, the next step to configuring Location Services on your Mac is to navigate to the Privacy tab. Follow these steps to proceed:
1. Locate the “Privacy” tab: Once the “Security & Privacy” window opens, you will see several tabs at the top. Look for and click on the tab labeled “Privacy.” This tab is situated between the “General” and “FileVault” tabs.
2. Ensure you are on the Privacy tab: Make sure that the Privacy tab is selected and displayed as the active tab. If not, click on the Privacy tab to switch to it.
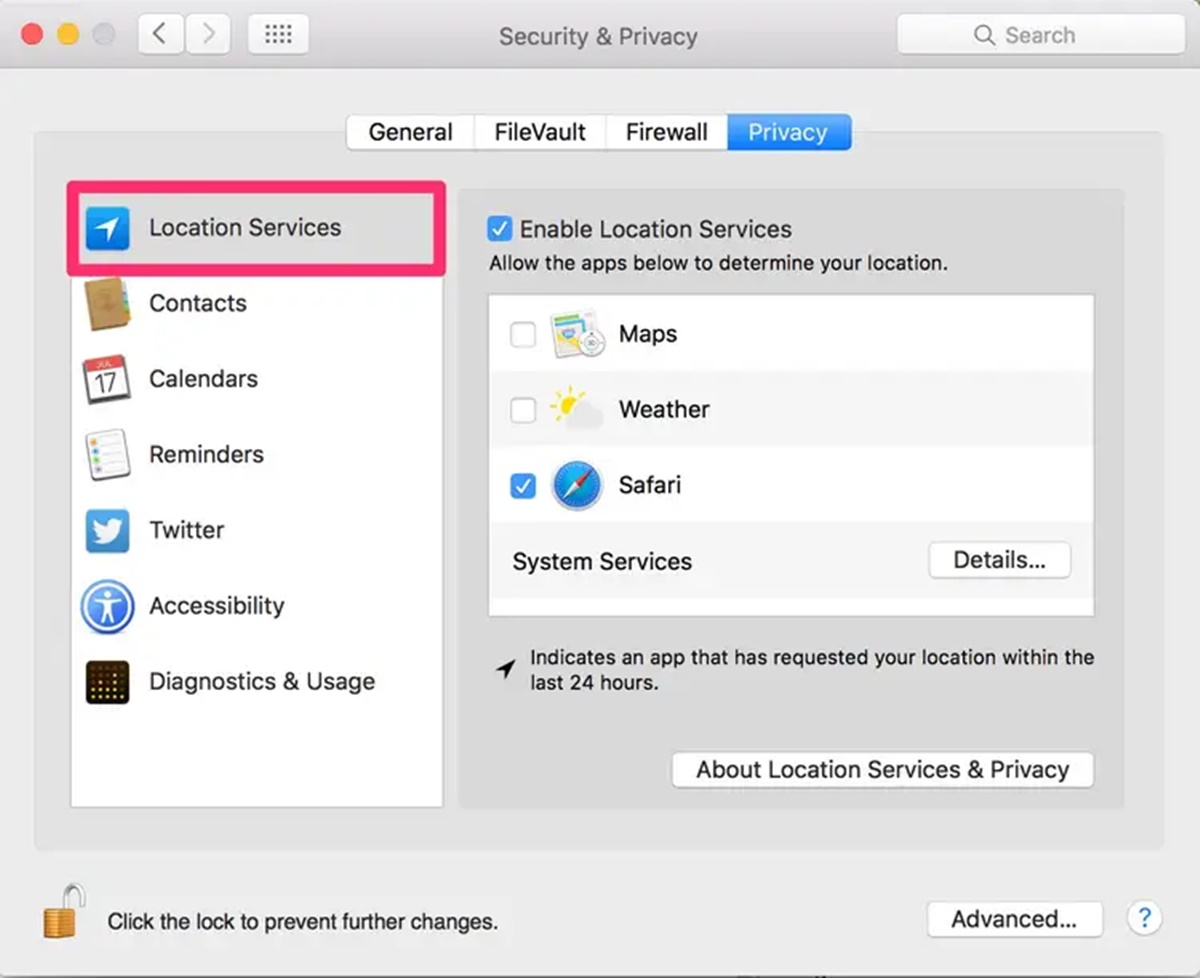
3. Scroll through the available privacy settings: As you enter the Privacy tab, you will see a list of different privacy settings and categories on the left-hand side. This includes options such as Location Services, Contacts, Microphone, Camera, and more. Scroll down until you find the “Location Services” option, which is what we are focusing on for configuring location-related settings.
4. Click on “Location Services” to access the settings: Once you have located the “Location Services” option, click on it to access the specific Location Services settings for apps and system services.
5. Unlock the settings if necessary: Depending on the current status of the Location Services settings, you may need to unlock them in order to make changes. Look for a lock icon at the bottom-left corner of the “Location Services” window. If the lock is locked, click on it and enter your administrator password to unlock the settings.
6. Proceed with customizing Location Services: With the Privacy tab open and the Location Services settings accessible, you can now proceed with customizing your Mac’s location-related settings. Enable or disable Location Services for specific apps or adjust the settings for system services according to your preference.
Going to the Privacy tab within the Security & Privacy settings is an essential step in configuring Location Services on your Mac. It allows you to manage and control which applications have access to your location data, ensuring your privacy and enabling a tailored user experience.
Step 4: Click on Location Services
Once you have accessed the Privacy tab in the Security & Privacy settings of your Mac, the next step in customizing Location Services is to click on the “Location Services” option. Follow these simple steps:
1. Locate the “Location Services” option: After the Privacy tab is open, you will see a list of different privacy settings and categories on the left-hand side. Scroll down until you find the “Location Services” option. It should be listed among the other available privacy settings.
2. Click on “Location Services” to access the settings: Once you have located the “Location Services” option, click on it to access the specific Location Services settings. A new window will open, displaying the various options and configurations related to Location Services.
3. Unlock the settings if necessary: If the Location Services settings are locked, you will need to unlock them before making any changes. Look for a lock icon in the bottom-left corner of the “Location Services” window. If the lock is locked, click on it and enter your administrator password to unlock the settings.
4. Explore the Location Services settings: Within the Location Services window, you will find a list of applications and system services that have requested access to your location data. This list provides an overview of which apps are currently using or have recently used your location. You can also adjust the settings for system services that utilize your location.
5. Customize Location Services: To enable or disable Location Services for specific applications, click on the checkbox next to each app’s name. You can also click on an app to reveal more detailed options, such as “Ask Next Time,” “Never,” or “While Using the App.” These settings give you more control over how and when each app can access your location data.
6. Adjust Location Services settings for system services: To customize Location Services for system services, click on the “Details” button located in the lower-right corner of the Location Services window. This will open a new window where you can enable or disable location data usage for various system services, such as Time Zone, Find My Mac, and more.
Clicking on the Location Services option within the Privacy tab is a crucial step in fine-tuning and managing how your Mac utilizes location data. By customizing these settings, you can ensure a personalized and secure experience that fits your preferences and protects your privacy.
Step 5: Unlock the Settings
Before making any changes to the Location Services settings on your Mac, you may need to unlock the settings if they are currently locked. Follow these steps to unlock the settings:
1. Locate the lock icon: In the bottom-left corner of the Location Services window, you will see a lock icon. This lock indicates that the settings are currently locked and require authentication to make changes.
2. Click on the lock icon: To unlock the Location Services settings, click on the lock icon. You may be prompted to enter your administrator password to verify your identity and authorize the changes. This step helps ensure that only authorized users can modify the system settings.
3. Enter your administrator password: After clicking on the lock icon, a dialog box will appear asking for your administrator password. Enter the password associated with your Mac and click “Unlock” to proceed.
4. Verify the unlocked status: Once you have entered the correct password, the lock icon should appear unlocked, indicating that the Location Services settings are now accessible for customization.
5. Proceed with making changes: With the lock icon unlocked, you can now make the necessary changes to the Location Services settings. Enable or disable Location Services for specific applications, adjust the settings for system services, and fine-tune your preferences according to your needs.
Note: It is important to exercise caution when modifying Location Services settings. Be mindful of the applications and services that require access to your location data, and consider the privacy implications before granting or revoking access.
Unlocking the Location Services settings is an essential step that grants you the authority to customize and manage the location-related settings on your Mac. It ensures that you have full control over how your location data is utilized and protects your privacy.
Step 6: Customize Location Services
Once you have accessed the Location Services settings on your Mac, the next step is to customize them according to your preferences. Follow these steps to tailor the Location Services to your needs:
1. Enable or disable Location Services for specific apps: Within the Location Services window, you will see a list of applications that have requested access to your location data. To enable or disable Location Services for a specific app, simply click on the checkbox next to its name. The checkbox indicates whether the app is allowed to access your location or not.
2. Adjust the level of location access for apps: For granular control over location access, you can click on an app to reveal more detailed options. These options may include “Never,” “Ask Next Time,” or “While Using the App.” Choose the option that aligns with your preferences. For example, you can select “While Using the App” to allow an app to access your location only when it’s actively in use.
3. Enable or disable location access for system services: To customize Location Services for system services, click on the “Details” button located in the lower-right corner of the Location Services window. This will open a new window where you can enable or disable location access for various system services, such as Time Zone, Find My Mac, Diagnostics & Usage, and more.
4. Fine-tune location settings for each app: Some apps may provide additional settings related to location, allowing you to further customize how they use that information. Explore the preferences or settings within individual apps to access these options, if available. This can include options like always showing your location on a map or only using your location when certain features or functions are needed.
5. Regularly review and update your Location Services settings: As your app usage and preferences evolve, it’s important to regularly review and update your Location Services settings. Periodically check the list of apps with location access and review their permissions. Remove access for apps you no longer use or those that you do not want to track your location.
Remember, while Location Services can enhance your experience using apps and services, it’s crucial to strike a balance between functionality and privacy. By customizing and regularly reviewing your Location Services settings, you can ensure that your Mac is utilizing location data in a way that aligns with your preferences and maintains your privacy.
Step 7: Enable Location Services for Specific Apps
Enabling Location Services for specific apps on your Mac allows them to access your location data, providing you with location-based features or services. Follow these steps to enable Location Services for specific apps:
1. Open the Location Services settings: Refer to the previous steps to access the Location Services settings on your Mac. This can be done through the System Preferences, Security & Privacy, and Privacy tabs.
2. Review the list of apps: Within the Location Services settings, you will see a list of apps that have requested or currently have access to your location. Take a moment to review the apps in the list.
3. Enable Location Services for an app: To enable Location Services for a specific app, make sure the checkbox next to the app’s name is selected. When the checkbox is ticked, it indicates that the app is allowed to access your location data.
4. Adjust the level of location access: For more control over location access, click on an app to reveal detailed options. These options may include “Never,” “Ask Next Time,” or “While Using the App.” Choose the option that best suits your preference.
5. Repeat for other apps: Continue reviewing the list of apps and enable Location Services for the apps that you want to access your location. Customize the level of access for each app as needed.
6. Consider privacy and security: While enabling Location Services can enhance the functionality of certain apps, it’s important to consider the privacy and security implications. Only allow access to your location for apps that genuinely require it and are from trusted sources.
7. Regularly review and manage location access: As you install new apps or update existing ones, be mindful of their location access requests. Periodically review the Location Services settings to ensure that apps have appropriate access and revoke access for any apps that are no longer needed or trusted.
Enabling Location Services for specific apps on your Mac provides you with personalized and location-based experiences. By carefully managing which apps have access to your location, you can strike a balance between functionality and privacy.
Step 8: Disable Location Services for Specific Apps
Disabling Location Services for specific apps is an important step in maintaining your privacy and controlling the access to your location data. Follow these steps to disable Location Services for specific apps on your Mac:
1. Open the Location Services settings: Refer to the previous steps to access the Location Services settings on your Mac. This can be done through the System Preferences, Security & Privacy, and Privacy tabs.
2. Review the list of apps: Within the Location Services settings, you will see a list of apps that have requested or currently have access to your location. Take a moment to review the apps in the list and identify the ones from which you want to revoke location access.
3. Disable Location Services for an app: To disable Location Services for a specific app, make sure the checkbox next to the app’s name is unselected. When the checkbox is unticked, it indicates that the app is not allowed to access your location data.
4. Revoke location access: To further ensure that an app does not access your location data, you can select the “Never” option for that app. This option ensures that the app cannot request location access in the future.
5. Repeat for other apps: Continue reviewing the list of apps and disable Location Services for any apps that you do not want to access your location. Customize the settings for each app based on your preferences.
6. Consider privacy and utility: Carefully assess the apps for which you disable Location Services. Consider whether the app’s functionality is significantly impacted without access to your location. If a particular app requires location access to provide essential features, you may want to reconsider disabling Location Services for that app.
7. Regularly review and manage location access: As app updates and new installations occur, review the location access requests they make. Be proactive in managing your Location Services settings by periodically reassessing the access permissions for each app and making adjustments as needed.
Disabling Location Services for specific apps gives you greater control over your location privacy. By being selective with the apps that have access to your location data, you can ensure that your personal information remains secure while still enjoying the benefits of location-based services.
Step 9: Adjust Location Services Settings for System Services
Adjusting the Location Services settings for system services on your Mac allows you to control how your device utilizes location data for essential functions. Follow these steps to adjust the Location Services settings for system services:
1. Open the Location Services settings: Refer to earlier steps to access the Location Services settings on your Mac. This can be done through the System Preferences, Security & Privacy, and Privacy tabs.
2. Find the “Details” button: Look for the “Details” button located in the lower-right corner of the Location Services window. This button allows you to access and customize the location settings for various system services.
3. Click on the “Details” button: Clicking on the “Details” button will open a new window that displays the location settings for system services.
4. Review the list of system services: Within the new window, you will see a list of system services that utilize location data. These include services such as Time Zone, Find My Mac, Diagnostics & Usage, and more.
5. Enable or disable location access: Assess each system service individually and adjust its location access according to your preferences. You can enable or disable location access by selecting the checkbox next to each service’s name.
6. Customize location access for specific services: Some system services offer additional options for location access. Click on a system service to reveal advanced settings and choose the option that aligns with your preferences.
7. Regularly review and manage location access for system services: Keep your location settings for system services up to date by regularly reviewing and adjusting them. It’s important to periodically reassess which services require access to your location data and disable unnecessary ones for increased privacy and security.
Adjusting the Location Services settings for system services ensures that your Mac uses your location data wisely and for necessary functions. By customizing these settings, you can tailor your location privacy and make informed choices about which system services have access to your location.
Step 10: Additional Considerations for Privacy and Security
While configuring and utilizing Location Services on your Mac, it’s essential to keep in mind additional considerations for privacy and security. These considerations ensure that your location data is protected and used responsibly. Here are some important factors to consider:
1. Understand app permissions: Before granting location access to an app, carefully review its permissions and consider the necessity of location data for its primary functionality. Be cautious when granting location access to apps from unknown or untrusted sources.
2. Regularly review location settings: Periodically review your Location Services settings to ensure the security and privacy of your location data. Remove access for any apps or services that you no longer use or trust.
3. Be mindful of public Wi-Fi networks: When using public Wi-Fi networks, be cautious about allowing apps or services to access your location. Disable Location Services or set them to “While Using the App” mode to avoid sharing your location unnecessarily.
4. Protect your Mac with a strong password: Safeguard your Mac by using a strong password or passcode. This adds an extra layer of security and prevents unauthorized access to your device and sensitive information, including your location data.
5. Utilize Find My Mac: Enable the Find My Mac feature to help locate your device if it’s lost or stolen. This feature uses location data to track the whereabouts of your Mac, increasing the chances of recovery and ensuring the security of your data.
6. Update your Mac and apps: Keeping your Mac and applications up to date ensures that you have the latest security patches and bug fixes. Regular updates mitigate potential vulnerabilities that could compromise the security of your location data.
7. Educate yourself on privacy policies: Familiarize yourself with the privacy policies of the apps and services you use. Understand how your location data is collected, stored, and shared. Choose apps and services from reputable sources that prioritize user privacy.
8. Use a virtual private network (VPN): When connecting to networks outside of your control, consider using a VPN. A VPN encrypts your internet connection, adding an extra layer of privacy and security to your online activities, including location-related data.
By considering these additional factors for privacy and security, you can ensure that your location data remains protected while using Location Services on your Mac. Take proactive steps to safeguard your information and maintain control over the access and use of your location data.