
Checking the Power Status
Before you begin turning your MacBook on or off, it’s a good idea to quickly check its power status. This will help you determine whether your MacBook is already powered on, in sleep mode, or completely turned off.
To check the power status of your MacBook, start by taking a look at the LED light located on the front edge of the device. If it’s solid green, it means your MacBook is turned on and running. A blinking green light indicates that your MacBook is in sleep mode. On the other hand, if the LED light is not lit at all, it means your MacBook is completely turned off or not receiving power.
Another way to check the power status of your MacBook is to look at the screen. If the screen is black and unresponsive, it’s likely that your MacBook is turned off. However, if the screen is illuminated or showing a lock screen, it means your MacBook is either powered on or in sleep mode.
You can also check the power status of your MacBook by pressing any key on the keyboard or moving the trackpad. If the screen wakes up and prompts you to enter your password or shows your desktop, it means your MacBook was in sleep mode. If nothing happens, it could indicate that your MacBook is turned off.
Remember, it’s crucial to check the power status before attempting to turn your MacBook on or off to avoid any unnecessary actions or potential data loss. So, take a moment to ensure you understand the power status of your MacBook before proceeding with further steps.
Turning on Your MacBook
To turn on your MacBook, follow these simple steps:
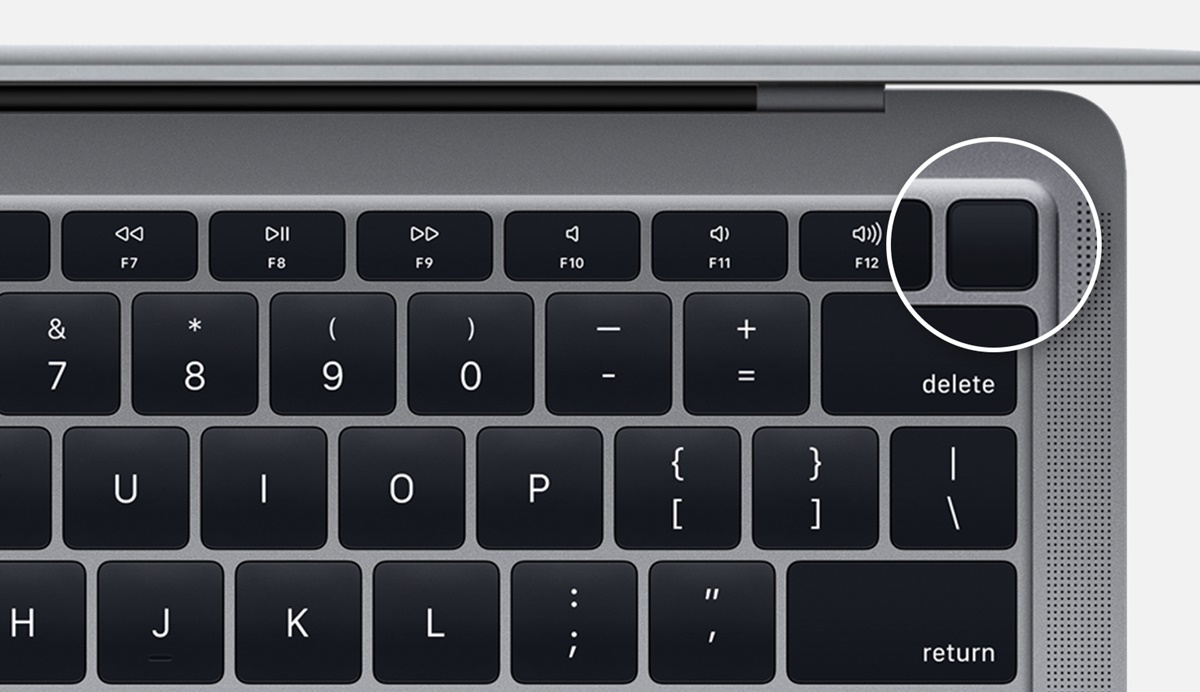
- Locate the power button on your MacBook. Depending on the model, it can be found on the top-right corner of the keyboard or on the Touch ID sensor.
- Press and hold the power button for a few seconds until you see the Apple logo appear on the screen.
- Release the power button and wait for your MacBook to boot up.
- Once your MacBook is powered on, you will be prompted to enter your username and password to access your desktop.
It’s worth noting that the time taken for your MacBook to start up can vary depending on the model and the number of applications installed. In general, newer models with solid-state drives (SSDs) tend to boot up faster compared to older models with traditional hard disk drives (HDDs).
If your MacBook doesn’t turn on or you encounter any issues during startup, make sure that it’s properly connected to a power source. Also, double-check that the battery is charged or connected to the power adapter. In some cases, a drained battery or a faulty power adapter can prevent your MacBook from turning on.
In the event that your MacBook still won’t start, you may need to troubleshoot further. You can try resetting the System Management Controller (SMC) or performing a safe boot by holding down the Shift key during startup. If the problem persists, it’s best to contact Apple Support or visit an Apple Authorized Service Provider for assistance.
Now that you know how to turn on your MacBook, you can start enjoying all its features and functionality. Whether you’re using it for work, entertainment, or creative tasks, powering on your MacBook is the first step towards a productive and enjoyable experience.
Shutting Down Your MacBook with the Shut Down Option
When you’re ready to power off your MacBook, it’s essential to shut it down properly to ensure that all your data is saved and the system is safely turned off. To do this, follow these steps:
- Click on the Apple menu icon located at the top-left corner of the screen.
- In the drop-down menu, select “Shut Down” from the options.
- A dialog box will appear, asking you to confirm the shutdown. Ensure that all your work is saved and any important applications are closed, then click “Shut Down” to proceed.
- Your MacBook will now begin the shut down process, and the screen will turn off once it’s complete.
It’s important not to interrupt the shut down process by closing the lid or pressing any buttons during the shutdown. This can lead to data corruption or potential hardware issues. Let your MacBook complete the shutdown procedure on its own.
Shutting down your MacBook using the shut down option allows your system to perform necessary tasks such as saving files, closing applications, and freeing up system resources. This ensures a smooth transition to a powered-off state and helps maintain the overall performance of your device.
It’s worth mentioning that shutting down your MacBook regularly can help improve its performance and prevent potential issues. If you’re not going to use your MacBook for an extended period, it’s recommended to shut it down to conserve battery life and reduce unnecessary wear on the hardware.
Remember, shutting down your MacBook properly not only ensures a smooth experience but also helps protect your data and prolong the lifespan of your device. By following these steps, you can safely power off your MacBook and rest assured that all your work is saved before you shut down.
Shutting Down Your MacBook using the Physical Power Button
If you’re unable to access the shut down option on your MacBook due to a frozen or unresponsive screen, you can still shut it down using the physical power button. Here’s how:
- Locate the power button on your MacBook. Depending on the model, it can be found on the top-right corner of the keyboard or on the Touch ID sensor.
- Press and hold the power button for a few seconds until a dialog box appears on the screen.
- In the dialog box, you will see different options such as “Restart,” “Sleep,” and “Shut Down.” Use the arrow keys on your keyboard to navigate to the “Shut Down” option.
- Once the “Shut Down” option is selected, press the Return or Enter key on your keyboard.
Your MacBook will now begin the shut down process, and the screen will turn off once it’s complete. It’s important to note that using the physical power button to shut down your MacBook is a forced shutdown, which is not the recommended method. It should only be used as a last resort when other options are unavailable or unresponsive.
Forcefully shutting down your MacBook using the physical power button may result in data loss or other potential issues. It’s advised to only use this method when necessary and to try the standard shut down option first.
After shutting down your MacBook using the physical power button, it’s recommended to wait a few seconds before pressing the power button again to turn it back on. This allows the system to properly power off and ensures a clean startup when you power on your MacBook again.
Remember, while using the physical power button to shut down your MacBook is a convenient option in certain situations, it’s always recommended to use the regular shut down option whenever possible. This helps ensure a safe and orderly shutdown process, protecting your data and maintaining the overall health of your device.
Restarting Your MacBook with the Restart Option
Restarting your MacBook can be useful when you encounter certain software issues, want to apply updates, or simply need a fresh start. Here’s how to restart your MacBook using the restart option:
- Click on the Apple menu icon located at the top-left corner of the screen.
- In the drop-down menu, select “Restart” from the options.
- A dialog box will appear, asking you to confirm the restart. Make sure to save any unsaved work, close all applications, and then click “Restart” to proceed.
- Your MacBook will now initiate the restart process. The screen will go blank momentarily, and you will see the Apple logo as your MacBook boots up.
- Once the restart is complete, you will be prompted to enter your username and password to access your desktop.
Restarting your MacBook can help resolve minor software glitches, clear temporary system files, and refresh system resources. It’s a quick and effective way to troubleshoot various issues and improve overall performance.
If you’re experiencing persistent problems or your MacBook becomes unresponsive, restarting can often provide a temporary fix. It allows the operating system to reload and clears any processes that may be causing issues.
Before you restart, it’s a good practice to close any open applications and save any important work. This ensures that your data is safely stored and avoids any potential data loss or corruption during the restart process.
Restarting your MacBook on a regular basis can also help maintain its performance and efficiency. It clears out cached files, resets system settings, and can resolve conflicts between applications.
Remember, restarting your MacBook is a simple yet powerful solution for various software-related issues. By following these steps, you can ensure a smooth restart and a refreshed operating system, helping you make the most of your MacBook’s capabilities.
Restarting Your MacBook using the Physical Power Button
If you’re unable to access the restart option on your MacBook due to a frozen or unresponsive screen, you can perform a forced restart using the physical power button. Here’s how you can restart your MacBook using this method:
- Locate the power button on your MacBook. Depending on the model, it can be found on the top-right corner of the keyboard or on the Touch ID sensor.
- Press and hold the power button for about 5-10 seconds until your MacBook shuts down completely.
- Release the power button and wait for a few seconds.
- Press the power button again to turn your MacBook back on.
Performing a forced restart using the physical power button is a useful workaround when your MacBook becomes unresponsive or freezes. It can help resolve software issues by terminating processes that might be causing the problem.
However, it’s important to note that a forced restart should be used sparingly and only as a last resort. This method doesn’t allow your MacBook to perform the necessary shutdown procedures, which can potentially lead to data loss or corruption.
If you find yourself needing to perform a forced restart frequently, it may indicate an underlying issue with your MacBook’s software or hardware. In such cases, it’s recommended to seek professional assistance from Apple Support or an authorized service provider.
Remember, while a forced restart using the physical power button can help in certain situations, it’s always ideal to use the regular restart option whenever possible. This allows your MacBook to perform a clean shutdown and startup, ensuring the safety of your data and maintaining the overall health of your device.
Putting Your MacBook to Sleep
Putting your MacBook to sleep is a convenient way to pause your work and conserve battery life without fully shutting down. Here’s how to put your MacBook to sleep:
- Click on the Apple menu icon located at the top-left corner of the screen.
- In the drop-down menu, select “Sleep” or “Sleep Display,” depending on your preference.
- Alternatively, press the power button once (on most MacBook models) to put your MacBook to sleep.
When your MacBook is put to sleep, it enters a low-power mode where it consumes minimal energy while still maintaining your work and application states. The screen turns off, and the system goes into a sleep state, preserving battery life and allowing for a quick resumption of work when you wake it up.
Putting your MacBook to sleep is ideal for short breaks when you plan to return to your work shortly. It allows you to quickly resume your tasks without going through the full startup process.
Additionally, putting your MacBook to sleep is useful for mobility. When you close the lid of your MacBook, it automatically goes into sleep mode, ensuring that no power is wasted and protecting your work from potential data loss.
During sleep mode, your MacBook will periodically wake up to perform system tasks, such as checking for updates or receiving notifications. This ensures that your MacBook remains up-to-date and connected even while it’s in sleep mode.
To wake your MacBook from sleep mode, simply press any key on the keyboard, click the trackpad, or open the lid (if it was closed). Your MacBook will quickly wake up, and you’ll be ready to continue where you left off.
Putting your MacBook to sleep is a convenient and energy-efficient way to temporarily pause your work while preserving your battery life. By utilizing this feature, you can easily switch between tasks, prolong your battery usage, and improve your overall productivity.
Waking Your MacBook from Sleep Mode
Waking your MacBook from sleep mode is a simple process and allows you to quickly resume your work or activities. Here’s how to wake your MacBook from sleep mode:
- If your MacBook’s lid is closed, simply open it to wake the device. The screen will automatically turn on, and you’ll be ready to use your MacBook.
- If your MacBook’s lid is already open, press any key on the keyboard or click the trackpad. This will wake your MacBook from sleep mode and display your desktop.
When waking your MacBook from sleep mode, you’ll notice that it resumes exactly where you left off. Any applications, files, or documents that were open will still be right where you left them.
Waking your MacBook from sleep mode is a quick and convenient way to get back to your tasks without having to go through the full startup process. It allows you to instantly pick up where you left off, increasing your productivity and saving you time.
It’s worth mentioning that waking your MacBook from sleep mode consumes minimal power compared to a full startup. This is because your MacBook has already retained its previous state and doesn’t need to go through all the initialization processes.
If you find that your MacBook doesn’t appear to wake from sleep mode, it’s possible that it may have entered a different power-saving state or encountered a technical issue. In such cases, try pressing and holding the power button for a few seconds to perform a forced restart. If the problem persists, it’s advisable to seek assistance from Apple Support or an authorized service provider.
Waking your MacBook from sleep mode is a seamless process that allows you to quickly access your work and resume your activities. By utilizing this feature, you can effortlessly switch between tasks and make the most out of your MacBook’s capabilities.
Forced Restarting Your MacBook
If your MacBook becomes unresponsive or encounters a serious issue, a forced restart can be a helpful troubleshooting step. Here’s how to perform a forced restart on your MacBook:
- Press and hold the power button located on your MacBook’s keyboard for about 10-15 seconds.
- Release the power button when your MacBook shuts down completely.
- Wait for a few seconds, and then press the power button again to turn on your MacBook.
Performing a forced restart forcibly terminates any ongoing processes and initiates a clean startup. It can help resolve temporary system glitches or freeze-ups that may be hindering the normal operation of your MacBook.
However, it’s important to note that a forced restart should only be used as a last resort when other troubleshooting steps have failed. It’s not a recommended method for regularly powering off or restarting your MacBook, as it bypasses the proper shutdown sequence and can potentially lead to data loss or corruption.
If you find yourself needing to perform a forced restart often, it may indicate an underlying issue with your MacBook’s software or hardware. In such cases, it’s best to seek assistance from Apple Support or visit an authorized service provider for a thorough diagnosis and solution.
Before resorting to a forced restart, you can try other troubleshooting steps such as quitting unresponsive applications, disconnecting peripherals, or resetting the SMC (System Management Controller) if applicable to your MacBook model.
Remember that a forced restart should be a last resort and not a regular method for powering off or restarting your MacBook. It’s important to find the underlying cause of any issues and address them appropriately to ensure the best performance and longevity of your device.
By following these steps, you can perform a forced restart on your MacBook when faced with unresponsiveness or critical issues. However, always keep in mind that it should be used sparingly and in conjunction with appropriate troubleshooting steps to maintain the integrity of your MacBook’s system.