
What is AirPlay?
AirPlay is a wireless streaming technology developed by Apple that allows you to stream audio, video, and other content from your Mac or iOS device to compatible devices such as Apple TVs, AirPlay-enabled speakers, and receivers. It provides a seamless way to enjoy your favorite media on a bigger screen or through a high-quality speaker system, offering a more immersive and enjoyable experience.
With AirPlay, you can easily mirror your Mac’s display onto a larger screen, making it perfect for presentations, sharing slideshows, or watching movies and videos with friends and family. Furthermore, you can stream music, podcasts, and even games from your Mac to compatible devices, turning your living room into a personal entertainment hub.
This technology utilizes your Wi-Fi network to establish a connection between your Mac and the AirPlay-enabled device. It ensures a reliable and high-quality streaming experience with minimal latency, allowing you to enjoy your content without any interruptions or delay.
AirPlay also supports multi-room audio, which means you can stream music to multiple AirPlay-enabled speakers simultaneously from your Mac. It’s a great way to fill your entire house with your favorite tunes and create a synchronized audio experience in every room.
Whether you want to present slides, watch movies, or listen to music, AirPlay offers a convenient and versatile solution that seamlessly integrates with your Mac and other Apple devices. It simplifies the way you access and enjoy your media, providing a wireless and hassle-free streaming experience.
Basic requirements for using AirPlay on a Mac
Before you can start using AirPlay on your Mac, there are a few basic requirements that you need to fulfill. These requirements ensure that your Mac is compatible with AirPlay and that you have the necessary setup to establish a connection to other AirPlay-enabled devices.
Here are the key requirements for using AirPlay on a Mac:
- Compatible Mac: Make sure that your Mac supports AirPlay. AirPlay is available on most Mac models running macOS 10.2 or later. You can check the compatibility of your Mac by going to the Apple menu, selecting “About This Mac,” and then clicking on “System Report.” Look for the “AirPlay” section to see if your Mac supports it.
- Wi-Fi network: Both your Mac and the AirPlay-enabled device need to be connected to the same Wi-Fi network. Make sure that your Mac is connected to a stable Wi-Fi network before you attempt to use AirPlay.
- AirPlay-enabled device: You need a compatible AirPlay-enabled device to stream content to. This can be an Apple TV, an AirPlay-enabled speaker system, or a receiver that supports AirPlay. Ensure that the device you want to connect to is powered on and connected to the same Wi-Fi network as your Mac.
- Latest software updates: Keep your Mac and the AirPlay-enabled device up to date with the latest software updates. Apple regularly releases updates that improve compatibility and performance, so it’s essential to ensure that you have the latest updates installed on both devices.
By meeting these basic requirements, you can ensure a smooth and seamless AirPlay experience on your Mac. Having the right hardware, software, and network setup will enable you to enjoy the convenience of wirelessly streaming content from your Mac to compatible devices.
Step 1: Check if your Mac is compatible with AirPlay
Before you can start using AirPlay on your Mac, it’s important to ensure that your Mac is compatible with this wireless streaming technology. Checking the compatibility of your Mac will help determine if you can take advantage of AirPlay’s features and capabilities.
Here’s how you can check if your Mac is compatible with AirPlay:
- Go to the Apple menu: Click on the Apple logo located at the top left corner of your Mac’s screen.
- Select “About This Mac”: From the drop-down menu, choose “About This Mac.” This will open a new window with information about your Mac.
- Check the system information: In the Overview tab of the “About This Mac” window, you’ll find information about your Mac’s hardware and software. Look for the line that says “AirPlay” or “AirPlay Mirroring” under the “System Report” section.
- Verify compatibility: If you see “AirPlay” or “AirPlay Mirroring” listed in the system information, it means that your Mac is compatible with AirPlay. You can proceed with the next steps to enable AirPlay on your Mac. However, if you don’t see any mention of AirPlay, it’s possible that your Mac might not support this feature.
It’s worth noting that AirPlay is available on most Mac models running macOS 10.2 or later. If your Mac meets these software and hardware requirements, you should be able to enjoy the benefits of AirPlay.
If you find that your Mac is not compatible with AirPlay, you still have alternative options for streaming content to other devices. For example, you can explore third-party applications that offer similar wireless streaming functionalities or consider using other wired connections to connect your Mac to compatible devices.
By checking the compatibility of your Mac with AirPlay, you can ensure that you have the necessary foundation to establish a seamless wireless streaming experience and unlock the full potential of AirPlay’s features on your Mac.
Step 2: Ensure your Mac and Apple devices are connected to the same Wi-Fi network
For AirPlay to work seamlessly, it is essential that both your Mac and the Apple device you want to connect to are connected to the same Wi-Fi network. This ensures that they can establish a proper connection and communicate with each other effectively.
Here are the steps to ensure that your Mac and Apple devices are connected to the same Wi-Fi network:
- Check Wi-Fi connectivity: Make sure that your Mac is connected to a stable Wi-Fi network. Open the Wi-Fi menu on your Mac’s menu bar, located at the top right corner of the screen. Ensure that your Mac is connected to the correct Wi-Fi network and has a strong signal.
- Verify Apple device connectivity: If you’re connecting to an Apple TV, check that it is connected to the same Wi-Fi network as your Mac. Similarly, if you’re connecting to an AirPlay-enabled speaker or receiver, ensure that it is connected to the same Wi-Fi network.
- Restart your Wi-Fi router: If you’re experiencing connectivity issues, it can be helpful to restart your Wi-Fi router. This can refresh the connection and resolve any temporary network-related issues.
- Reconnect to Wi-Fi if necessary: If you’re still unable to establish a connection, you may need to reconnect your Mac and Apple device to the Wi-Fi network. Go to the Wi-Fi menu on your Mac, disconnect from the current network, and reconnect to it again. Follow the same steps for the Apple device you’re connecting to.
Ensuring that both your Mac and Apple devices are connected to the same Wi-Fi network is crucial for successful AirPlay usage. This enables them to discover each other on the network and establish a secure and stable connection.
If you’re still encountering issues with connecting to the same Wi-Fi network, you can try troubleshooting your Wi-Fi network setup or seek assistance from your network administrator or internet service provider.
By confirming that your Mac and Apple devices are connected to the same Wi-Fi network, you are one step closer to enjoying the seamless wireless streaming capabilities of AirPlay.
Step 3: Enable AirPlay on your Mac
Once you’ve confirmed that your Mac and Apple devices are connected to the same Wi-Fi network, the next step is to enable AirPlay on your Mac. By enabling AirPlay, you allow your Mac to discover and connect to AirPlay-enabled devices for easy streaming of audio, video, and other content.
Here are two options to enable AirPlay on your Mac:
Option 1: Enable AirPlay from the Menu bar
- Click on the AirPlay icon: Look for the AirPlay icon in the Menu bar at the top right corner of your Mac’s screen. It looks like a rectangle with a triangle at the bottom. Click on the AirPlay icon to open the AirPlay menu.
- Select the AirPlay destination: In the AirPlay menu, you’ll see a list of available AirPlay-enabled devices on your network, such as Apple TVs, AirPlay-enabled speakers, or other Macs. Choose the device you want to connect to from the list. Your Mac’s screen and audio output will be mirrored to the selected device.
Option 2: Enable AirPlay from System Preferences
- Go to System Preferences: Click on the Apple menu at the top left corner of your Mac’s screen and select “System Preferences” from the drop-down menu.
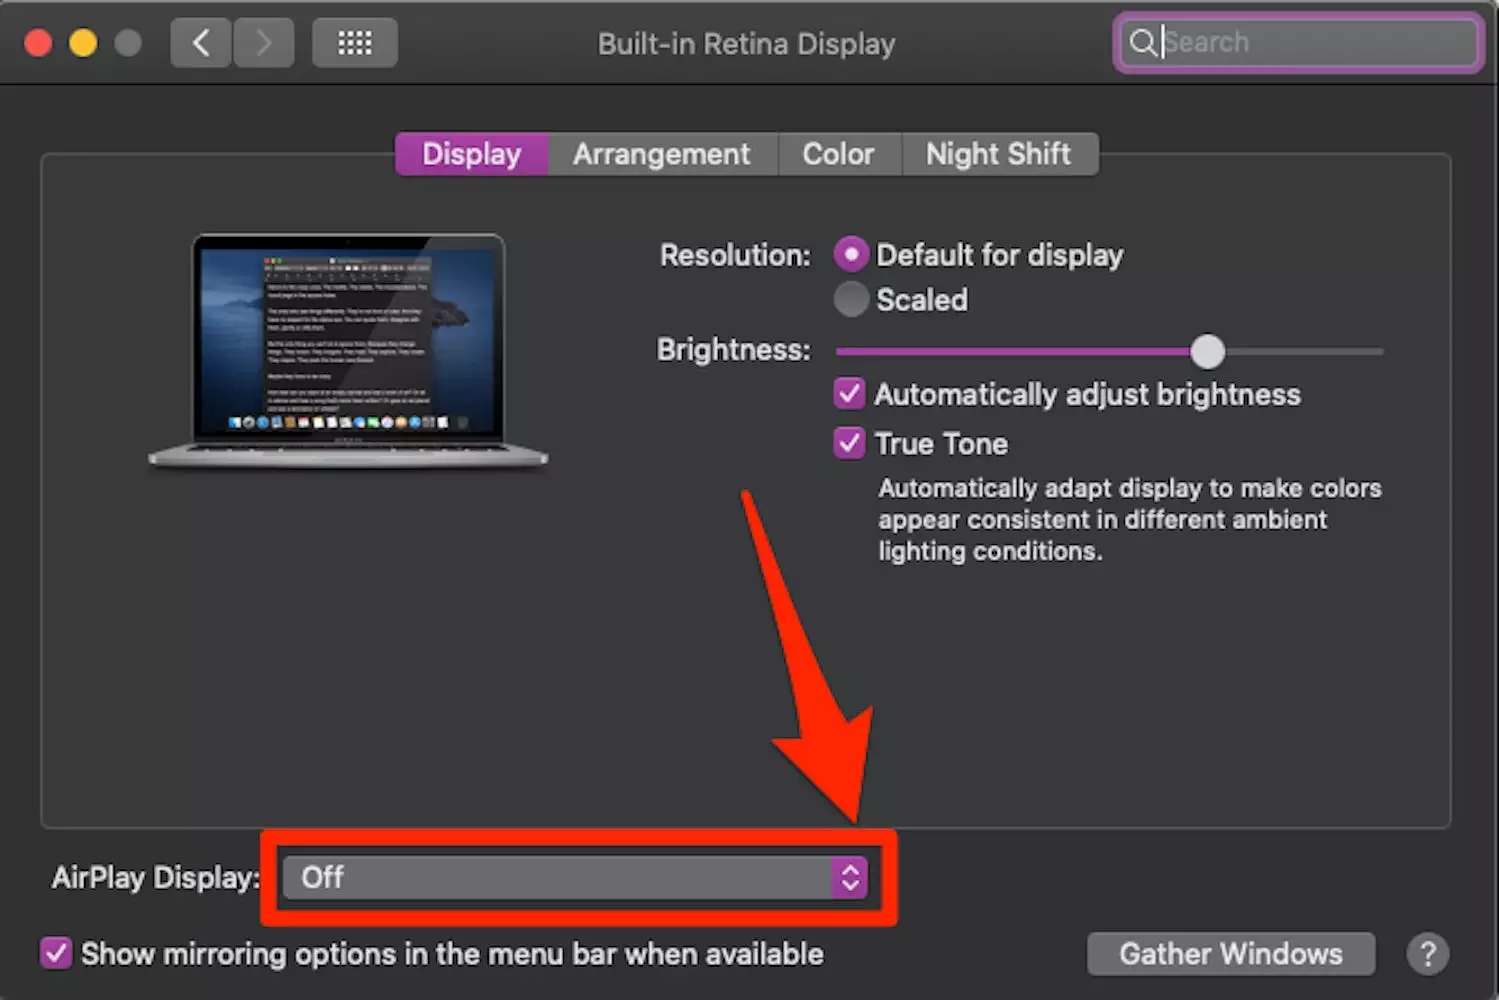
- Open the Displays or Sound preference pane: Depending on the version of macOS you’re using, you will find either the “Displays” or “Sound” preference pane. Both of these panes have options to enable AirPlay.
- Select the AirPlay destination: In the Displays or Sound preference pane, you should see an AirPlay tab or button. Click on it to open a list of available AirPlay-enabled devices. Choose the device you want to connect to, and your Mac’s screen and audio output will be mirrored to the selected device.
By enabling AirPlay on your Mac, you can easily connect and stream content to AirPlay-enabled devices. Whether you want to share presentations, enjoy movies, or listen to music, AirPlay provides a convenient and seamless way to do so.
Once you’ve enabled AirPlay on your Mac, you can proceed to the next step of connecting your Mac to the desired AirPlay-enabled device and start enjoying the benefits of wireless streaming.
Option 1: Enable AirPlay from the Menu bar
Enabling AirPlay from the Menu bar on your Mac provides a quick and convenient way to connect to AirPlay-enabled devices. By following these steps, you can easily select the desired device and start streaming your content wirelessly.
- Click on the AirPlay icon: Locate the AirPlay icon in the Menu bar at the top right corner of your Mac’s screen. It appears as a rectangle with a triangle at the bottom. Give it a click to open the AirPlay menu.
- Select the AirPlay destination: The AirPlay menu will display a list of available AirPlay-enabled devices on your network. These may include Apple TVs, AirPlay-enabled speakers, or other Macs. Choose the device you want to connect to from the list.
- Mirror your screen and audio: After selecting the AirPlay destination, your Mac’s screen and audio output will be mirrored to the chosen device. This means that whatever appears on your Mac’s screen will be replicated on the selected AirPlay-enabled device, creating a seamless viewing or listening experience.
Enabling AirPlay from the Menu bar allows you to switch between AirPlay-enabled devices quickly. You can effortlessly connect to different devices depending on your needs and preferences, whether you’re presenting slideshows, watching videos, or enjoying music.
If you encounter any connectivity issues or if the desired AirPlay-enabled device doesn’t appear in the list, double-check that both the Mac and the device are connected to the same Wi-Fi network. Restarting the Wi-Fi router or reconnecting to the network may also help resolve any temporary connectivity issues.
By utilizing the AirPlay icon in the Menu bar, you can effortlessly enable AirPlay on your Mac and connect to AirPlay-enabled devices for an enhanced multimedia experience.
Option 2: Enable AirPlay from System Preferences
Another way to enable AirPlay on your Mac is through the System Preferences. This option provides a more comprehensive control over AirPlay settings, allowing you to fine-tune your preferences and connect to AirPlay-enabled devices with ease.
- Go to System Preferences: Click on the Apple menu at the top left corner of your Mac’s screen and select “System Preferences” from the drop-down menu.
- Open the Displays or Sound preference pane: Depending on the version of macOS you have, you will find either the “Displays” or “Sound” preference pane. Both of these panes feature options to enable AirPlay.
- Select the AirPlay tab or button: In the Displays or Sound preference pane, look for the AirPlay tab or button. Click on it to open a list of available AirPlay-enabled devices on your network.
- Select the desired AirPlay destination: From the list of available AirPlay-enabled devices, choose the device you want to connect to. This can be an Apple TV, an AirPlay-enabled speaker, or another Mac. Once selected, your Mac’s screen and audio output will be mirrored to the chosen device.
The System Preferences option gives you more control and flexibility when it comes to AirPlay settings. For example, you can adjust the resolution and screen layout when mirroring your display, select the audio output destination, and even enable password protection for AirPlay connections.
If you’re experiencing any issues with AirPlay connectivity or if the desired AirPlay-enabled device is not appearing in the list, ensure that both your Mac and the device are connected to the same Wi-Fi network. Restarting the Wi-Fi router or reconnecting to the network may also help resolve any temporary connectivity issues.
By utilizing the AirPlay settings in System Preferences, you can easily manage AirPlay connections and customize your streaming options on your Mac.
Step 4: Connect your Mac to an Apple device using AirPlay
Now that you have enabled AirPlay on your Mac, it’s time to connect to an Apple device and start enjoying the benefits of wireless streaming. AirPlay allows you to seamlessly share your Mac’s screen, audio, and other content with compatible devices.
Here are three options for connecting your Mac to an Apple device using AirPlay:
Option 1: AirPlay to an Apple TV
- Ensure your Apple TV is powered on: Make sure your Apple TV is connected to the same Wi-Fi network as your Mac and powered on.
- Enable AirPlay on your Mac: Follow the earlier steps to enable AirPlay on your Mac either from the Menu bar or System Preferences.
- Select your Apple TV as the AirPlay destination: In the AirPlay menu on your Mac, choose your Apple TV from the list of available devices. Your Mac’s screen and audio will be mirrored on your Apple TV.
Option 2: AirPlay to an AirPlay-enabled speaker or receiver
- Ensure your AirPlay-enabled speaker or receiver is powered on: Ensure that the speaker or receiver you want to connect to is connected to the same Wi-Fi network as your Mac and turned on.
- Enable AirPlay on your Mac: Enable AirPlay on your Mac using the steps mentioned earlier.
- Select your speaker or receiver as the AirPlay destination: From the AirPlay menu on your Mac, choose the AirPlay-enabled speaker or receiver you want to connect to. Your Mac’s audio output will now be directed to the selected device.
Option 3: AirPlay to a Mac or iOS device
- Ensure the target Mac or iOS device is connected to the same Wi-Fi network: Ensure that the Mac or iOS device you wish to connect to is connected to the same Wi-Fi network as your Mac.
- Enable AirPlay on your Mac: Enable AirPlay on your Mac as mentioned earlier in the Menu bar or System Preferences.
- Select the target Mac or iOS device as the AirPlay destination: In the AirPlay menu on your Mac, choose the Mac or iOS device you want to connect to. Your Mac’s screen and audio will be mirrored on the selected device.
By connecting your Mac to an Apple device using AirPlay, you can enjoy the convenience of wirelessly streaming content and have a seamless, multi-platform experience across your devices.
Option 1: AirPlay to an Apple TV
AirPlay offers a convenient way to stream content from your Mac to an Apple TV, allowing you to enjoy your favorite movies, TV shows, photos, and more on a bigger screen. Here’s how you can connect your Mac to an Apple TV using AirPlay:
- Ensure your Apple TV is powered on: Make sure your Apple TV is connected to the same Wi-Fi network as your Mac and powered on.
- Enable AirPlay on your Mac: You can enable AirPlay from the Menu bar or System Preferences on your Mac, as explained earlier.
- Select your Apple TV as the AirPlay destination: Access the AirPlay menu on your Mac and choose your Apple TV from the list of available devices. Once selected, your Mac’s screen and audio will be mirrored on your Apple TV.
Once your Mac is connected to the Apple TV via AirPlay, you can enjoy a seamless streaming experience. You can play video or audio files, mirror your entire screen, or extend your desktop to the Apple TV, depending on your preferences.
AirPlay to an Apple TV opens up a range of possibilities. You can stream videos from your favorite streaming services, play games on the big screen, or showcase presentations to a larger audience. Additionally, with AirPlay 2, you can create a multi-room audio setup by connecting multiple AirPlay 2-enabled speakers to your Apple TV.
If you encounter any issues during the AirPlay process, such as the Apple TV not appearing in the AirPlay menu, ensure that both your Mac and the Apple TV are connected to the same Wi-Fi network. Restarting the Apple TV or reconnecting to the Wi-Fi network may help resolve connectivity issues.
By leveraging the AirPlay feature to connect your Mac to an Apple TV, you can transform your living room into a multimedia powerhouse and enjoy a richer, more immersive audio and visual experience.
Option 2: AirPlay to an AirPlay-enabled speaker or receiver
With AirPlay, you can wirelessly stream audio from your Mac to an AirPlay-enabled speaker or receiver, allowing you to enjoy your favorite music, podcasts, and more with high-quality sound. Here’s how you can connect your Mac to an AirPlay-enabled speaker or receiver using AirPlay:
- Ensure your AirPlay-enabled speaker or receiver is powered on: Make sure that the speaker or receiver you want to connect to is connected to the same Wi-Fi network as your Mac and turned on.
- Enable AirPlay on your Mac: Enable AirPlay on your Mac using either the Menu bar or System Preferences, as mentioned earlier.
- Select your speaker or receiver as the AirPlay destination: Open the AirPlay menu on your Mac and choose the AirPlay-enabled speaker or receiver you want to connect to. Your Mac’s audio output will now be directed to the selected device.
Once your Mac is connected to an AirPlay-enabled speaker or receiver, you can enjoy high-quality audio playback wirelessly. AirPlay allows you to stream music from your preferred apps or play audio from videos and games on your Mac, all with the convenience of no cables or connections.
AirPlay to an AirPlay-enabled speaker or receiver provides a versatile audio solution, as you can set up multi-room audio setups by connecting multiple speakers or receivers to your Mac. This allows you to enjoy synchronized music throughout your home or different sound zones for different spaces.
If you encounter any issues while connecting to your AirPlay-enabled speaker or receiver, ensure that both your Mac and the device are connected to the same Wi-Fi network. Restarting the speaker or receiver, as well as reconnecting to the Wi-Fi network, can potentially resolve any connection problems.
By leveraging AirPlay to connect your Mac to an AirPlay-enabled speaker or receiver, you can elevate your audio experience and enjoy your favorite music and podcasts with exceptional sound quality, all without the need for cumbersome connections.
Option 3: AirPlay to a Mac or iOS device
AirPlay allows you to stream content not only from your Mac to other devices but also from your Mac to another Mac or iOS device. This opens up possibilities for collaborative work, sharing presentations, or simply enjoying media on a different device. Here’s how you can connect your Mac to a Mac or iOS device using AirPlay:
- Ensure the target Mac or iOS device is connected to the same Wi-Fi network: Make sure that the Mac or iOS device you wish to connect to is connected to the same Wi-Fi network as your Mac.
- Enable AirPlay on your Mac: Enable AirPlay on your Mac, following the steps mentioned earlier from the Menu bar or System Preferences.
- Select the target Mac or iOS device as the AirPlay destination: In the AirPlay menu on your Mac, choose the Mac or iOS device you want to connect to. Your Mac’s screen and audio will then be mirrored on the selected device.
Once your Mac is connected to another Mac or iOS device via AirPlay, you can easily share screens, collaborate on projects, demonstrate apps or presentations, or even enjoy media content on a larger display.
AirPlay to a Mac or iOS device offers versatility and flexibility for both professional and personal use cases. It allows you to extend your workspace, engage in interactive discussions, or simply enjoy media content on a different screen.
If you encounter any issues during connection, such as the target Mac or iOS device not appearing in the AirPlay menu, ensure that both devices are connected to the same Wi-Fi network. Restarting the devices or reconnecting to the Wi-Fi network might help resolve connectivity issues.
By utilizing AirPlay to connect your Mac to another Mac or iOS device, you can enhance collaboration, productivity, and entertainment possibilities across different Apple devices, creating a seamless and connected experience.
Step 5: Adjust AirPlay settings on your Mac
After connecting your Mac to an AirPlay-enabled device, you may want to customize the AirPlay settings to suit your preferences and optimize your streaming experience. Adjusting AirPlay settings on your Mac allows you to fine-tune the audio and video outputs, password protect your connections, and more.
Here are two options for adjusting AirPlay settings on your Mac:
Option 1: Adjust AirPlay settings from the Menu bar
- Click on the AirPlay icon: Locate the AirPlay icon in the Menu bar at the top right corner of your Mac’s screen. Click on the icon to open the AirPlay menu.
- Access AirPlay settings: In the AirPlay menu, you’ll find options to adjust various AirPlay settings. These may include controlling audio output, managing screen mirroring, and more. Click on the desired setting to customize it according to your preferences.
Option 2: Adjust AirPlay settings from System Preferences
- Go to System Preferences: Click on the Apple menu at the top left corner of your screen and select “System Preferences” from the drop-down menu.
- Open the Displays or Sound preference pane: Depending on your macOS version, locate either the “Displays” or “Sound” preference pane in System Preferences. These panes contain the AirPlay settings.
- Customize AirPlay settings: Once in the respective preference pane, you can adjust settings related to screen mirroring, audio output, resolution, and more. Modify these settings to match your preferences and optimize your AirPlay experience.
By adjusting the AirPlay settings on your Mac, you can customize the audio and video outputs to your liking, ensuring the best possible streaming experience. Additionally, you can password protect your AirPlay connections to enhance security and restrict unauthorized access.
If you encounter any issues while adjusting the AirPlay settings or find that the changes aren’t reflected properly, try restarting your Mac or disconnecting and reconnecting the AirPlay connection to refresh the settings.
By fine-tuning the AirPlay settings on your Mac, you can personalize your streaming experience, optimize audio and video outputs, and enhance the overall quality of your AirPlay-enabled connections.
Option 1: Adjust AirPlay settings from the Menu bar
Adjusting AirPlay settings from the Menu bar on your Mac provides a quick and easy way to customize your AirPlay experience. With just a few clicks, you can control audio output, manage screen mirroring, and modify other AirPlay settings to tailor your streaming preferences.
- Click on the AirPlay icon: Located in the Menu bar at the top right corner of your Mac’s screen, click on the AirPlay icon to open the AirPlay menu.
- Access AirPlay settings: In the AirPlay menu, you’ll find various options to adjust AirPlay settings. These can include selecting audio output devices, managing screen mirroring, and more. Choose the setting you wish to modify by clicking on it.
- Control audio output: From the AirPlay menu, you can select the preferred audio output destination for your Mac. This allows you to stream audio to AirPlay-enabled speakers or receivers, creating a wireless audio setup without the need for cables.
- Manage screen mirroring: The AirPlay menu also provides options to manage screen mirroring. You can toggle the screen mirroring feature on or off, allowing you to mirror your Mac’s display to an AirPlay-enabled device or only use it as an extended display.
- Adjust other AirPlay settings: Depending on your macOS version and AirPlay capabilities, the AirPlay menu may offer additional settings to customize your streaming experience. Explore these options to personalize your AirPlay connections further.
Adjusting AirPlay settings from the Menu bar provides a quick and accessible way to modify your streaming preferences. You can easily switch between different audio output devices or adjust screen mirroring settings based on your needs and preferences.
If you encounter any difficulties in accessing or modifying the AirPlay settings from the Menu bar, ensure that your Mac and the AirPlay-enabled devices are connected to the same Wi-Fi network. Restarting your Mac or the AirPlay-enabled device may also help resolve any connection issues.
By utilizing the AirPlay menu in the Menu bar, you can conveniently adjust AirPlay settings to optimize your streaming experience and tailor it to your preferences.
Option 2: Adjust AirPlay settings from System Preferences
Adjusting AirPlay settings from System Preferences on your Mac allows for more comprehensive control and customization of your AirPlay experience. Within the Display or Sound preference pane, you can fine-tune various settings related to AirPlay, ensuring the optimal streaming setup for your needs.
- Go to System Preferences: Click on the Apple menu at the top left corner of your screen and select “System Preferences” from the drop-down menu.
- Open the Displays or Sound preference pane: Depending on your macOS version, locate either the “Displays” or “Sound” preference pane within System Preferences.
- Access the AirPlay settings: Within the Displays or Sound preference pane, you’ll find an AirPlay tab or button. Click on it to access the AirPlay settings specific to that system preference.
- Customize AirPlay options: Once you’re in the AirPlay settings, you can adjust various options related to screen mirroring, audio output, resolution, and more. Explore the available settings and modify them according to your preferences and requirements.
- Save your changes: After customizing the AirPlay settings, close the preference pane, and your changes will be saved automatically.
Adjusting AirPlay settings from System Preferences provides you with greater control and flexibility to fine-tune your streaming experience. This option allows you to customize screen mirroring options, adjust the resolution when mirroring your display, select specific audio output devices, and more.
If you encounter any difficulties accessing the AirPlay settings in System Preferences or find that your modifications aren’t applied correctly, try restarting your Mac or reconnecting your AirPlay-enabled devices to refresh the settings.
By utilizing the AirPlay settings within System Preferences, you can tailor your AirPlay experience to your liking, ensuring the best possible audio and video output, and making the most out of your wireless streaming capabilities.
Troubleshooting common issues with AirPlay on a Mac
While AirPlay generally provides a seamless streaming experience, there are instances where you may encounter issues. Below are some common problems that users face when using AirPlay on a Mac, along with their potential solutions:
- Devices not appearing in the AirPlay menu: If you’re unable to see AirPlay-enabled devices in the AirPlay menu, ensure that both your Mac and the desired device are connected to the same Wi-Fi network. Restarting the Wi-Fi router can also help refresh the network.
- Poor connection or buffering: If you experience stuttering, buffering, or a discontinuous connection, check that you have a stable Wi-Fi connection on both your Mac and the AirPlay-enabled device. Moving your devices closer to the Wi-Fi router or eliminating potential interference can improve the connection.
- No audio or distorted sound: If you encounter audio issues, verify that the volume is turned up on both your Mac and the AirPlay-enabled device. Additionally, check the audio settings on both devices to ensure they are set correctly.
- Mirroring issues: If you have trouble mirroring your Mac’s screen to an AirPlay-enabled device, confirm that both devices support screen mirroring. Some older devices may not have this capability. Restarting your Mac and the AirPlay-enabled device can often resolve the issue.
- Connection dropouts: If your AirPlay connection drops frequently, ensure that there are no physical obstructions between your Mac and the AirPlay-enabled device that might interrupt the Wi-Fi signal. Updating the software on both devices to the latest version can also help fix any compatibility issues.
- Authentication failures: If you encounter authentication errors when connecting to an AirPlay-enabled device, double-check that you are entering the correct credentials, such as a password or passcode, if required. Verify that the devices are on the same Wi-Fi network and try reconnecting.
If troubleshooting the above suggestions does not resolve your issue, you can try restarting your Mac and the AirPlay-enabled device, as well as disconnecting and reconnecting to the Wi-Fi network. In some cases, it may be helpful to consult the user manual or contact the manufacturer for further assistance.
Remember, maintaining up-to-date software on your Mac, AirPlay-enabled devices, and Wi-Fi router is essential for ensuring proper functionality and compatibility. By addressing common AirPlay issues, you can enjoy a seamless streaming experience and make the most of this wireless technology on your Mac.