
What is AirPlay Display?
AirPlay Display is a convenient feature available on macOS that allows you to wirelessly connect your Mac to an external display, such as an Apple TV or a compatible smart TV. This feature enables you to mirror or extend your Mac’s screen, providing a seamless and convenient way to consume media, give presentations, or simply enjoy a larger display without the hassle of cables.
With AirPlay Display, you can effortlessly stream audio, video, and even mirror your entire desktop onto a larger screen, all with just a few clicks. It offers incredible flexibility, making it a valuable tool for both personal and professional use.
This feature is especially beneficial when you want to share content with others, whether it’s a business presentation, a slideshow of your vacation photos, or streaming a movie on the big screen. It eliminates the need for multiple HDMI cables and adapters, making it a versatile and user-friendly solution.
One of the biggest advantages of AirPlay Display is its seamless integration with macOS. With just a few simple steps, you can enable and use AirPlay Display on your Mac without any additional software or complicated setup processes. It is a native feature that works effortlessly with other Apple devices and services.
Not only does AirPlay Display support screen mirroring, but it also allows you to extend your Mac’s display, providing you with additional screen real estate for increased productivity. This means you can have multiple windows open and easily move between them, enhancing your multitasking capabilities.
Whether you’re using AirPlay Display for work or entertainment purposes, it offers a user-friendly and efficient way to connect your Mac to an external display wirelessly. With just a few clicks, you can enjoy a larger screen, better audio, and a more immersive experience.
How to enable AirPlay Display on your macOS?
Enabling AirPlay Display on your macOS is a straightforward process that can be done in just a few simple steps. Here’s how:
- Ensure that both your Mac and the external display (such as an Apple TV or compatible smart TV) are connected to the same Wi-Fi network.
- On your Mac, click on the Apple menu in the top-left corner of the screen and select “System Preferences.”
- In the System Preferences window, click on “Displays.”
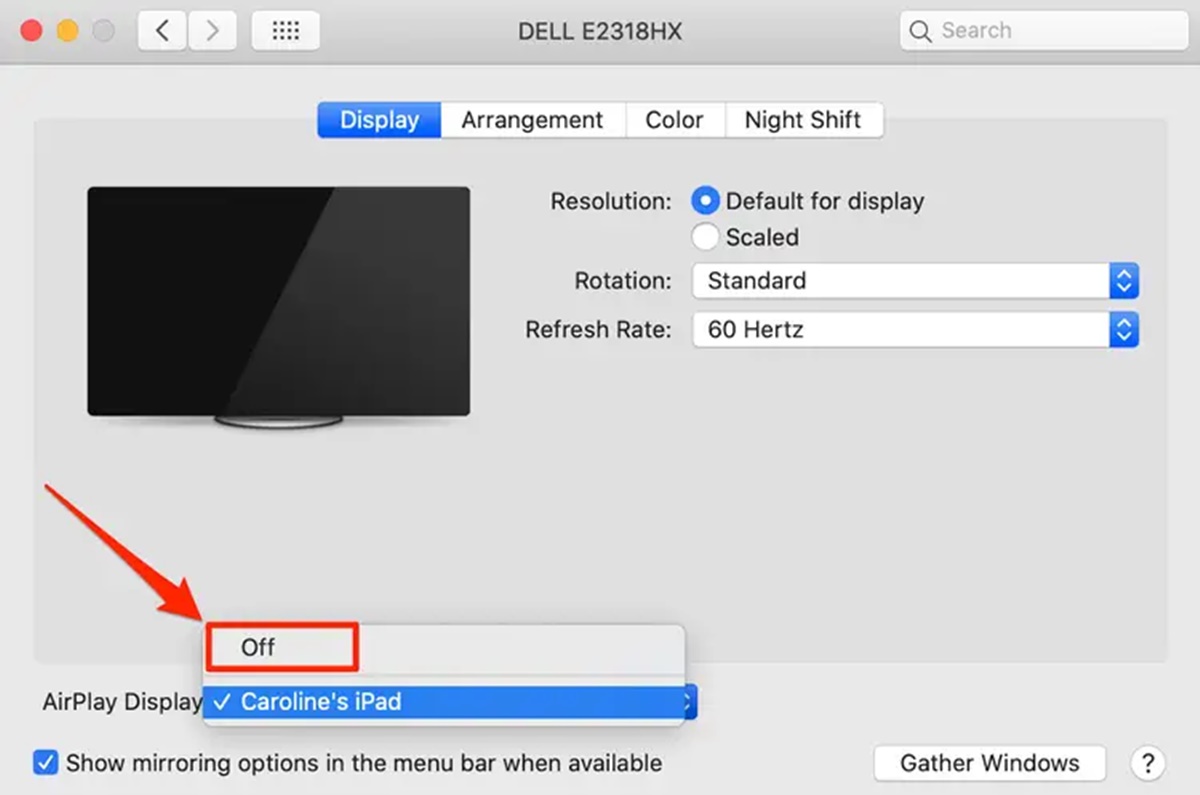
- In the Displays menu, you will see a tab labeled “AirPlay Display.” Click on it.
- Toggle the “Show mirroring options in the menu bar when available” option to enable it.
- The AirPlay Display menu will now appear in the menu bar at the top of your screen.
- Click on the AirPlay Display menu and select the external display you want to connect to.
That’s it! Your Mac will now connect to the chosen AirPlay Display, allowing you to mirror or extend your screen wirelessly.
If you’re unable to see the AirPlay Display option in the Displays menu, make sure that both your Mac and the external display are compatible with AirPlay Display. Also, ensure that the Wi-Fi connection is stable and that both devices are on the same network.
Remember to keep your Mac and the external display within a reasonable distance of each other for optimal performance. Additionally, make sure that both devices are updated to the latest software version to avoid any compatibility issues.
By following these simple steps, you can quickly enable AirPlay Display on your macOS and enjoy the convenience of wireless screen mirroring or extended display capabilities. It’s a fantastic feature that enhances your Mac’s versatility and provides a seamless, cable-free experience.
How to connect your Mac to an AirPlay Display?
Connecting your Mac to an AirPlay Display, such as an Apple TV or compatible smart TV, is a simple and hassle-free process. Here’s a step-by-step guide:
- Ensure that your Mac and the AirPlay Display are connected to the same Wi-Fi network.
- On your Mac, click on the AirPlay Display menu located in the menu bar at the top of the screen.
- A dropdown menu will appear, displaying available AirPlay Display devices within range.
- Select the AirPlay Display device you want to connect to from the dropdown menu.
- If prompted, enter the AirPlay Display device’s password or verification code.
- Once connected, your Mac’s screen will be mirrored or extended onto the AirPlay Display.
It’s important to note that the AirPlay Display menu may appear differently depending on the macOS version you are using. However, the general steps to connect to an AirPlay Display remain the same.
If you’re experiencing trouble connecting to the AirPlay Display, ensure that both your Mac and the display device are powered on and connected to the same Wi-Fi network. Verify that the AirPlay Display device is in range and functioning properly.
Additionally, some AirPlay Display devices may require you to adjust the input settings on the TV or monitor to recognize the incoming signal from your Mac. Consult the user manual or manufacturer’s instructions for specific guidance on how to switch to AirPlay Display mode on your device.
Once connected, you can enjoy the benefits of a larger screen, improved audio, and the flexibility of wireless streaming. Use AirPlay Display to watch movies, view photos, give presentations, or simply extend your workspace for enhanced productivity.
Disconnecting from an AirPlay Display is as easy as selecting your Mac’s screen from the AirPlay Display menu and choosing the “Disconnect” option. Alternatively, you can turn off the AirPlay Display device or disable AirPlay Display in the System Preferences to stop the connection.
By following these steps, you can effortlessly connect your Mac to an AirPlay Display and unlock a whole new level of convenience and versatility.
How to mirror your Mac’s screen using AirPlay Display?
Mirroring your Mac’s screen onto an AirPlay Display, such as an Apple TV or compatible smart TV, allows you to share your entire desktop or specific applications wirelessly. Here’s a step-by-step guide on how to do it:
- Ensure that your Mac and the AirPlay Display are connected to the same Wi-Fi network.
- On your Mac, click on the AirPlay Display menu located in the menu bar at the top of the screen.
- In the dropdown menu, select the AirPlay Display device you want to mirror your screen to.
- If prompted, enter the AirPlay Display device’s password or verification code.
- Once connected, you will notice that your Mac’s screen is now mirrored on the AirPlay Display.
- To stop screen mirroring, click on the AirPlay Display menu again and select “Stop Mirroring.”
While mirroring your screen, any activity that takes place on your Mac will be replicated in real-time on the AirPlay Display. This is particularly useful for sharing presentations, videos, or any content that you want to display on a larger screen for a better viewing experience.
To optimize the mirroring experience, make sure that your Wi-Fi connection is stable and that your Mac and AirPlay Display device are within a reasonable range of each other. This will help to prevent any lag or interruption in the mirroring process.
If you encounter any issues while mirroring your screen, ensure that your AirPlay Display device is updated to the latest firmware version. Additionally, check that your Mac’s software is up to date.
Overall, screen mirroring via AirPlay Display offers a convenient way to share your Mac’s screen wirelessly, eliminating the need for cables and adapters. It opens up possibilities for collaborative work, presentations, and enjoying media on a larger display with ease.
How to extend your Mac’s screen using AirPlay Display?
Extending your Mac’s screen using AirPlay Display allows you to create a dual-screen setup, providing additional workspace and enhancing productivity. Here’s a step-by-step guide on how to extend your Mac’s screen:
- Ensure that your Mac and the AirPlay Display are connected to the same Wi-Fi network.
- On your Mac, click on the AirPlay Display menu located in the menu bar at the top of the screen.
- In the dropdown menu, select the AirPlay Display device you want to extend your screen to.
- If prompted, enter the AirPlay Display device’s password or verification code.
- Once connected, your Mac’s screen will extend to the AirPlay Display, creating an extended desktop.
- You can now move windows and applications to the AirPlay Display, effectively increasing your screen space.
- To disable the extended display and revert to a single screen, go to System Preferences > Displays, then select “Mirror Displays” option.
By extending your screen, you can have multiple applications and windows open simultaneously, which is particularly useful for tasks like multitasking, productivity, and creative work. You can have your email client open on one screen, while working on a document on the other, or have your design tools on one screen, and the reference material on the other.
When using the extended screen feature, make sure your Wi-Fi connection is stable to ensure smooth operation. Keep in mind that the performance and responsiveness of the extended display may vary depending on the capabilities of your AirPlay Display device.
Furthermore, adjust the position and arrangement of your displays by going to System Preferences > Displays. Here, you can arrange your screens according to your preference, such as aligning them side by side or positioning one above the other.
It’s important to note that not all applications are optimized for use with extended displays, and some may not behave as expected. In such cases, you may need to adjust the application settings or seek support from the application’s developer.
With the ability to extend your Mac’s screen using AirPlay Display, you can enhance your workflow, boost productivity, and make the most out of your screen real estate.
AirPlay Display versus HDMI: Which one is better?
When it comes to connecting your Mac to an external display, you may have the option of using either AirPlay Display or an HDMI cable. Both options have their advantages and considerations. Let’s compare AirPlay Display and HDMI to determine which one might be better suited for your needs:
AirPlay Display:
AirPlay Display offers the convenience of wireless connectivity, allowing you to connect your Mac to compatible devices, such as Apple TV or smart TVs, without the need for cables or adapters. This wireless feature provides flexibility in terms of mobility and eliminates the clutter of cables.
With AirPlay Display, you can easily mirror your Mac’s screen or extend it wirelessly. This makes it ideal for situations where you want to share content on a larger screen or create a dual-screen setup. AirPlay Display works seamlessly with other Apple devices and services, providing a streamlined and integrated experience.
However, AirPlay Display does have some limitations. It relies on a stable Wi-Fi connection, so if your network is congested or the signal is weak, you may experience lag or interruptions in the display. Additionally, the quality of the connection and performance may vary depending on the capabilities of the AirPlay Display device.
HDMI:
HDMI (High-Definition Multimedia Interface) is a standard audio/video interface that allows you to connect your Mac to an external display using a physical cable. HDMI offers reliable and stable connectivity, providing a high-quality signal transmission without the potential issues of a wireless connection.
Using HDMI, you can enjoy a consistent and high-definition display, making it suitable for tasks that require precise visuals or demanding applications, such as graphic design or video editing. HDMI also supports audio transmission, so you can enjoy both video and audio through a single cable.
One drawback of HDMI is the limitation of cable length. HDMI cables typically have a maximum working length, and if you need to connect your Mac to a display that is far away, you may require additional extensions. Additionally, the physical cable can be cumbersome, especially if you need to frequently connect and disconnect devices.
Which one is better?
The choice between AirPlay Display and HDMI ultimately depends on your specific needs and preferences. If you value convenience, ease of use, and wireless connectivity, AirPlay Display may be the better option. It offers the flexibility of connecting to compatible devices without the hassle of cables or adapters.
On the other hand, if you prioritize reliability, consistent performance, and high-quality visuals, HDMI may be the better choice. It provides a stable and direct connection, ensuring minimal lag and optimal image and audio transmission.
Consider the specific requirements of your setup, the tasks you need to accomplish, and the devices you are connecting to when making a decision. It’s also worth noting that some Mac models may have limitations in terms of available ports or support for specific display options, so be sure to check the specifications of your Mac before making a decision.
In the end, both AirPlay Display and HDMI have their strengths and considerations, and the best choice will depend on your unique needs and preferences.
Troubleshooting common issues with AirPlay Display
While AirPlay Display is generally a reliable and user-friendly feature, there are a few common issues that users may encounter. Understanding and troubleshooting these issues can help you resolve them quickly and ensure a smooth AirPlay Display experience. Here are some common issues and their solutions:
1. Connection Problems:
If you’re having trouble connecting to an AirPlay Display, make sure that both your Mac and the display device are connected to the same Wi-Fi network. Ensure that the AirPlay Display device is within range and functioning properly. Restarting your Mac and the display device can also help resolve connectivity issues.
2. Lag or Delay:
If you experience lag or delay while using AirPlay Display, check the Wi-Fi signal strength. A weak or unstable connection can cause latency. Moving your Mac and AirPlay Display device closer to the wireless router or access point can improve the signal. Another solution is to reduce network congestion by disconnecting unnecessary devices from the Wi-Fi network and closing bandwidth-intensive applications running in the background.
3. Audio or Video Issues:
If you encounter audio or video problems, ensure that the AirPlay Display device is updated to the latest firmware version. Updating your Mac’s software can also help resolve compatibility issues. If the audio is out of sync with the video, try adjusting the audio sync settings on the AirPlay Display device, if available.
4. Display Resolution:
If the resolution on the AirPlay Display does not match your Mac’s screen resolution, go to System Preferences > Displays and adjust the settings accordingly. Keep in mind that the AirPlay Display’s resolution may be limited by the device’s capabilities.
5. Mirroring Restrictions:
Some third-party applications and DRM-protected content may not be available for screen mirroring due to copyright restrictions. In such cases, you will only be able to mirror your Mac’s desktop, excluding the restricted content.
6. Update Software:
Ensure that both your Mac and the AirPlay Display device have the latest software updates installed. Software updates often include bug fixes and improvements that can help resolve issues with AirPlay Display functionality.
If you continue to experience problems with AirPlay Display despite troubleshooting, consulting the user manual or reaching out to the manufacturer’s support can provide additional assistance tailored to the specific device you are using.
By understanding these common issues and implementing the appropriate solutions, you can quickly troubleshoot and resolve any challenges that may arise when using AirPlay Display, ensuring a seamless and enjoyable experience.
Tips and tricks for using AirPlay Display on macOS
Using AirPlay Display on macOS offers a convenient and versatile way to connect your Mac to an external display wirelessly. To enhance your experience and make the most out of this feature, here are some tips and tricks:
1. Optimize your Wi-Fi network:
Ensure that your Wi-Fi network is stable and has a strong signal. Place your Mac and AirPlay Display device closer to your wireless router or access point to minimize interference and improve connectivity.
2. Use screen rotation:
If the AirPlay Display device supports it, take advantage of screen rotation to adjust the orientation of the extended or mirrored display. This is useful for tasks such as reading long documents or viewing vertical content.
3. Explore audio options:
In the Sound settings of macOS, you can select the audio output device when using AirPlay Display. This allows you to enjoy audio through the AirPlay Display device’s speakers instead of the Mac’s built-in speakers.
4. Customize display arrangement:
In System Preferences > Displays, you can customize the arrangement of your screens by dragging and rearranging the display icons. This enables you to align your screens according to their physical positions, ensuring a seamless transition when moving your cursor across displays.
5. Set up a screensaver:
Configure a screensaver specifically for the AirPlay Display. This can be entertaining during downtime or provide a professional touch during presentations, adding visual interest to the extended or mirrored screen.
6. Use password protection:
If you’re concerned about unauthorized access to your AirPlay Display, enable password protection. This will prompt users to enter a password before connecting to your device, ensuring that only authorized individuals can access the display.
7. Experiment with picture-in-picture:
If your AirPlay Display device supports it, experiment with picture-in-picture mode. This allows you to multitask by keeping a small floating window of specific content on-screen while working on other applications.
8. Keep devices up to date:
Regularly update the software on your Mac and AirPlay Display device to ensure compatibility and access new features or performance improvements that may be available through firmware updates.
9. Check for third-party apps:
Explore third-party applications that offer advanced features and customization options for AirPlay Display. These apps can enhance your experience and provide additional functionalities beyond what is available in the native macOS settings.
10. Disconnect when not in use:
If you’re not actively using AirPlay Display, disconnect your Mac from the AirPlay Display device to free up network resources and maintain an optimal Wi-Fi connection for other devices in your network.
By applying these tips and tricks, you can maximize your productivity, customization, and overall user experience while using AirPlay Display on macOS.