
Prerequisites for taking screenshots on Apple TV
Before getting started, there are a few requirements to keep in mind when it comes to taking screenshots on your Apple TV. By ensuring you have the necessary prerequisites, you can make the process of capturing screenshots hassle-free.
1. Apple TV: Naturally, you’ll need an Apple TV device to take screenshots. Make sure your Apple TV is up and running, connected to the internet, and functioning properly.
2. Apple Device: To capture screenshots from your Apple TV, you’ll need an Apple device such as an iPhone, iPad, or iPod Touch. Ensure that your Apple device is running on the latest version of iOS or iPadOS for optimal compatibility.
3. Lightning or USB-C cable: Depending on the type of Apple device you’re using, you’ll need a Lightning or USB-C cable to establish a physical connection between your Apple device and your Mac computer. This cable will be essential for transferring the screenshots from your Apple device to your computer.
4. macOS: If you plan on using a Mac to capture screenshots from your Apple TV, make sure your Mac is running on the latest version of macOS for optimal performance and compatibility.
5. Third-Party Tool (Optional): While not mandatory, using a third-party tool can provide additional functionalities and convenience when taking screenshots on Apple TV. There are several tools available, such as QuickTime Player, which allows you to capture screenshots and screen recordings effortlessly.
By ensuring you have these prerequisites in place, you’ll be prepared to capture screenshots on your Apple TV seamlessly. Now that we’ve covered the prerequisites, let’s explore the different methods you can use to capture screenshots on Apple TV.
Method 1: Using an Apple device to capture screenshots
If you have an Apple device such as an iPhone, iPad, or iPod Touch, you can easily capture screenshots from your Apple TV. Follow the steps below to learn how:
1. Ensure both your Apple device and Apple TV are connected to the same Wi-Fi network.
2. On your Apple device, open the Control Center by swiping down from the top-right corner (iPhone X and newer) or swiping up from the bottom of the screen (iPhone 8 and older).
3. Look for the “Screen Mirroring” or “AirPlay” option in the Control Center and tap on it.
4. A list of available AirPlay devices will appear. Select your Apple TV from the list.
5. Once your Apple device is connected to your Apple TV, navigate to the screen or app from which you want to capture the screenshot.
6. Press the appropriate button combination on your Apple device to capture the screenshot. For most devices, this involves pressing the Home button and the Sleep/Wake button simultaneously. On newer devices without a Home button, press the Side button and the Volume Up button simultaneously.
7. You’ll see a thumbnail preview of the screenshot in the bottom-left corner of the screen. Tap on it to edit, annotate, or share the screenshot immediately. Alternatively, you can find the screenshot in your Photos app for later use.
8. To disconnect your Apple device from your Apple TV, open the Control Center again and tap on the “Screen Mirroring” or “AirPlay” option. Select “Stop Mirroring” or “Disconnect AirPlay” to end the connection.
Using an Apple device to capture screenshots from your Apple TV is a straightforward and convenient method. It allows you to quickly and effortlessly capture visuals from your favorite apps, movies, or games. Let’s dive into the next method to capture screenshots on Apple TV.
Method 2: Capturing screenshots on Apple TV with a Mac
If you prefer to use your Mac computer to capture screenshots from your Apple TV, you can easily do so by following these steps:
1. Connect your Mac computer and Apple TV using a Lightning or USB-C cable.
2. On your Mac, open the QuickTime Player application. You can find it in the Applications folder or use Spotlight Search to locate it quickly.
3. In QuickTime Player, click on “File” in the menu bar and select “New Movie Recording” from the dropdown menu.
4. A new QuickTime Player window will open with your Mac’s camera activated. Don’t worry, we won’t be using the camera for this purpose.
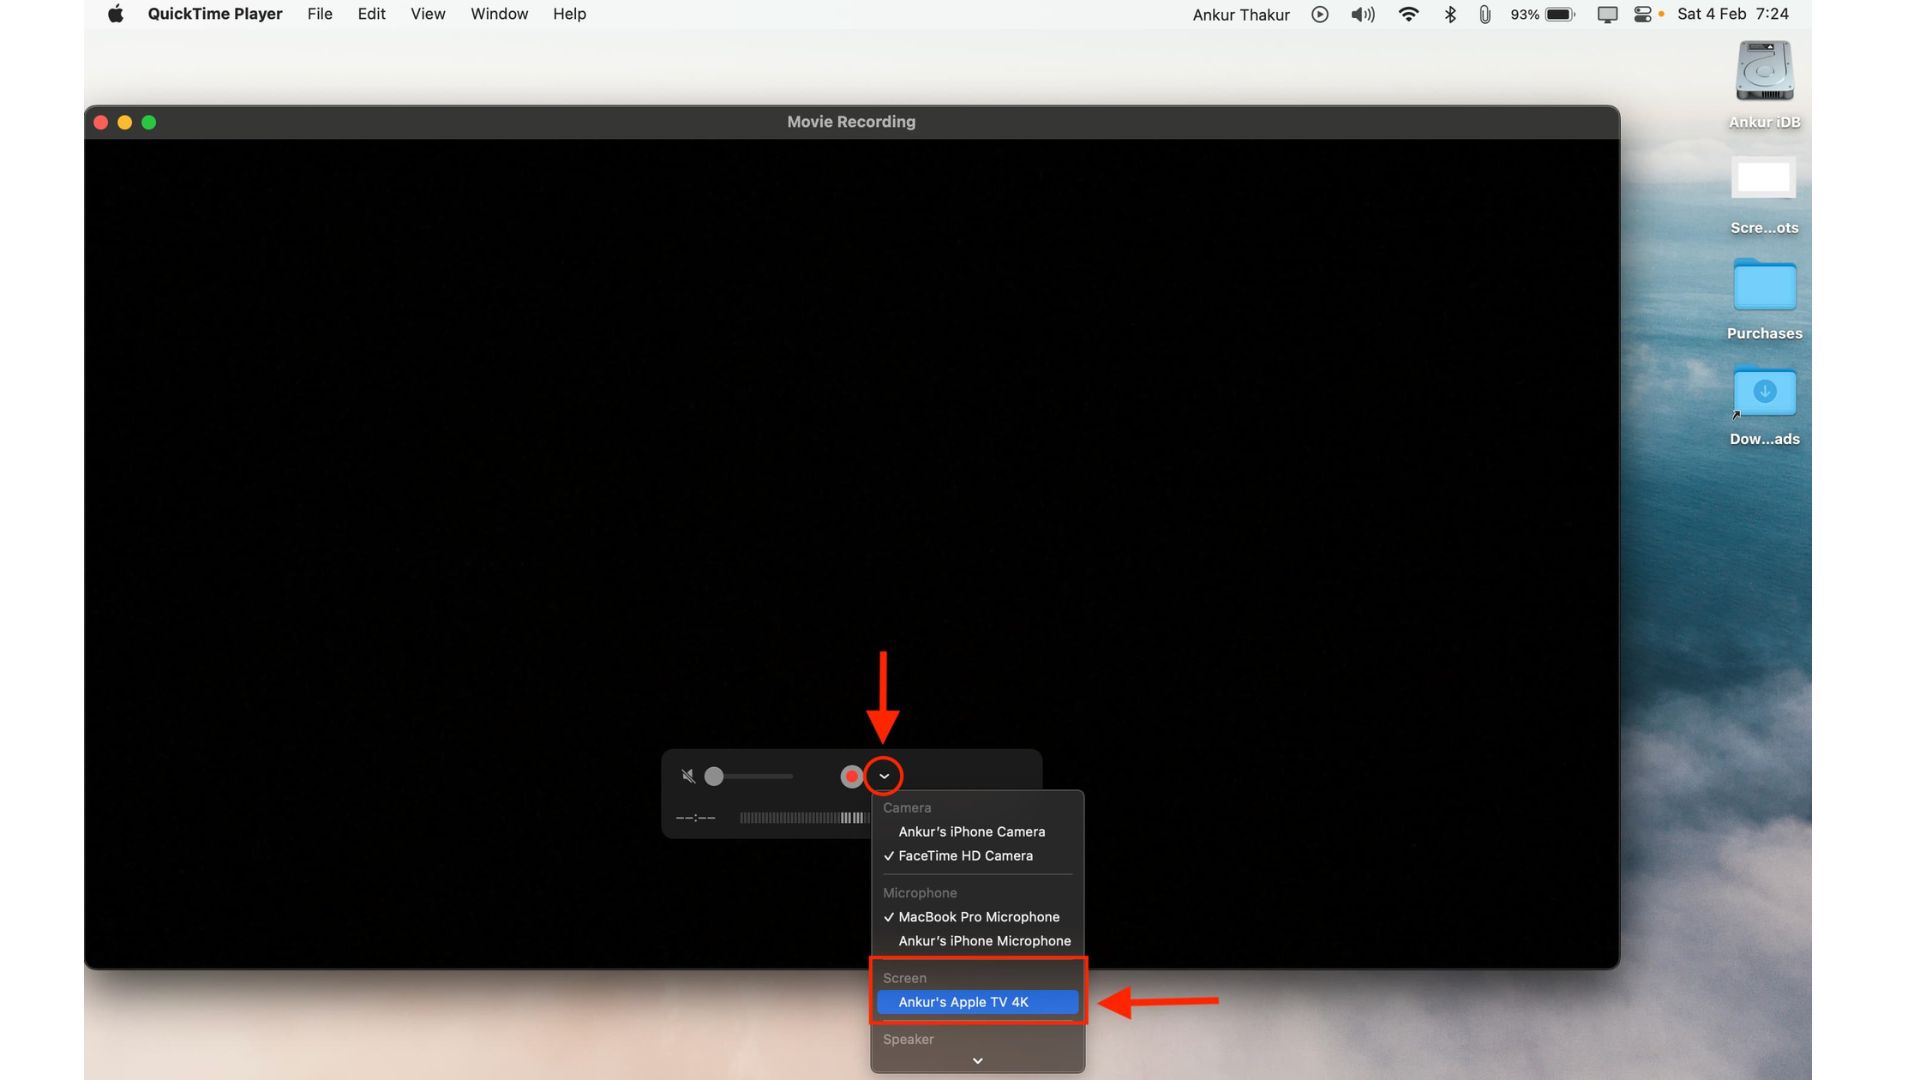
5. Next to the record button in the QuickTime Player window, click on the dropdown arrow and select your Apple TV as the input device.
6. You’ll now see your Apple TV’s screen mirrored in the QuickTime Player window. Navigate to the screen or app on your Apple TV that you want to capture as a screenshot.
7. With the desired screen displayed in the QuickTime Player window, go to “File” in the menu bar and select “Take Screenshot.”
8. The screenshot will be saved to your Mac’s desktop by default. You can also choose a different location to save it if desired.
9. To disconnect your Mac from your Apple TV, simply unplug the Lightning or USB-C cable connecting the two devices.
Using your Mac to capture screenshots from your Apple TV provides more control and flexibility when it comes to saving and managing your screenshots. This method is especially useful if you prefer using a larger screen, have more advanced editing capabilities, or need to capture multiple screenshots in quick succession. Now, let’s move on to the next method for capturing screenshots on Apple TV.
Method 3: Utilizing a third-party tool to take screenshots on Apple TV
If you prefer to explore third-party tools for capturing screenshots on your Apple TV, there are several options available that provide additional functionalities and convenience. One popular tool is QuickTime Player, which is already installed on most Mac computers. Here’s how you can use it to capture screenshots on Apple TV:
1. Connect your Apple TV and Mac using a Lightning or USB-C cable.
2. Launch QuickTime Player on your Mac from the Applications folder or by searching for it using Spotlight Search.
3. In the QuickTime Player menu, click on “File” and select “New Movie Recording” from the dropdown menu.
4. A new QuickTime Player window will open with your Mac’s camera activated. Don’t worry, you won’t be using the camera for this purpose.
5. Next to the record button in the QuickTime Player window, click on the dropdown arrow and choose your Apple TV as the input device.
6. Once your Apple TV screen is mirrored in the QuickTime Player window, navigate to the screen or app you want to capture as a screenshot.
7. With the desired screen displayed in the QuickTime Player window, go to “File” in the menu bar and select “Take Screenshot.”
8. The screenshot will be saved to a location of your choice on your Mac. You can specify the save location or use the default settings.
Aside from QuickTime Player, there are other third-party tools available that offer more advanced features and options for capturing screenshots on Apple TV. These tools often come with built-in annotation tools, screen recording capabilities, and more. Explore the options available and choose the one that best suits your preferences and needs.
By utilizing a third-party tool, you can enhance your screenshot capturing experience on Apple TV with additional functionalities not found in the default methods. Now that you’re familiar with the different methods available, let’s move on to the next section to learn about saving and managing the screenshots you’ve captured on your Apple TV.
Saving and managing the screenshots
After capturing screenshots on your Apple TV using any of the methods mentioned earlier, it’s important to know how to save and manage them for easy accessibility and organization. Here are a few tips to help you with saving and managing your screenshots:
1. File Naming: When saving your screenshots, consider using descriptive file names that reflect the content or context of the screenshot. This will make it easier to locate specific screenshots in the future.
2. Folder Organization: Create dedicated folders on your device or computer to store your Apple TV screenshots. Organizing screenshots into different folders based on the app or category can help you locate them quickly.
3. Cloud Storage: Consider using cloud storage services like iCloud, Google Drive, Dropbox, or OneDrive to save your screenshots. This way, you can access them across multiple devices and ensure they are backed up in case of any data loss.
4. Image Editing: If you want to make any edits or annotations to your screenshots, you can use image-editing software like Adobe Photoshop, Preview (on Mac), or third-party apps available on your Apple device. These tools allow you to crop, resize, add text, draw shapes, or highlight specific areas of your screenshots.
5. Sharing: If you want to share your screenshots with others, you can do so easily through various platforms. You can send screenshots via email, messaging apps, social media, or even use AirDrop to transfer them directly to other Apple devices nearby.
Remember to regularly organize and review your screenshots to avoid clutter and ensure you can easily locate specific ones when needed. Deleting any unwanted screenshots or transferring them to a separate archive folder can help keep your screenshot collection organized and manageable.
By implementing these tips, you can ensure that your captured screenshots from Apple TV are well-organized, easily accessible, and shared with others if needed. Now that you know how to save and manage your screenshots, let’s address some common troubleshooting issues you may encounter when taking screenshots on Apple TV.
Troubleshooting common issues with taking screenshots on Apple TV
Taking screenshots on Apple TV is usually a straightforward process, but you may encounter some common issues along the way. Here are a few troubleshooting tips to help you overcome any difficulties you may face:
1. Lack of Screen Mirroring: If you can’t find the AirPlay or screen mirroring option on your Apple device, make sure both your Apple device and Apple TV are connected to the same Wi-Fi network. Also, ensure that your Apple TV and your Apple device are running on the latest software versions.
2. Incompatibility Issues: If you’re using an older Apple device or an outdated version of iOS, you may experience compatibility issues when attempting to capture screenshots. Update your Apple device’s software to the latest version available to ensure smooth functionality.
3. Unresponsive Apple TV: If your Apple TV is unresponsive or not displaying correctly, try restarting the device by going to the Settings app, selecting System, and choosing Restart. This can help resolve temporary glitches that may interfere with capturing screenshots.
4. Blurry Screenshots: Occasionally, screenshots captured from Apple TV may appear blurry or pixelated. Ensure that your Apple TV is set to the highest possible resolution and adjust your screen settings accordingly for optimal image quality.
5. Capture Errors: If you encounter errors or issues when attempting to capture screenshots using third-party software or tools, check for updates to ensure you’re running the latest version. If the problem persists, try using an alternative tool or consult the tool’s official support resources for further assistance.
6. Insufficient Storage: If you’re unable to save screenshots due to insufficient storage space on your Apple device, consider freeing up space by deleting unused apps, videos, or files. Alternatively, you can transfer your screenshots to an external storage device or cloud storage service.
If you’re still experiencing issues or encountering unique problems while taking screenshots on Apple TV, consult official Apple support resources or reach out to their customer support for personalized assistance.
By following these troubleshooting tips, you can overcome common issues and ensure a smooth and successful screenshot capturing experience on your Apple TV.

![How Does Disney + Works and How Much It Cost [Explained]](https://citizenside.com/wp-content/uploads/2020/05/disney-plus-300x200.jpg)