
Why Turn off Notifications?
Notifications are a double-edged sword. On the one hand, they keep us informed and up to date with important information and updates from our apps. On the other hand, they can be incredibly distracting and disruptive, constantly vying for our attention and pulling us away from our focus and productivity.
Whether you’re in the middle of an important task, trying to relax, or simply wanting to reduce screen time, turning off notifications on your Android device can be a game-changer. Here’s why:
- Improved Focus: By disabling notifications, you can minimize distractions and maintain better focus on the task at hand. Whether you’re working on a project or trying to unwind, fewer interruptions mean greater concentration and increased productivity.
- Reduced Anxiety: Constant notifications can contribute to anxiety and overwhelm. The pressure to constantly check and respond to alerts can be overwhelming and exhausting. Turning off notifications can help create a sense of calm and allow you to regain control over your device and your time.
- Better Battery Life: Notifications constantly consume battery power as they activate your device’s screen and other hardware components. By disabling unnecessary notifications, you can prolong your device’s battery life and ensure it lasts throughout the day.
- Improved Sleep Quality: Many of us keep our devices close by, even when we sleep. The sound of notifications can disturb your sleep and affect its quality. By turning off notifications, you can enjoy uninterrupted sleep and wake up refreshed.
- Greater Privacy: Notifications often contain personal or sensitive information that you may not want others to see. By turning off notifications, you can maintain a higher level of privacy and prevent unintentional exposure of your personal or confidential information.
Ultimately, the choice to turn off notifications on your Android device is a personal one. It depends on your specific needs, preferences, and circumstances. However, by considering the benefits mentioned above, you can make a more informed decision and take back control of your device and your time.
Method 1: Turning off Notifications for Specific Apps
If you find that certain apps bombard you with notifications that you don’t want or need, you can easily turn off notifications for those specific apps. Here’s how:
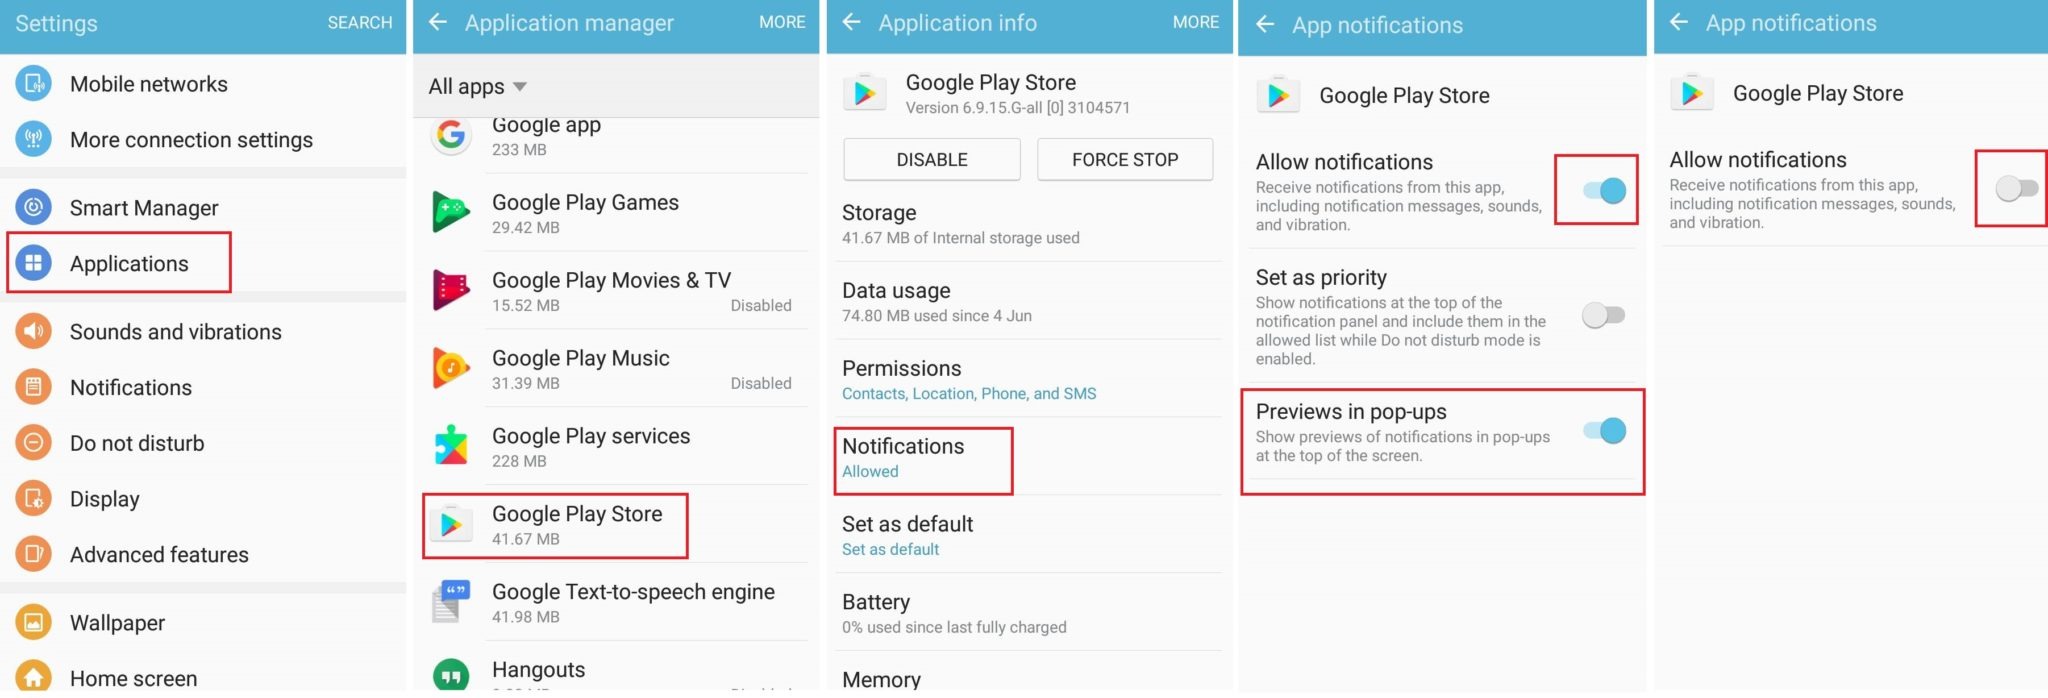
- Open the “Settings” app on your Android device.
- Scroll down and select “Apps & Notifications” or “Apps” (depending on your device).
- Find the app for which you want to disable notifications and tap on it.
- Tap on “Notifications” or “App Notifications.”
- On the next screen, you will see a list of notification categories for that app. Toggle off the switch next to each category to disable notifications for that specific app.
- Alternatively, you can tap on “Advanced” (if available) and select “None” or “Don’t show notifications” to completely disable notifications for the app.
This method allows you to have more control over the notifications you receive. You can choose to turn off notifications for apps that constantly send you promotional messages, social media updates, or other non-essential alerts.
By selectively disabling notifications for specific apps, you can reduce distractions and maintain better focus on the apps and tasks that require your attention. It’s a great way to declutter your notifications and only receive alerts from the apps that matter most to you.
Keep in mind that disabling notifications for an app doesn’t mean you won’t receive any updates or information from that app. It simply means you won’t receive notifications in the form of pop-up messages, sounds, or vibrations.
In the next section, we will explore another method to manage notifications using Do Not Disturb mode.
Method 2: Using Do Not Disturb Mode
Do Not Disturb mode is a powerful feature on Android devices that allows you to temporarily silence all notifications and alerts. It’s a useful method to ensure uninterrupted focus, whether you’re in a meeting, sleeping, or simply need some quiet time. Here’s how to use Do Not Disturb mode:
- Open the “Settings” app on your Android device.
- Scroll down and select “Sound & Vibration” or “Sound.”
- Tap on “Do Not Disturb” or “Do Not Disturb Mode.”
- You will see different options for activating Do Not Disturb mode. Choose the option that suits your needs:
- Turn on now: Allows you to activate Do Not Disturb mode immediately.
- Schedule: Lets you set specific times during which Do Not Disturb mode will automatically turn on and off.
- Priority only: This option allows only certain notifications to come through, such as calls from specific contacts or alerts marked as priority.
- Once Do Not Disturb mode is activated, you will see an icon in the status bar indicating that notifications are silenced.
- If needed, you can customize additional settings such as allowing calls from specific contacts or enabling alarms to sound even in Do Not Disturb mode.
Using Do Not Disturb mode allows you to create designated periods of uninterrupted focus and silence. It’s a great solution when you don’t want to be disturbed by any notifications or alerts.
Remember to customize the settings according to your preferences and needs. For example, you can enable “Allow Calls From” to receive calls from important contacts or enable “Repeat Callers” to allow repeated calls within a certain time frame.
In the next section, we will explore another method to manage notifications by adjusting app notification settings.
Method 3: Adjusting App Notification Settings
If you prefer more granular control over the notifications you receive, you can adjust the notification settings for individual apps. This method allows you to choose which types of notifications you want to receive from each app. Here’s how to adjust app notification settings:
- Go to the “Settings” app on your Android device.
- Scroll down and select “Apps & Notifications” or “Apps.”
- Find and tap on the app for which you want to adjust notification settings.
- Tap on “Notifications” or “App Notifications.”
- You will see a list of notification categories for that app. Tap on each category to customize the notification settings.
- Toggle the switch to enable or disable notifications for each category, or choose the specific type of notification you want to receive.
- Some apps provide additional customization options within each notification category. For example, you may be able to choose the sound, vibration pattern, or LED color for notifications from a specific app.
By adjusting app notification settings, you can fine-tune the types of notifications you receive from each app. This allows you to tailor your notifications to match your preferences and needs.
For example, you can choose to only receive important notifications, or you can disable sound or vibration for non-essential alerts. This level of customization ensures that you stay informed without being overwhelmed by unnecessary notifications.
Keep in mind that the available options may vary depending on the app. Some apps may provide more extensive notification customization features, while others may only offer basic settings.
In the next section, we will explore another method to manage notifications by blocking them from a specific app.
Method 4: Blocking Notifications from a Specific App
If you want to completely block notifications from a specific app, you can utilize the blocking feature available on Android devices. This method ensures that you won’t receive any notifications from the app, eliminating distractions entirely. Here’s how to block notifications from a specific app:
- Open the “Settings” app on your Android device.
- Scroll down and select “Apps & Notifications” or “Apps.”
- Find and tap on the app for which you want to block notifications.
- Tap on “Notifications” or “App Notifications.”
- Locate the specific notification category that you want to block, and tap on it.
- Toggle off the switch next to “Show notifications” or “Allow notifications.”
- If available, you can also disable additional notification settings such as sound, vibration, or LED indicator.
- Repeat the above steps for each notification category within the app, if desired.
By blocking notifications from a specific app, you can effectively eliminate distractions and prevent any interruptions caused by that app’s notifications. This is particularly useful for apps that constantly send non-essential alerts or promotional messages.
Keep in mind that blocking notifications from an app means you won’t receive any notifications from that app, including important or urgent ones. Make sure you understand the consequences of blocking notifications before proceeding.
In the next section, we will explore another method to manage notifications by customizing notification settings for individual apps.
Method 5: Customizing Notification Settings for Individual Apps
To have more control over your notifications, you can customize the notification settings for individual apps on your Android device. This method allows you to specify how each app notifies you, including the sound, vibration, and visibility of the notifications. Here’s how to customize notification settings for individual apps:
- Go to the “Settings” app on your Android device.
- Scroll down and select “Apps & Notifications” or “Apps.”
- Find and tap on the app for which you want to customize notification settings.
- Tap on “Notifications” or “App Notifications.”
- You will see a list of notification categories for that app. Tap on each category to customize its notification settings.
- Within each category, you can toggle the switch next to “Show notifications” or “Allow notifications” to enable or disable notifications for that category.
- Additionally, you can customize the notification behavior for each category. This may include options such as choosing the sound, vibration pattern, importance level, or visibility of notifications.
- Repeat the above steps for each notification category within the app, if desired.
Customizing notification settings for individual apps allows you to have more control over how each app alerts you. You can tailor the notifications based on the importance and urgency of the information they provide.
For example, you can choose to receive sound and vibration notifications for important emails, while reducing the visibility and sound for social media notifications. This way, you can stay informed without being overwhelmed by unnecessary alerts.
Take some time to explore the available options within each app’s notification settings. Different apps may offer varying levels of customization, allowing you to personalize your notification experience.
In the next section, we will explore another method to manage notifications by using a third-party app.
Method 6: Using a Third-Party App to Manage Notifications
If you’re looking for more advanced notification management options, you can turn to third-party apps that specialize in managing notifications on Android devices. These apps provide additional features and customization options beyond what is available in the device’s default settings. Here’s how to use a third-party app to manage notifications:
- Visit the Google Play Store on your Android device.
- Search for “notification management” or “notification control” apps.
- Read app descriptions, reviews, and ratings to find a suitable app that meets your needs.
- Once you’ve chosen an app, tap on “Install” to download and install it on your device.
- Open the app and follow the on-screen instructions to set it up.
- Explore the app’s features and options to customize your notification settings.
- Some third-party apps allow you to create custom rules and filters for managing notifications, prioritize certain apps, or even block specific types of notifications.
Using a third-party app can provide advanced functionality and customization options for managing notifications on your Android device. These apps are designed to give you more control over your notifications and help you declutter your notification panel.
However, it’s important to note that third-party apps may require additional permissions and access to your device’s features and data. Make sure to review the permissions and privacy policy of any app before installing it on your device.
In the next section, we will explore another method to manage notifications by disabling Android system notifications.
Method 7: Disabling Android System Notifications
Aside from app notifications, Android system notifications can also contribute to a cluttered notification panel. These are the notifications generated by the operating system itself, such as software updates, system alerts, and other system-level notifications. If you find these notifications unnecessary or intrusive, you can disable them. Here’s how to disable Android system notifications:
- Open the “Settings” app on your Android device.
- Scroll down and select “Apps & Notifications” or “Apps.”
- Tap on “Notifications” or “App Notifications.”
- Look for an option such as “Android System” or “System UI” and tap on it.
- On the next screen, you will see a list of system notification categories. Tap on each category to customize its notification settings.
- To disable system notifications, toggle off the switch next to “Show notifications” or “Allow notifications” for each category.
- Repeat the above steps for each system notification category, if desired.
Disabling Android system notifications can help declutter your notification panel and reduce distractions caused by system-level alerts. However, it’s important to note that some system notifications are essential for the proper functioning of your device, such as low battery warnings or security updates. Exercise caution when disabling system notifications and ensure that you understand the potential impact.
By customizing and selectively disabling Android system notifications, you can create a more streamlined and focused notification experience on your Android device.
Now that you’re equipped with these methods, you can choose the one(s) that best suit your needs to turn off notifications on your Android device. Remember, finding the right balance between staying informed and avoiding distractions is key for a more productive and peaceful digital experience.