
How to Disable Emergency Alerts on iPhone
Emergency alerts can be essential for ensuring your safety and well-being, but there are times when you may want to disable them temporarily or customize them according to your preferences. If you find that emergency alerts on your iPhone are causing frequent disruptions or if you simply prefer not to receive them, you can easily disable them. Here’s how:
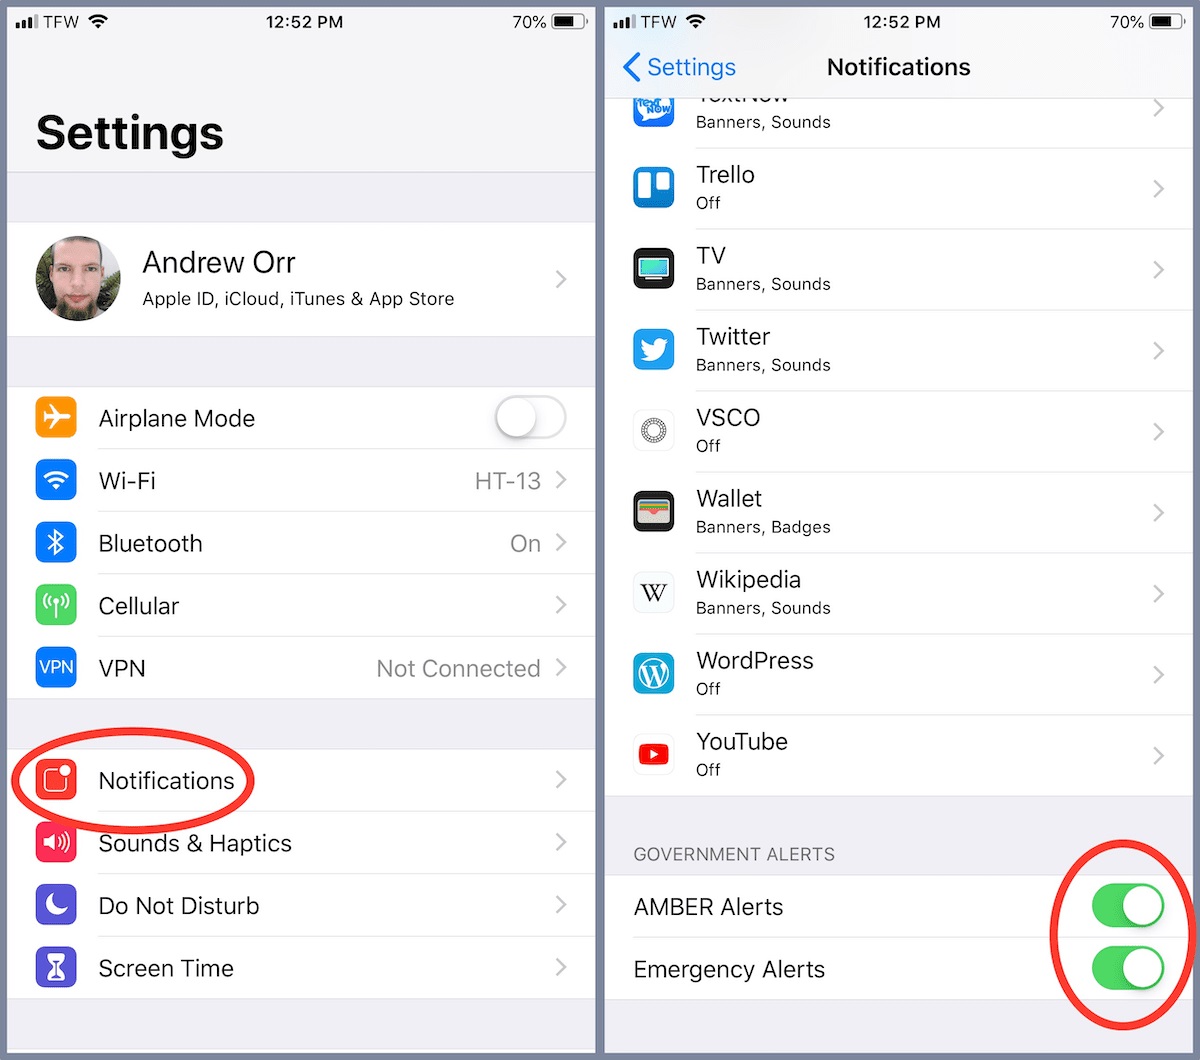
- Open the ‘Settings’ app on your iPhone’s home screen.
- Scroll down and tap on ‘Notifications’.
- Scroll all the way to the bottom and select ‘Government Alerts’.
- To turn off emergency alerts completely, simply toggle off the switch next to ‘Emergency Alerts’.
Keep in mind that turning off emergency alerts means you will not receive any type of emergency alert, including extreme weather warnings and public safety messages. However, it’s important to consider the potential consequences of completely disabling these alerts, as they are designed to provide critical information during emergencies.
If you would like to disable specific types of emergency alerts while still receiving others, you can customize the settings accordingly. For example, you may choose to disable alerts for AMBER alerts (child abduction emergency) while keeping alerts for severe weather or public safety messages enabled.
- To customize emergency alerts, go to the ‘Government Alerts’ section as mentioned above.
- Toggle off the switch next to the specific type of alert you wish to disable. For example, to turn off AMBER alerts, toggle off the switch next to ‘AMBER Alerts’.
By following these steps, you can effectively disable emergency alerts or customize them based on your preferences. Remember, emergency alerts are designed to keep you safe and informed, so it’s essential to consider the potential risks and benefits before completely turning them off.
How to Turn Off AMBER Alerts on iPhone
AMBER Alerts are emergency notifications issued in the event of a child abduction. While these alerts serve an important purpose in helping to locate missing children, they may sometimes cause disruptions or be unnecessary for some individuals. If you wish to turn off AMBER Alerts on your iPhone, you can do so by following these steps:
- Open the ‘Settings’ app on your iPhone.
- Scroll down and tap on ‘Notifications’.
- Scroll to the bottom and select ‘Government Alerts’.
- Toggle off the switch next to ‘AMBER Alerts’.
Disabling AMBER Alerts on your iPhone ensures that you will no longer receive notifications specific to child abductions. However, it’s important to note that this feature is designed to help recover missing children and it may be crucial in certain situations. Consider the potential impact before deciding to turn off AMBER Alerts completely.
If you prefer to receive AMBER Alerts but want to customize the way they are delivered, you can do so within the ‘Government Alerts’ settings. Here are the steps:
- Open the ‘Settings’ app on your iPhone.
- Scroll down and tap on ‘Notifications’.
- Scroll to the bottom and select ‘Government Alerts’.
- Toggle on the switch next to ‘AMBER Alerts’.
- Tap on ‘Sound’ to choose a specific sound for AMBER Alerts.
- Toggle on the switch next to ‘Show on Lock Screen’ if you want AMBER Alerts to be displayed even when your iPhone is locked.
By following these steps, you can either turn off AMBER Alerts completely or customize how they are received on your iPhone. Remember, AMBER Alerts are an important tool in aiding child recovery, so it’s essential to carefully consider the potential impact of disabling them.
Enabling and Disabling Government Alerts on iPhone
Government alerts on your iPhone, such as emergency alerts and AMBER Alerts, are important for keeping you informed and safe during critical situations. By default, these alerts are enabled on your device. However, if you wish to adjust the settings or disable them temporarily, you can easily do so. Here’s how:
Enabling Government Alerts:
- Open the ‘Settings’ app on your iPhone.
- Scroll down and tap on ‘Notifications’.
- Scroll to the bottom and select ‘Government Alerts’.
- Toggle on the switch next to ‘Emergency Alerts’. This ensures that you receive important emergency notifications.
- Toggle on the switch next to ‘AMBER Alerts’ if you want to receive child abduction alerts.
Disabling Government Alerts:
- Open the ‘Settings’ app on your iPhone.
- Scroll down and tap on ‘Notifications’.
- Scroll to the bottom and select ‘Government Alerts’.
- To turn off all government alerts, toggle off the switch next to ‘Emergency Alerts’.
Keep in mind that disabling government alerts means you won’t receive any type of emergency alert or AMBER Alert. It’s important to carefully consider this decision as these alerts provide crucial information during emergencies or child abductions.
Customizing Government Alerts:
- Open the ‘Settings’ app on your iPhone.
- Scroll down and tap on ‘Notifications’.
- Scroll to the bottom and select ‘Government Alerts’.
- Toggle on or off the switches next to the specific types of alerts you want to customize. For example, you can disable AMBER Alerts and only receive emergency alerts.
By following these steps, you can easily enable, disable, or customize government alerts on your iPhone to suit your preferences. Remember to consider the importance of these alerts and their purpose in keeping you informed and safe during critical situations.
Customizing Emergency Alerts on iPhone
Emergency alerts on your iPhone play a crucial role in keeping you informed and safe during emergencies, such as severe weather events or public safety threats. While these alerts are essential, you may want to customize them to better suit your needs. Here’s how you can customize emergency alerts on your iPhone:
Customizing Alert Types:
- Go to the ‘Settings’ app on your iPhone.
- Scroll down and tap on ‘Notifications’.
- Scroll to the bottom and select ‘Government Alerts’.
- Under the ‘Emergency Alerts’ section, you can toggle on or off the switches next to specific alert types, such as Extreme Alerts and Severe Alerts.
By customizing the alert types, you can choose which types of emergency alerts you want to receive on your iPhone. This allows you to tailor the alerts to your specific needs and preferences.
Customizing Alert Tone and Vibration:
- Go to the ‘Settings’ app on your iPhone.
- Scroll down and tap on ‘Notifications’.
- Scroll to the bottom and select ‘Government Alerts’.
- Under the ‘Emergency Alerts’ section, tap on ‘Sound’ to choose a specific sound for emergency alerts.
- Toggle on or off the ‘Vibration’ switch to enable or disable vibration for emergency alerts.
Customizing the alert tone and vibration allows you to personalize the way you receive emergency alerts on your iPhone. This can help you differentiate emergency alerts from other notifications and ensure that you don’t miss important information.
Customizing Alert Display:
- Go to the ‘Settings’ app on your iPhone.
- Scroll down and tap on ‘Notifications’.
- Scroll to the bottom and select ‘Government Alerts’.
- You can toggle on or off the ‘Show on Lock Screen’ switch to decide whether emergency alerts are displayed on the lock screen of your iPhone.
Customizing the alert display allows you to choose whether emergency alerts are shown on the lock screen, making it easier to quickly view important information without unlocking your device.
By customizing emergency alerts on your iPhone, you can tailor the notifications to your preferences and ensure that you receive important information in a way that suits your needs. Remember, it’s crucial to strike a balance between customizing alerts and ensuring that you still receive critical emergency information when necessary.
Turning Off Emergency Alerts During Specific Hours on iPhone
Emergency alerts on your iPhone are essential for keeping you informed and safe during critical situations. However, there may be times when you want to avoid receiving these alerts during specific hours, such as when you’re sleeping or in a meeting. Fortunately, you can set up a schedule to automatically turn off emergency alerts during certain hours. Here’s how:
Setting Up Do Not Disturb:
- Open the ‘Settings’ app on your iPhone.
- Scroll down and tap on ‘Do Not Disturb’.
- Toggle on the switch next to ‘Scheduled’.
- Tap on ‘From’ and select the start time for when you want emergency alerts to be disabled. For example, if you want to turn off emergency alerts from 11:00 PM, select that time.
- Tap on ‘To’ and select the end time for when emergency alerts should be enabled again. For instance, if you want to resume receiving emergency alerts at 7:00 AM, select that time.
By setting up a schedule with Do Not Disturb, emergency alerts will be automatically silenced during the specified hours. This allows you to have uninterrupted sleep or focused work time without being disturbed by emergency notifications.
However, keep in mind that by turning off emergency alerts during specific hours, you won’t receive any type of emergency alert during that time. It’s important to consider the potential consequences and risks before implementing this schedule.
Allowing Repeated Calls:
If you’re concerned about missing emergency calls from loved ones during the Do Not Disturb hours, you can enable the ‘Repeated Calls’ feature. When this feature is enabled, if someone calls you twice within three minutes, the second call will go through even if your iPhone is in Do Not Disturb mode. Here’s how to enable it:
- Go to the ‘Settings’ app on your iPhone.
- Scroll down and tap on ‘Do Not Disturb’.
- Toggle on the switch next to ‘Repeated Calls’ to enable the feature.
Enabling ‘Repeated Calls’ ensures that urgent calls are not missed during the scheduled Do Not Disturb hours, providing you with an additional layer of security and peace of mind.
By configuring Do Not Disturb and enabling the ‘Repeated Calls’ feature, you can effectively turn off emergency alerts during specific hours while still ensuring that important calls can reach you when necessary. Keep in mind that it’s crucial to evaluate the potential impact of disabling emergency alerts during specific times based on your individual needs and circumstances.
Temporarily Disabling Emergency Alerts on iPhone
Emergency alerts on your iPhone are crucial for receiving critical information during emergencies. However, there may be situations when you need to temporarily disable these alerts, such as when you’re in a movie theater, attending an important meeting, or simply need uninterrupted focus. Fortunately, you can easily silence emergency alerts on your iPhone for a temporary period. Here’s how:
Using the Silent Switch:
- Locate the physical Silent switch on the side of your iPhone. It’s typically located above the volume buttons.
- Push the switch towards the back of the device to enable Silent mode. You will see an orange indicator on the switch, confirming that your iPhone is in Silent mode.
By enabling Silent mode, all sounds on your iPhone, including emergency alert sounds, will be muted. This ensures that emergency alerts won’t disturb you during your desired period of silence.
However, it’s important to note that while in Silent mode, you won’t receive any sound-based notifications, including phone calls and regular text messages. You’ll only see visual alerts on your iPhone’s screen.
Using Airplane Mode:
- Swipe down from the top-right corner of your iPhone’s screen to open Control Center.
- Tap on the Airplane Mode icon to enable it. The icon will turn orange, indicating that Airplane Mode is activated.
Enabling Airplane Mode disables all wireless connections on your iPhone, including cellular service and Wi-Fi. This ensures that not only emergency alerts but also other notifications won’t interrupt you during your designated period.
However, it’s important to keep in mind that when Airplane Mode is enabled, you won’t have access to cellular data or be able to make or receive phone calls. Use this option only when it’s safe and appropriate to be in a disconnected state.
By utilizing the physical Silent switch or enabling Airplane Mode, you can temporarily disable emergency alerts on your iPhone when you need uninterrupted quiet or limited distractions. However, remember to turn off these features when you are no longer in a situation that requires them to ensure that you can receive important emergency notifications in a timely manner.
How to Disable Emergency Alerts on iPhone for Specific Types of Emergencies
Emergency alerts on your iPhone are designed to keep you informed and safe during various types of emergencies. However, there may be specific types of emergency alerts that you prefer to disable while still receiving others. Luckily, you can customize the settings on your iPhone to disable emergency alerts for specific types of emergencies. Here’s how:
Customizing Emergency Alert Types:
- Open the ‘Settings’ app on your iPhone.
- Scroll down and tap on ‘Notifications’.
- Scroll to the bottom and select ‘Government Alerts’.
- Under the ‘Emergency Alerts’ section, you will see a list of specific types of emergency alerts.
- To disable a specific type of emergency alert, simply toggle off the switch next to it. For example, if you want to disable alerts for Flash Flood Warnings, toggle off the switch next to ‘Flash Flood Alerts’.
By customizing the emergency alert types, you can choose which specific types of emergencies you want to be alerted about and which ones you prefer to disable. This allows you to tailor the emergency alerts to your preferences and needs.
It’s important to note that while disabling specific types of emergency alerts can provide a more personalized experience, it’s crucial to consider the potential risks involved. Ensure that you don’t disable alerts for emergencies that could directly impact your safety and well-being.
To ensure that you’re still receiving critical emergency information, it’s recommended to enable notifications for at least the most important types of emergencies, such as extreme weather warnings and public safety messages.
By following these steps to customize emergency alert types on your iPhone, you can disable alerts for specific types of emergencies while still receiving important emergency notifications that are relevant to your safety and well-being. Remember to regularly review and update your settings based on your needs and preferences, while keeping in mind the importance of staying informed during emergencies.
Managing Emergency and AMBER Alerts in iPhone Settings
Emergency alerts and AMBER Alerts on your iPhone are crucial for receiving critical information during emergencies and child abduction situations. It’s important to be aware of how to manage these alerts effectively in your iPhone settings. Here’s a guide on how to manage emergency and AMBER alerts:
Accessing Emergency and AMBER Alerts Settings:
- Open the ‘Settings’ app on your iPhone.
- Scroll down and tap on ‘Notifications’.
- Scroll to the bottom and select ‘Government Alerts’.
By accessing the ‘Government Alerts’ settings, you can customize your preferences for emergency and AMBER Alerts on your iPhone.
Enabling or Disabling Emergency and AMBER Alerts:
- In the ‘Government Alerts’ settings, you will see the options to toggle on or off ‘Emergency Alerts’ and ‘AMBER Alerts’.
- Toggle on the switch next to ‘Emergency Alerts’ to enable the reception of emergency notifications.
- Toggle on the switch next to ‘AMBER Alerts’ to receive child abduction emergency alerts.
- If you want to disable these alerts, simply toggle off the respective switches.
Enabling or disabling emergency and AMBER alerts allows you to customize the types of alerts you receive on your iPhone based on your preferences and needs.
Customizing Emergency and AMBER Alerts Sounds:
- In the ‘Government Alerts’ settings, you’ll find an option to customize the sound for emergency and AMBER alerts.
- Tap on ‘Sound’ and select a preferred sound for these alerts from the available options.
Customizing the sounds for emergency and AMBER alerts allows you to differentiate them from other notifications and ensure that you don’t miss important alerts.
Managing Emergency and AMBER Alerts on the Lock Screen:
- In the ‘Government Alerts’ settings, you can toggle on or off the ‘Show on Lock Screen’ switch.
- Enabling this option ensures that emergency and AMBER alerts are displayed on your iPhone’s lock screen, making it easier to view important information without unlocking your device.
By managing these settings, you can have greater control over how emergency and AMBER alerts are delivered and displayed on your iPhone, ensuring that you stay informed and safe during critical situations while maintaining a personalized experience.
Remember to regularly review and update these settings based on your preferences and circumstances, while keeping in mind the importance of receiving important emergency information and AMBER alerts when necessary.
What to Do if You’re Not Receiving Emergency Alerts on iPhone
Receiving emergency alerts on your iPhone is crucial for staying informed and ensuring your safety during critical situations. However, if you find that you’re not receiving emergency alerts, there are a few steps you can take to troubleshoot the issue and ensure that you’re receiving these important notifications. Here’s what you can do:
Check Your Settings:
- Open the ‘Settings’ app on your iPhone.
- Scroll down and tap on ‘Notifications’.
- Scroll to the bottom and select ‘Government Alerts’.
- Ensure that the switches next to ‘Emergency Alerts’ and ‘AMBER Alerts’ are toggled on. If they’re already enabled, try toggling them off and on again to refresh the settings.
By checking and adjusting your notification settings, you can ensure that emergency alerts on your iPhone are enabled and ready to be received.
Check Cellular Connection:
- Ensure that your iPhone has a stable cellular connection. Emergency alerts are typically delivered through wireless emergency alert (WEA) technology, which relies on your cellular service.
- If you are in an area with limited or no cellular coverage, you may not receive emergency alerts. In such cases, moving to an area with better cellular reception or contacting your service provider for assistance may be necessary.
Check Do Not Disturb Settings:
- Open the ‘Settings’ app on your iPhone.
- Scroll down and tap on ‘Do Not Disturb’.
- Ensure that Do Not Disturb mode is disabled or scheduled outside of the time when you expect to receive emergency alerts.
Do Not Disturb mode can silence all alerts, including emergency alerts, so make sure it is not interfering with the delivery of these important notifications.
Contact Your Service Provider:
- If you’ve checked all the settings and still aren’t receiving emergency alerts, it’s recommended to contact your service provider for further assistance.
- They can help troubleshoot your device and ensure that the necessary configurations are in place for receiving emergency alerts.
Remember, emergency alerts are issued at the discretion of government authorities and are not under your control or your service provider’s control. So, there may be instances when you don’t receive an emergency alert despite having all settings properly configured.
By following these steps and reaching out to your service provider if needed, you can troubleshoot the issue of not receiving emergency alerts on your iPhone and ensure that you’re receiving these critical notifications when they are issued.
Understanding the Importance of Emergency and AMBER Alerts on iPhone
Emergency alerts and AMBER Alerts are vital features on your iPhone that play a crucial role in keeping you safe and informed during critical situations. It’s essential to understand their importance and the impact they can have on your well-being. Here’s why emergency and AMBER alerts are significant:
Prompt Information in Emergencies:
Emergency alerts allow you to receive immediate and timely information during emergencies, such as natural disasters, extreme weather events, or public safety threats. By receiving these alerts on your iPhone, you can take necessary precautions or actions to ensure your safety and the safety of those around you.
Assistance in Child Abduction Cases:
AMBER Alerts are specifically designed to help in cases of child abduction. These alerts provide critical information about the abducted child, the abductor, and any relevant details that can aid in their safe recovery. By receiving AMBER Alerts on your iPhone, you can actively contribute to the search efforts and potentially assist in locating the missing child.
Immediate Public Safety Information:
Emergency alerts also provide essential public safety information that can help you make informed decisions during emergencies. Whether it’s a hazardous situation in your area, a local evacuation order, or any other imminent threat, these alerts ensure that you have the necessary information to take appropriate action for your safety and the safety of your loved ones.
Promote Community Awareness:
Emergency and AMBER Alerts rely on the collective effort of the community to effectively respond to emergencies and aid in the recovery of missing children. By receiving these alerts on your iPhone, you become an active participant in the safety and well-being of your community. Your awareness and response to these alerts can greatly contribute to timely assistance and potentially save lives.
Prevent Complacency and Promote Preparedness:
Emergency and AMBER Alerts serve as critical reminders that emergencies can happen at any time. By receiving these alerts, you’re reminded to remain vigilant and prepared for unexpected events. This encourages you to develop emergency plans, assemble emergency supplies, and stay informed about local emergency resources, ensuring that you’re ready to respond effectively in case of an emergency.
Understanding the importance of emergency and AMBER alerts on your iPhone allows you to appreciate their role in keeping you safe, informed, and connected to your community during critical situations. By staying aware of these alerts and taking appropriate actions, you contribute to a safer and more resilient society.