
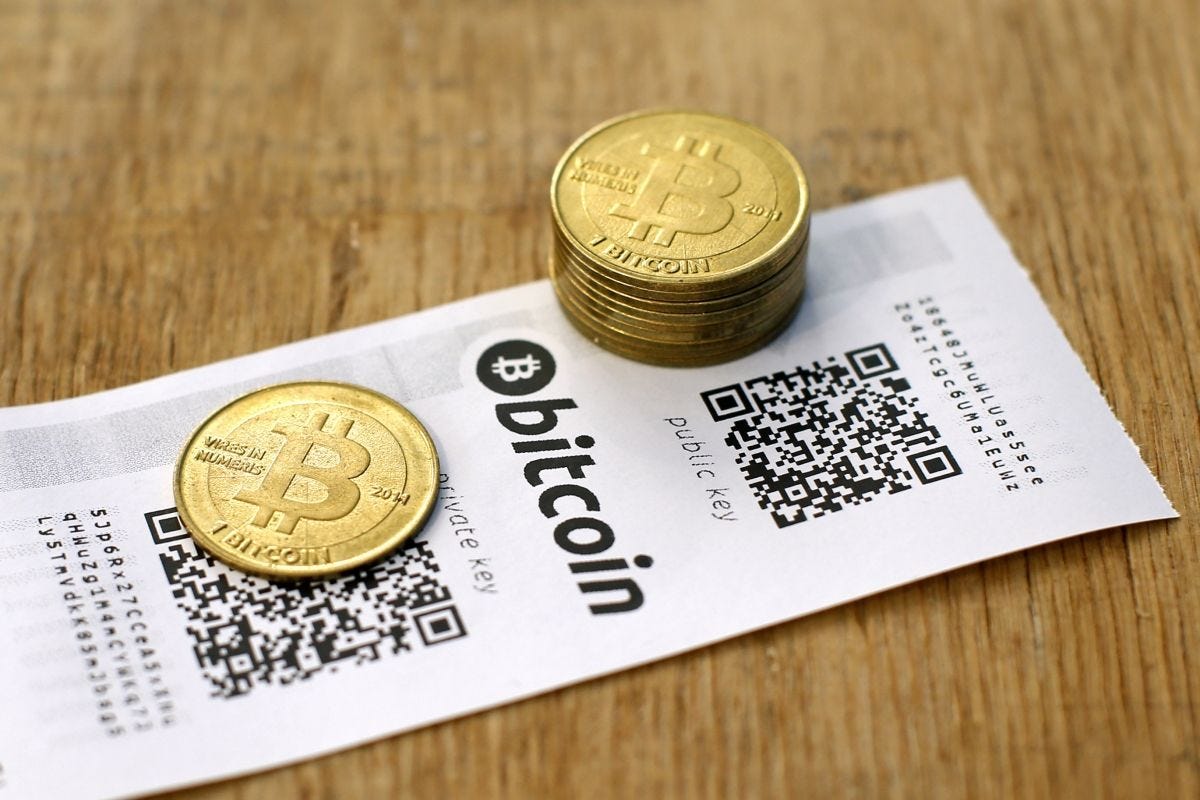
What is a Paper Wallet?
A paper wallet is a physical form of storing your cryptocurrency, such as Bitcoin, on a piece of paper. It is considered a cold storage method, meaning it is kept offline, making it less vulnerable to hacking or online threats. A paper wallet contains a public key, which is used to receive funds, and a private key, which is required to access and transfer the funds.
The process of creating a paper wallet involves generating a random Bitcoin address and its corresponding private key. This can be done using various online tools, but it is essential to use a trusted and secure platform to ensure the integrity of your wallet. Once the address and private key are generated, they are usually printed on a piece of paper or written down manually.
One of the primary benefits of a paper wallet is its simplicity and offline nature. It allows users to have complete control over their cryptocurrency without relying on digital devices or third-party services. This makes it an attractive option for those who prioritize security and want to keep their Bitcoin away from potential cyber threats.
However, it is crucial to handle a paper wallet with care, as it is a physical item that can be lost, damaged, or stolen. It is advised to keep multiple copies of your paper wallet in secure, separate locations to minimize the risk of losing access to your funds. Additionally, extra precautions should be taken to prevent unauthorized access, such as keeping the wallet in a locked safe or using tamper-evident seals.
While a paper wallet offers a high level of security, it is also important to note that it may not be the most convenient option for frequent transactions. The process of transferring funds from a paper wallet to a digital wallet can be a bit more involved compared to other methods. This is where a hardware wallet, such as the Ledger Nano S, comes into play.
What is a Ledger Nano S?
A Ledger Nano S is a hardware wallet specifically designed to securely store cryptocurrencies, including Bitcoin. It is a compact device that resembles a USB flash drive and provides an extra layer of protection for your digital assets.
Unlike online wallets or software wallets that are vulnerable to hacking and malware attacks, a Ledger Nano S keeps your private keys isolated within the device itself. It utilizes state-of-the-art security features, including a secure chip and a built-in display, to ensure the safety of your cryptocurrency holdings.
One of the key advantages of using a Ledger Nano S is its ability to securely sign transactions offline. When you need to make a Bitcoin transfer, you can simply connect the device to your computer and review the transaction details on the device’s screen. This allows you to verify and authorize the transaction without exposing your private keys to potential online threats.
Furthermore, the Ledger Nano S offers a user-friendly interface through its companion app called Ledger Live. This software allows you to manage multiple cryptocurrencies, view your account balances, and track transaction history. It also provides a seamless way to update the firmware and install new applications on the device.
To protect the device from physical damage or theft, the Ledger Nano S is built with a durable metal body and is equipped with a PIN code system. Each time you connect the device, you will be prompted to enter your PIN to access your funds. In the event of multiple incorrect PIN attempts, the device will automatically wipe its memory, ensuring that your private keys remain secure even if the device falls into the wrong hands.
Overall, the Ledger Nano S provides a convenient and robust solution for safely storing your Bitcoin. Its offline transaction signing, secure chip, and user-friendly interface make it a popular choice among cryptocurrency enthusiasts who value security and control over their digital assets.
Why Transfer Bitcoin from a Paper Wallet to a Ledger Nano S?
While a paper wallet is a secure method of storing Bitcoin, transferring your funds to a Ledger Nano S offers several advantages that make it worth considering.
First and foremost, a Ledger Nano S provides an added layer of security. With a paper wallet, your private keys are physically written down or printed on paper. While this offers protection from online threats, it is still susceptible to physical damage, loss, or theft. With a Ledger Nano S, your private keys are stored securely within the device, reducing the risk of unauthorized access and ensuring the safety of your Bitcoin.
In addition to enhanced security, a Ledger Nano S offers convenience and ease of use. With a paper wallet, if you want to make a transaction or access your Bitcoin, you would need to manually import your private keys into a digital wallet each time. This can be a tedious and time-consuming process. With a Ledger Nano S, on the other hand, you can easily connect the device to your computer and manage your Bitcoin using the Ledger Live app. It simplifies the process of sending and receiving Bitcoin and allows you to seamlessly manage your cryptocurrency holdings.
Furthermore, transferring your Bitcoin to a Ledger Nano S gives you access to additional features and functionalities. Ledger Live, the companion app, not only allows you to manage your Bitcoin, but also supports various other cryptocurrencies. This means you can consolidate all your digital assets in one place and have a holistic view of your portfolio.
Another advantage of using a Ledger Nano S is its compatibility with third-party services and applications. Many cryptocurrency platforms and exchanges integrate with Ledger devices, allowing you to securely interact with these services using your Ledger Nano S. This opens up a world of possibilities and makes it easier to participate in various crypto activities such as trading, lending, and staking.
Lastly, transferring your Bitcoin from a paper wallet to a Ledger Nano S future-proofs your storage solution. Technology is constantly evolving, and it’s important to adapt and stay up-to-date with the latest security measures. By using a hardware wallet like the Ledger Nano S, you ensure that your Bitcoin storage is in line with current best practices and security standards.
Step 1: Set Up Your Ledger Nano S
Before transferring your Bitcoin from a paper wallet to a Ledger Nano S, you need to set up the hardware wallet properly. Follow these steps to get started:
1. Start by unpacking your Ledger Nano S and connecting it to your computer using the provided USB cable. Ensure that your computer is connected to the internet.
2. Once connected, the Ledger Nano S will display a welcome message, prompting you to press both buttons to continue. Press the buttons simultaneously to proceed.
3. Next, you will see a prompt asking you to choose a PIN for your device. Use the buttons on the Ledger Nano S to navigate through the options and select your desired PIN. Make sure to choose a PIN that is unique and difficult to guess.
4. After selecting your PIN, you will be asked to confirm it. Enter the PIN again using the buttons on the device.
5. At this stage, you will be given a recovery phrase. The recovery phrase is a set of 24 words that can be used to restore your wallet in case your Ledger Nano S is lost, stolen, or damaged. Write down the recovery phrase and store it in a safe and secure location. Be sure to keep it offline and away from prying eyes.
6. Once you have securely stored your recovery phrase, the Ledger Nano S will prompt you to confirm some of the words from the phrase to ensure that you have written them down correctly. Follow the instructions on the device to complete this verification process.
7. After confirming the recovery phrase, the Ledger Nano S will display a message indicating that the setup is complete. You are now ready to proceed with the next steps to transfer your Bitcoin from the paper wallet.
It is essential to note that the setup process may vary slightly depending on the specific model of the Ledger device and the firmware version. Therefore, it is advisable to refer to the official Ledger documentation for detailed instructions tailored to your specific device.
By completing the setup process, you have ensured that your Ledger Nano S is ready for use and equipped with the necessary security measures to protect your Bitcoin holdings.
Step 2: Ensure You Have Access to Your Paper Wallet
Before transferring your Bitcoin from a paper wallet to a Ledger Nano S, it is crucial to ensure that you have easy and secure access to your paper wallet’s private key. Follow these steps to confirm your access:
1. Locate your paper wallet: Retrieve the physical paper wallet where you have recorded your Bitcoin address and private key. This can be a printed sheet of paper or any medium where you have securely stored the information.
2. Keep the paper wallet secure: Ensure that the paper wallet is in a safe and controlled environment. Protect it from potential damage, loss, or unauthorized access. Consider locking it in a secure location such as a safe or a safety deposit box.
3. Verify the private key: Double-check that you can accurately read and interpret the private key written on your paper wallet. It is essential to ensure that you have correctly transcribed the key to prevent any errors during the process of transferring the Bitcoin.
4. Test the private key: To validate that the private key is functioning correctly, you may perform a test transaction where you send a small amount of Bitcoin to a different wallet. This test will verify that you can successfully access and control the Bitcoin linked to that paper wallet.
5. Safely store the private key: Once you have confirmed that you can access your Bitcoin using the private key on the paper wallet, securely store the paper wallet and keep it separate from your Ledger Nano S. This ensures that you have a backup in case anything goes wrong during the transfer process.
It is essential to exercise caution and adhere to security best practices when handling your paper wallet’s private key. Treat it with the same level of care and security as you would with physical cash or valuable documents.
By verifying that you have easy and secure access to your paper wallet’s private key, you can proceed with confidence to the next steps of transferring your Bitcoin to the Ledger Nano S.
Step 3: Download the Ledger Live App
In order to transfer your Bitcoin from a paper wallet to a Ledger Nano S, you will need to download and install the Ledger Live app. Follow these steps to get started:
1. Visit the official Ledger website: Go to the official website of Ledger (www.ledger.com) using a web browser on your computer.
2. Navigate to the Downloads page: Find the Downloads page on the Ledger website. This page typically provides links to download the Ledger Live app for different operating systems, such as Windows, Mac, or Linux.
3. Choose the appropriate version: Select the correct version of the Ledger Live app for your operating system. Make sure to download the latest version to ensure you have access to all the latest features and security updates.
4. Start the download: Click on the download link for the Ledger Live app, and the file will begin downloading to your computer. The download time may vary depending on your internet speed.
5. Install the app: Once the download is complete, locate the downloaded file and initiate the installation process. Follow the on-screen instructions to install the Ledger Live app on your computer. You may need to grant administrative permissions during the installation process.
6. Launch the Ledger Live app: After the installation is complete, locate the Ledger Live app on your computer and open it. The app may require an internet connection to establish a secure connection with your Ledger Nano S.
7. Connect your Ledger Nano S: Connect your Ledger Nano S to your computer using the provided USB cable. Ensure that your Ledger Nano S is powered on and unlocked by entering your PIN.
8. Complete the device setup: If prompted by the Ledger Live app, follow the on-screen instructions to complete the setup process. This typically includes confirming the firmware version and validating your device’s authenticity.
9. Sync your Ledger Nano S: Once your Ledger Nano S is connected and set up, the Ledger Live app will sync with your device to retrieve the necessary information to manage your Bitcoin accounts.
By downloading and installing the Ledger Live app, you are now ready to proceed with the next steps of importing your paper wallet and transferring your Bitcoin to your Ledger Nano S.
Step 4: Connect Your Ledger Nano S to Your Computer
In order to transfer your Bitcoin from a paper wallet to your Ledger Nano S, you need to establish a connection between the hardware wallet and your computer. Follow these steps to connect your Ledger Nano S:
1. Plug in the USB cable: Take the USB cable that came with your Ledger Nano S and connect one end to the USB port on your computer. The other end should be plugged into the USB port on your Ledger Nano S.
2. Power on your Ledger Nano S: Press the button on the Ledger Nano S to power it on. You will see the Ledger logo displayed on the device’s screen, indicating that it is ready for connection.
3. Unlock your Ledger Nano S: If prompted, enter your PIN code using the device’s buttons to unlock your Ledger Nano S. The device may ask for your PIN as a security measure before establishing the connection.
4. Allow USB access: On your Ledger Nano S, you may see a message asking if you want to allow the computer to access the device. Use the buttons to select “Allow” and confirm the connection.
5. Open the Ledger Live app: Launch the Ledger Live app on your computer. Once opened, the app will detect the Ledger Nano S and establish a secure connection between the device and the app.
6. Follow on-screen instructions: Depending on the setup and your device’s firmware version, you may be prompted to update the firmware or install the Bitcoin app on your Ledger Nano S. Follow the on-screen instructions provided by the Ledger Live app to complete any necessary steps.
7. Verify connection status: Once your Ledger Nano S is connected and recognized by the Ledger Live app, you should see the device listed and a confirmation message that it is successfully connected.
By connecting your Ledger Nano S to your computer, you have established a secure communication channel to transfer your Bitcoin from the paper wallet to your hardware wallet. Proceed to the next steps in order to complete the process.
Step 5: Set Up a New Account on Ledger Live
In order to transfer your Bitcoin from a paper wallet to your Ledger Nano S, you need to set up a new account on the Ledger Live app. Follow these steps to create a new account:
1. Launch the Ledger Live app: Open the Ledger Live app on your computer. Ensure that your Ledger Nano S is connected and unlocked.
2. Click on “Add Account”: In the Ledger Live app, locate and click on the “Add Account” button. This will prompt the app to guide you through the process of adding a new account.
3. Choose “Bitcoin” as the account type: From the list of supported cryptocurrencies, select “Bitcoin” as the account type. If you have a different cryptocurrency on your paper wallet, choose the corresponding option.
4. Select the derivation path: Ledger Live will present you with a list of derivation paths for your Bitcoin account. In most cases, the default option should be sufficient. If you are unsure, you can consult the official Ledger documentation or select the default path.
5. Confirm the account creation: Review the details of the new account and click on the “Create Account” button to proceed. Ledger Live will generate a new Bitcoin address associated with your Ledger Nano S.
6. Copy or write down the Bitcoin address: Once the account is created, Ledger Live will display the newly generated Bitcoin address. Copy the address or write it down securely, as you will need it to import your Bitcoin from the paper wallet.
7. Repeat the process if necessary: If you have multiple paper wallets or want to create additional accounts for different purposes, you can repeat steps 2 to 6 for each account you wish to set up.
By setting up a new account on Ledger Live, you have created a dedicated space to manage your Bitcoin on the Ledger Nano S. This account will be used to import your Bitcoin from the paper wallet in the subsequent steps.
Step 6: Import Your Paper Wallet to Ledger Live
To transfer your Bitcoin from a paper wallet to your Ledger Nano S, you need to import the paper wallet into Ledger Live. Follow these steps to import your paper wallet:
1. Open the Ledger Live app: Launch the Ledger Live app on your computer. Ensure that your Ledger Nano S is connected and unlocked.
2. Select the Bitcoin account: In the Ledger Live app, click on the Bitcoin account that you created in the previous step. This is the account where you want to import your Bitcoin from the paper wallet.
3. Click on “Receive”: In the Bitcoin account view, click on the “Receive” button. This will display the Bitcoin address associated with your Ledger Nano S.
4. Choose the import method: In the “Receive” section, you will see different import methods. Select the appropriate method for importing a wallet, which is usually labeled as “Import wallet” or “Advanced options”.
5. Import your paper wallet: Follow the on-screen instructions provided by the Ledger Live app to import your paper wallet. This typically involves entering or scanning the private key associated with your paper wallet.
6. Validate the import: After entering the private key, Ledger Live will validate the key and verify that it corresponds to the Bitcoin address associated with your Ledger Nano S. This is done to ensure that the funds are transferred to the correct account.
7. Confirm the transfer: Once the import is validated, Ledger Live will ask you to confirm the transfer of funds from the paper wallet to your Ledger Nano S. Carefully review the details of the transaction and click on the “Confirm” button to proceed.
8. Wait for the transfer to complete: Ledger Live will initiate the transfer of the Bitcoin from the paper wallet to your Ledger Nano S. The time required for the transfer to complete may vary depending on network congestion and transaction processing speed. Be patient and do not interrupt the process.
9. Verify the transfer: After the transfer is complete, check the transaction history in Ledger Live to confirm that the Bitcoin has been successfully imported from the paper wallet to your Ledger Nano S. The balance should reflect the transferred amount.
By following these steps and importing your paper wallet into Ledger Live, you have successfully transferred your Bitcoin from the paper wallet to your Ledger Nano S. Your Bitcoin is now securely stored on your hardware wallet, providing enhanced security and peace of mind.
Step 7: Transfer Bitcoin from Paper Wallet to Ledger Nano S
Now that your paper wallet has been imported into Ledger Live, it’s time to transfer your Bitcoin from the paper wallet to your Ledger Nano S. Follow these steps to complete the transfer:
1. Open the Ledger Live app: Launch the Ledger Live app on your computer. Ensure that your Ledger Nano S is connected and unlocked.
2. Select the Bitcoin account: In the Ledger Live app, click on the Bitcoin account that you imported the paper wallet into. This is the account that currently holds your Bitcoin.
3. Click on “Send”: In the Bitcoin account view, click on the “Send” button. This will prompt Ledger Live to guide you through the process of sending your Bitcoin.
4. Enter the receiving address: In the “Send” section, enter the Bitcoin address of your Ledger Nano S. You can obtain this address by clicking on the “Receive” button in the Ledger Live app and copying the address.
5. Enter the amount: Specify the amount of Bitcoin you want to transfer from the paper wallet to your Ledger Nano S. Make sure to double-check the amount to avoid any errors.
6. Review the details: Ledger Live will display a summary of the transaction, including the recipient address, the amount to be sent, and the transaction fee. Take a moment to review all the details for accuracy.
7. Confirm the transfer: Once you have verified the transaction details, click on the “Confirm” or “Send” button to initiate the transfer. This will notify Ledger Live to generate and broadcast the transaction to the Bitcoin network.
8. Wait for confirmation: The time required for the transaction to be confirmed and added to the blockchain may vary. You can track the progress of the transaction within Ledger Live or use a blockchain explorer to monitor its status. Once confirmed, the Bitcoin will be transferred from the paper wallet to your Ledger Nano S.
9. Check the Ledger Nano S balance: After the transaction is confirmed, check the balance in your Ledger Live app to ensure that the transferred Bitcoin is reflected in your Ledger Nano S account.
By following these steps, you have successfully transferred your Bitcoin from the paper wallet to your Ledger Nano S. Your Bitcoin is now securely stored on your hardware wallet, providing you with full control and enhanced security for your digital assets.
Step 8: Confirm the Transaction on Your Ledger Nano S
After initiating the transaction to transfer your Bitcoin from the paper wallet to your Ledger Nano S using Ledger Live, you will need to confirm the transaction on your Ledger Nano S device. Follow these steps to complete the confirmation process:
1. Check the Ledger Live app: Once you have submitted the transaction in Ledger Live, check the app for any on-screen instructions or prompts. It may display a message indicating that you need to confirm the transaction on your Ledger Nano S device.
2. Take your Ledger Nano S: Pick up your Ledger Nano S and ensure that it is unlocked and powered on.
3. Open the Bitcoin app: Navigate to the Bitcoin app on your Ledger Nano S. If you have multiple cryptocurrency apps installed, you may need to locate and open the Bitcoin app specifically.
4. Confirm the transaction details: On the Ledger Nano S device, you will see a message or prompt displaying the transaction details, such as the recipient address, the amount to be sent, and the transaction fee. Take the time to carefully review the details to ensure they match the transaction you initiated in Ledger Live.
5. Verify and approve: After confirming the transaction details, use the buttons on your Ledger Nano S to verify and approve the transaction. Typically, you need to press a button or combination of buttons, such as the right or left buttons, to provide your consent for the transaction to proceed.
6. Wait for the confirmation: After confirming the transaction on your Ledger Nano S, the device will process the transaction and securely sign it with your private key. This may take a few moments as the device generates a digital signature.
7. Ledger Live updates: Once the transaction is confirmed and signed by your Ledger Nano S, Ledger Live will receive the signed transaction and broadcast it to the Bitcoin network. As the transaction gets included in the blockchain and confirmed by the network, Ledger Live will update the transaction status accordingly.
8. Record the transaction details: As an additional security measure, consider recording the transaction details, such as the transaction ID or hash, date, and amount sent. These details can be useful for future reference or in case there are any questions or issues with the transaction.
By confirming the transaction on your Ledger Nano S, you have ensured that the transfer of Bitcoin from the paper wallet to your hardware wallet is securely authorized. You can now proceed to the final step to verify the arrival of your transferred Bitcoin.
Step 9: Check Your Ledger Live Account for the Transferred Bitcoin
After successfully transferring your Bitcoin from the paper wallet to your Ledger Nano S and confirming the transaction, it’s important to check your Ledger Live account to ensure that the transferred Bitcoin has arrived. Follow these steps to verify the arrival of your Bitcoin:
1. Open the Ledger Live app: Launch the Ledger Live app on your computer. Make sure that your Ledger Nano S is connected and unlocked.
2. Select the Bitcoin account: In the Ledger Live app, choose the Bitcoin account where you transferred the Bitcoin from the paper wallet.
3. Check the balance: Within the Bitcoin account view, you should see the updated balance reflecting the transferred Bitcoin. It may take some time for the balance to update, especially if the transaction is still being confirmed by the Bitcoin network.
4. Verify transaction status: Review the transaction history within the Ledger Live app to confirm that the transferred Bitcoin transaction is recorded. You should see the transaction with details like the date, time, amount sent, and transaction ID.
5. Monitor confirmations: If the transaction is still being confirmed by the Bitcoin network, you can monitor the number of confirmations in the transaction details. Each confirmation adds another layer of security, indicating that the transaction is being accepted and validated by the network.
6. Use a blockchain explorer (optional): If you want to obtain more detailed information about the transaction, you can use a blockchain explorer. Copy the transaction ID from the Ledger Live app and search for it on a blockchain explorer website. This will allow you to view the transaction details, including the status, block height, and other relevant information.
7. Double-check the recipient address: It’s important to confirm that the recipient address displayed in the transaction details matches the Bitcoin address of your Ledger Nano S. This ensures that the Bitcoin has been successfully transferred to the intended destination.
8. Store proof of transaction (optional): For future reference or record-keeping purposes, you may want to store proof of the transaction. This can include taking screenshots or saving the transaction details, such as the transaction ID and date.
By checking your Ledger Live account for the transferred Bitcoin, you can ensure that the transaction was successful and that the Bitcoin is securely stored on your Ledger Nano S. Now you can enjoy the peace of mind knowing that your cryptocurrency is safely in your control.