
Choosing the Right Camera Settings
When it comes to capturing photos while recording video on your iPhone, choosing the right camera settings is crucial. This will ensure that you capture the best quality photos without compromising the video footage. Here are some key settings to consider:
- Resolution: Select the highest resolution available on your iPhone, such as 4K or 1080p, to ensure maximum detail in both the video and photos.
- Frame Rate: Set your desired frame rate, depending on the smoothness of motion you want in your video. Keep in mind that higher frame rates require more storage space.
- Aspect Ratio: Choose the aspect ratio that best suits your needs. The most common options are 16:9 for widescreen and 4:3 for standard photos.
- Video Stabilization: Enable the built-in optical or electronic stabilization feature of your iPhone to minimize blur caused by shaky hands or movement while capturing photos and recording video simultaneously.
- Exposure: Adjust the exposure settings to control the brightness of both the video and photos. In well-lit environments, you may not need to make any adjustments, but in low-light situations, consider increasing the exposure to avoid dark or underexposed photos.
- White Balance: Set the white balance based on the lighting conditions. The auto white balance option generally works well in most situations, but you can also adjust it manually for more accurate colors.
Remember that the specific camera settings may vary slightly depending on the model and iOS version of your iPhone. It is essential to familiarize yourself with your device’s camera settings and experiment with different combinations to find the optimal configuration that suits your needs.
Understanding the Photo Settings in Video Mode
When using your iPhone to record video and capture photos simultaneously, it’s essential to understand the photo settings available in video mode. These settings allow you to fine-tune your photos while ensuring a seamless transition between capturing video and taking pictures. Here are the key photo settings to be aware of:
- Live Photos: Enable the Live Photos feature to capture a short video clip along with your photo. This adds a dynamic element to your images and allows you to relive the moment when viewing them later.
- HDR: High Dynamic Range (HDR) combines multiple exposures to create a well-balanced photo, particularly in challenging lighting conditions. Consider enabling HDR to enhance the overall quality and detail of your photos.
- Grid: Activate the grid overlay on your camera screen to help compose your shots more effectively. The grid follows the rule of thirds, which assists in achieving better composition and balanced images.
- Flash: While recording video, the flash is typically disabled by default. However, you can manually enable the flash for photos if needed, especially in low-light scenarios.
- Burst Mode: Burst mode allows you to capture a series of photos in rapid succession by holding down the shutter button. This feature is useful for capturing fast-moving subjects or ensuring that you get the perfect shot during dynamic video recordings.
- Timer: Sometimes, you may want to delay the photo capture when recording video. You can use the timer function to set a specific time delay, giving you enough time to compose yourself or strike the perfect pose.
Understanding these photo settings in video mode will enable you to make quick adjustments and capture stunning photos while recording videos on your iPhone. Experimenting with different combinations of these settings can help you unleash your creativity and take your smartphone photography to the next level.
Taking Photos during Video Recording
One of the great features of the iPhone is the ability to take photos while recording video. This allows you to capture still moments amidst a video recording without interrupting the flow. Here’s how you can take photos during video recording:
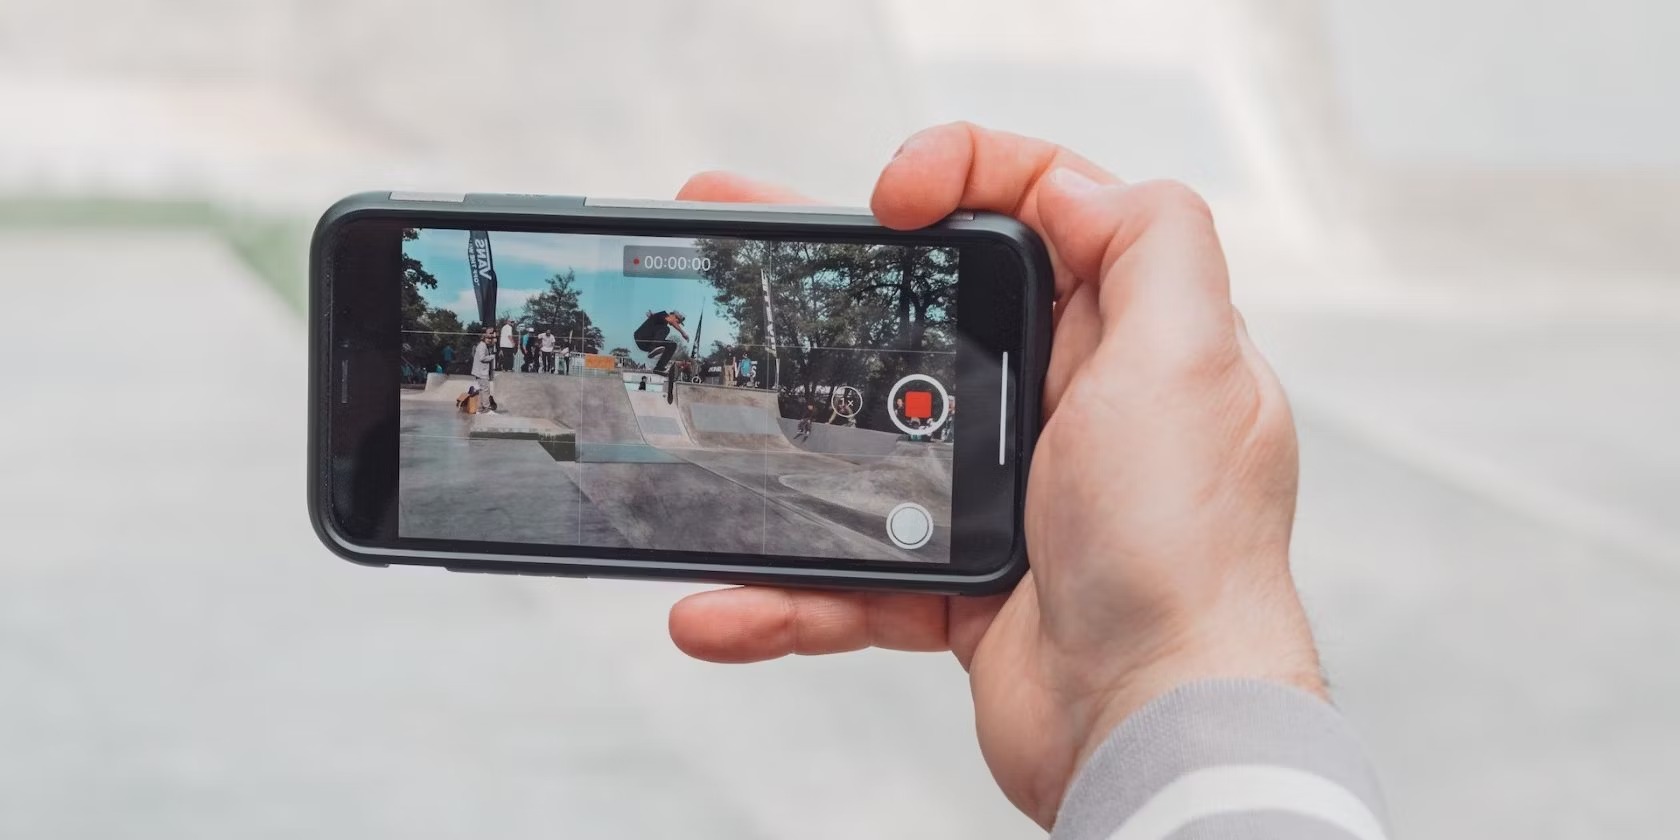
1. Start Recording: Open the camera app on your iPhone and switch to video mode. Begin recording the video by tapping the record button.
2. Capture a Photo: While the video is recording, look for the shutter button on the screen. It appears as a white circle or camera icon. Tap the shutter button to capture a photo without stopping the video recording.
3. Timing is Key: Since photos are taken in real-time during video recording, it’s important to time your shots carefully. Anticipate the moment you want to capture and tap the shutter button at the right moment to ensure you capture the desired photo.
4. Focus and Exposure: The iPhone’s autofocus and exposure settings work simultaneously when capturing photos during video recording. Simply tap on the screen to adjust the focus and exposure on your desired subject.
5. Multiple Shots: You can take multiple photos while recording a video by tapping the shutter button multiple times. This is particularly useful when you want to capture several shots in quick succession.
6. Disable Auto-Review: By default, the iPhone displays a preview of the photo right after taking it. To disable this auto-review feature, go to the settings app on your iPhone and navigate to the Camera settings. Toggle off “Review Captured Content” to prevent the interruption of the video recording.
Remember, capturing photos during video recording allows you to capture spontaneous moments without missing a beat. With practice and a keen eye, you can master the art of capturing stunning photos while seamlessly recording videos on your iPhone.
Using the Burst Mode Feature
When it comes to capturing fast-moving action or ensuring you get the perfect shot while recording a video on your iPhone, the Burst Mode feature comes in handy. Burst Mode allows you to take a series of photos in rapid succession with just a single press of the shutter button. Here’s how you can make the most of the Burst Mode feature:
1. Enable Burst Mode: To activate Burst Mode, open the camera app on your iPhone and switch to photo mode. Keep your finger pressed on the shutter button, and you’ll notice the camera rapidly capturing a series of photos.
2. Capture Action: Burst Mode is particularly useful when capturing action shots, sports events, or any fast-paced scene. It ensures you don’t miss the perfect moment, as it captures multiple frames in a fraction of a second.
3. Review and Select: After capturing a burst of photos, you’ll see a thumbnail strip at the bottom of the screen. Tap on the thumbnail strip, and you’ll be presented with a preview of the burst sequence. Swipe left or right to browse through the photos and select the ones you want to keep.
4. Best Photo Selection: The iPhone’s intelligent image processing software is designed to help you choose the best photo from the burst sequence. When you select a burst, the iPhone automatically analyzes and suggests the photo it considers to be the sharpest and best composed. However, you have the freedom to manually select your favorite shots based on your personal preferences.
5. Delete Unused Photos: Burst Mode captures many photos in a short amount of time, which can result in a large number of images to review. To free up storage space and keep your photo library organized, make sure to delete the photos you do not need from the burst sequence.
Using the Burst Mode feature allows you to capture action-packed moments with precision and ensure you get the perfect shot. Whether you’re documenting a thrilling event or photographing a moving subject, Burst Mode on your iPhone is a valuable tool to have in your photography arsenal.
Adjusting Focus and Exposure
When capturing photos while recording video on your iPhone, adjusting the focus and exposure settings is crucial to ensure your images come out sharp, clear, and well-exposed. Here’s how you can fine-tune these settings to enhance your photos:
1. Tap to Focus: To adjust the focus, tap on the area of the screen where you want to bring sharpness and clarity. The camera will automatically adjust the focus based on your touch. This feature is especially useful when you have a specific subject in mind that you want to highlight in your photo.
2. Manual Focus Control: If you want more control over the focus, you can activate the manual focus function on your iPhone. This is particularly useful in situations where the automatic focus may struggle, such as shooting through glass or capturing small subjects. To activate manual focus, tap on the screen and hold your finger until the “AE/AF Lock” indicator appears. Drag up or down to manually adjust the focus point.
3. Exposure Compensation: Sometimes, the automatic exposure may not accurately capture the lighting conditions of your scene. To adjust the exposure manually, tap on the area of the screen that contains the subject you want to expose properly. You’ll see a small sun icon appear next to the focus box. Swipe up or down to increase or decrease the exposure level. This is particularly helpful when you have a high-contrast scene or want to achieve a specific exposure effect.
4. AE/AF Lock: The AE/AF (Auto Exposure/Auto Focus) Lock feature allows you to lock the exposure and focus settings so that they remain constant while you’re capturing photos and recording video. To use this feature, tap and hold on the screen until the “AE/AF Lock” indicator appears. This is useful when you want to maintain a consistent exposure and focus point, even if the scene changes slightly.
By adjusting the focus and exposure settings, you can elevate the quality and impact of your photos while recording video on your iPhone. Experiment with different focal points, exposure levels, and manual control to achieve the desired look and feel in your images.
Utilizing the Grid and Level Tools
When it comes to taking photos while recording video on your iPhone, utilizing the grid and level tools can greatly enhance the composition and balance of your images. These features provide visual guides to help you align and frame your shots more effectively. Here’s how you can make the most of the grid and level tools:
Grid: Activate the grid overlay on your camera screen by going to the Settings app on your iPhone, selecting “Camera,” and toggling on the “Grid” option. The grid divides the screen into a 3×3 grid with two horizontal and two vertical lines intersecting at four points. This follows the rule of thirds, an essential photography guideline for creating visually appealing and well-balanced compositions. By aligning your subjects or points of interest along the grid lines or at the intersections, you can achieve better balance and more engaging photos.
Level: The level tool helps you ensure that the horizon line in your photos is perfectly straight. To activate the level, open the camera app and tap on the grid icon in the top-right corner of the screen. This enables the level tool, which consists of two horizontal lines that move in real-time to indicate the straightness of the camera. When capturing photos while recording video, use the level tool to align the horizon or any other straight elements in your frame. This tool is particularly useful when capturing landscapes, architecture, or any scene where a level perspective is desired.
By utilizing the grid and level tools, you can elevate the composition and balance of your photos while recording video on your iPhone. Incorporating these visual guides into your photography workflow will help you create more visually appealing and professional-looking images.
Enhancing Photos in Post-Processing
After capturing photos while recording video on your iPhone, you can further enhance their quality and visual appeal through post-processing. Post-processing refers to the editing and adjustment of images using photo editing apps or software. Here are some post-processing techniques you can use to enhance your photos:
1. Adjust Exposure and Contrast: Fine-tune the overall exposure and contrast of your photos to enhance their brightness, shadows, and highlights. This can help bring out details and create a more visually striking image.
2. Color Correction: Adjust the colors in your photo to achieve the desired tone and mood. This can involve boosting or reducing saturation, tweaking white balance, or applying selective color adjustments.
3. Crop and Straighten: Use cropping to remove distractions and improve the composition of your photos. Additionally, you can straighten any crooked horizons or lines to give your image a more polished look.
4. Sharpen and Enhance Details: Apply sharpening techniques to enhance the fine details in your photos. This can make your subject appear crisper and more defined.
5. Apply Filters and Presets: Experiment with different filters and presets to add unique styles and effects to your photos. These can range from vintage looks to modern and vibrant aesthetics.
6. Remove Unwanted Elements: Utilize the clone or healing tool to remove any unwanted elements, such as blemishes, distractions, or objects that may have unintentionally appeared in your photo.
7. Fine-Tune Composition: Adjust the framing and composition of your photos by cropping or selectively resizing specific elements. This can help emphasize your subject or improve the overall balance and visual flow.
There are many photo editing apps and software available for your iPhone that offer a wide range of editing tools and capabilities. Explore and experiment with different applications to find the one that best suits your needs and style.
Remember, post-processing should be used to enhance your images, not to drastically alter them. Aim for a natural and balanced look that represents your vision while maintaining the integrity of the original scene.
Tips for Capturing Great Photos While Recording Video
When it comes to capturing photos while recording video on your iPhone, a few tips can help you achieve exceptional results. Here are some valuable tips to keep in mind:
1. Plan Ahead: Before you start recording, visualize the shots you want to capture and plan your composition. Keep in mind the key elements you want to highlight in your photos and position yourself accordingly.
2. Timing is Key: Anticipate the right moment to take a photo within the video recording. Pay attention to the movement and actions of your subject to capture the most engaging and impactful shots.
3. Use the Rule of Thirds: Frame your shots using the rule of thirds. Imagine dividing the frame into a 3×3 grid, and position your subject or points of interest along the gridlines or at the intersections. This creates visually pleasing compositions.
4. Experiment with Angles and Perspectives: Move around and try different angles and perspectives to add depth and visual interest to your photos. Explore high and low angles, get close-ups, or capture unique viewpoints.
5. Focus and Recompose: If your subject moves within the frame, tap on it to ensure it remains in focus. You can then recompose your shot while maintaining the focus on the subject.
6. Capture Details: Don’t forget to capture close-up shots of details that add significance to the story or scene. These details can provide context and enrich your visual storytelling.
7. Utilize Natural Light: Whenever possible, take advantage of natural light, as it can bring out the best in your photos. Avoid using the camera’s flash, as it can be too harsh and create unnatural lighting.
8. Experiment with Different Settings: Explore different camera settings, such as portrait mode, panoramic mode, or different filters, to add variety and creativity to your photos while recording video.
9. Keep the Camera Steady: To avoid blurry photos, stabilize your camera by holding it steady or using a tripod. This becomes even more important when capturing photos during video recording.
Remember, practice and experimentation are key to improving your photography skills. Take the time to understand your iPhone’s camera settings, and don’t be afraid to try different techniques to achieve the desired results. Happy shooting!
Troubleshooting Common Issues
While capturing photos while recording video on your iPhone is a fantastic feature, you may encounter some common issues along the way. Here are some troubleshooting tips to help you overcome these challenges:
1. Blurry Photos: Blurriness can occur if your hand shakes while capturing a photo during video recording. To minimize blurriness, hold your iPhone steady and consider using a tripod or stabilizing device.
2. Overexposed or Underexposed Photos: If your photos appear too bright or dark, adjust the exposure manually by tapping on the screen and swiping up or down to increase or decrease the exposure level. Take multiple shots with different exposure settings to ensure you capture the desired level of brightness.
3. Out-of-Focus Photos: If your subject appears blurry or out of focus, tap on the screen to set the focus point explicitly on your subject. Be mindful of any movement or changes in distance between you and the subject, and adjust the focus accordingly.
4. Limited Storage Space: Capturing photos while recording video can quickly consume storage on your iPhone. Make sure you have sufficient storage available by regularly transferring or deleting unnecessary files. Consider using cloud services or external storage solutions to expand your storage capacity.
5. Unintentional Camera Shake: While tapping the shutter button during video recording, it’s common for the camera to shake, resulting in blurry photos. To avoid this, use the volume buttons on your iPhone or the volume up button on your headphones as a remote shutter release. This allows you to capture photos without physically touching the screen.
6. Unwanted Noise: In certain environments, you may encounter unwanted noise or interference in your photos. To minimize noise, ensure you’re in a well-lit area or use the camera’s flash if necessary. Additionally, you can edit photos in post-processing to reduce noise or apply noise reduction techniques in photo editing apps.
7. Poor Composition: If you’re struggling with composition and framing, use the grid tool available on your iPhone to guide your placement of subjects and objects. This helps you achieve balanced and visually appealing compositions.
By keeping these troubleshooting tips in mind, you can overcome common issues and consistently capture high-quality photos while recording video on your iPhone. Don’t hesitate to experiment with different techniques and settings to find the best solutions for your specific situations.