Factors Affecting Video Recording on an iPhone
When it comes to capturing high-quality videos on an iPhone, several factors can impact the recording capabilities. Understanding these factors can help you optimize your video recording experience. Let’s dive into the key factors that affect video recording on an iPhone.
1. Storage Capacity: One of the most critical factors is the available storage capacity on your iPhone. Video files can consume a significant amount of storage space, so it’s essential to have enough free space to record and store your videos. Regularly backing up and deleting unnecessary files can help maintain sufficient storage.
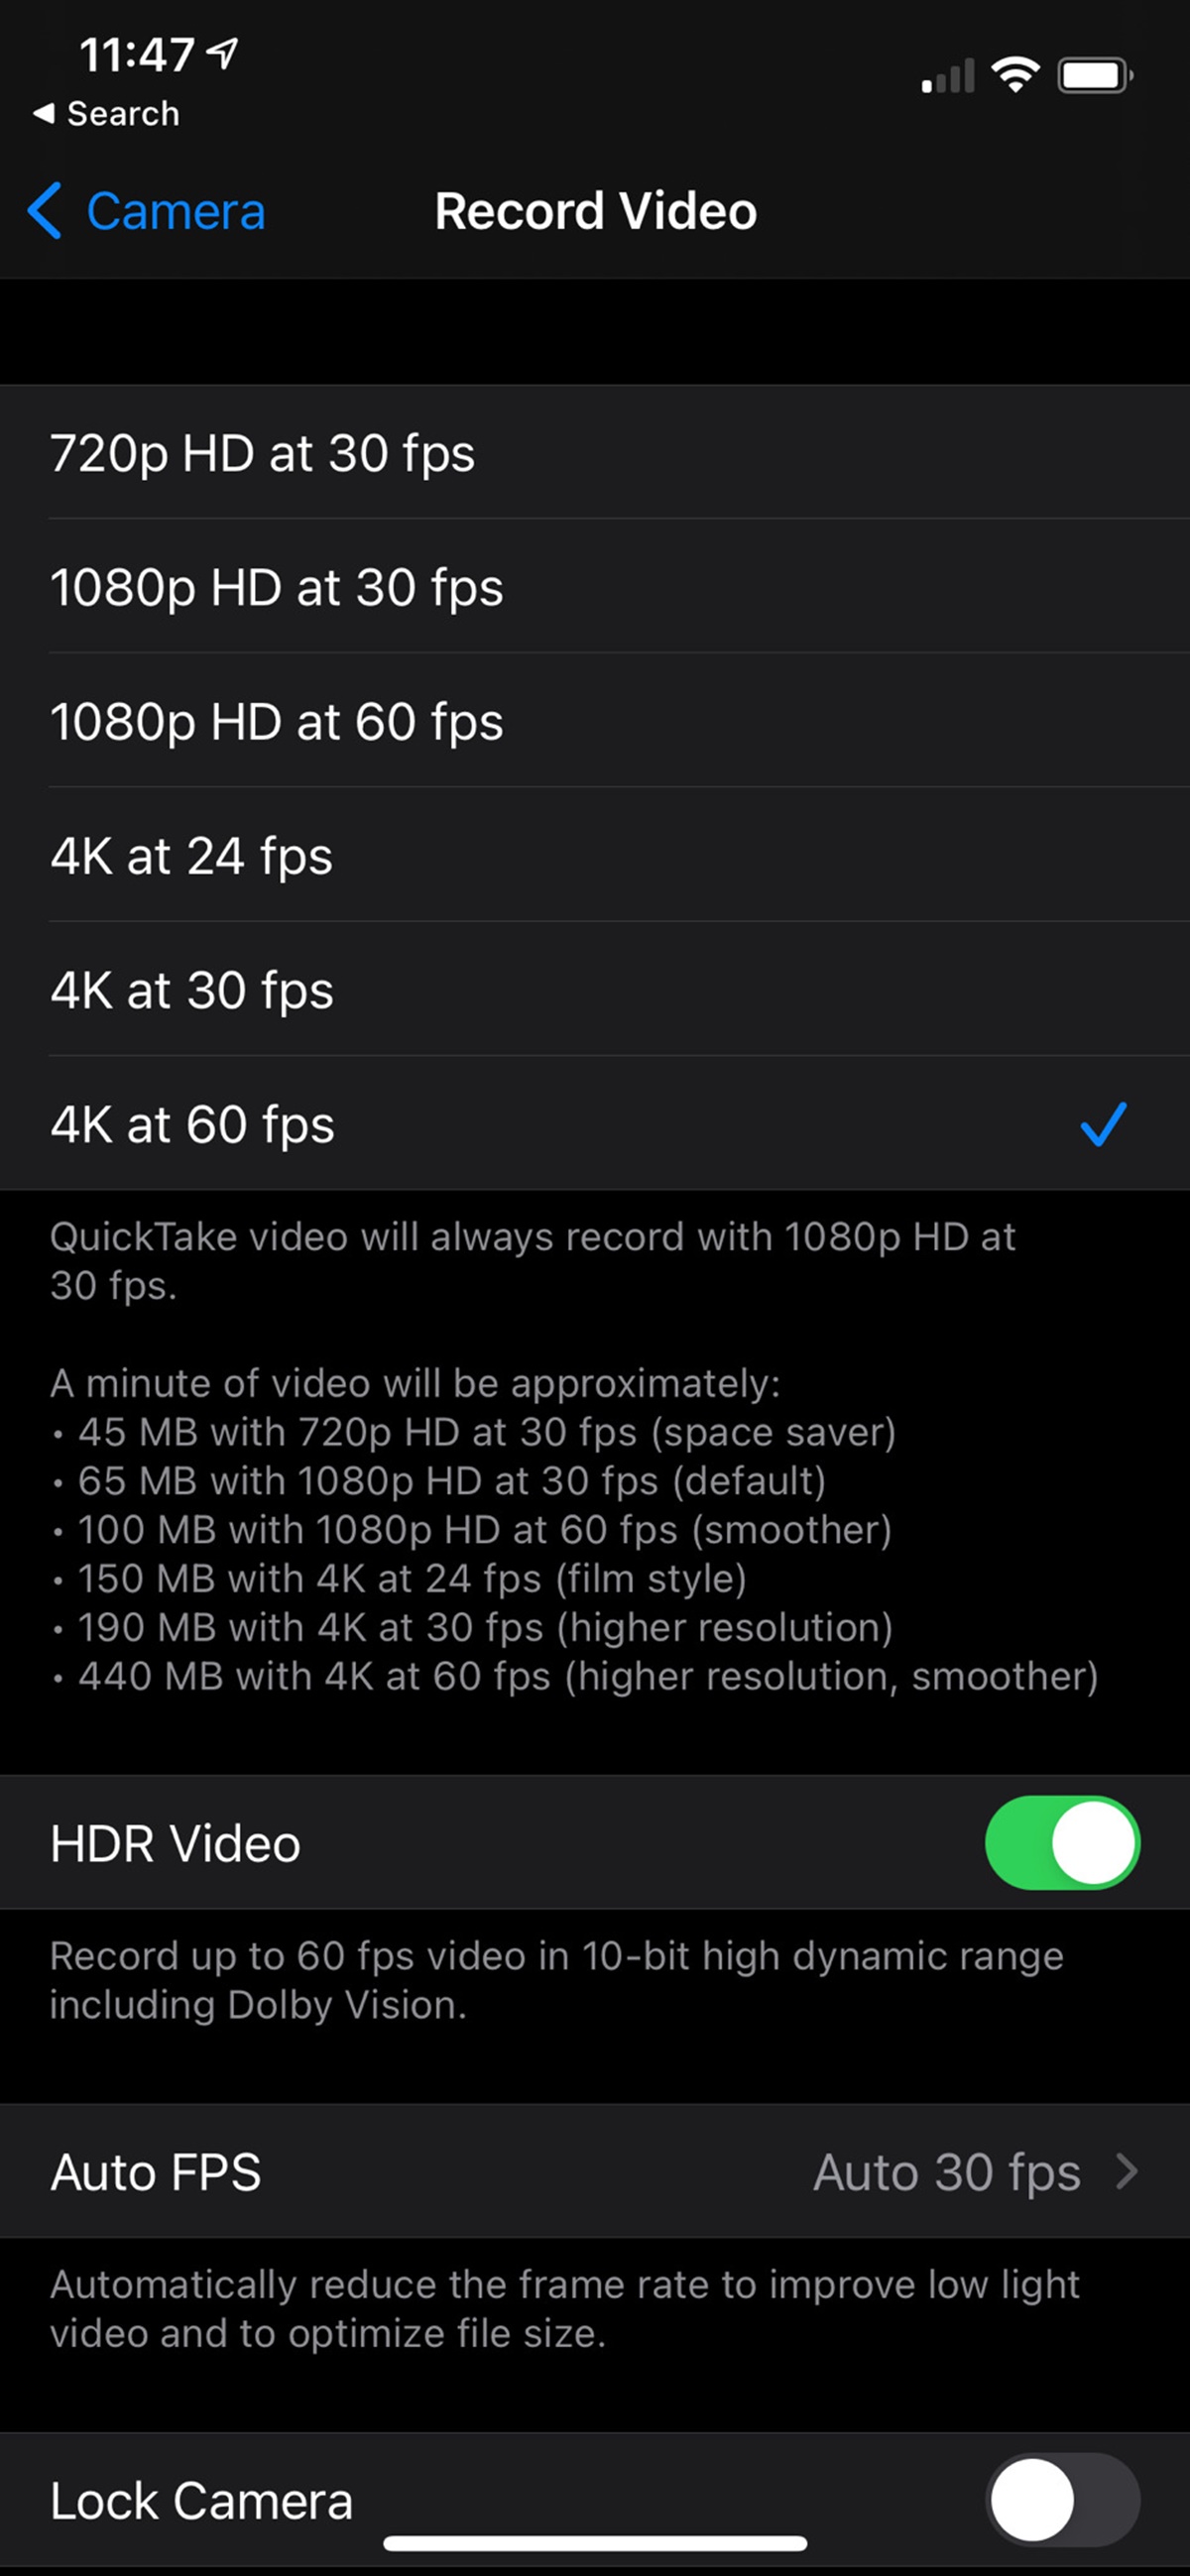
2. Video Recording Settings: The video recording settings on an iPhone can also influence the length and quality of your videos. Higher video resolutions, such as 4K or 1080p, may result in larger file sizes and shorter recording times. Adjusting the settings based on your needs and storage limitations can help you strike a balance between video quality and recording duration.
3. Recording Time for Different Video Qualities: The length of video you can record on an iPhone varies depending on the selected video quality. For example, a 64 GB iPhone can record approximately 40 minutes of 4K video at 30fps, but it can record up to 3 hours of 720p video at the same frame rate. Understanding the trade-off between video quality and recording time is crucial in planning your recording sessions.
4. Recording Limitations on Older iPhone Models: Older iPhone models may have recording limitations due to hardware constraints. For instance, some older models have a maximum video recording resolution of 1080p or lower. If you’re using an older device, it’s essential to consider its capabilities and adjust your expectations accordingly.
5. Tips to Optimize Video Recording on an iPhone: To make the most of your iPhone’s video recording capabilities, keep these tips in mind. Close unnecessary apps, disable unnecessary features like Bluetooth or Wi-Fi, and ensure your iPhone has sufficient battery life. Additionally, capturing videos in well-lit environments with a stable hand can enhance the overall video quality.
Considering these factors and following the optimization tips can help you make informed decisions when it comes to recording videos on your iPhone. By understanding the limitations and capabilities of your device, you can ensure a smooth and enjoyable video recording experience.
iPhone Storage Capacity
The storage capacity of your iPhone plays a crucial role in determining how much video you can record. The available storage space on your device directly impacts the number of videos you can capture and store without running out of memory. Let’s explore the relationship between iPhone storage capacity and video recording capabilities.
Each iPhone model comes with a specific storage capacity, ranging from 16GB to 512GB or more. However, keep in mind that not all of the listed capacity is available for regular use. The operating system and pre-installed apps consume a portion of the storage, leaving you with less space for your own files, including videos.
When recording videos on your iPhone, the file sizes can vary depending on factors such as video resolution, frame rate, and compression settings. Higher-quality videos, such as those recorded in 4K or at higher frame rates, generally result in larger file sizes. This means that you will be able to record fewer minutes of video if you have limited storage capacity.
It’s important to regularly check your iPhone’s available storage and manage it effectively to avoid running out of space while recording videos. If your device is running low on storage, you may experience performance issues, including choppy video recording or even the inability to record videos altogether.
To optimize your iPhone’s storage capacity, consider these tips:
- Regularly delete unnecessary files and apps to free up space.
- Offload unused apps, which removes the app from your device but retains the data, allowing you to reinstall it later without losing any information.
- Enable iCloud Photo Library or other cloud storage options to automatically back up your photos and videos and free up space on your device.
- Transfer your videos to a computer or external storage device to create more space on your iPhone.
By managing your iPhone’s storage effectively, you can ensure that you have enough space to record and store videos without any interruptions. It’s recommended to regularly evaluate your storage usage and adopt practices that optimize the available space. Whether you have a 16GB or 512GB iPhone, taking control of your device’s storage capacity will enable you to make the most of its video recording capabilities.
Different Video Recording Settings on an iPhone
When recording videos on your iPhone, you have the option to customize various settings to achieve the desired quality and file size. Understanding these settings can help you make informed decisions when capturing videos. Let’s explore the different video recording settings available on an iPhone.
1. Video Resolution: One of the primary settings to consider is the video resolution. The iPhone offers different resolution options, including 720p, 1080p, and even 4K. Higher resolutions provide more detailed and sharper videos but result in larger file sizes. If you have limited storage space or do not require maximum details, choosing a lower resolution can help you save storage and maintain smooth recording.
2. Frame Rate: Another important setting is the frame rate, which determines how many frames per second (fps) are captured in the video. The iPhone typically supports frame rates of 30fps and 60fps. Higher frame rates result in smoother motion but may increase the file size. Consider the nature of the content you’re recording and your desired playback experience when selecting the frame rate.
3. Compression: Compression settings influence the file size of your videos. The iPhone automatically applies compression to video files to reduce their size while maintaining acceptable quality. However, some apps or third-party video recording options allow you to adjust the compression level manually. Keep in mind that higher compression can result in some loss of video quality, so finding the right balance is crucial.
4. Video Stabilization: If you tend to capture videos while moving or in less stable conditions, enabling video stabilization can help reduce shakiness and improve the overall video quality. The iPhone utilizes optical image stabilization (OIS) and digital image stabilization (DIS) techniques to create smoother footage. However, note that video stabilization may slightly crop the frame or affect the overall field of view.
5. Additional Settings: Depending on your iPhone model and iOS version, you might have access to additional video recording settings. These might include adjusting exposure levels, enabling HDR (High Dynamic Range), or choosing different focus or metering options. Exploring these settings and experimenting with them can help you achieve desired results in specific shooting scenarios.
Every video recording setting on an iPhone has its own trade-offs between quality and file size. It’s essential to consider the available storage space, the subject of your videos, and your intended use to determine the optimal settings for each recording session. By familiarizing yourself with these settings, you can maximize the potential of your iPhone’s video recording capabilities and capture videos that meet your needs and preferences.
Recording Time for Different Video Qualities
The video quality you choose when recording on your iPhone affects not only the visual appeal of your videos, but also the amount of storage space they occupy and the duration of your recordings. Let’s explore how different video qualities impact the recording time on an iPhone.
1. 4K Video: Recording videos in 4K resolution offers the highest level of detail and clarity. However, the trade-off is larger file sizes and shorter recording times. On an iPhone with ample storage, you can record approximately 10 minutes of 4K video at 30 frames per second (fps) for every 1GB of space available. This means that a 64GB iPhone can store roughly 6-7 hours of 4K footage if no other apps or files are taking up space.
2. 1080p Full HD Video: Choosing 1080p resolution strikes a balance between good video quality and reasonable file sizes. At 30fps, you can expect to capture about 20 minutes of 1080p video for every 1GB of storage. This means that the same 64GB iPhone can record around 12-13 hours of Full HD video.
3. 720p HD Video: Selecting 720p resolution reduces the file sizes even further while still offering decent video quality. At 30fps, you can record approximately 40 minutes of 720p video for every 1GB of storage. Hence, a 64GB iPhone can accommodate about 25-26 hours of HD video recorded at this resolution.
Keep in mind that these estimates are rough guidelines based on average video compression rates and assume no other files or apps are taking up storage space on your iPhone. The actual recording time may vary depending on various factors such as the complexity of the scene, movement in the frame, and the amount of detail within the footage.
To optimize the recording time for your desired video quality:
- Regularly check your iPhone’s available storage and make sure you have enough space to accommodate longer recordings.
- If you plan to record extended videos, consider using external storage options, such as connecting a lightning-enabled external hard drive or using wireless storage devices.
- Consider the purpose and intended use of your recordings to determine the appropriate video quality. For casual videos or sharing on social media, lower resolutions like 720p may suffice, while high-quality projects may benefit from recording in 4K.
Understanding the recording time implications of different video qualities can help you plan and manage your video recording sessions effectively. By selecting the appropriate video quality based on your needs and storage limitations, you can capture memorable moments without running out of space.
Recording Limitations on Older iPhone Models
While iPhones offer impressive video recording capabilities, it’s important to note that older iPhone models may have certain limitations that can affect the video recording experience. Let’s explore some of the common recording limitations found on older iPhone models.
1. Maximum Video Resolution: Older iPhone models may have a maximum video recording resolution lower than the current models. For example, some older models may be limited to recording videos in 1080p or even lower resolutions. If video quality is a priority for you, it’s important to check the specifications of your specific iPhone model to understand its video recording capabilities.
2. Frame Rate Restrictions: Similarly, older iPhone models may have limitations when it comes to frame rate options. While the newer iPhones can support recording at higher frame rates such as 60fps or even 240fps for slow-motion videos, older models may only support lower frame rates like 30fps or 60fps. This can impact the smoothness and overall quality of your video recordings.
3. Storage Capacity: Older iPhone models typically come with smaller storage capacities compared to their more recent counterparts. Limited storage can significantly impact the amount of video you can record and store on your device. Depending on the available storage and video quality settings, you may find yourself with less recording time and the need to offload or delete files more frequently to free up space.
4. Hardware Limitations: The hardware components of older iPhone models may not be as advanced as the latest models, which can result in performance limitations during video recording. For example, older models may experience more heat buildup when recording for extended periods, leading to potential overheating issues and forced shutdowns.
5. Software Support: As newer versions of iOS are released, older iPhone models may lose software support for the latest features and updates. This can result in missing out on improvements to the camera software and video recording capabilities. It’s important to check if your iPhone model is compatible with the latest iOS updates to ensure the best possible video recording experience.
If you’re using an older iPhone model, it’s crucial to understand its limitations when it comes to video recording. Adjust your expectations accordingly and make the most of the available features and settings. While you may not have access to the latest video recording capabilities, you can still capture memorable moments and create impressive videos using the available resources on your device.
Tips to Optimize Video Recording on an iPhone
Recording videos on an iPhone can be a seamless and enjoyable experience when you implement a few tips to optimize the process. By following these recommendations, you can capture high-quality videos and make the most of your iPhone’s recording capabilities. Let’s explore some tips to optimize video recording on an iPhone.
1. Close unnecessary apps: Before recording a video, close any unnecessary apps running in the background. This helps free up system resources and ensures smooth video recording without any performance issues.
2. Disable unnecessary features: Disable features like Bluetooth, Wi-Fi, and cellular data when recording videos to minimize distractions and potential interruptions.
3. Ensure sufficient battery life: Check your iPhone’s battery level before recording videos and ensure it has enough charge. Video recording can be battery-intensive, so consider using a power source or portable charger for longer recording sessions.
4. Clean the camera lens: The camera lens on your iPhone can easily accumulate smudges and dirt, affecting the quality of your videos. Before recording, clean the lens with a microfiber cloth to ensure clear and sharp footage.
5. Choose a stable shooting position: To avoid shaky footage, stabilize your iPhone by using a tripod or holding it steady against a solid surface. This will result in smoother videos, especially when recording in challenging conditions or for extended periods.
6. Use lighting to your advantage: Lighting plays a crucial role in video quality. Whenever possible, capture videos in well-lit environments to ensure clarity and vibrant colors. If shooting in low-light conditions, consider using external lighting sources or the iPhone’s built-in flash to improve visibility.
7. Experiment with different angles and perspectives: Get creative with your videos by exploring different angles and perspectives. Play around with camera movements, framing, and composition to add visual interest to your footage.
8. Utilize the grid feature: Enable the grid feature on your iPhone’s camera settings. The grid lines help you align your shots, adhere to the rule of thirds, and create visually pleasing compositions.
9. Practice smooth camera movements: When panning or tilting the camera, do it slowly and smoothly to avoid jerky and jarring footage. Practice your camera movements beforehand to achieve buttery-smooth transitions between shots.
10. Take advantage of editing tools: After recording your videos, take advantage of the editing tools available on your iPhone. Trim unwanted footage, adjust brightness and saturation, add music, and apply filters to enhance the overall look and feel of your videos.
By implementing these tips and techniques, you can optimize your video recording experience on an iPhone and capture stunning videos that you’ll be proud to share with others. Whether capturing family moments or creating professional content, these tips will help you make the most of your iPhone’s recording capabilities.
Cloud Storage Options for Video Files on an iPhone
With the increasing popularity of capturing videos on iPhones, the need for efficient storage solutions has become more important. Cloud storage provides a convenient and secure way to store and access your video files without occupying precious storage space on your iPhone. Let’s explore some of the cloud storage options available for video files on an iPhone.
1. iCloud: iCloud is Apple’s cloud storage service that seamlessly integrates with iPhones and other Apple devices. It offers a variety of storage plans, allowing you to store your video files, photos, documents, and more. By enabling iCloud Photo Library, your videos will automatically upload to your iCloud account, freeing up space on your iPhone while keeping your videos accessible across all your Apple devices.
2. Google Drive: Google Drive provides cross-platform cloud storage and file backup services. You can use the Google Drive app on your iPhone to upload and store your video files. With a Google account, you get 15 GB of free storage, which can be upgraded to larger storage plans if needed.
3. Dropbox: Dropbox is a popular cloud storage service that offers seamless file synchronization across multiple devices. With the Dropbox app for iPhone, you can upload your video files and access them from any device with an internet connection. Dropbox provides a free storage allowance, with the option to upgrade to higher-tier plans for additional storage capacity.
4. OneDrive: OneDrive is Microsoft’s cloud storage service that offers integration with Windows devices, including iPhones. By installing the OneDrive app on your iPhone, you can easily upload and share your video files. OneDrive offers a generous amount of free storage and various subscription plans for more storage and advanced features.
5. Amazon Drive: Amazon Drive provides secure cloud storage for your videos and other files. With the Amazon Drive app for iPhone, you can upload and access your videos from anywhere. Amazon offers different storage plans, including a free tier and subscription plans for additional storage capacity.
Using a cloud storage service for your video files offers several advantages. It not only helps you free up storage space on your iPhone but also provides backup protection for your precious videos. Additionally, cloud storage allows you to access your videos from any device and easily share them with others.
Before choosing a cloud storage service, consider factors such as storage capacity, pricing plans, integration with your iPhone’s ecosystem, and any additional features or security measures that are important to you. By utilizing cloud storage, you can ensure that your video files are safe, accessible, and easily manageable, while enjoying the convenience of extra storage space on your iPhone for more recording.
Understanding Video File Sizes on an iPhone
When recording videos on an iPhone, it’s essential to consider the file sizes of your video recordings. Video file sizes can impact the storage capacity of your device, upload/download times, and also affect the overall performance when capturing and sharing videos. Let’s explore the factors that contribute to video file sizes on an iPhone and how to manage them effectively.
1. Video Resolution: The resolution of a video plays a significant role in determining its file size. Higher resolutions, such as 4K or 1080p, generally result in larger file sizes compared to lower resolutions like 720p. This is because higher resolutions contain more pixels and therefore require more data to store the additional visual details.
2. Frame Rate: The frame rate also affects the file size of a video. Higher frame rates, such as 60fps or 120fps, result in smoother motion but require more data to store the additional frames per second. Therefore, videos recorded at higher frame rates will have larger file sizes compared to videos recorded at lower frame rates like 30fps.
3. Video Codec and Compression: The codec and compression settings used during video recording impact the file size as well. Different codecs and compression algorithms can produce varying levels of compression and quality. More efficient codecs, such as H.265 (HEVC), can deliver better compression while maintaining high video quality, resulting in smaller file sizes compared to older codecs like H.264.
4. Video Length: The duration of a video directly impacts its file size. Longer videos will have larger file sizes compared to shorter ones, assuming all other factors (resolution, frame rate, and compression) remain the same. It’s important to consider video lengths when planning for storage space or when sharing videos with others.
5. Bitrate: The bitrate refers to the amount of data encoded per second of video playback. Higher bitrates will result in higher video quality but also larger file sizes. Encoders typically offer options to adjust the bitrate, allowing you to find the right balance between quality and file size based on your preferences and storage limitations.
Understanding these factors can help you manage video file sizes on your iPhone effectively. Here are a few tips to consider:
- Consider the purpose and intended use of your videos to determine the appropriate resolution, frame rate, and bitrate settings.
- Regularly assess the available storage space on your iPhone and delete unnecessary videos or move them to external storage devices or cloud storage platforms.
- Experiment with different codec and compression settings to find the most suitable balance between video quality and file size.
By optimizing these settings and managing your video files efficiently, you can ensure that you have enough storage space on your iPhone to capture and store videos without compromising their quality.
Video Recording Apps for Extended Recording Time on an iPhone
While the built-in camera app on an iPhone offers great video recording capabilities, you may sometimes need extended recording time or additional features. Thankfully, there are several third-party video recording apps available in the App Store that can enhance your video recording experience. Let’s explore some of these apps that can help you achieve extended recording time on an iPhone.
1. Filmic Pro: Filmic Pro is a powerful video recording app that offers advanced manual controls, including options to adjust frame rates, resolutions, and bitrates. It provides features such as focus peaking, audio monitoring, and even support for external microphones. Filmic Pro also allows for extended recording time beyond the limitations of the native camera app, making it a popular choice among professional videographers.
2. ProMovie Recorder: ProMovie Recorder is another feature-rich video recording app that expands the capabilities of your iPhone’s camera. It provides manual controls, adjustable frame rates, resolutions, and real-time audio monitoring. With ProMovie Recorder, you can also record videos for longer durations and take advantage of its extensive settings for maximum customization.
3. Cinema FV-5: Cinema FV-5 offers professional-grade video recording features. It allows you to adjust various parameters such as exposure, focus, white balance, and more. With Cinema FV-5, you can manually set the frame rate, bitrate, and video resolution, which can extend the recording time beyond the native camera app. This app is suitable for those who want to have more control over their video recordings.
4. Open Camera: Open Camera is a free and open-source video recording app that provides many advanced settings. It offers options for adjusting resolution, bitrate, and frame rates. Open Camera also includes features like timelapse recording, remote control via voice commands, and video stabilization. This app is continuously updated and has a dedicated user community contributing to its development.
5. FiLMiC Firstlight: FiLMiC Firstlight is a versatile camera app that specializes in capturing high-quality photos and videos. It offers manual control over various settings, including frame rates, resolutions, and bitrates. FiLMiC Firstlight provides extended recording time capabilities and additional features like a live analytics suite and RAW photo support. It’s a comprehensive solution for users who want advanced controls for both photography and videography.
These video recording apps offer extended recording time and advanced features beyond what the native camera app provides. Carefully consider your specific recording needs, such as manual controls, long-duration recording, or other specialized features, when choosing the right app for your requirements. With these third-party apps, you can maximize your iPhone’s video recording capabilities and unlock new creative possibilities.
Transferring and Editing Video Files on an iPhone
Once you have recorded videos on your iPhone, you may want to transfer them to other devices or edit them before sharing. Fortunately, iPhones offer various methods to transfer and edit video files, allowing you to refine your videos and unleash your creativity. Let’s explore the options for transferring and editing video files on an iPhone.
Transferring Video Files:
1. iCloud: If you use iCloud to back up your iPhone, your video files will automatically sync across your devices. You can access them on other Apple devices or through the iCloud website.
2. AirDrop: AirDrop allows you to wirelessly transfer videos between Apple devices. Simply enable AirDrop on both devices, select the video file, and share it with the recipient. AirDrop uses Bluetooth and Wi-Fi to establish a secure connection for quick and easy file transfer.
3. Cloud Storage Services: Uploading your videos to cloud storage services like iCloud Drive, Google Drive, Dropbox, or OneDrive enables you to access them from different devices. Simply install the relevant app on your iPhone, upload the videos, and sign in to the same account on other devices to download them.
4. USB/Lightning Cable: Connect your iPhone to a computer or Mac using a USB/Lightning cable. On the computer, open the file explorer or iTunes (for Mac) and navigate to your iPhone’s storage. You can copy and paste or drag and drop the video files onto your computer.
Editing Video Files:
1. iMovie: iMovie is a powerful video editing app available on iPhones and iPads. It offers a user-friendly interface and a wide range of features, including video trimming, adding transitions, applying filters, adding titles, and more. iMovie allows you to edit videos directly on your iPhone, enabling quick and easy video editing.
2. Adobe Premiere Rush: Adobe Premiere Rush is a professional-grade video editing app available on iPhone. It provides advanced editing tools, such as multi-track timeline editing, color grading, audio adjustments, and special effects. Adobe Premiere Rush offers seamless integration with the desktop version of Adobe Premiere Pro, enabling you to continue editing your videos across different devices.
3. Other Video Editing Apps: App Store offers a wide range of video editing apps, each with its own set of features and capabilities. Some popular alternatives include LumaFusion, InShot, and Kinemaster. Explore the App Store, read user reviews, and decide on the editing app that best suits your needs and expertise.
By utilizing the various transfer and editing options on your iPhone, you can easily transfer video files to other devices and unleash your creativity by editing them to perfection. Whether you prefer convenience, wireless connectivity, or powerful editing capabilities, there are plenty of options available to enhance your video editing experience on an iPhone.