
How to Take a Screenshot Using Physical Buttons
Taking a screenshot on your Kindle Fire is a simple and quick process. One of the easiest methods is using the physical buttons on the device. Here’s how you can do it:
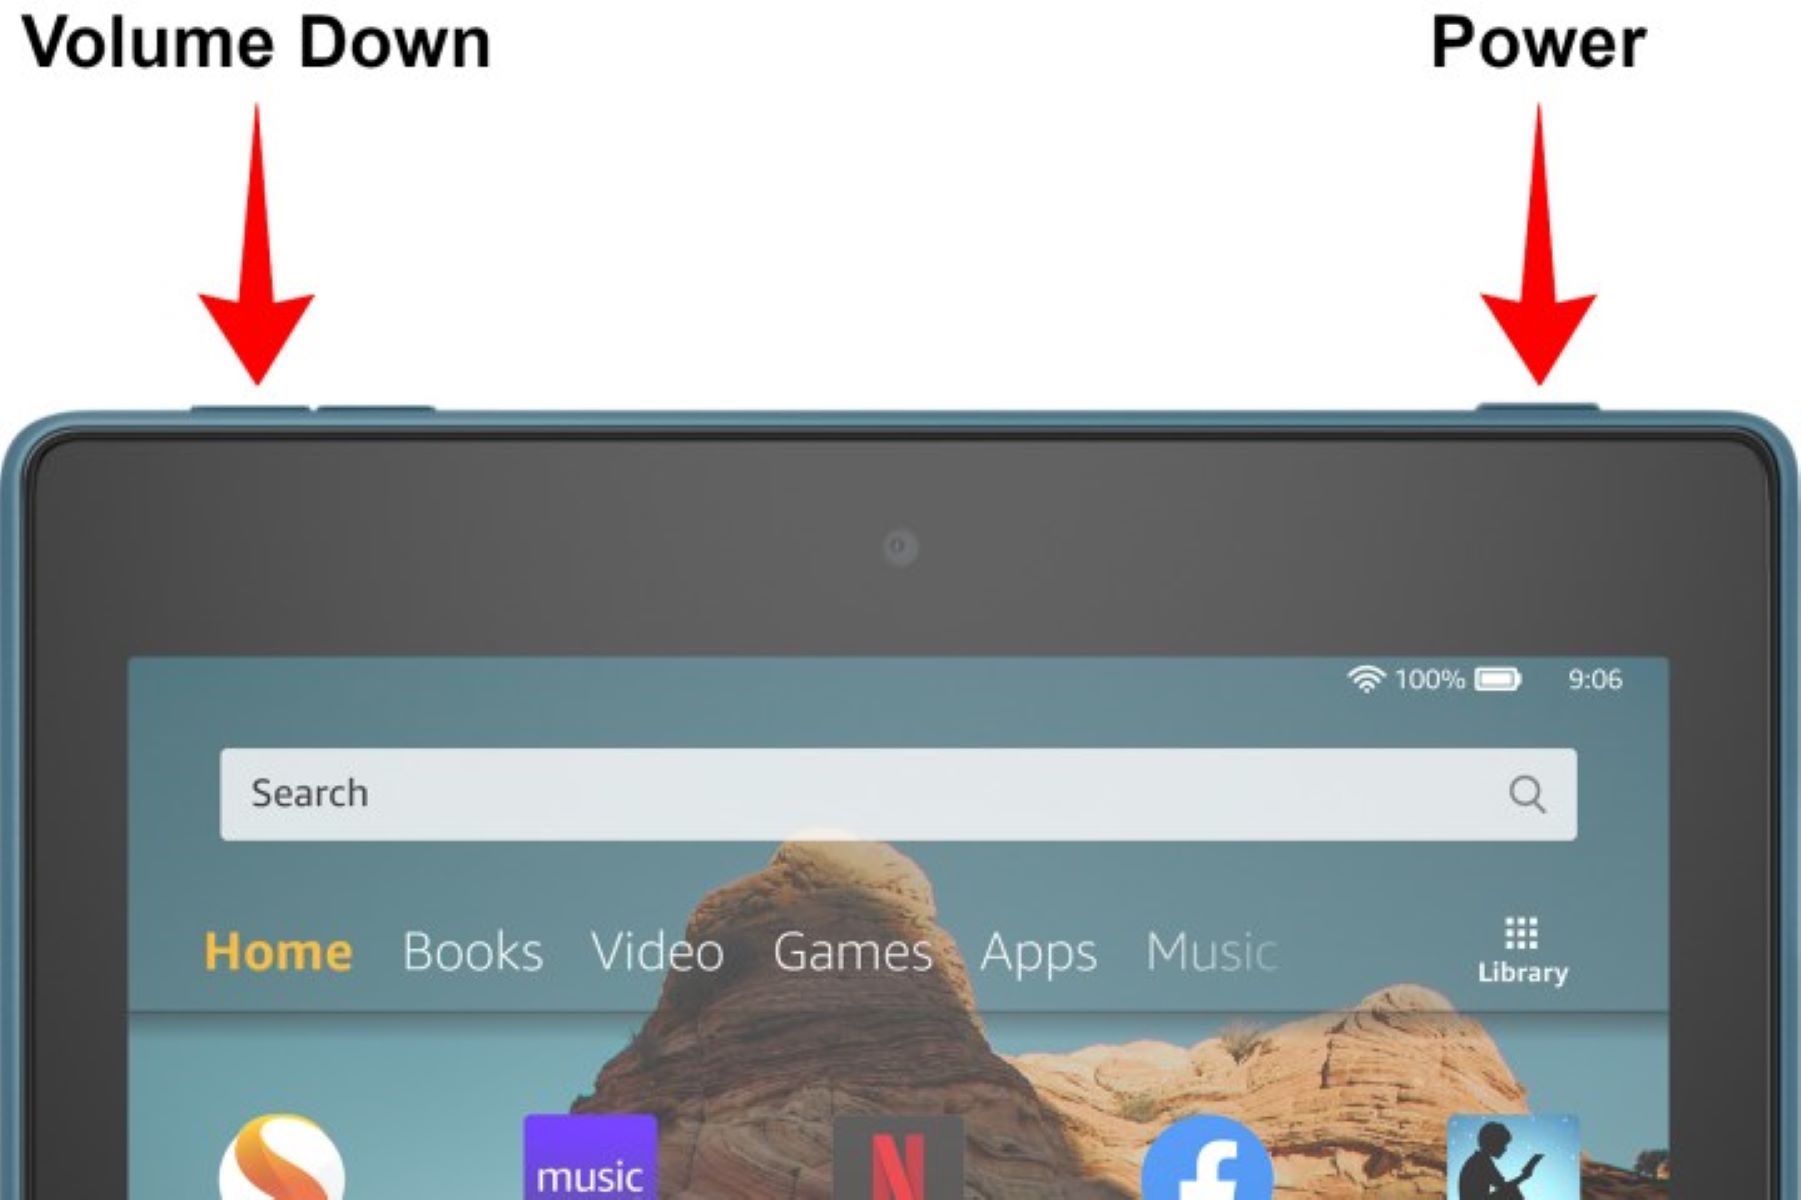
- Locate the power button and the volume down button on your Kindle Fire. The power button is usually located on the top or side of the device, while the volume button is typically found on the side.
- Open the screen or app you want to capture and make sure it’s displayed on the screen.
- Press and hold the power button and volume down button simultaneously. It’s important to press both buttons at the same time and hold them until you see a visual indication that the screenshot has been taken.
- You may hear a shutter sound or see a brief flash on the screen, indicating that the screenshot has been successfully captured.
- Release the buttons once you see the confirmation of the screenshot.
Once you’ve successfully captured a screenshot, it will be saved in your device’s storage. You can find your screenshots by accessing your device’s gallery or photo app. From there, you can view, edit, or share the captured screenshots with ease.
Taking screenshots using the physical buttons is a convenient method that works across various Kindle Fire models and versions. It’s a reliable way to capture moments, important information, or troubleshooting steps for future reference or sharing with others. Remember to practice pressing the buttons simultaneously to ensure you capture the screen accurately and efficiently.
How to Take a Screenshot Using the Power Button Menu
If you’re looking for an alternative method to capture a screenshot on your Kindle Fire, you can use the Power Button Menu. Here’s how you can do it:
- Open the screen or app you want to capture and ensure it’s displayed on the screen.
- Press and hold the power button located on the top or side of your Kindle Fire.
- After holding the power button for a few seconds, a small menu will appear on the screen.
- From the menu options, select the “Screenshot” or “Capture” button. The naming may vary depending on the Kindle Fire model or version you’re using.
Once you’ve selected the screenshot option, your device will capture the current screen and save it to your photo library or gallery. You may notice a short confirmation message or hear a shutter sound to indicate that the screenshot has been successfully taken.
The Power Button Menu method provides a convenient way to capture screenshots without using the physical buttons on your Kindle Fire. It’s particularly useful if you find it difficult to press the buttons simultaneously or if your device has a different button configuration.
Remember to access your photo library or gallery to find your captured screenshots. From there, you can edit, share, or delete the screenshots as needed. Whether it’s capturing important information or sharing memorable moments, taking screenshots using the Power Button Menu is a straightforward and efficient method.
How to Take a Screenshot Using the Quick Settings Menu
Another method to take screenshots on your Kindle Fire is by using the Quick Settings menu. It provides a convenient shortcut that allows you to capture the screen in just a few steps. Here’s how you can do it:
- Swipe down from the top of your Kindle Fire screen to open the Quick Settings menu.
- Look for the “Screenshot” or “Capture” icon among the available options. It typically resembles a camera or a phone screen with a dotted outline.
- Tap on the “Screenshot” or “Capture” icon to initiate the screenshot process.
Once you tap the icon, your device will immediately capture the current screen and save it as a screenshot. You may see a visual confirmation, such as a flash on the screen or a notification, indicating that the screenshot has been successfully taken.
The Quick Settings menu method provides a quick and convenient way to capture screenshots without the need to use physical buttons or navigate through different menus. It’s particularly useful if you frequently need to capture screens for various purposes on your Kindle Fire.
Remember to access your device’s photo library or gallery to find your captured screenshots. From there, you can easily manage them, edit them, or share them with others as needed.
Taking screenshots using the Quick Settings menu is a handy feature that simplifies the process and allows you to capture important information, memorable moments, or interesting content with ease.
How to Take a Screenshot Using a Third-Party App
If you’re looking for more advanced options and customization features when taking screenshots on your Kindle Fire, you can explore third-party apps available in the Amazon Appstore. These apps provide additional functionality and flexibility compared to the built-in screenshot methods. Here’s how you can take a screenshot using a third-party app:
- Open the Amazon Appstore on your Kindle Fire and search for a screenshot app. There are several available options, such as “Screenshot Easy” or “Screenshot Touch.”
- Select and download the app that best suits your needs and preferences.
- Once the app is installed, open it and follow the on-screen instructions or settings to configure the app to your liking.
- Depending on the app, you can access the screenshot feature through a floating button, a notification icon, or a customized shortcut.
- When you’re ready to take a screenshot, simply tap the appropriate button or icon within the third-party app.
Using a third-party app for taking screenshots offers various advantages, including the ability to annotate, crop, and edit screenshots before saving or sharing them. These apps often come with additional features, such as capturing scrolling screenshots or capturing screens by shaking the device.
Remember to explore the app’s settings and options to fully utilize its capabilities and customize it according to your preferences. You can also find tutorials or user guides within the app for more advanced features or troubleshooting.
Using a third-party app can enhance your screenshot-taking experience on the Kindle Fire, allowing you to capture and customize screens in a way that suits your specific needs.
How to Find Your Screenshots on the Kindle Fire
After capturing screenshots on your Kindle Fire, you may be wondering where they are saved and how to access them. Here’s how you can find your screenshots:
- Unlock your Kindle Fire and go to the home screen or view the app or screen from which you took the screenshot.
- Swipe down from the top of the screen to open the notification panel and tap on the “Settings” gear icon.
- In the settings menu, scroll down and tap on “Storage & USB.”
- Under the “Internal Storage” section, tap on “Pictures.”
- You will find a folder named “Screenshots.” Tap on the folder to open it.
Inside the “Screenshots” folder, you will see all the screenshots you have taken on your Kindle Fire. Depending on your device model and settings, the screenshots may be organized by date or appear in a chronological order. You can scroll through the folder to find the specific screenshot you are looking for.
Once you have located the desired screenshot, you can tap on it to view it in full size. From there, you can share it with others, edit it using a photo editing app, or delete it if it’s no longer needed.
It’s worth noting that some third-party screenshot apps may save the screenshots in different folders or locations. In such cases, it’s recommended to refer to the app’s documentation or settings to locate the screenshots.
Knowing where to find your screenshots on the Kindle Fire makes it easier to access, manage, and share them. Whether it’s capturing important information or saving memorable moments, your screenshots are stored in a specific folder for convenient retrieval and organization.
Tips for Taking Clear Screenshots on the Kindle Fire
When capturing screenshots on your Kindle Fire, you want them to be clear and visually appealing. Here are some tips to help you take clear and high-quality screenshots:
- Ensure proper lighting: Good lighting can significantly enhance the quality of your screenshots. Make sure you are in a well-lit environment, either natural or artificial light, to avoid grainy or dark screenshots.
- Clean your screen: Before taking a screenshot, wipe your Kindle Fire’s screen with a soft, lint-free cloth to remove smudges, fingerprints, or dust. A clean screen ensures a clear and unobstructed view of the content you want to capture.
- Choose the right moment: Timing is important when taking screenshots, especially if you’re capturing dynamic or time-sensitive content. Be patient and wait for the perfect moment, whether it’s pausing a video or waiting for a specific screen to load before capturing the screenshot.
- Check the composition: Pay attention to the composition of your screenshot. Make sure the relevant content is properly visible and not cropped or cut off. Align the screen elements to create a balanced and visually pleasing screenshot.
- Use the highest resolution: If your Kindle Fire allows you to adjust the screenshot resolution, choose the highest available option. Higher resolution screenshots will have more detail and clarity when viewed or shared on different devices.
- Avoid unnecessary overlays: Before capturing a screenshot, remove any unnecessary overlays, such as notifications or pop-up windows, that may obstruct the main content you want to capture. This ensures a clean and uncluttered screenshot.
- Experiment with different methods: Don’t hesitate to try different screenshot methods, such as using physical buttons or third-party apps, to find the best method for your needs. Each method may offer different advantages and features, so explore and choose the one that works best for you.
By following these tips, you’ll be able to capture clear and visually appealing screenshots on your Kindle Fire. Whether it’s capturing important information, sharing interesting content, or preserving memorable moments, clear screenshots will enhance your overall experience and make your captured screens more engaging.