
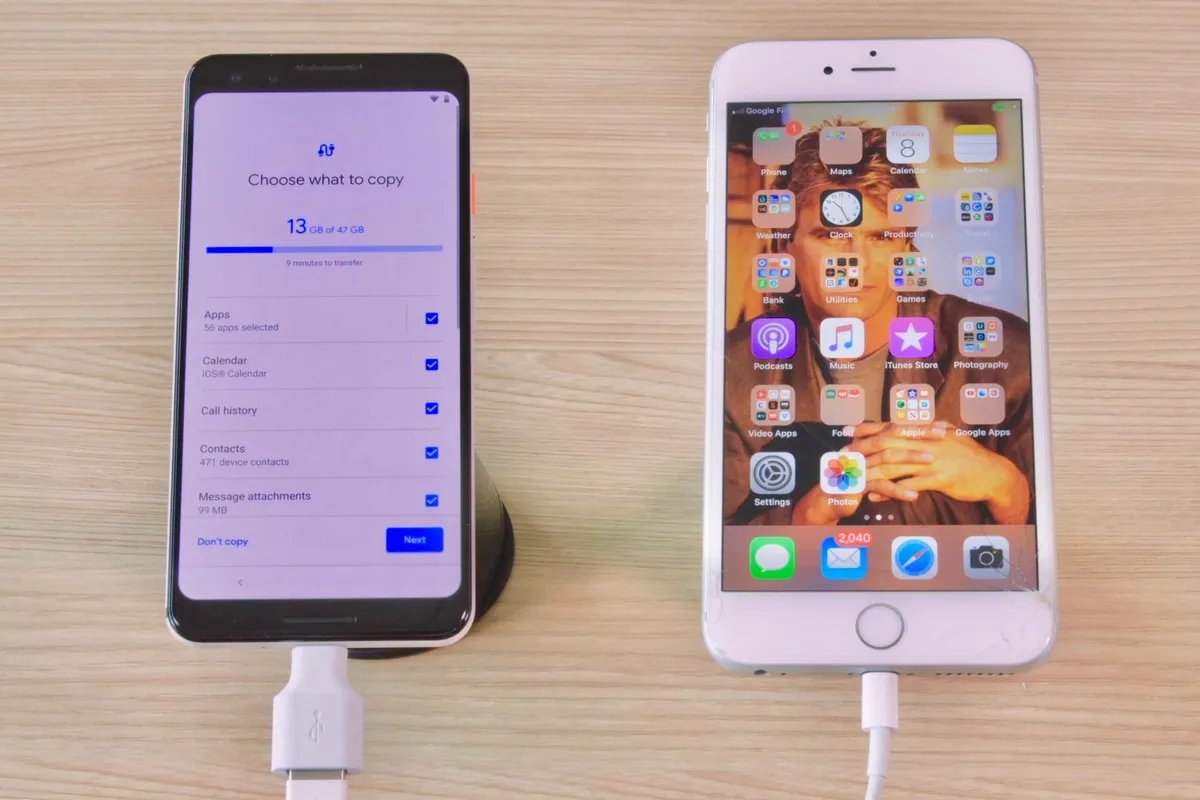
Transfer Contacts
Switching from iPhone to Android may seem daunting, but one of the most crucial aspects to consider is transferring your contacts. Fortunately, there are multiple methods to ensure a seamless transition:
1. Sync with your Google Account: If you don’t already have a Google account, now is the perfect time to create one. On your iPhone, go to Settings > Mail > Accounts > Add Account, and select Google. Enter your Google account details and toggle on the Contacts option. Your contacts will then sync to your Google account.
2. Use third-party apps: There are various apps available in the App Store that can help you migrate your contacts. Look for apps such as “Copy My Data,” “My Contacts Backup,” or “SmartIO” to easily transfer your contacts to your Android device.
3. Transfer via iCloud: If you have been backing up your contacts using iCloud, you can access them on your computer. Log in to your iCloud account on a web browser, select Contacts, and export them as a vCard. Transfer the vCard file to your Android device and import it into your contacts.
4. Manually export and import: If you prefer a hands-on approach, you can manually export your contacts from your iPhone. Open the Contacts app, select all contacts, and choose the option to export them as a vCard file. Move the vCard to your Android device and import it into your contacts.
Remember to double-check that all your contacts successfully transferred to your Android device. In some cases, you may need to merge duplicates or edit any missing details manually.
By following these methods, you can ensure a smooth transition when it comes to transferring your contacts from iPhone to Android. Now that you’ve successfully dealt with this crucial step, let’s move on to the next aspect of the switch.
Transfer Photos and Videos
When switching from an iPhone to an Android device, one of the primary concerns is how to transfer your precious photos and videos. Here are a few methods to help you with the process:
1. Google Photos: Google Photos is a fantastic tool for backing up and transferring your media. Install the Google Photos app on your iPhone and sign in with your Google account. Open the app, go to Settings > Backup & Sync, and enable the backup option. Your photos and videos will now automatically sync to your Google account. Once you’ve set up your Android device, simply log in with the same Google account to access all your media.
2. Transfer via USB: If you prefer a direct method, you can connect your iPhone to your computer using a USB cable. On your iPhone, unlock the device and tap “Trust” when prompted. Your computer should recognize the iPhone as a storage device. Open the device and navigate to the DCIM folder, where your photos and videos are stored. Copy the desired files to your computer, and then connect your Android device. Copy the files from your computer to the desired location on your Android device.
3. Cloud Services: Another option is to utilize cloud storage services like Dropbox or OneDrive. Install the respective app on your iPhone and sign in with your account. Upload your photos and videos to the cloud storage. Then, download the cloud storage app on your Android device and sign in to access your media. Remember to check whether the free tier of the service provides enough storage space for your needs.
4. Share via Email or Messaging: If you only have a few photos or videos that you wish to transfer, you can simply email them to yourself or send them as attachments via messaging apps. Open the Photos app on your iPhone, select the desired photos and videos, and tap the share button. Choose the email or messaging app, enter your email or the recipient’s details, and send the files. Open the email or message on your Android device and download the attachments.
Remember to delete any unnecessary media from your iPhone once you have successfully transferred them to your Android device to free up storage space. With these methods, you can effortlessly transfer your cherished photos and videos to your new Android device.
Transfer Music and Podcasts
Switching from an iPhone to an Android device doesn’t mean leaving your favorite music and podcasts behind. Here are a few ways to transfer your music and podcasts seamlessly:
1. Streaming Services: If you primarily use streaming services like Spotify, Apple Music, or Google Play Music, you can simply download the respective app on your Android device and sign in with your account details. Your playlists, saved albums, and podcast subscriptions will sync automatically, allowing you to enjoy your favorites on your new device.
2. Transfer via USB: If you have a collection of locally stored music or podcasts on your iPhone, you can transfer them to your Android device using a USB cable. Connect your iPhone to your computer and open iTunes. Select the music or podcasts you wish to transfer and drag them to a folder on your computer. Disconnect your iPhone and connect your Android device. Transfer the music or podcasts from your computer to the desired location on your Android device. You can use a file manager app on your Android device to locate and play the transferred files.
3. Use Third-Party Apps: There are third-party apps available that specialize in transferring music and podcasts between different platforms. Apps such as Soundiiz or Stamp can help you migrate your music library and podcast subscriptions from iPhone to Android. Install the app on your iPhone, follow the instructions to transfer your content, and then install the app on your Android device to access your transferred music and podcasts.
4. Local Syncing: If you have a large music library on your computer, you can sync it with your Android device using a media player application like doubleTwist or MediaMonkey. Connect your Android device to your computer, open the media player app, and follow the instructions to sync your music library. You can transfer specific playlists or your entire music library, depending on your preferences.
Remember to organize your music and podcasts on your Android device using your preferred music player or podcast app. You may need to recreate playlists or resubscribe to podcasts. With these methods, you can easily bring your favorite music and podcasts to your new Android device and enjoy them wherever you go.
Transfer Apps and App Data
When transitioning from an iPhone to an Android device, you’ll want to ensure a smooth transfer of your favorite apps and app data. Here are a few methods to help you with this process:
1. Google Play Store: Android devices come preinstalled with the Google Play Store, which offers a vast selection of apps. Simply log in with your Google account on your new Android device, and you’ll be able to download and install your desired apps. While not all apps available on the Apple App Store may have an Android equivalent, you’ll find many popular apps and games to get you started.
2. App Store account: Some developers offer cross-platform versions of their apps, meaning you may be able to download the Android version of an app you previously had on your iPhone. Open the Google Play Store, search for your desired app, and check if it’s available for Android. If so, download and install it on your Android device.
3. App Data: Unfortunately, app data such as saved game progress or custom settings cannot be directly transferred between iPhone and Android. However, some apps offer their own data transfer methods. Check if your apps have an option to back up data to the cloud or export/import data via other means. You may find this option within the settings of the apps themselves or on their respective websites.
4. Manual Approach: If you have important data within certain apps that don’t have built-in transfer options, you may need to manually transfer the data. For example, if you have notes or documents in a specific app, you can email them to yourself or use a cloud storage service like Google Drive or Dropbox to transfer them between devices. This method requires more manual effort, but it ensures you don’t lose any vital information.
Remember to explore the Google Play Store for similar apps that can meet your needs if some of your favorite iOS apps aren’t available on Android. In some cases, alternative apps may offer even better features or functionalities. With these methods, you can transfer your apps and find suitable alternatives, ensuring a seamless transition to your Android device.
Set Up Email
Configuring your email account on your new Android device is an essential step to ensure you can stay connected and organized. Here’s how you can set up your email:
1. Gmail: If you already have a Gmail account, setting up your email is straightforward. Open the pre-installed Gmail app on your Android device, tap on “Add Account,” and select “Google.” Enter your Gmail email address and password, and follow the on-screen instructions to complete the setup. Gmail will automatically sync your email, contacts, and calendar events. If you have multiple Gmail accounts, repeat the process for each account.
2. Other Email Providers: If you use an email provider other than Gmail, such as Yahoo, Outlook, or AOL, Android devices offer built-in support for these accounts as well. Open the “Settings” app on your Android device, go to “Accounts,” and select “Add Account.” Choose the corresponding email provider from the list and enter your email address and password. Follow the on-screen instructions to complete the setup. Android will configure the settings automatically, but you may need to input additional information specific to your email provider.
3. Manual Setup: In some cases, you may need to set up your email account manually if it’s not recognized by the automatic setup process. To do this, choose “Manual Setup” when adding an account and enter the required information, which typically includes incoming and outgoing server details, port numbers, and encryption settings. You can find this information from your email provider or their support documentation.
Once your email account is set up, you can customize additional settings within the email app. You can choose your sync frequency, notification preferences, and signature, among other options. Explore the settings to tailor your email experience to your preferences.
It’s important to note that switching to a new device may cause a temporary interruption in email service. If you normally use an email client like Microsoft Outlook or Apple Mail, you’ll need to reconfigure your email settings on your Android device using the instructions specific to that app.
By setting up your email accounts on your Android device, you’ll be able to access and manage your messages conveniently, ensuring you stay connected and organized on the go.
Set Up Messaging
Setting up messaging on your new Android device is essential for staying connected and communicating with friends and family. Here’s how you can get started:
1. Default Messaging App: Android devices come with a pre-installed default messaging app, usually called “Messages” or “Messaging.” To set up messaging, simply open the app and follow the on-screen instructions to configure your phone number. The app will automatically detect your carrier and set up the necessary settings for text messaging.
2. Third-Party Messaging Apps: If you prefer to use a different messaging app, you can explore the Google Play Store for alternatives such as WhatsApp, Facebook Messenger, or Telegram. Install your preferred app, open it, and follow the instructions to sign in or create an account. These apps often offer additional features like group messaging, shared media, and end-to-end encryption.
3. iMessage Alternatives: If you have been using iMessage on your iPhone and want to continue using a similar messaging experience on your Android device, there are several cross-platform messaging apps available. Apps like WhatsApp or Telegram allow you to send messages, photos, videos, and more, even if your contacts are using iPhones.
4. Messaging Backup: To ensure you don’t lose any important text messages during the transition, consider backing up your messages from your iPhone. On your iPhone, go to Settings > [your name] > iCloud > iCloud Backup, and make sure “Messages” is toggled on. Back up your device, and once you set up the new Android device, check if the messaging app has an option to restore messages from backup.
Remember to adjust the settings within the messaging app according to your preferences. You can customize notifications, chat wallpapers, and privacy settings to enhance your messaging experience.
It’s important to note that if you switch from iPhone to Android, you may experience temporary loss of iMessage functionality. Make sure to inform your contacts about your new phone number or alternative messaging app to ensure uninterrupted communication.
By setting up messaging on your Android device, you’ll be able to send and receive messages effortlessly, keeping you connected with the important people in your life.
Set Up Calendar
Setting up your calendar on your new Android device is crucial for staying organized and managing your schedule effectively. Here’s how you can get started:
1. Google Calendar: Android devices seamlessly integrate with Google Calendar. If you already have a Google account, setting up your calendar is easy. Open the pre-installed Google Calendar app on your Android device and sign in with your Google account. Your calendar events will automatically sync to your device. You can create new events, set reminders, and organize your schedule right from the app.
2. Other Calendar Providers: If you use a calendar service other than Google Calendar, such as Microsoft Outlook, Apple iCloud, or Exchange, Android devices offer support for these providers as well. Open the “Settings” app on your Android device, go to “Accounts,” and select “Add Account.” Choose the corresponding provider from the list, enter your account details, and follow the on-screen instructions to complete the setup. Your calendar events will sync to your device’s default calendar app.
3. Import and Export: If you have existing calendar data from your previous device, you can import it to your Android device. Export your calendar data from your old device in an appropriate file format (e.g., .ics for iCalendar events) and transfer it to your new Android device. From the calendar app, go to settings or preferences, find the import/export option, and import the file. This will populate your Android calendar with your previous events.
4. Synchronization: Once your calendar is set up, ensure that the syncing settings are correctly configured. Open the calendar app and go to settings or preferences. Look for the synchronization options and adjust them according to your preferences. You can choose to sync events from specific calendars, set the sync frequency, and enable notifications for upcoming events.
Keep in mind that, by default, your Android device may also display holidays and other events based on your location. You can toggle these settings on or off in the calendar app settings.
With your calendar set up on your Android device, you’ll be able to keep track of appointments, meetings, and important events, ensuring you stay organized and well-prepared.
Set Up Notes and Reminders
Managing notes and reminders is essential for staying organized and productive. Here’s how you can set up your notes and reminders on your new Android device:
1. Google Keep: Android devices come preloaded with Google Keep, a versatile note-taking app. Open the app, sign in with your Google account, and start creating notes. You can organize notes with labels, color code them, and set reminders for important tasks. Google Keep also allows you to add images, voice recordings, and checklists to your notes, making it a comprehensive tool for managing information.
2. Other Note-Taking Apps: If you prefer using a different note-taking app, you can explore the Google Play Store for alternatives such as Evernote, Microsoft OneNote, or Simplenote. Install your preferred app, create an account or sign in, and start capturing your thoughts, ideas, and to-do lists. These apps often offer additional features like organizing notes into notebooks, syncing across devices, and collaborating with others.
3. Reminder Apps: Android devices also come with a built-in reminder system. Open the clock app on your device and navigate to the “Alarms & Clock” or “Reminders” tab. You can set one-time or recurring reminders for specific tasks, events, or appointments. Additionally, you can customize reminder tones, snooze options, and notification preferences to suit your needs.
4. Synchronization: If you have been using a note-taking app or reminder system on your previous device, ensure that your data is synchronized and backed up. Check if the app offers a backup or syncing option, such as using a cloud service or connecting to your Google account. Sync your data on your previous device and then sign in with the same account on your new Android device to access your notes and reminders.
Remember to explore the settings within your chosen note-taking or reminder app to customize options and preferences according to your needs. You can adjust font styles, enable dark mode, and set default behaviors to enhance your note-taking and reminder experience.
With your notes and reminders set up on your Android device, you’ll have a convenient and organized system to capture ideas, track tasks, and stay on top of your schedule.
Set Up Maps and Navigation
Setting up maps and navigation on your new Android device is essential for getting directions, exploring new places, and navigating your way around. Here’s how you can get started:
1. Google Maps: Android devices come with Google Maps pre-installed, offering a comprehensive mapping and navigation solution. Open the Google Maps app and sign in with your Google account. You can search for places, get driving, walking, or public transit directions, and explore nearby attractions. Google Maps also provides real-time traffic updates and alternative routes to help you navigate efficiently.
2. Other Navigation Apps: If you prefer using a different navigation app, you have various options available on the Google Play Store. Apps like Waze, HERE WeGo, or MapQuest offer alternative features and interfaces. Install your preferred app, sign in if required, and explore its settings and features to get familiar with its unique offerings.
3. Voice Commands: Android devices come with a built-in voice assistant called Google Assistant. Utilize voice commands to get directions or ask for navigation assistance hands-free. Simply say “Ok Google” or long-press the home button to activate Google Assistant, and then ask for directions to a specific place or request turn-by-turn navigation.
4. Synchronize Saved Places: If you had saved places or favorite locations on your previous device, make sure to sync them with your Google account. Open the settings of your previous mapping app and look for an option to export or sync your saved places. Once synced, sign in with the same Google account on your new Android device, and your saved places should appear in the Google Maps app.
Remember to adjust the settings within your mapping and navigation app to personalize your experience. You can customize map views, enable or disable traffic overlays, and set preferences for voice guidance and notifications.
It’s worth noting that some navigation apps offer offline maps, which can be helpful when you’re in an area with limited or no internet connectivity. Download the offline maps of your desired location in advance to ensure you can navigate even without an internet connection.
With maps and navigation set up on your Android device, you’ll have a powerful tool to help you find your way, discover new places, and make your travel more convenient.
Set Up Weather
Staying informed about the weather conditions is essential for planning your day and making informed decisions. Here’s how you can set up weather information on your new Android device:
1. Default Weather App: Android devices often come with a pre-installed weather app, such as Google Weather or the manufacturer’s customized app. Open the app and grant it location permissions. The app will automatically fetch weather information based on your current location. You can view current conditions, hourly forecasts, and extended outlooks right from the app.
2. Third-Party Weather Apps: If you prefer a different weather app with more features or a unique interface, you can explore the Google Play Store for alternatives like AccuWeather, The Weather Channel, or Dark Sky. Install your preferred app, grant it location permissions, and configure the settings according to your preferences. These apps often provide detailed forecasts, radar maps, severe weather alerts, and customizable widgets for your home screen.
3. Weather Widgets: Android devices offer the option to add weather widgets to your home screen, providing you with quick access to current conditions and forecasts without opening a dedicated app. Long-press on your home screen, select “Widgets,” and look for weather-related options. Choose a widget that suits your preferences and adjust its settings for location, units, and appearance.
4. Weather Notifications: Set up weather notifications to receive updates and alerts about changing weather conditions. Open the settings of your weather app and look for notification preferences. You can choose to receive alerts for severe weather, daily forecasts, or specific weather events. Customize the notification sound, frequency, and priority to suit your needs.
Remember to check the settings within your chosen weather app regularly, as they may offer additional features such as pollen forecasts, UV index information, or customizable weather layers. Adjust these settings according to your preferences and needs.
If you’re traveling or want to stay informed about weather conditions in different locations, you can add additional locations to your weather app. This allows you to easily switch between local and distant weather forecasts.
With weather information set up on your Android device, you’ll be able to stay prepared for changing weather conditions and plan your activities accordingly.
Set Up Social Media Accounts
Setting up your social media accounts on your new Android device is crucial for staying connected and engaged with friends, family, and your online community. Here’s how you can get started:
1. Facebook: If you use Facebook, look for the official Facebook app in the Google Play Store. Install the app, open it, and sign in with your Facebook account credentials. You’ll have access to your News Feed, notifications, and messaging functionality. Customize your app settings to control privacy, notification preferences, and other account-related options.
2. Twitter: To set up your Twitter account, search for the official Twitter app in the Google Play Store. Install it, open the app, and sign in with your Twitter account credentials. You can view and interact with your timeline, post tweets, and engage with other Twitter users. Explore the app settings to personalize your experience, including notification preferences, tweet display options, and privacy settings.
3. Instagram: For Instagram, download the official Instagram app from the Google Play Store. After installing, open the app and sign in with your Instagram account details. You’ll be able to view and post photos and videos, follow other users, and engage with their content. Customize your profile settings, including privacy options and notification preferences, to tailor your Instagram experience.
4. Other Social Media Platforms: If you use other social media platforms like Snapchat, LinkedIn, Pinterest, or TikTok, search for their respective apps in the Google Play Store. Install the app, open it, and sign in with your account credentials. Familiarize yourself with the settings and options specific to each platform to make the most of your social media experience.
As you set up your social media accounts, take the opportunity to review your privacy settings and ensure they align with your preferences. You can adjust who can see your posts, control who can contact you, and manage other privacy-related settings. Additionally, explore the notification settings within each app to customize the frequency and types of notifications you receive.
Remember to avoid using the same password for all your social media accounts for added security. Consider using a password manager to securely manage and generate unique passwords for each platform.
With your social media accounts set up on your Android device, you can easily stay connected, share moments, and engage with your online community, all from the convenience of your new device.
Set Up Passwords
Setting up strong and secure passwords is crucial for protecting your personal information and safeguarding your online accounts. Here’s how you can effectively set up and manage passwords on your new Android device:
1. Use a Password Manager: Consider using a trusted password manager app to securely store and generate unique passwords for all your online accounts. Apps like LastPass, 1Password, or Bitwarden allow you to create and manage complex passwords, autofill login credentials, and sync your passwords across multiple devices. Install your preferred password manager app from the Google Play Store, set it up, and create a strong master password to protect your password vault.
2. Create Strong Passwords: When setting up passwords for your various accounts, ensure they are strong and unique. A strong password typically consists of a combination of uppercase and lowercase letters, numbers, and special characters. Avoid using easily guessable information such as your name, birthdate, or common dictionary words. Instead, consider using a passphrase or a combination of random words to enhance password security.
3. Enable Two-Factor Authentication: Two-factor authentication (2FA) adds an extra layer of security to your accounts. It typically requires you to provide a second form of identity verification, such as a temporary code sent to your phone or a biometric authentication method. Enable 2FA whenever possible for your online accounts to reduce the risk of unauthorized access, even if someone manages to obtain your password.
4. Regularly Update Passwords: It’s good practice to periodically change your passwords, especially for accounts that contain sensitive information. Update your passwords every few months, or sooner if a security breach or account compromise is reported. Utilize your password manager to generate a new secure password for each account and update the login credentials accordingly.
5. Secure Your Device: Protecting your Android device with a strong device password or PIN is crucial. This locks your device and prevents unauthorized access to your personal data. Set up a secure device lock by going to the security settings on your Android device and following the prompts to create a PIN, password, or pattern that only you know.
Remember to keep your password manager app updated to benefit from the latest security enhancements and features. Also, ensure that your Android device is running the latest software updates for optimal security.
By following these practices, you can strengthen your password security and protect your online accounts from unauthorized access and potential breaches.
Set Up Voice Assistant
Setting up your voice assistant on your new Android device can enhance your productivity and make various tasks more convenient. Here’s how you can set up and utilize your voice assistant:
1. Google Assistant: Android devices come with Google Assistant, a powerful voice assistant. To set it up, navigate to the Google app or press and hold the home button on your device to activate the voice assistant. Follow the prompts to enable voice activation and give necessary permissions. You can use Google Assistant to search the web, set reminders, send messages, make calls, control smart devices, and perform a wide range of tasks using just your voice.
2. Activating Voice Assistant: Configure your device to activate the voice assistant with your preferred wake word or gesture. By default, “OK Google” is used, but some devices also support custom wake words. Open the settings of your voice assistant app or the device settings, and look for options related to voice commands and activation. Enable the desired setting and follow any setup instructions provided.
3. Customize Voice Assistant Preferences: Explore the settings of your voice assistant app to customize its behavior and preferences. You can adjust language settings, voice feedback, and personalize your assistant’s responses. Additionally, explore the app’s settings to grant permissions and customize features like reminders, controlling your smart home devices, managing your calendar, and receiving personalized recommendations.
4. Third-Party Voice Assistants: If you prefer using a different voice assistant, you can explore alternatives like Amazon Alexa or Microsoft Cortana by downloading the respective apps from the Google Play Store. Install your preferred voice assistant app, follow the setup instructions, and personalize the settings according to your preferences.
Remember to interact with your voice assistant naturally and clearly for accurate responses. Experiment with different voice commands to discover the full capabilities of your voice assistant, and don’t hesitate to ask questions or request assistance when needed.
It’s worth noting that for optimal performance, ensure that your Android device is connected to the internet and has access to a stable network connection, as voice commands are processed in real-time through cloud-based services.
With your voice assistant set up on your Android device, you can perform various tasks effortlessly and efficiently, all with the power of your voice.
Customize Home Screen and Widgets
Personalizing your home screen and widgets on your Android device allows you to create a customized and visually appealing interface that suits your preferences. Here’s how you can make your home screen truly yours:
1. App Icons and Layout: Rearrange and organize your app icons by long-pressing on an icon and dragging it to your desired position. Create folders by dragging one app icon onto another to group similar apps together. To change the layout of your home screen, long-press on an empty area and select “Home settings” or “Settings.” From here, you can customize the grid size, icon size, and other home screen layout options.
2. Widgets: Android devices offer a wide range of widgets that provide quick access to information or perform specific tasks. Long-press on an empty area of your home screen and select “Widgets” to browse through the available widgets. Select a widget and drag it to your desired location on the home screen. Resize the widget by tapping and dragging the resize handles. Customize the settings of the widget, if available, to tailor its appearance and functionality.
3. Wallpapers: Change the wallpaper of your home screen to personalize its look and feel. Long-press on an empty area of your home screen and select “Wallpapers” or “Wallpaper settings.” Choose a wallpaper from the available options, including pre-installed wallpapers or images from your own photo gallery. You can also set dynamic wallpapers that change throughout the day or with each unlock.
4. Home Screen Launchers: Consider installing a third-party home screen launcher app for even more customization options. Launchers like Nova Launcher, Action Launcher, or Apex Launcher offer features like custom icon packs, gesture controls, and advanced theming options. Install your preferred launcher from the Google Play Store, set it as your default home screen app, and follow the given instructions to customize it to your liking.
Remember to find a balance between customization and functionality. Avoid cluttering your home screen with too many widgets or icons, as it may make navigation more difficult. Keep it clean and organized to improve efficiency and visual appeal.
Experiment with different layouts, themes, and widgets to find a setup that matches your style and enhances your productivity. Customize your home screen and widgets to create a personalized Android experience that reflects your unique preferences and usage patterns.
Set Up Notifications
Configuring your notification settings on your Android device is vital to stay informed while managing interruptions effectively. Here’s how you can set up and manage notifications:
1. App Notifications: Android allows you to customize notifications on a per-app basis. To access app notification settings, go to “Settings” and select “Apps” or “Apps & Notifications.” Choose the app you want to adjust and tap on “Notifications.” From here, you can enable or disable notifications, adjust notification priority, sound, vibration, and other specific settings for each app.
2. Notification Channels: Android introduced notification channels, which provide a granular level of control over different types of notifications within an app. In the app notification settings, you may find options to control specific channels for that app. For example, in a messaging app, you can individually manage notifications for messages, group chats, or general app alerts. Customize the settings for each channel according to your preferences.
3. Do Not Disturb: Android devices feature a “Do Not Disturb” mode that allows you to silence notifications during specific times or activities. Access this feature by going to “Settings” and selecting “Sound” or “Sound & Notification.” Choose “Do Not Disturb” and set it to the desired schedule. You can allow exceptions for specific contacts, apps, or customize the behavior of alarms and other critical notifications while in Do Not Disturb mode.
4. Notification Light: Some Android devices have an LED notification light that can provide visual alerts. To enable or customize the notification light, go to “Settings” and select “Display” or “Sound & Notification.” Look for options related to the notification light and customize its color, blink pattern, and behavior for different types of notifications.
5. Managing Unwanted Notifications: If you receive notifications that you consider unnecessary or unwanted, Android allows you to limit or block them. Long-press on a notification or swipe it slightly to reveal a gear or settings icon. Tap on the icon to access notification settings specifically for that app. From there, you can adjust notification preferences or block notifications altogether.
Remember to strike a balance between being informed and being overwhelmed with notifications. Customize your notification settings to ensure that you only receive the most relevant and important alerts. Regularly review and manage your notification settings to adapt to your changing needs and prevent notification overload.
By setting up notifications on your Android device, you can stay on top of important information and ensure that interruptions are minimized, allowing you to focus, stay productive, and manage your time effectively.
Set Up Security and Privacy Settings
Setting up strong security and privacy settings on your Android device is important to protect your personal information and ensure your online safety. Here’s how you can enhance your device’s security and privacy:
1. Screen Lock: Set up a secure screen lock method to prevent unauthorized access to your device. Go to “Settings” and select “Security” or “Lock screen.” Choose a PIN, password, pattern, or biometric unlock method (such as fingerprint or face recognition) to secure your device. Avoid using easily guessable or common patterns to ensure maximum security.
2. App Permissions: Android allows you to manage app permissions individually to control how each app accesses your device’s features and personal data. Go to “Settings” and select “Apps” or “Apps & Notifications.” Choose the app you want to review and tap on “Permissions.” Enable or disable permissions based on your preferences and the app’s necessity. Be cautious of granting unnecessary permissions that could potentially compromise your privacy.
3. Google Account Privacy: Protect your Google account by reviewing its privacy and security settings. Go to “Settings” and select “Google” or “Accounts.” Tap on your Google account and explore the settings to manage data sharing preferences, review connected apps and websites, and enable two-factor authentication for an added layer of security.
4. Network Security: When connecting to public Wi-Fi networks, be cautious about transmitting sensitive information. Use reputable virtual private network (VPN) apps to encrypt your internet connections and protect your data from potential threats. Android devices have built-in VPN support; go to “Settings,” select “Network & internet,” and choose “VPN” to configure and enable a VPN app or service.
5. Security Updates: Regularly install system and app updates to keep your device protected against security vulnerabilities. Android devices receive security patches, bug fixes, and feature enhancements through these updates. Set your device to automatically download and install updates: go to “Settings” and select “System” or “Software Update.”
6. App Protection: Some apps may contain sensitive data, and you can add an extra layer of security to protect them. Install an app locker or use the built-in app lock features (if available) to require a PIN, password, or biometric authentication to access specific apps with sensitive information.
7. Privacy Settings: Explore the privacy settings within your device’s settings menu to further enhance your privacy. Adjust settings related to location services, app data usage, ad personalization, and app-specific privacy preferences to suit your comfort level.
It’s essential to strike a balance between convenience and security. Adjust the security and privacy settings according to your preferences and needs, but be mindful not to hinder your device’s usability or essential app functionalities.
By setting up strong security measures and managing privacy settings on your Android device, you can protect your personal information, maintain your privacy, and enhance your overall online security.
Set Up Battery and Power Saving Settings
Optimizing the battery life and power consumption on your Android device is important to ensure prolonged usage and avoid unnecessary drain. Here’s how you can set up battery and power saving settings:
1. Battery Optimization: Android devices come with built-in battery optimization features to maximize battery life. To access these settings, go to “Settings” and select “Battery” or “Battery & performance.” Review the list of apps and ensure that they are optimized for battery usage. Some apps may have additional battery optimization settings within their individual app settings as well.
2. Power Saving Mode: Enable the power saving mode on your device to conserve battery life. Depending on your device, this may be called “Battery Saver” or “Power Saving Mode.” Activate it from the “Battery” or “Battery & performance” settings. Power saving mode typically limits background data sync, reduces screen brightness, and restricts certain app activities to extend battery life.
3. Smart Battery Management: Android devices offer smart battery management features that learn your usage patterns and optimize battery performance automatically. These features may include adaptive battery, which prioritizes power to frequently used apps, and adaptive brightness, which adjusts screen brightness based on your surroundings. Ensure these features are enabled in the “Battery” settings.
4. Background App Restrictions: Restrict or manage background app activities, as they can significantly impact battery life. In the “Battery” or “Battery & performance” settings, look for options such as “App power usage” or “Background restrictions” to review and manage which apps can run in the background and consume resources.
5. Sleep and Standby Settings: Adjust the sleep and standby settings of your device to optimize power usage when your device is idle. Go to “Settings” and select “Display” or “Accessibility.” Adjust the screen timeout duration to ensure your device goes to sleep after a specified period of inactivity. Additionally, enable “Wi-Fi sleep mode” to conserve battery by automatically disconnecting from Wi-Fi networks during idle periods.
6. Widget and Live Wallpaper Usage: Minimize the usage of widgets and live wallpapers, as they can consume significant battery resources. Remove or reduce the number of active widgets on your home screen and consider using static wallpapers instead of live wallpapers to conserve power.
Remember to charge your device using the original charger or a reputable charging accessory to ensure optimal battery health. Avoid using your device while charging and charge it in a well-ventilated area away from heat sources.
With effective battery and power saving settings in place, you can extend your device’s battery life, optimize power consumption, and ensure a reliable and efficient Android experience.
Set Up Data Usage and Wi-Fi Settings
Configuring your data usage and Wi-Fi settings on your Android device is vital to efficiently manage your internet connectivity and avoid excessive data charges. Here’s how you can set up and manage your data usage and Wi-Fi settings:
1. Data Usage Monitoring: Android devices provide tools to monitor and control your data usage. Go to “Settings” and select “Network & internet” or “Data usage.” Set a data usage cycle and enable notifications to receive alerts when you approach your set limit. You can also view the data usage details for each app and adjust their background data or restrict them from using data entirely.
2. Set Data Saver: Enable the Data Saver mode to reduce data usage. This feature restricts background data usage for apps and limits the amount of data consumed by certain background activities. Access this setting in the “Network & internet” or “Data usage” settings and toggle on the Data Saver option. Customize which apps are exempted from data restrictions if necessary.
3. Wi-Fi Usage: To manage your Wi-Fi usage, go to “Settings” and select “Network & internet” or “Wi-Fi.” Enable Wi-Fi and select your desired network from the available options. You can configure your device to automatically connect to known networks or manually connect to trusted networks. Additionally, you can view and manage saved Wi-Fi networks and set preferences for Wi-Fi calling or Wi-Fi sharing.
4. Wi-Fi Assist: Android devices may offer a Wi-Fi Assist feature, which automatically switches to mobile data when the Wi-Fi network becomes weak or unstable. This ensures a seamless internet experience. To enable or disable Wi-Fi Assist, go to “Settings” and select “Network & internet” or “Data usage.” Look for Wi-Fi Assist or a similar option and customize its settings according to your preference.
5. Wi-Fi Optimization: Android devices provide Wi-Fi optimization features to improve connection stability and enhance performance. In the “Network & internet” or “Wi-Fi” settings, look for options such as “Wi-Fi preferences” or “Advanced settings.” Enable features like Wi-Fi scanning or Wi-Fi optimization if available, as these can improve the reliability of your Wi-Fi connections.
6. Hotspot and Tethering: Android devices allow you to share your mobile data connection with other devices through hotspot and tethering options. In the “Network & internet” or “Data usage” settings, select “Hotspot & tethering” to configure and customize the settings according to your needs. Set a secure hotspot password to protect your connection from unauthorized access.
Remember to connect to trusted and secure Wi-Fi networks when available to ensure safe browsing and protect your data. Additionally, be mindful of data usage limits and adjust settings to avoid exceeding your data plan’s limitations.
By setting up and managing your data usage and Wi-Fi settings on your Android device, you can optimize your internet connectivity, control your data consumption, and ensure a seamless online experience.
Set Up Accessibility Settings
Configuring accessibility settings on your Android device is essential to make your device more user-friendly and accessible to individuals with different needs. Here’s how you can set up and customize accessibility settings:
1. Accessibility Menu: Enable the Accessibility Menu feature on your Android device for quick access to common accessibility functions. Go to “Settings” and select “Accessibility” or “Accessibility & interactions.” Choose “Accessibility Menu” and toggle it on. You can now access a menu with shortcuts to various accessibility features by tapping the accessibility button on the navigation bar or by using the device’s gesture controls.
2. TalkBack: TalkBack is a popular accessibility feature that provides spoken feedback to assist users with visual impairments. Enable TalkBack in the “Accessibility” settings and follow the prompts to set it up. You can customize TalkBack settings to adjust speech rate, feedback volume, and other preferences. Use gestures or physical buttons to navigate your device and have items read aloud to you.
3. Display Size and Font: Android devices allow you to adjust the display size and font to enhance readability. In the “Accessibility” settings, select “Display” or “Display & text size.” From here, you can adjust the display size to make content larger or smaller according to your preference. Additionally, you can customize the font style and size for improved readability.
4. Color Inversion and Filters: Android provides color inversion and color correction filters for users with specific visual needs. In the “Accessibility” settings, select “Display” or “Display & text size.” Look for options like “Color inversion” or “Color correction” to enable these features. Color inversion reverses the display colors, while color correction filters can aid individuals with color vision deficiencies.
5. Hearing Accessibility: Android devices offer various features to assist individuals with hearing impairments. In the “Accessibility” settings, select “Sound” or “Hearing accessibility.” Enable features such as “Mono audio,” “Sound amplifier,” or “Live Caption” to enhance sound clarity or provide text captions for media playback.
6. Interaction and Dexterity: Android devices incorporate features to assist users with limited dexterity or physical impairments. In the “Accessibility” settings, select “Interaction controls” or “Motor & cognition.” Set up options like “Switch Access,” which allows control through external switches, or “AssistiveTouch,” which provides customizable on-screen gestures for easier navigation.
Remember to explore the settings within each accessibility feature to customize them according to your specific needs. Android devices offer a wide range of accessibility options to accommodate different users with diverse accessibility requirements.
By setting up and customizing accessibility settings on your Android device, you can ensure a more inclusive and accessible experience for yourself or others who may benefit from these features.
Explore Android Features and Gestures
Android devices offer a multitude of features and gestures that can enhance your experience and streamline your interactions with the device. Here’s a glimpse into some of the notable features and gestures you can explore:
1. Quick Settings: Access the Quick Settings panel by swiping down from the top of the screen with two fingers. This panel provides easy access to frequently used settings like Wi-Fi, Bluetooth, screen brightness, and more. Customize the Quick Settings tiles by clicking on the pencil icon or a three-dot menu to add or remove tiles according to your preference.
2. App Drawer Search: Searching for apps on your Android device is quick and efficient. Open the app drawer by swiping up from the bottom of the screen or tapping the app drawer icon. Once in the app drawer, use the search bar at the top to quickly find and launch any app installed on your device.
3. Split Screen Multi-Tasking: Take advantage of the split-screen feature to view and interact with two apps simultaneously. Start with the first app open, and then swipe up from the bottom to reveal the recent apps overview. Tap and hold on the app’s title bar and drag it to either the top or bottom of the screen. Choose the second app from the recent apps overview, and it will open in the remaining portion of the screen.
4. Gesture Navigation: Android devices offer gesture-based navigation as an alternative to traditional navigation buttons. Go to “Settings” and select “System” or “Buttons & gestures.” Choose “Gesture navigation” and follow the instructions to enable it. With gesture navigation, you can swipe up from the bottom to go home, swipe up and hold to access recent apps, and swipe from the sides to go back.
5. Do Not Disturb Customization: Customize the behavior and settings of the Do Not Disturb mode according to your preferences. Access Do Not Disturb by swiping down from the top of the screen to reveal the Quick Settings panel and tapping on the Do Not Disturb icon. From here, you can set schedules, allow exceptions, and adjust priority settings for calls and notifications.
6. One-Handed Mode: Android devices offer a one-handed mode that makes it easier to use your device with one hand. Enable one-handed mode by swiping down from the top of the screen twice to reveal the Quick Settings panel fully. Look for the one-handed mode icon and tap on it to activate. This feature shrinks the display, making it more comfortable to operate in one-handed scenarios.
Remember to explore the settings and options within each feature to customize them according to your needs and preferences. Android devices offer a range of functionalities and customizable options to personalize your device and streamline your interactions.
By exploring these Android features and gestures, you can make the most of your device’s capabilities and enhance your overall user experience.