
Enable Screen Sharing on Zoom
Screen sharing is a crucial feature for online meetings and presentations, allowing you to share your screen with participants on Zoom. If you’re using Zoom on your iPad, here’s how you can enable screen sharing:
1. Launch the Zoom app on your iPad and sign in to your account. If you don’t have the app, you can download it from the App Store.
2. Once you’re signed in, tap on the “New Meeting” button to start a new meeting or join an existing one.
3. Navigate to the meeting controls by tapping on the screen. This will bring up additional options for managing the meeting.
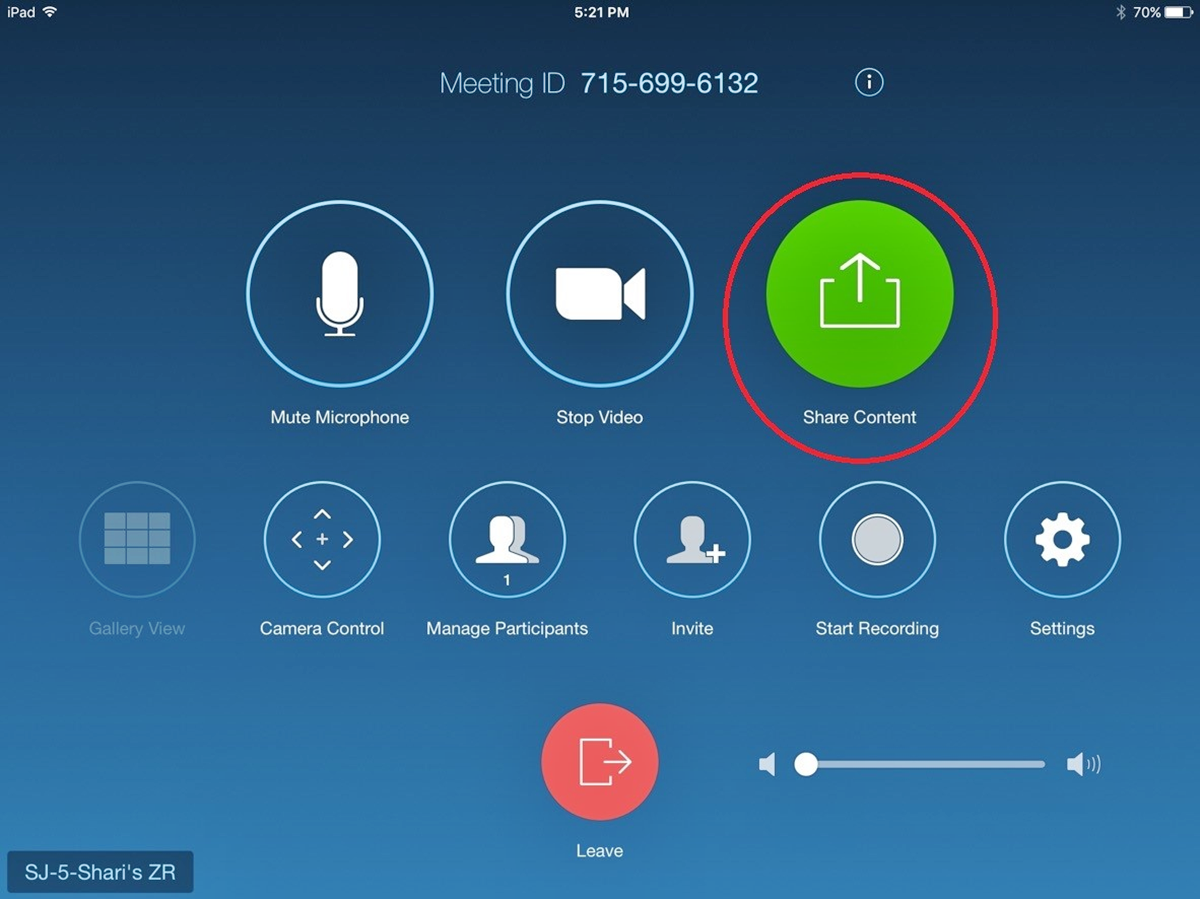
4. Look for the “Share Content” or “Share Screen” button in the meeting controls menu. It’s usually represented by an icon of a screen or two overlapping rectangles.
5. Tap on the “Share Content” or “Share Screen” button to access the screen sharing options.
6. You will be presented with three options: “Screen”, “Whiteboard”, and “iPhone/iPad”. Select the “Screen” option to share your iPad screen.
7. If it’s your first time sharing the screen, you may need to grant Zoom permission to record your screen. Follow the on-screen prompts to enable screen recording.
8. Once screen sharing is enabled, you can choose to share your entire screen or a specific app or document. Simply select the one you want to share, and it will be displayed to all participants in the meeting.
9. You can also enable the “Optimize for Full Screen Video Clip” option for smoother playback when sharing videos, especially if you’re presenting a video during the meeting.
With these steps, you can easily enable screen sharing on Zoom for your iPad. This feature allows you to present documents, slideshows, videos, and more, making your online meetings productive and engaging.
Start a Zoom Meeting on Your iPad
Starting a Zoom meeting on your iPad is simple and convenient. Here’s a step-by-step guide to help you get started:
1. Open the Zoom app on your iPad. If you don’t have the app, you can download it for free from the App Store.
2. Sign in to your Zoom account using your credentials. If you don’t have an account, you can create one by following the on-screen instructions.
3. Once you’re signed in, you’ll be greeted with the Zoom home screen. Tap on the “New Meeting” button to initiate a new meeting. You can also tap on the “Join” button if you want to join an existing meeting.
4. Customize your meeting settings by tapping on the options available. You can enable or disable features like video, audio, and screen sharing according to your preferences. You can also choose to use your personal meeting ID or generate a random one-time meeting ID.
5. After configuring your meeting settings, tap on the “Start a Meeting” button to begin the meeting. This will launch the meeting interface with your video feed displayed.
6. You can invite participants to your meeting by tapping on the “Participants” icon at the bottom of the screen. This will bring up the participant panel, where you can send invitations via email, SMS, or copy the invitation link to share it manually.
7. During the meeting, you can access various controls and options by tapping on the screen. This will reveal a toolbar at the bottom of the screen, allowing you to manage participants, chat, share content, and more.
8. To end the meeting, tap on the “End Meeting” button. You will be prompted to confirm the end of the meeting, and upon confirmation, all participants will be disconnected.
Starting a Zoom meeting on your iPad gives you the flexibility to connect and collaborate with others from anywhere. Whether it’s a team meeting, a webinar, or an online lecture, Zoom on your iPad provides a seamless and user-friendly experience.
Access the Control Menu during a Zoom Meeting
While in a Zoom meeting on your iPad, you’ll have access to a control menu that allows you to manage various aspects of your meeting. Here’s how to access the control menu:
1. Join or start a Zoom meeting on your iPad by following the previous instructions.
2. Once you’re in the meeting interface, tap anywhere on the screen to display the meeting controls.
3. The control menu will appear at the bottom of the screen. It contains several icons representing different features and options.
4. To access additional controls and options, tap on the “More” icon (represented by three dots) at the right end of the control menu. This will open a dropdown menu with additional options.
5. From the dropdown menu, you can access features such as “Chat”, “Participants”, “Share Content”, “Record”, “Gallery View”, and more.
6. Tapping on the “Chat” icon allows you to open the chat panel and communicate with other participants through text during the meeting.
7. The “Participants” icon opens the participants panel, where you can view the list of attendees, manage participants’ audio and video settings, and perform other participant-related actions.
8. The “Share Content” icon provides options for screen sharing, sharing documents, slideshows, or other media files with all participants in the meeting.
9. The “Record” icon allows you to start or stop recording the meeting. You can choose to record the audio, video, and/or screen sharing during the meeting.
10. The “Gallery View” icon switches the video layout to display all participants’ video feeds in a grid view, making it easier to see everyone at once.
By accessing the control menu during a Zoom meeting on your iPad, you can take full advantage of the various features and functionalities available. Whether you need to chat with other participants, share your screen, or record the meeting, the control menu puts these options right at your fingertips for a seamless and efficient meeting experience.
Navigate to the Share Screen Option
Sharing your screen during a Zoom meeting on your iPad can be incredibly helpful for presentations, demonstrations, or collaborating on documents. To navigate to the Share Screen option, follow these steps:
1. Join or start a Zoom meeting on your iPad using the steps mentioned earlier.
2. Once you’re in the meeting interface, tap anywhere on the screen to bring up the meeting controls.
3. Look for the “Share Content” or “Share Screen” button in the control menu at the bottom of the screen. It’s typically represented by an icon that resembles a screen or two overlapping rectangles.
4. Tap on the “Share Content” or “Share Screen” button to access the screen sharing options.
5. In the screen sharing options menu, you’ll find three different options: “Screen”, “Whiteboard”, and “iPhone/iPad”. Tapping on the “Screen” option will allow you to share your entire iPad screen.
6. If it’s your first time sharing the screen, you may be prompted to grant Zoom permission to record your screen. Follow the on-screen prompts to enable screen recording.
7. Once screen sharing is enabled, you can choose to share your entire screen or a specific app or document. Simply select the one you want to share, and it will be displayed to all participants in the meeting.
8. There’s also an option to optimize for full-screen video clip sharing, which ensures smooth playback if you’re sharing a video during the meeting.
With these steps, you can navigate to the Share Screen option and seamlessly share your iPad screen during a Zoom meeting. Whether you need to present slides, demonstrate a process, or collaborate on a document, screen sharing enhances engagement and collaboration among meeting participants.
Select the Screen You Want to Share
When screen sharing on Zoom with your iPad, you have the flexibility to choose which screen or app you want to share with the meeting participants. Here’s how to select the screen you want to share:
1. Make sure you have already accessed the screen sharing options menu by following the previous instructions.
2. In the screen sharing options menu, you’ll see a list of available screens or apps that you can share.
3. If you want to share your entire iPad screen, select the “Screen” option. This will mirror your entire screen to the meeting participants.
4. If you prefer to share a specific app or document, tap on the corresponding option in the list. This could be an app like Keynote, PowerPoint, or any other app that you have open on your iPad.
5. If you choose an app or document to share, the selected app or document will be displayed to all participants in the meeting. They will be able to see any changes or interactions you make with that specific app or document in real-time.
6. As you switch between screens or apps during the meeting, the shared screen will automatically update for all participants, allowing them to follow along with your presentation or demonstration.
By selecting the screen or app you want to share, you have full control over what information or content you present to the meeting participants. This flexibility enables you to deliver effective presentations, collaborate on specific documents, or provide hands-on demonstrations, enhancing the overall meeting experience.
Start Sharing Your Screen on Zoom
Once you’ve selected the screen or app you want to share during a Zoom meeting on your iPad, you can start sharing it with the participants. Here’s how to start sharing your screen:
1. Ensure that you have already accessed the screen sharing options menu and selected the desired screen or app to share, as outlined in the previous sections.
2. Once you’ve selected the screen or app, tap on the “Share” button located in the bottom right corner of the screen sharing options menu.
3. A prompt will appear, asking you to confirm if you want to start sharing your screen. Tap on “Start Broadcast” to begin sharing.
4. The screen or app you’ve selected will now be displayed to all participants in the meeting. They will be able to see any changes or interactions you make on your iPad screen in real-time.
5. A floating toolbar will appear on your screen while screen sharing. It provides additional controls for managing the screen sharing session. You can access features like pause, stop, annotate, and more.
6. During screen sharing, you can navigate through different apps or documents on your iPad without interrupting the screen sharing session. This allows you to seamlessly switch between content or apps as needed.
7. If you want to temporarily pause screen sharing, tap on the “Pause Share” button in the floating toolbar. To resume sharing, tap on the “Resume Share” button.
8. If you need to end the screen sharing session, tap on the “Stop Share” button in the floating toolbar. This will stop sharing your screen and return you to the meeting interface.
With these steps, you can effortlessly start sharing your screen during a Zoom meeting on your iPad. Whether you’re presenting slides, demonstrating software, or collaborating on documents, screen sharing enhances communication and engagement among meeting participants, making your meetings more dynamic and interactive.
Annotate Your Shared Screen
When sharing your screen on Zoom with your iPad during a meeting, you have the ability to annotate or make notes directly on the shared screen. This can be incredibly useful for highlighting important points, drawing diagrams, or emphasizing specific sections. Here’s how you can annotate your shared screen:
1. Start sharing your screen on Zoom by following the previous instructions detailed in the “Start Sharing Your Screen on Zoom” section.
2. Once your screen is being shared, a floating toolbar will appear on your screen. This toolbar provides various annotation tools that you can use to mark up your shared screen.
3. Tap on the “More” button (represented by three dots) in the floating toolbar to access additional annotation options.
4. In the expanded annotation menu, you’ll find a range of tools such as pen, highlighter, eraser, text, shapes, and more. Select the desired annotation tool by tapping on it.
5. Use your finger or an Apple Pencil (if available) to annotate on the shared screen. You can draw or write directly on the screen using the selected annotation tool.
6. To change the color or thickness of the annotation, tap on the color or thickness options available in the annotation toolbar.
7. If you make a mistake or want to remove an annotation, you can use the eraser tool to selectively erase your markings.
8. In addition to annotations, you can also use the text tool to add text-based notes to your shared screen. Tap on the “T” icon in the annotation toolbar and type the desired text.
9. If you need to clear all annotations at once, tap on the “Clear” button in the annotation toolbar.
10. To exit the annotation mode and continue screen sharing without annotations, tap on the “X” icon in the annotation toolbar.
Annotating your shared screen during a Zoom meeting on your iPad allows you to engage with the participants and emphasize key information. Whether you’re presenting a slideshow, going through a document, or brainstorming ideas, annotations provide an interactive and visual element to your shared content.
Stop Sharing Your Screen on Zoom
Once you have finished sharing your screen during a Zoom meeting on your iPad, you may want to stop the screen sharing session. Here’s how you can do it:
1. While in a Zoom meeting and sharing your screen, locate the floating toolbar that appears on your iPad screen during screen sharing.
2. In the floating toolbar, look for the “Stop Share” button. It is usually located at the bottom or in a prominent position on the toolbar.
3. Tap on the “Stop Share” button to end the screen sharing session.
4. After confirming that you want to stop sharing your screen, you will be returned to the meeting interface without screen sharing.
5. The participants in the meeting will no longer see your shared screen and will be back to seeing the active speaker or gallery view, depending on the view you had set for the meeting.
6. If you need to share your screen again at any point during the meeting, you can follow the previous instructions for selecting and sharing your screen.
Stopping the screen sharing session allows you to regain privacy and control over your screen. It is important to stop sharing your screen when you have finished presenting or sharing the required information.
By being aware of how to stop sharing your screen on Zoom, you can seamlessly transition between screen sharing and regular meeting modes to ensure a smooth and professional meeting experience.
Troubleshooting Screen Sharing Issues on Zoom
While screen sharing on Zoom on your iPad is generally a straightforward process, you may encounter some issues from time to time. Here are some troubleshooting steps to resolve common screen sharing issues:
1. Check your Zoom app and device settings. Ensure that you have granted Zoom permission to access your iPad’s screen. You can do this by going to the Settings app on your iPad, selecting Zoom, and enabling the Screen Recording option.
2. Verify that you are using the latest version of the Zoom app. Outdated versions may have compatibility issues that can affect screen sharing. Update to the latest version from the App Store if necessary.
3. Check your internet connection. A stable and reliable internet connection is crucial for screen sharing. Make sure you are connected to a strong Wi-Fi network or have a stable cellular data connection.
4. Restart your Zoom app or your iPad. Close the Zoom app and reopen it to refresh the settings and resolve any temporary glitches that may be affecting screen sharing.
5. Clear the app cache. If you encounter persistent issues, clearing the Zoom app’s cache can help resolve them. Go to the Settings app on your iPad, select Zoom, and tap on Clear Cache.
6. Disable other screen sharing or remote control software. Sometimes, conflicts may arise if you have other screen sharing or remote control applications running simultaneously. Close or disable these applications and try screen sharing again.
7. Test screen sharing in a different meeting. Create a test meeting or join a different meeting with a colleague to determine if the issue is specific to a particular meeting or app-wide.
8. Restart your iPad. If all else fails, restarting your iPad can often resolve various technical issues, including those related to screen sharing.
9. Contact Zoom support. If you continue to experience issues with screen sharing on your iPad, reach out to Zoom support for further assistance. They can provide specific troubleshooting steps or help you troubleshoot any device-specific issues.
By following these troubleshooting steps, you can overcome common screen sharing issues on Zoom. Remember to check your settings, update your app, and ensure a stable internet connection to have a seamless and efficient screen sharing experience.