
Why Share an Amazon Wish List?
An Amazon wish list is a convenient tool that allows you to curate a personalized list of products or items that you desire. You can add anything from books and gadgets to home decor and clothing to your wish list. But why should you share your Amazon wish list with others?
1. Making gifting easier: By sharing your Amazon wish list, you make it effortless for people to know what you truly want or need. It eliminates the guesswork for anyone looking to give you a gift, ensuring that they choose something you will genuinely appreciate.
2. Saving time and effort: Sharing your Amazon wish list streamlines the gift-giving process. Friends and family members no longer have to spend hours searching for the perfect present. They can simply browse your list, select an item, and have it shipped directly to you.
3. Avoiding duplicate gifts: How many times have you received two of the same gift? By sharing your wish list, you minimize the chances of duplicates. People can see what has already been purchased for you, reducing the likelihood of receiving identical items.
4. Discovering new interests: Sharing your wish list allows others to see your interests and preferences. It provides an opportunity for them to explore new products or genres that they may not have been aware of before. This can lead to exciting discoveries and introduce you to items you might have otherwise overlooked.
5. Special occasions and events: Whether it’s your birthday, a wedding, or a baby shower, sharing your wish list ensures that people can find suitable gifts for the occasion. It takes the stress out of gift shopping and provides a convenient solution for both the giver and the recipient.
6. Collaborative wish lists: Sharing your Amazon wish list can be especially useful when planning group purchases or coordinating gifts for someone. It enables multiple people to contribute to a larger gift or join forces to fulfill a specific wish, making it a great option for family, friends, or colleagues.
By sharing your Amazon wish list, you create a seamless and efficient gift-giving experience for both yourself and others. It fosters a sense of connection and satisfaction, knowing that you’ll receive something you truly desire while making it easier for others to find the perfect gift.
Creating an Amazon Wish List
Creating an Amazon wish list is a straightforward process that allows you to compile a personalized collection of items you desire. Follow these simple steps to create your own wish list:
- Sign in to your Amazon account: Visit the Amazon website and log in using your credentials. If you don’t have an account, you can quickly create one for free.
- Go to the wish list page: Once you are logged in, hover over the “Account & Lists” option at the top-right corner of the page. From the drop-down menu, select “Wish List” to navigate to the wish list page.
- Select “Create a List”: On the wish list page, you will find a button labeled “Create a List.” Click on it to start the process of creating your personalized wish list.
- Name your wish list: Give your wish list a descriptive and memorable name that reflects your interests or occasion. For example, you could name it “Birthday Wishes” or “Books I Want to Read.”
- Set the privacy settings: Amazon gives you the option to make your wish list public, private, or shared with specific people. Choose the privacy settings that suit your preferences.
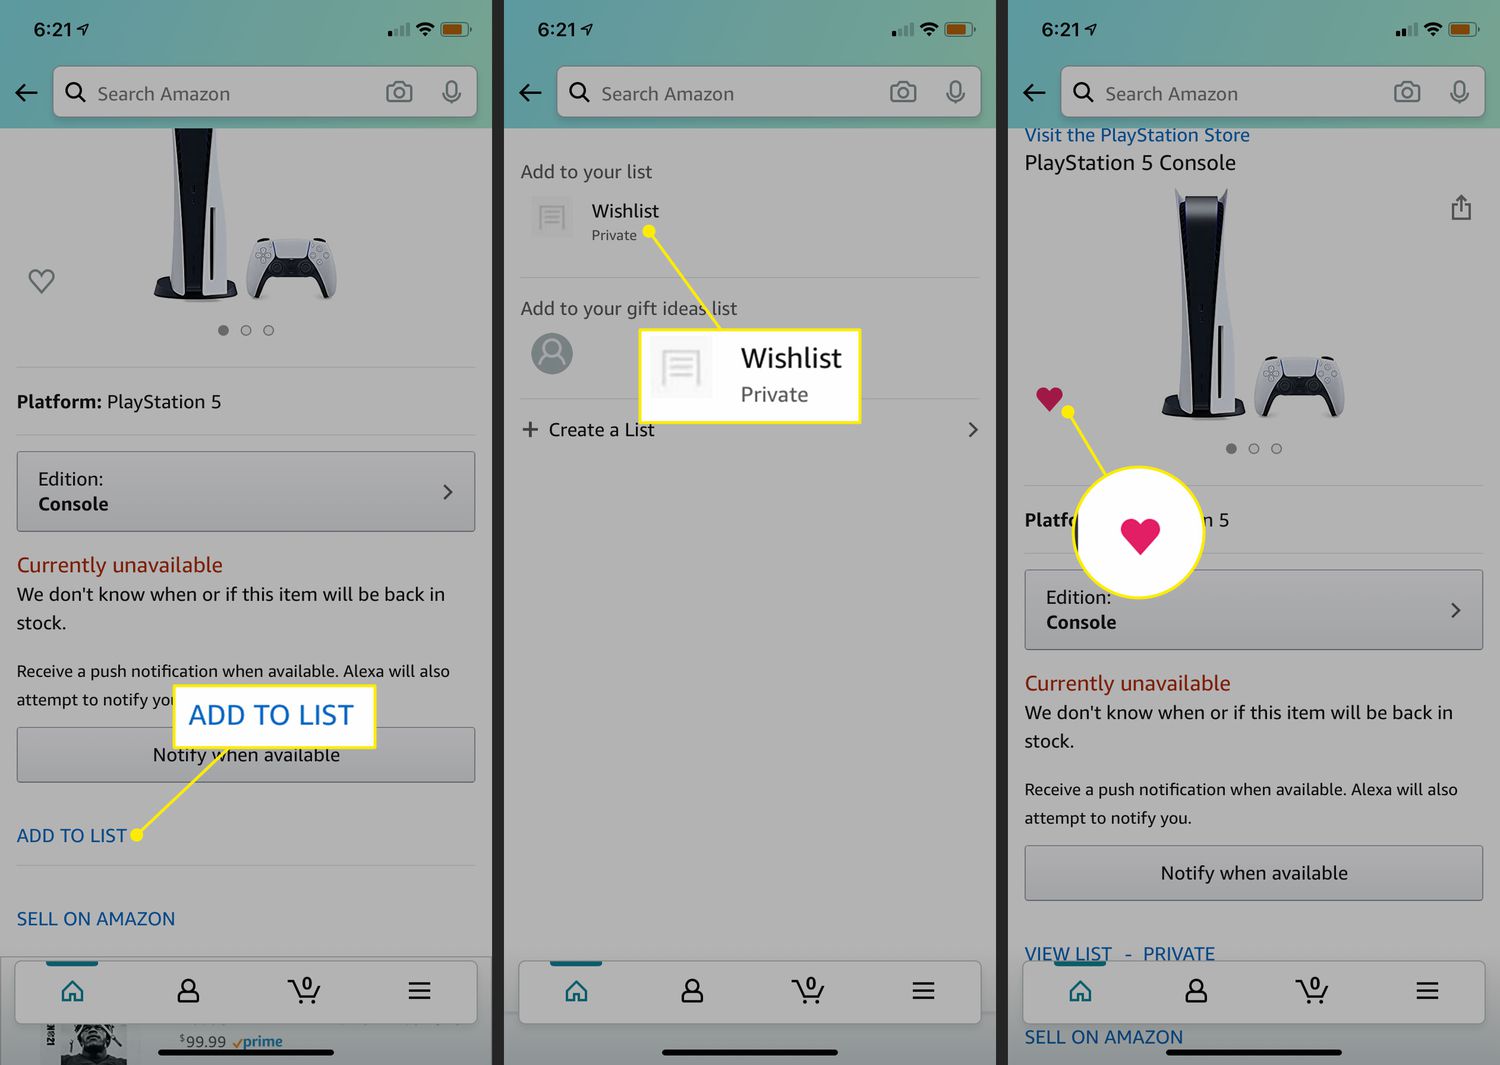
- Start adding items: Now it’s time to populate your wish list with items. You can browse the Amazon website and search for products you desire. On the product page, click on the “Add to List” button next to the item to include it in your wish list.
- Organize your list: Amazon allows you to categorize and prioritize your items. You can create different sections within your wish list, such as “Books,” “Electronics,” or “Home Decor.” This helps to keep your list organized and easily accessible.
- Add notes and comments: If there are specific details or preferences you’d like to note about an item, you can add notes or comments to each individual entry in your wish list. This can be useful for providing additional guidance to those who may view your list.
- Update and manage your wish list: As time goes on, you may want to update or modify your wish list. You can add new items, remove old ones, or adjust the priorities and sections. Regularly reviewing and updating your wish list ensures that it remains current and reflects your evolving desires.
Once you have created your Amazon wish list, you can easily access and share it with others, allowing them to explore the items you desire and make gift-giving a breeze.
Accessing Your Amazon Wish List
Once you have created your Amazon wish list, accessing it is a simple and convenient process. Here are the steps to access your wish list:
- Sign in to your Amazon account: Visit the Amazon website and log in using your credentials. Make sure to use the same account that you used to create your wish list.
- Go to the wish list page: After logging in, hover over the “Account & Lists” option at the top-right corner of the page. From the drop-down menu, select “Wish List” to navigate to the wish list page.
- Select the desired wish list: If you have created multiple wish lists, you will see them listed on the left-hand side of the wish list page. Click on the name of the wish list that you want to access.
- Explore your wish list: Once you have selected your wish list, you will be directed to the page displaying all the items you have added. Take your time to browse through the list and view the details of each item.
- Sorting and filtering: Amazon offers sorting and filtering options to help you organize and discover items in your wish list. You can sort by price, priority, or recently added items. Additionally, you can filter by category or search for specific items within your list.
- Managing your wish list: On the wish list page, you can easily modify and manage your list. You can add new items, remove existing items, change priorities, create sections, and update notes or comments for individual entries.
- Viewing purchased items: If someone has already purchased an item from your wish list, it will be marked as purchased. You can see these items and keep track of what has been bought for you.
- Accessing your wish list on the Amazon app: If you prefer using the Amazon mobile app, accessing your wish list is just as simple. Open the app, sign in to your Amazon account, and tap on the “Account” icon at the bottom right. From there, select “Wish List” to view your list and make any necessary changes.
- Sharing your wish list: Once you have accessed your wish list, you can easily share it with others. Whether you want to send it to friends and family via email or share it on social media, Amazon provides various options to let others explore and shop from your list.
By following these steps, you can effortlessly access your Amazon wish list and make any necessary updates or additions. Whether you’re browsing it yourself or sharing it with others, accessing your wish list ensures a seamless shopping experience.
Sharing Your Amazon Wish List
Sharing your Amazon wish list is a great way to let others know what you want and streamline the gift-giving process. Here are several methods to share your wish list:
Sharing Your Amazon Wish List via Email
One of the simplest ways to share your wish list is through email. Follow these steps to send your wishlist via email:
- Access your wish list: Sign in to your Amazon account and navigate to your wish list page.
- Click on the “Send List to Others” button: On the right-hand side of your wish list page, you’ll find a button labeled “Send List to Others”. Click on it to initiate the sharing process.
- Enter recipients’ email addresses: In the pop-up window, enter the email addresses of the people you want to share your wish list with. You can separate multiple email addresses with commas.
- Customize the email message: Amazon provides a default message, but you can personalize it to include any additional information or requests.
- Send the email: Once you’ve customized the message, click on the “Send” button to share your wish list with the selected recipients.
Sharing Your Amazon Wish List via Social Media
Another way to share your wish list is through social media platforms. Here’s how to do it:
- Access your wish list: Sign in to your Amazon account and go to your wish list page.
- Click on the “Share” button: On the right-hand side of your wish list page, you’ll find the “Share” button. Click on it to see sharing options.
- Select a social media platform: Choose the social media platform you want to share your wish list on, like Facebook, Twitter, or Pinterest.
- Customize the post: Add a personal message or any other details you want to include in the post. You can also choose the privacy settings for the shared post.
- Share your wish list: Click the “Share” button to publish the post with a link to your Amazon wish list on your chosen social media platform.
Sharing Your Amazon Wish List with Specific People
If you want to share your wish list with specific people, you can generate a link to send to them. Here’s how:
- Access your wish list: Sign in to your Amazon account and navigate to your wish list page.
- Click on the “Send List to Others” button: On the right-hand side of your wish list page, click on the “Send List to Others” button to open the sharing options.
- Copy the wish list link: In the pop-up window, you’ll see a link to your wish list. Click on the “Copy link” button to copy the link to your clipboard.
- Share the link: Paste the link in a message and send it to the specific individuals you want to share your wish list with. They can simply click on the link to access your wish list.
By utilizing these methods, you can easily share your Amazon wish list with friends, family, or anyone you want to make gift shopping a breeze for!
Sharing Your Amazon Wish List via Email
Sharing your Amazon wish list with others can be done conveniently through email. By sending your wish list via email, you can let your friends, family, or colleagues know what you would love to receive as a gift. Here’s how you can easily share your wish list via email:
- Access your wish list: Sign in to your Amazon account and navigate to your wish list page.
- Click on the “Send List to Others” button: On the right-hand side of your wish list page, you’ll find a button labeled “Send List to Others”. Click on it to initiate the sharing process.
- Enter recipients’ email addresses: In the pop-up window, you’ll see a field where you can enter the email addresses of the people you want to share your wish list with. You can separate multiple email addresses with commas.
- Customize the email message: Amazon provides a default message that includes a link to your wish list, but you can personalize it to add a personal touch. Consider including a friendly note or specific instructions to make it even easier for the recipients to choose a gift.
- Send the email: Once you’ve customized the message, click on the “Send” button to share your wish list with the selected recipients.
By following these steps, you can efficiently share your Amazon wish list through email. It’s a simple and effective way to inform others about your desired gifts and make the gift-giving process smoother for both you and your loved ones.
Sharing Your Amazon Wish List via Social Media
Social media provides a fantastic platform for sharing your Amazon wish list with a wide audience. By sharing your wish list via platforms like Facebook, Twitter, or Pinterest, you can reach out to your friends, followers, and online community, making it effortless for them to discover and fulfill your gift preferences. Here’s how to share your Amazon wish list via social media:
- Access your wish list: Sign in to your Amazon account and go to your wish list page.
- Click on the “Share” button: On the right-hand side of your wish list page, you’ll find a button labeled “Share”. Click on it to see the sharing options available.
- Select a social media platform: Choose the social media platform on which you want to share your wish list. Some popular options include Facebook, Twitter, and Pinterest. Select the platform that you frequently use or that aligns best with your audience.
- Customize the post: Before you share your wish list, you can customize the post according to your preferences. Add a personal message, description, or any additional details you want to include. This offers a chance to express your excitement, mention any specific interests, or provide context for your wish list.
- Share your wish list: Once you’ve customized the post, click the “Share” button to publish it on your selected social media platform. It will include a link to your Amazon wish list, allowing your friends and followers to easily access and explore the items you desire.
Using social media to share your Amazon wish list can be an effective way to reach a larger audience and increase the chances of your gift preferences being fulfilled. It’s an engaging and interactive method that encourages your friends and followers to explore your wish list and choose a gift that resonates with them.
Sharing Your Amazon Wish List with Specific People
Sometimes, you may want to share your Amazon wish list with specific individuals, such as close friends or family members. Amazon provides a convenient option for sharing your wish list with these specific people. Here’s how you can do it:
- Access your wish list: Sign in to your Amazon account and navigate to your wish list page.
- Click on the “Send List to Others” button: On the right-hand side of your wish list page, you’ll find a button labeled “Send List to Others”. Click on it to initiate the sharing process.
- Copy the wish list link: In the pop-up window, you’ll see a link to your wish list. Click on the “Copy link” button to copy the link to your clipboard.
- Share the link: Paste the link in a message or email and send it to the specific individuals you want to share your wish list with. This could include close friends, family members, or anyone you wish to give access to your desired gifts.
By sharing the link with specific individuals, you grant them direct access to your Amazon wish list. This ensures that only those you have personally shared the link with can view and explore your desired items. They can easily browse the list, select a gift, and make a purchase, knowing that it’s something you truly desire.
This method of sharing is especially useful when you want to keep your wish list private and only share it with a select group of people. It offers a more personalized and targeted approach, allowing you to include individuals who you know will appreciate the opportunity to view and fulfill your specific gift preferences.
Customizing Your Amazon Wish List Message
When sharing your Amazon wish list, you have the option to customize the message that accompanies it. Adding a personalized message can add a thoughtful touch and provide additional context about your wish list. Here are some ideas for customizing your wish list message:
Express your gratitude: Begin your message with a heartfelt thank you to the recipients for taking the time to explore your wish list and consider gifting you something special. This shows appreciation and sets a positive tone for the gift-giving process.
Explain the purpose: Provide a brief explanation of why you created the wish list. You can mention special occasions like birthdays, anniversaries, or holidays, or simply express your desire to share your preferences to make gift shopping easier for others.
Include specific interests or themes: If there are specific interests, themes, or genres that you predominantly focus on in your wish list, mention them in the message. This information can help guide the recipients when they are selecting a gift.
Add personal anecdotes: Share personal stories or memories related to some of the items on your wish list. This can create an emotional connection and make the gift-giving experience more meaningful for both you and the recipient.
Mention any size or style preferences: If there are specific size requirements or style preferences for certain items, include them in the message. This helps prevent any confusion or misunderstandings and ensures that the gifts align with your preferences.
Provide alternative options: If there are alternative items or similar products that you would be equally happy to receive, mention them in your message. This allows the recipients to have some flexibility in their gift choices and ensures that they can find something that matches their budget or availability.
Offer additional instructions: If there are any additional instructions or special requests regarding the gift-giving process, you can include them in your message. For example, if you prefer digital gifts or have a specific delivery address, be sure to convey that information.
Remember, the goal of customizing your wish list message is to communicate your appreciation, share relevant details, and make the experience more personal. By adding a thoughtful and personalized touch to your message, you can create a positive and meaningful connection with the recipients of your wish list.
Sharing Your Amazon Wish List via a Link
Sharing your Amazon wish list is made even easier with the option to share it via a direct link. This method allows you to quickly and conveniently share your wish list with anyone, regardless of whether they have an Amazon account. Here’s how to share your wish list using a link:
- Access your wish list: Sign in to your Amazon account and navigate to your wish list page.
- Click on the “Send List to Others” button: On the right-hand side of your wish list page, click on the “Send List to Others” button to open the sharing options.
- Copy the wish list link: In the pop-up window, you will see a link to your wish list. Click on the “Copy link” button to copy the link to your clipboard.
- Share the link: Paste the copied link in a message, email, or any other desired platform to share it with your intended recipients. You can send the link through various communication channels, such as text messages, instant messaging apps, or even social media platforms.
By sharing the direct link to your wish list, you provide others with a convenient option to access and explore your desired items. Recipients can simply click on the link to view your wish list, browse the products, and make a purchase directly through Amazon.
This method of sharing is especially useful when you want to reach a larger audience or share your wish list with people who don’t have an Amazon account. It allows you to easily connect with friends, family members, or colleagues and provides them with a hassle-free way to find the perfect gift for you.
Whether you’re sharing the link via email, messaging platforms, or social media, the direct link simplifies the process by eliminating the need for recipients to search for your wish list manually. It ensures that your desired items are just a click away for anyone you choose to share the link with.
Managing and Updating Your Shared Amazon Wish List
Once you’ve shared your Amazon wish list, it’s important to regularly manage and update it to ensure that it accurately reflects your preferences and desires. Here are some tips for managing and updating your shared wish list:
- Regularly review your wish list: It’s a good practice to periodically review your wish list to ensure that it still aligns with your current interests and needs. Remove any items that are no longer relevant or desired.
- Add new items: As you come across new products that capture your interest or that you would love to receive as a gift, add them to your wish list. Keep it constantly updated with fresh and exciting options.
- Update item priorities: If there are items on your wish list that you prefer to receive sooner rather than later, prioritize them accordingly. You can adjust the item priorities within your wish list to let others know about your preferences.
- Create sections for organization: If your wish list is growing and becoming extensive, consider creating sections within it. Categorize your items, such as “Books,” “Electronics,” or “Home Decor,” to make it easier for others to navigate and select gifts.
- Adjust quantities: If there are certain items on your wish list that you would like to receive multiple units of, make sure to include the desired quantity for those items. This helps prevent duplicate purchases and provides clarity to those looking to fulfill your wish list.
- Utilize notes and comments: Take advantage of the notes and comments feature in your wish list to add additional information or details about specific items. This can be helpful in providing more context or specifying preferences for particular products.
- Notify your wish list recipients of updates: When you make significant updates or changes to your wish list, it’s a good idea to notify your wish list recipients about these updates. This ensures they are aware of any modifications and can choose from the most updated list of items.
- Remove purchased items: If someone has already purchased an item from your wish list, make sure to remove it or mark it as purchased to avoid duplicate gifts. This also helps others to know what has already been fulfilled.
By actively managing and updating your shared Amazon wish list, you keep it relevant, organized, and up-to-date. Regularly reviewing and refining your wish list ensures that it provides an accurate reflection of your desires, making it easier for others to choose the perfect gift for you.
Privacy Settings for Your Shared Amazon Wish List
When sharing your Amazon wish list, it’s important to consider and set the appropriate privacy settings to ensure that you have control over who can view and access your list. Amazon offers several privacy options to help you manage the visibility of your wish list. Here’s how you can adjust the privacy settings:
Public: By default, your wish list is set to public, which means it can be viewed by anyone who has the link. Public wish lists can also be discovered by search engines. This setting is suitable if you want your wish list to be accessible to a broader audience.
Private: If you prefer to keep your wish list completely private, you can select the private setting. With this option, only you can view and access your wish list. Your list will not appear in search results, and the link will not work for others unless you explicitly share it with them.
Shared with specific people: Amazon also allows you to share your wish list with specific individuals. This option is useful when you want to restrict access to your wish list to a select group of people. You can define who can view and access your list by entering their email addresses in the sharing settings.
To adjust the privacy settings for your Amazon wish list, you can follow these steps:
- Access your wish list: Sign in to your Amazon account and navigate to your wish list page.
- Click on the “Manage List” button: On the right-hand side of your wish list page, you’ll find a button labeled “Manage List”. Click on it to access the wish list management options.
- Select “Manage privacy settings”: In the wish list management options, locate the “Manage privacy settings” option and click on it.
- Choose your desired privacy setting: From the available options (public, private, or shared with specific people), select the privacy setting that suits your preferences.
- Save your changes: Once you’ve chosen your desired privacy setting, click on the “Save Changes” button to apply the new settings to your wish list.
By adjusting the privacy settings for your Amazon wish list, you have control over who can see and access the items you desire. Whether you want your wish list to be public, private, or shared with specific people, Amazon provides the flexibility to customize your privacy settings according to your preferences.