
Why Make an Amazon Wish List?
Creating an Amazon Wish List can be a game changer when it comes to managing your personal preferences, organizing potential purchases, and sharing gift ideas with friends and family. Whether you’re planning your birthday wishlist or compiling a list of items you’re interested in, having an Amazon Wish List simplifies the process and makes it easier for others to find the perfect gift for you.
One of the key advantages of creating an Amazon Wish List is that it helps you keep track of the products you desire. You no longer need to rely on your memory or scattered notes to remember the things you want to purchase. By having a centralized and easily accessible wish list, you can easily refer back to it whenever you’re ready to make a purchase or when someone asks about gift ideas.
Additionally, an Amazon Wish List allows you to prioritize your preferences. You can create a comprehensive list of all the items you’re hoping to acquire, whether it’s a new gadget, a fashion accessory, or a home decor item. This way, you can organize and classify your desired items based on their priority, ensuring that you focus your attention on the most important ones first.
Furthermore, a Wish List enables you to take advantage of discounts and price drops. By adding items to your list and selecting the option to receive notifications, you’ll be alerted whenever a price reduction or special offer becomes available. This feature can help you save money and make informed purchasing decisions without continuously monitoring the prices manually.
Another benefit of having an Amazon Wish List is the ease of sharing your preferences with others. Whether it’s for your birthday, a holiday, or any special occasion, sharing your list with friends and family makes gift-giving effortless for them. They can simply refer to your Wish List and select an item that they know you desire, ensuring that you receive something you truly want.
In summary, creating an Amazon Wish List enhances your shopping experience by allowing you to organize your preferences, keep track of desired items, and share gift ideas with others. It simplifies the process of finding the perfect gift while also helping you stay organized and informed about price drops and discounts. So why wait? Start creating your Amazon Wish List today and enjoy the convenience it offers!
Creating an Amazon Account
Before you can start making an Amazon Wish List, you’ll need to create an Amazon account. Fortunately, the process is straightforward and can be completed in just a few simple steps.
To begin, visit the Amazon website and click on the “Account & Lists” button located at the top right-hand corner of the homepage. From the dropdown menu, select “Create a New Account.”
You will then be redirected to the account creation page, where you’ll need to provide some basic information. This includes your name, email address, and a password for your account. Choose a strong password that is easy to remember but difficult for others to guess.
Next, you’ll need to enter your preferred shipping address. This will ensure that any items you purchase or receive as gifts will be delivered to the correct location. You can also add multiple addresses if you frequently have items shipped to different locations.
After entering your shipping address, you will be prompted to enter your payment information. Amazon accepts various payment methods, including credit cards, debit cards, and Amazon gift cards. Choose the option that is most convenient for you and enter the necessary details.
Once you have provided all the required information, click on the “Create your Amazon account” button. You may be asked to verify your email address by clicking on a confirmation link that will be sent to the email you provided.
After completing the verification process, your Amazon account will be successfully created. You can now begin utilizing the various features and services offered by Amazon, including the Wish List functionality.
Note: If you already have an existing Amazon account, you only need to sign in using your username/email and password. In this case, you can skip the account creation process and move on to accessing the Wish List feature.
In summary, creating an Amazon account is a quick and easy process that allows you to fully utilize all the features and benefits offered by Amazon, including the ability to create and manage your own Wish List.
Accessing the Wish List Feature
Once you have created your Amazon account, accessing the Wish List feature is a breeze. Here’s how you can quickly find and access your Wish List:
1. Sign in to your Amazon account using your username/email and password. If you’re already signed in, skip this step.
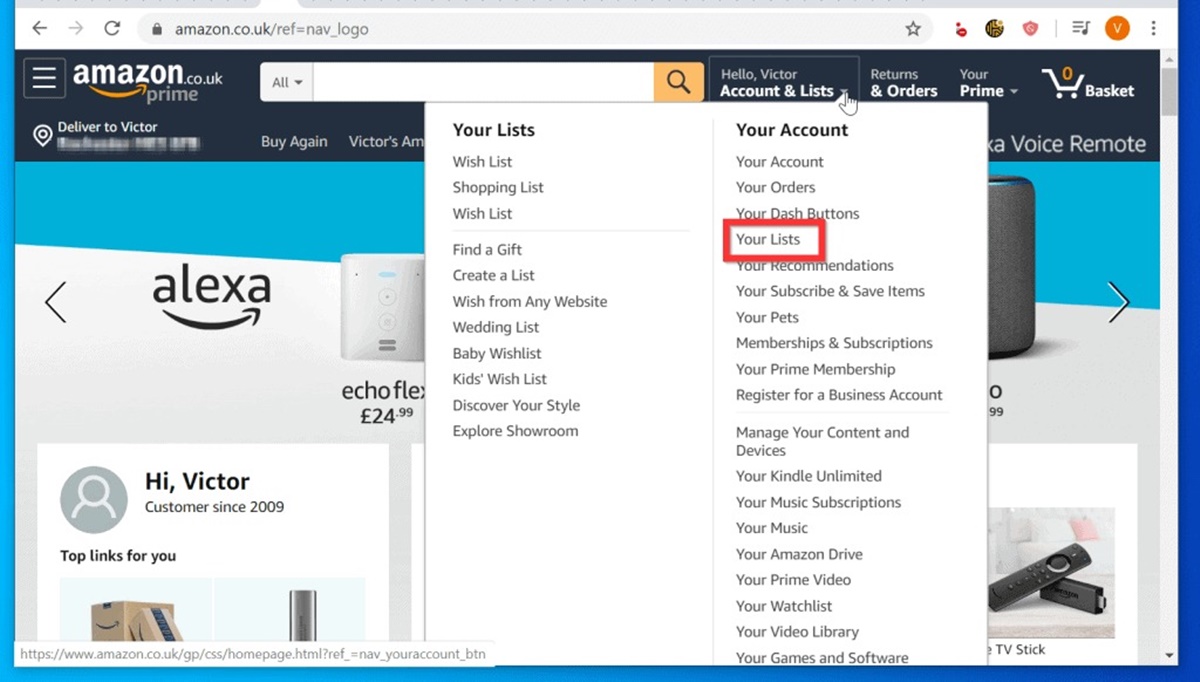
2. Once you’re signed in, hover your mouse over the “Account & Lists” button located at the top right-hand corner of the Amazon homepage. A dropdown menu will appear.
3. From the dropdown menu, select “Your Lists.” This will take you to the main Wish List page, where you can view and manage your existing lists or create a new one.
4. On the main Wish List page, you will see all the lists you have created. If you haven’t created any lists yet, you will have the option to create a new one.
5. To access a specific Wish List, simply click on the title or name of the list. This will take you to the individual list page, where you can view, add, and manage items.
Alternatively, you can also access your Wish List directly from the Amazon homepage by hovering your mouse over the “Account & Lists” button and selecting “Your Wish List” from the dropdown menu. This will take you directly to your default or most recently accessed Wish List.
Whether you’re accessing your Wish List from the main Wish List page or the Amazon homepage, you’ll be able to easily navigate through different lists, view items, and perform various actions such as adding items, organizing your lists, and sharing them with others.
In summary, accessing the Wish List feature on Amazon is a simple process. By signing in to your Amazon account, you can easily find and access your Wish List from the “Account & Lists” dropdown menu or directly from the Amazon homepage. Once you’re on the main Wish List page or your individual list page, you can manage your items, organize your lists, and utilize other features to enhance your Wish List experience.
Adding Items to Your Wish List
Now that you have accessed your Wish List, it’s time to start adding items that you want to keep track of or receive as gifts. Amazon provides multiple ways to add items to your Wish List, making the process convenient and hassle-free.
Here are the different methods you can use to add items to your Wish List:
1. Directly from the product page: When you find a product on Amazon that you want to add to your Wish List, simply navigate to the product page. On the right-hand side of the page, you’ll see a button labeled “Add to List.” Click on it and select the specific Wish List you want to add the item to.
2. Using the Wish List browser extension: Amazon offers a browser extension called “Add to Wish List.” After installing the extension on your preferred browser, you’ll see an icon in your browser’s toolbar. Whenever you come across a product you want to add to your Wish List, simply click on the extension icon to add it to your list.
3. Via the “Your Lists” page: If you prefer a more comprehensive method, you can navigate to the “Your Lists” page. From here, you can manually search for items, browse through different categories, or explore recommendations to find products you want to add to your Wish List.
4. Using the mobile app: If you’re using the Amazon mobile app, you can easily add items to your Wish List as well. Just navigate to the product page and tap on the “Add to List” button, then select the appropriate Wish List.
Once you’ve added an item to your Wish List, it will be saved and displayed in your list. You can view details of the item such as the title, image, price, and availability. You can also add additional information or notes to the item if you want to provide more details or specify certain preferences.
It’s important to note that you can add items from various sources to your Wish List, not just from Amazon. If you find a product on another website that you want to include in your Wish List, you can use the “Add to Wish List” browser extension mentioned earlier. This way, all your desired items will be stored in one centralized location.
In summary, adding items to your Amazon Wish List is a straightforward process. Whether you’re adding items directly from the product page, using the browser extension, exploring recommendations, or utilizing the mobile app, you can easily create a comprehensive list of the products you want to keep track of or receive as gifts.
Organizing Your Wish List
Once you have added items to your Amazon Wish List, it’s important to keep your list organized to ensure easy navigation and effective management. Amazon provides several features and options to help you organize your Wish List according to your preferences.
1. Creating separate lists: If you have different categories or groups of items you want to keep track of, you can create multiple lists. For example, you can have a list for books, another for electronics, and another for home decor. This allows you to easily find and manage items based on their specific category or purpose.
2. Move or copy items between lists: Amazon allows you to move or copy items between lists. This can be useful if you decide to reorganize your lists or if you have similar items that belong to different categories. Simply select the item and choose the appropriate list from the options provided.
3. Prioritizing your items: Within each list, you can prioritize your items by rearranging the order. This is particularly useful if you have a long list of items and want to quickly identify the most important ones. By dragging and dropping the items, you can easily adjust their order based on your preferences.
4. Adding comments or notes: If you want to provide additional details or personal notes about specific items in your Wish List, you can add comments to them. This can be helpful for indicating specific color preferences, sizing information, or additional context that would be useful to others viewing your list.
5. Using custom fields: Another way to further organize your Wish List is by utilizing custom fields. Amazon allows you to create custom fields for each item, such as size, color, or any other relevant information. This can help you keep track of specific variations or attributes of the items in your list.
6. Filtering and searching: As your Wish List grows, it might become necessary to search for specific items or filter them based on particular criteria. Amazon provides search and filter options, allowing you to quickly locate items by keyword, price, priority, or other parameters.
By utilizing these organizational features, you can keep your Wish List tidy, easily locate desired items, and make it more user-friendly for others who may be viewing your list.
In summary, organizing your Amazon Wish List is essential to maintain an efficient and effective system. By creating separate lists, prioritizing items, adding comments or notes, utilizing custom fields, and utilizing search and filter options, you can keep your Wish List organized and easily manage your desired items.
Adding Notes to Your Wish List Items
Adding notes to your Amazon Wish List items can be a valuable way to provide additional details and context for each item. Whether it’s specifying preferred sizes, colors, or adding personal reminders, notes help ensure that you and others have all the necessary information when considering a purchase or selecting a gift.
To add notes to your Wish List items, follow these steps:
1. Access your Wish List: Sign in to your Amazon account and navigate to your Wish List using the “Account & Lists” drop-down menu or the “Your Lists” page.
2. Identify the item: Locate the item that you want to add a note to within your Wish List.
3. Open item details: Click on the item to open its details and view additional information.
4. Add notes: Within the item details page, you’ll find a box or area where you can enter your notes. This is usually labeled as “Add a note” or something similar. Click on the box and type in your desired notes.
5. Save the notes: After entering your notes, click on the appropriate button to save them. The label may vary, but it will typically be something like “Save,” “Add Note,” or “Done.”
Adding notes to your Wish List items allows you to provide specific details that may not be evident from the item’s name or image alone. Here are some examples of how notes can be useful:
1. Size and color preferences: If the item you want comes in different sizes or colors, you can note your preferred option to help others choose the right variant. For clothing, shoes, or accessories, specifying your size can be particularly helpful.
2. Personal recommendations: For items that you have personal experience with or recommendations for, you can add a note explaining why you find it valuable or why you’d like to receive it as a gift. This can help others understand your preferences better.
3. Important reminders: If there are specific features, compatibility requirements, or other important details about the item that others should be aware of, you can add notes to highlight those points. This helps ensure that the item is a good fit for your needs or the needs of the gift recipient.
4. Alternative options: If there are multiple versions or similar products available, you can use notes to indicate your preferences or highlight differences between them. This can help others make better-informed decisions when selecting a gift.
By adding notes to your Wish List items, you enhance the overall usefulness and clarity of your list, making it easier for both you and others to understand your preferences and make informed decisions.
In summary, adding notes to your Amazon Wish List items allows you to provide additional details and preferences that can help others select the perfect gift for you. It’s a convenient feature that ensures everyone has the necessary information when considering a purchase or selecting a gift. Utilize the note feature to specify sizes, colors, personal recommendations, reminders, or to highlight alternative options.
Sharing Your Wish List with Others
Sharing your Amazon Wish List with friends, family, or anyone else can be a fantastic way to provide gift ideas and make it easier for others to find the perfect present for you. Amazon offers several options for sharing your Wish List, ensuring that it’s convenient and accessible to everyone.
Here are the different ways you can share your Wish List:
1. Making your Wish List public: By default, your Wish List is private, meaning only you can access it. However, you have the option to make your Wish List public, allowing others to see and access it. To do this, go to your Wish List, click on the “More” button, and select “Manage List Profile.” From there, you can change the privacy setting to make it public.
2. Sharing via email or social media: Once your Wish List is public, you can easily share it with others through email or social media platforms. On your Wish List page, you’ll find buttons labeled “Share” or “Share with others.” Clicking on these buttons will provide you with options to send a direct link to your Wish List via email or share it on various social media platforms such as Facebook, Twitter, and Pinterest.
3. Sending your Wish List via messenger: If you prefer to send your Wish List directly to specific individuals, Amazon allows you to do so via messenger. This can be particularly useful if you want to share it with close friends or family members. To send your Wish List, select the “Send list to others” option on your Wish List page, enter the recipients’ email addresses, and customize the message if desired.
4. Collaborating with friends or family: If you’re working on a shared Wish List with friends or family members, Amazon provides a collaborative feature. This allows multiple people to contribute to and manage the same list. To enable collaboration, go to your Wish List page, click on the “More” button, and select “Manage List Profile.” From there, you can invite others to collaborate by entering their email addresses.
Sharing your Wish List gives others the opportunity to browse through the items you desire and choose a gift that aligns with your preferences. It simplifies the process of gift-giving and ensures that you receive something you truly want and need.
It’s worth noting that although you have the option to make your Wish List public, you can still maintain control over who can see and access it. By default, the list is open to anyone with the link. However, you can also set it to be accessible only to specific individuals by providing them with the link or sending it directly to them.
In summary, sharing your Amazon Wish List with others is a convenient way to provide gift ideas and make gift-giving easier for your friends or family. Whether you make your list public, share it via email or social media, send it through messenger, or collaborate with others, sharing your Wish List ensures that you receive meaningful and desired gifts.
Making Your Wish List Public or Private
Deciding whether to make your Amazon Wish List public or private is an important consideration when sharing your preferences with others. Amazon provides the flexibility to control the privacy settings of your Wish List, allowing you to choose who can view and access it.
Making your Wish List public:
By default, your Wish List is set to private, meaning only you can access it. However, you have the option to make your Wish List public, enabling others to view and access it. Making your Wish List public can be beneficial when you want to share gift ideas with friends, family, or anyone else.
To make your Wish List public, follow these steps:
- Sign in to your Amazon account and navigate to your Wish List.
- Click on the “More” button located on the top-right corner of your Wish List page.
- Select “Manage List Profile” from the dropdown menu.
- Under the “Privacy” section, choose the option to make your list public.
Once you’ve made your Wish List public, you can easily share it with others by sending the direct link or sharing it through email or social media platforms. Remember that anyone with the link will be able to view your list, so ensure you are comfortable with sharing it before making it public.
Making your Wish List private:
If you prefer to keep your Wish List private and accessible only to yourself, you can maintain the default privacy setting. Keeping your Wish List private ensures that your preferences remain confidential and only accessible to you.
To keep your Wish List private, simply follow the above steps but choose to keep your list private instead of making it public.
It’s important to note that even if your Wish List is set to private, you still have the option to share it with specific individuals by sending them the direct link or inviting them to collaborate on the list. This allows you to maintain control over who can access your Wish List.
Remember to review and adjust your privacy settings regularly to ensure that they align with your preferences. You can make changes at any time, making your Wish List public or private based on your current needs and sharing preferences.
In summary, Amazon provides the flexibility to make your Wish List public or private. Making it public enables others to view and access the list, making gift-giving easier. Keeping it private ensures your preferences remain confidential, but you still have the option to share it with specific individuals if desired. Regularly review and adjust your privacy settings to align with your preferences.
Sharing Your Wish List via Email or Social Media
Sharing your Amazon Wish List with others is made effortless by the option to share it via email or through various social media platforms. Whether you want to provide gift ideas to friends and family or share your list with a broader audience, Amazon makes it simple to spread the word and make gift-giving a breeze.
Sharing via email:
One of the easiest methods to share your Wish List is by sending it directly through email. Here’s how you can share your Wish List via email:
- Sign in to your Amazon account and navigate to your Wish List.
- Click on the “Share” button located on the top-right corner of your Wish List page.
- Select the option to share your list via email.
- Enter the email addresses of the recipients in the provided field.
- Customize the message if desired and click the “Send” button to send the email with your Wish List.
The recipients will receive an email containing a direct link to your Wish List, making it easy for them to access and explore the items you’ve selected.
Sharing via social media:
Sharing your Wish List on social media platforms is another effective way to spread the word and receive gift suggestions from a wider audience. Follow these steps to share your Wish List on social media:
- Sign in to your Amazon account and navigate to your Wish List.
- Click on the “Share” button located on the top-right corner of your Wish List page.
- Choose the social media platform you want to share your list on (e.g., Facebook, Twitter, Pinterest).
- Authenticate and authorize Amazon to connect with your chosen social media account.
- Customize the accompanying message if desired and click the button to share your list on the selected platform.
By sharing your Wish List on social media, you can engage with your friends, followers, and network, allowing them to access your list and provide gift ideas or recommendations. Remember to review your privacy settings for each platform to ensure your list is visible to the intended audience.
Additionally, you can also copy and paste the direct link to your Wish List and share it manually through email or any other messaging platform you prefer. This gives you the flexibility to share your list with specific individuals or groups outside of social media platforms.
In summary, sharing your Amazon Wish List via email or social media is a convenient way to provide gift ideas to friends, family, or a broader audience. By following a few simple steps, you can send your Wish List directly through email or share it on popular social media platforms. Remember to customize your messages and review your privacy settings to ensure your list is visible to the intended recipients.
Sending Your Wish List to Others via Messenger
Alongside email and social media, another convenient method to share your Amazon Wish List is by sending it directly to specific individuals via messenger platforms. This approach allows for a more personalized and targeted sharing experience, ensuring that your Wish List reaches the intended recipients. Here’s how you can send your Wish List via messenger:
1. Access your Wish List:
Sign in to your Amazon account and navigate to your Wish List. Ensure that you have your Wish List open and ready to share.
2. Choose a messenger platform:
Decide which messenger platform you want to use to send your Wish List. Popular options include Facebook Messenger, WhatsApp, Telegram, or any other messaging app of your choice. Make sure that both you and the recipient have the same messaging app installed.
3. Compose a message:
Open the messaging app and start a new conversation with the person you want to share your Wish List with. Craft a personalized message, explaining that you’re sharing your Wish List with them and providing any additional context or instructions you deem necessary.
4. Share the Wish List link:
Return to your Wish List in the Amazon app or website and copy the direct link to your Wish List. Then, paste the link into the message you’re composing in your messenger app. The recipient will be able to click on the link to access your Wish List directly.
5. Send the message:
Once you’ve composed your message and included the Wish List link, send the message to the chosen recipient. They will receive the message, along with the link to your Wish List, allowing them to view the items you’ve selected.
By sharing your Wish List via messenger, you can provide a more personal touch and engage in direct communication to discuss specific gift ideas or preferences. This method is particularly effective when sharing your list with close friends, family members, or individuals with whom you have frequent contact.
Remember to respect the privacy and comfort of the recipient when sending your Wish List via messenger. If you’re unsure whether the person would be interested in receiving your Wish List, it’s best to ask them first before sharing it.
In summary, sharing your Amazon Wish List via messenger provides a personalized and direct way of sharing gift ideas. By composing a message, including the direct link to your Wish List, and sending it to the desired recipient, you can engage in a more targeted sharing experience. Consider the preferences and comfort of the recipient before sharing your Wish List via messenger.
Collaborating on a Wish List with Friends or Family
Collaborating on a Wish List with friends or family members can be a fun and interactive way to gather gift ideas and plan for special occasions. Amazon offers a collaborative feature that allows multiple individuals to contribute to and manage the same Wish List. This feature streamlines the process of gathering suggestions, avoids duplicate gifts, and ensures that everyone’s preferences are taken into account. Here’s how you can collaborate on a Wish List together:
1. Create the collaborative Wish List:
The first step is to create the Wish List that you, your friends, or family members will collaborate on. Sign in to your Amazon account, navigate to your Wish List, and click on the “More” button. Select the option to “Manage List Profile,” then click on “Invite” or “Collaborate” (the label may vary). Enter the email addresses of the individuals you want to collaborate with and send the invitations.
2. Accept the collaboration invitation:
The recipients of the collaboration invitations will receive an email notification. They need to click on the provided link to accept the invitation and join the collaborative Wish List. If they don’t have an Amazon account, they’ll be prompted to create one.
3. Contribute to the Wish List:
Once all collaborators have accepted the invitation and joined the Wish List, each individual can start adding items, making notes, and customizing the list based on their preferences. Everyone can view and interact with the items added by others, ensuring that the list is comprehensive and reflects everyone’s desires.
4. Communicate and avoid duplicates:
As collaborators, it’s important to communicate with each other to avoid duplicate gifts. Discussing the items added to the list and indicating which ones have been purchased can prevent multiple people from buying the same thing. Use the messaging feature within Amazon or your preferred communication method to keep each other updated.
5. Manage privacy and customization:
When collaborating on a Wish List, you can collectively decide on the privacy settings and customization options for the list. The list can be public, private, or shared only with the collaborators, depending on your preferences. Additionally, you can customize the list by rearranging items, adding comments or notes, and utilizing custom fields to provide further details.
6. Make purchases:
Once the collaborative Wish List is populated with desired items, each collaborator can make purchases directly from the list. By doing so, everyone can contribute to making sure that the gift selections are chosen with care, avoiding any confusion or disappointment.
Collaborating on a Wish List fosters a sense of togetherness and ensures that everyone’s preferences are considered. It simplifies the process of gathering gift ideas, helps avoid duplicate purchases, and provides an enjoyable platform for planning and sharing special occasions.
In summary, Amazon’s collaborative feature enables friends and family members to collaborate on a Wish List. By creating the collaborative list, accepting invitations, contributing items, communicating, managing privacy and customization settings, and making purchases, collaborators can ensure a smooth and enjoyable experience of planning and exchanging gifts.
Managing Your Wish List Notifications
Managing your Wish List notifications on Amazon allows you to stay updated on price changes, availability, and other important information related to the items on your list. By configuring your notification preferences, you can ensure you never miss out on discounts or changes that could affect your purchasing decisions. Here’s how you can effectively manage your Wish List notifications:
1. Access your Wish List:
Sign in to your Amazon account and navigate to your Wish List. Ensure that you have your Wish List open and ready to manage.
2. Locate the notification settings:
On your Wish List page, look for the “Manage list profile” or “List settings” button. The label may vary, but it is usually located near the top-right corner of your list.
3. Configure your notification preferences:
Within the notification settings page, you’ll find a range of options to customize your Wish List notifications. These options may include:
- Price Drop Notifications: Choose whether you want to receive notifications when the prices of your Wish List items decrease. This can help you take advantage of discounts and savings.
- Availability Notifications: Select whether you want to be notified when an item on your Wish List becomes available for purchase. This is particularly useful for popular or limited-stock items.
- Delivery Notifications: Determine if you want to receive notifications about the delivery status or updates for items that have been purchased from your Wish List.
- General Notifications: Customize your preferences for other types of notifications, such as updates about your Wish List in general.
4. Save your changes:
After configuring your notification preferences, click on the “Save” or “Apply” button to save your changes. Amazon will then update your preferences and ensure that you receive the desired notifications.
By managing your Wish List notifications, you can stay informed about any changes that may occur regarding the items you’re interested in. This empowers you to make well-informed purchasing decisions and take advantage of discounts or availability updates.
Remember to review and adjust your notification settings periodically to align them with your current preferences. This way, you can ensure that you aren’t overwhelmed with notifications or missing out on important updates.
In addition to managing your Wish List notifications, you can also take advantage of tools like Amazon’s Daily Deals and Lightning Deals to stay informed about time-sensitive discounts and promotions for a wide variety of products.
In summary, managing your Wish List notifications on Amazon allows you to customize your preferences for price drops, availability updates, delivery status, and other important notifications related to the items on your list. By configuring these settings, you can stay informed about changes and make well-informed purchasing decisions.
Editing or Deleting Items from Your Wish List
Editing or deleting items from your Amazon Wish List is a simple and convenient way to keep your list up to date with your preferences and interests. Whether you want to remove items that are no longer desired or make changes to existing items, Amazon provides easy-to-use tools for managing your Wish List. Here’s how you can edit or delete items from your Wish List:
1. Access your Wish List:
Sign in to your Amazon account and navigate to your Wish List. Make sure that you have your Wish List open and ready to edit.
2. Locate the item you want to edit or delete:
Scroll through your Wish List until you find the item you want to edit or remove. Take note of the item’s position on your list or any specific details that will help you identify it.
3. Edit an item:
To edit an item, click on the item’s name or image to access its details. You can then make changes to any of the item’s details such as quantity, color, size, or any customizable options offered by the seller. Once you have made your changes, don’t forget to save them before moving on.
4. Delete an item:
To delete an item from your Wish List, hover over the item and look for the visible menu icon (usually represented by three vertical dots or a “More” button). Click on the menu icon, and you should see an option to delete or remove the item from your list. Confirm the deletion, and the item will be permanently removed from your Wish List.
It’s important to note that deleting an item from your Wish List does not affect the availability or purchase options for that item on Amazon. It simply removes it from your list.
5. Review and repeat:
After editing or deleting one item, review the rest of your Wish List to see if there are any other items you want to modify. Repeat the process for each item you wish to edit or remove.
By regularly editing or deleting items from your Wish List, you can ensure that your list remains updated with your current preferences and helps you stay organized when tracking desired products or receiving gift suggestions.
Remember to periodically review your Wish List to remove items you no longer desire or add new items that capture your interest. This way, you can keep your list relevant and reflective of your evolving preferences.
In summary, editing or deleting items from your Amazon Wish List is a straightforward process. By accessing your Wish List, locating the desired item, and either editing its details or selecting the option to delete it, you can keep your list updated and customized to your changing preferences.
Purchasing Items from Your Wish List
When you’re ready to make a purchase from your Amazon Wish List, the process is seamless and straightforward. Amazon provides convenient options to add desired items to your cart and complete the purchasing process. Here’s how you can purchase items from your Wish List:
1. Access your Wish List:
Sign in to your Amazon account and navigate to your Wish List. Make sure that you have your Wish List open and ready to purchase from.
2. Review the item details:
Scroll through your Wish List and locate the item that you want to purchase. Click on the item’s name or image to access its details. Review the item’s description, price, options, and any other relevant information to ensure it meets your desired specifications.
3. Add the item to your cart:
If you’re satisfied with the item and want to proceed with the purchase, look for the option to “Add to Cart” or “Buy Now.” Click on the appropriate button, and the item will be added to your Amazon shopping cart.
4. Continue shopping or proceed to checkout:
If you wish to continue shopping and add additional items from your Wish List to your cart, you can do so. Simply navigate back to your Wish List and repeat the process for each item you want to purchase. If you’re ready to complete your purchase, click on the “Proceed to Checkout” button or the cart icon to proceed to the checkout page.
5. Follow the checkout process:
On the checkout page, review the items in your cart, quantities, and any other applicable details. Specify the shipping address, select a payment method, and choose any desired delivery options. Double-check all the information to ensure accuracy before finalizing your purchase.
6. Place your order:
Once you have reviewed and confirmed all the details, click on the “Place your order” or “Buy now” button to complete your purchase. Amazon will process your order and provide an order confirmation with the estimated delivery date.
By following these steps, you can efficiently purchase items from your Wish List and have them delivered to your desired location. Remember to monitor your order status and any updates through your Amazon account or the provided tracking information.
It’s worth noting that purchasing items from your Wish List doesn’t remove them from the list automatically. You may need to manually delete or mark the item as purchased to keep your Wish List organized and updated.
In summary, purchasing items from your Amazon Wish List is a straightforward process. By accessing your Wish List, reviewing item details, adding desired items to your cart, and following the checkout process, you can conveniently complete your purchase. Enjoy the satisfaction of turning your desired items into reality with just a few clicks.
Keeping Track of Purchased Items
As you make purchases from your Amazon Wish List, it’s important to keep track of the items you have already bought. This helps you avoid duplicate purchases, prevent confusion, and stay organized. Here are some strategies to effectively keep track of purchased items:
1. Mark items as purchased:
After making a purchase from your Wish List, go back to your list and mark the item as purchased. Amazon provides an option to indicate that an item has been bought. This way, you can easily see which items are still pending and which ones have already been purchased.
2. Use the order history:
Another way to keep track of purchased items is by using your Amazon order history. Sign in to your Amazon account and navigate to your account settings. From there, you can access your order history, which provides a comprehensive record of all the items you have purchased from Amazon. This serves as a reliable reference to see which items on your Wish List have already been bought, even if you didn’t mark them as purchased directly on your Wish List.
3. Keep a separate record:
If you prefer a manual record-keeping method, you can also maintain a separate document or spreadsheet to track your purchased items. Create columns for the item name, date purchased, and any additional details you find relevant. This can be particularly useful if you make purchases from sources other than Amazon or if you want to include additional information about each item.
4. Remove purchased items from your Wish List:
Once you have marked an item as purchased or have noted it in your record, consider removing it from your Wish List. Removing purchased items declutters your list and ensures that you’re focusing on the items you still want to acquire. You can delete items manually or periodically clean up your list to keep it streamlined.
5. Utilize order confirmation emails:
When Amazon processes your order, they send a confirmation email with details about the items you have purchased. These emails serve as a handy reference to keep track of your purchases. You can create a folder in your email account specifically for order confirmations, making it easy to review your past purchases whenever needed.
By employing these strategies, you can effectively keep track of the items you have purchased from your Wish List. Whether you choose to mark items as purchased on your list, utilize your order history, maintain a separate record, remove purchased items from your list, or refer to order confirmation emails, staying organized ensures a smooth and efficient management of your Wish List.
In summary, keeping track of purchased items from your Amazon Wish List is essential to avoid duplicate purchases and maintain an organized list. Utilize the different strategies available, such as marking items as purchased, using your order history, keeping a separate record, removing purchased items from your list, and referring to order confirmation emails, to stay on top of your purchases and maintain a clear overview of your Wish List.
Reviewing and Updating Your Wish List Regularly
Regularly reviewing and updating your Amazon Wish List is a valuable practice that ensures its accuracy, relevance, and effectiveness. By taking the time to assess and make necessary adjustments, you can keep your list up to date with your current preferences and maintain an organized and enjoyable experience. Here are some reasons why it’s important to review and update your Wish List regularly:
1. Remove items you no longer desire:
As time passes, your interests may change, and certain items on your Wish List may no longer align with your preferences. By reviewing your list periodically, you can identify and remove items that have lost their appeal. This keeps your list streamlined and focused on the items that genuinely reflect your current desires.
2. Add new items:
As you discover new products or develop new interests, it’s essential to add fresh items to your wish list. Regularly updating your list with new items ensures that it remains dynamic, exciting, and reflective of your evolving preferences.
3. Prioritize and rearrange items:
Your priorities may change over time, and certain items on your Wish List may become more or less important. By reviewing your list regularly, you can adjust the priority of items by rearranging their order. This allows you to focus on the items that matter most to you and optimize your decision-making when it comes to purchasing or receiving gifts.
4. Customize notes and details:
Personalization is key to a meaningful Wish List experience. By reviewing and updating your list, you can customize notes or details for each item to provide specific preferences, sizes, or color choices. This level of customization helps others understand your preferences better and makes gift selection more accurate and personalized.
5. Stay organized and informed:
Regularly reviewing your Wish List allows you to stay organized and well-informed about the items you desire. It helps you maintain a clear overview of your preferences, avoid duplicate purchases, and make well-informed decisions when purchasing or receiving gifts. Additionally, it ensures that your Wish List remains relevant and useful to others when they seek gift ideas for you.
6. Take advantage of price changes and discounts:
By reviewing your Wish List regularly, you can identify any price changes or discounts on desired items. Amazon provides notifications for price drops, keeping you informed about potential savings. Regularly reviewing your list allows you to take advantage of these discounts and make timely purchasing decisions.
Consider setting a recurring schedule to review and update your Wish List, such as every few months or on special occasions. This will help you maintain an organized and up-to-date list that accurately reflects your desires.
In summary, it is essential to review and update your Amazon Wish List regularly. By removing items you no longer desire, adding new items, prioritizing and rearranging items, customizing notes and details, staying organized and informed, and taking advantage of price changes and discounts, you can maintain an accurate and enjoyable Wish List that reflects your evolving preferences.
Tracking Prices and Discounts with Your Wish List
Tracking prices and discounts with your Amazon Wish List is a smart strategy that can help you save money and make informed purchasing decisions. Amazon offers features that allow you to monitor and track price changes, ensuring that you stay updated on potential savings for the items on your list. Here’s how you can effectively track prices and discounts:
1. Enable price drop notifications:
When adding items to your Wish List, opt to receive price drop notifications. This feature alerts you when the price of a desired item decreases, allowing you to take advantage of potential savings. To enable price drop notifications, access your Wish List, click on the “More” button, and select “Manage list profile” or “List settings.” From there, ensure that you have enabled price drop notifications.
2. Set price thresholds:
In addition to enabling price drop notifications, you can set specific price thresholds for each item on your Wish List. This allows you to receive alerts only when the price of an item drops below a certain amount that you define. By setting price thresholds, you can further refine your notifications and focus on the price changes that matter most to you.
3. Review the pricing history graph:
Amazon provides a pricing history graph for many products, displaying the price fluctuations over time. When viewing an item’s details on your Wish List, check the pricing history graph to gain insights into whether the current price is higher or lower compared to the past. This helps you make informed decisions about when to make a purchase and if it’s the right time to take advantage of a discount.
4. Utilize Amazon’s Daily Deals and Lightning Deals:
In addition to tracking prices directly on your Wish List, keep an eye on Amazon’s Daily Deals and Lightning Deals. These are time-sensitive promotions that offer significant discounts on various products. By regularly checking these deals, you can potentially find items from your Wish List at discounted prices. Act quickly, as many of these deals have limited quantities or short timeframes.
5. Take note of special shopping events:
During special shopping events such as Prime Day, Black Friday, or Cyber Monday, Amazon offers substantial discounts across a wide range of products. Make sure to review your Wish List and take advantage of these events to potentially save on your desired items. Keep in mind that these events often have time constraints, so plan accordingly.
By effectively tracking prices and discounts with your Wish List, you can make informed purchasing decisions and potentially save money on your desired items. Stay proactive, review the pricing history, set price thresholds, utilize Amazon’s deals, and take advantage of special shopping events for optimal savings.
In summary, tracking prices and discounts with your Amazon Wish List empowers you to stay updated on potential savings and make informed purchasing decisions. By enabling price drop notifications, setting price thresholds, reviewing pricing history graphs, utilizing Amazon’s Daily Deals and Lightning Deals, and taking note of special shopping events, you can maximize your savings and ensure the best value for the items on your Wish List.
Deleting or Closing Your Wish List
Deleting or closing your Amazon Wish List is a simple process that allows you to remove your list permanently or temporarily depending on your preference. Whether you no longer need the list or want to start fresh with a new one, Amazon provides options to manage and remove your Wish List. Here’s how you can delete or close your Wish List:
Deleting your Wish List:
Deleting your Wish List permanently removes it from your account, and it cannot be recovered. If you’re certain that you no longer need the list, follow these steps:
- Sign in to your Amazon account and navigate to your Wish List.
- Click on the “More” button located on the top-right corner of your Wish List page.
- Select the option to “Manage List Profile” or “List settings.”
- Look for the option to delete or remove your list.
- Follow the prompts or confirmations to permanently delete your Wish List.
Closing your Wish List:
If you want to temporarily close your Wish List but keep it saved for future reference or reactivation, you have the option to do so. Closing your Wish List removes it from public view, making it inaccessible to others. Follow these steps:
- Sign in to your Amazon account and navigate to your Wish List.
- Click on the “More” button located on the top-right corner of your Wish List page.
- Select the option to “Manage List Profile” or “List settings.”
- Look for the option to close your list temporarily.
- Confirm the closure and save your changes.
If you decide to reactivate your closed Wish List at a later time, you can do so by following similar steps and selecting the option to reopen or make your wish list public again.
Deleting or closing your Wish List is a personal decision based on your current needs and preferences. Consider whether you want to permanently remove the list or temporarily close it while keeping it saved for future use.
It’s important to note that when you delete or close your Wish List, the items within it are not affected. The items on your list remain separate, and you can access them individually, even if the list itself is no longer available. However, if you want to remove the items as well, you can manually delete them from your list before deleting or closing it.
In summary, deleting your Wish List permanently removes it from your account, while closing it temporarily hides it from public view. Consider your needs and preferences before deciding to permanently delete or temporarily close your Wish List. Remember that deleting or closing the Wish List does not affect the individual items within it.
Additional Tips and Tricks for Using Your Wish List
Managing your Amazon Wish List effectively can enhance your shopping experience and ensure that you make the most out of this feature. Here are some additional tips and tricks to maximize the utility of your Wish List:
1. Add products from external websites:
While browsing other websites, you can still add items you desire to your Amazon Wish List. Install the Amazon browser extension or use the “Add to Wish List” feature in the Amazon mobile app to quickly add items from external sites to your list. This way, you can centralize all your desired items in one place.
2. Explore Wish List recommendations:
Amazon provides personalized recommendations based on your browsing and purchase history. Visit your Wish List page and scroll down to see the “Recommended Items” section. These suggestions can help you discover new products and add them to your list with ease.
3. Export your Wish List:
If you want to keep a backup copy of your Wish List or share it with others outside of Amazon, you can export your list. Amazon allows you to export your Wish List as a CSV file, which can be opened in spreadsheet programs like Microsoft Excel or Google Sheets. This feature enables you to have an offline record of your Wish List for reference or sharing purposes.
4. Utilize third-party tracking tools:
There are external tools and websites available that can help you track price changes and receive notifications specifically for items on your Amazon Wish List. Research and consider using these tools to enhance your ability to find the best deals and savings for your desired products.
5. Share your list during special occasions:
During special occasions like birthdays or holidays, make a point to share your Wish List with friends and family. This makes it easier for them to find gifts that you truly desire and helps streamline the gift-giving process for everyone involved.
6. Regularly review and update your Wish List:
Keep your Wish List up to date by reviewing and updating it periodically. Remove items you no longer desire, add new items that capture your interest, prioritize or rearrange items based on your preferences, and customize details or notes to provide more information. Regularly maintaining your Wish List ensures it remains relevant and useful to you and those who want to purchase gifts for you.
7. Take advantage of AmazonSmile:
If you’re interested in supporting charitable organizations, consider using AmazonSmile. It allows you to select a charity, and when you make eligible purchases from your Wish List or any other Amazon purchase, a portion of the price is donated to the charity of your choice at no extra cost to you.
Implementing these tips and tricks will enhance your Wish List experience and make it a more effective tool for managing your desired products, tracking price changes, and receiving gifts that align with your preferences. Utilize these strategies to optimize the use of your Wish List for a seamless and enjoyable shopping journey.