
Why Sharing Your Screen Can Be Useful
Sharing your screen during a Zoom meeting can greatly enhance communication and collaboration among participants. Whether you are conducting a remote presentation, demonstrating a product or software, or providing visual instructions, screen sharing offers a multitude of benefits. Here are a few reasons why screen sharing is so useful:
- Visual Aid: Screen sharing allows you to display visuals, such as slideshows, charts, and graphs, which can significantly enhance your presentation. Instead of just describing ideas or concepts verbally, you can provide a visual representation to aid understanding and engagement.
- Real-Time Collaboration: When you share your screen, participants can see exactly what you see, making it easier to collaborate on projects or documents. Whether you are reviewing a report, editing a document, or brainstorming ideas, screen sharing enables everyone to actively participate and contribute.
- Training and Demonstrations: If you need to train colleagues or clients on a specific software or process, screen sharing allows you to demonstrate step-by-step instructions, ensuring that everyone can follow along. This is particularly helpful for remote teams or when conducting webinars.
- Troubleshooting: When facing technical issues, screen sharing can be a valuable tool for troubleshooting. By sharing your screen, IT support or colleagues can diagnose and fix problems more efficiently, as they can see the issue firsthand.
- Engagement and Attention: Visual stimulation tends to grab and hold people’s attention better than just listening to someone speak. By sharing your screen, you can keep participants engaged throughout the meeting by providing dynamic and interactive content.
Overall, screen sharing is a powerful feature that can enhance communication, promote collaboration, and improve understanding in Zoom meetings. Whether you are hosting a formal presentation, facilitating a training session, or troubleshooting technical issues, screen sharing allows you to convey information effectively and engage your participants on a visual level.
Step 1: Starting a Zoom Meeting
To share your screen on Zoom, you must first start a Zoom meeting. Here is a step-by-step guide on how to start a Zoom meeting:
- Launch the Zoom Application: Open the Zoom application on your computer. You can download it from the Zoom website if you haven’t already installed it.
- Sign in to Your Zoom Account: If you have a Zoom account, sign in using your login credentials. If you don’t have an account, you can choose to sign in with your Google or Facebook account, or create a new Zoom account.
- Click on “New Meeting”: Once you are logged in, click on the “New Meeting” button to start a new meeting. This will instantly launch a meeting room with you as the host.
- Configure Meeting Settings: Before starting the meeting, you can configure various meeting settings, such as enabling or disabling video and audio for participants, enabling or disabling the waiting room, and setting up passwords or waiting room options for additional security.
- Invite Participants: Once you have configured the meeting settings, you can invite participants by clicking on the “Invite” button. You can choose to invite participants via email, by copying the meeting invitation link, or by sharing the Meeting ID and password directly with them.
- Start the Meeting: When you are ready to start the meeting, click on the “Start” button. This will open the meeting room and display your video and audio feed.
- Test Your Audio and Video: Before sharing your screen, it’s a good idea to test your audio and video settings to ensure that everything is working properly. You can do this by clicking on the arrow next to the “Mute” button and selecting the “Test Speaker/Microphone” option.
Once you have started the Zoom meeting and tested your audio and video settings, you are ready to share your screen with the participants. In the following steps, we will discuss how to share your screen and make the most of the screen sharing feature on Zoom.
Step 2: Joining an Existing Meeting
If you have been invited to a Zoom meeting and want to share your screen, you will need to join the meeting first. Here is a step-by-step guide on how to join an existing Zoom meeting:
- Open the Zoom Application: Launch the Zoom application on your computer. If you don’t have the application installed, you can download it from the Zoom website.
- Sign in to Your Zoom Account: If you have a Zoom account, sign in using your login credentials. If you don’t have an account, you can choose to sign in with your Google or Facebook account, or join the meeting as a guest.
- Enter the Meeting ID: Once you are signed in, you can join a meeting by entering the Meeting ID provided by the host. The Meeting ID is usually a 9 or 10-digit number.
- Choose Join with Computer Audio: After entering the Meeting ID, you will have the option to choose how to join the audio. Select “Join with Computer Audio” to enable your microphone and speakers. If you prefer to use a different audio source, you can select the appropriate option.
- Click on Join: Once you have entered the Meeting ID and selected the audio option, click on the “Join” button to join the meeting. You will then be placed in the meeting room with other participants.
- Test Your Audio and Video: Before sharing your screen, it’s a good idea to test your audio and video settings to ensure that everything is working properly. You can do this by clicking on the arrow next to the “Mute” button and selecting the “Test Speaker/Microphone” option.
Once you have successfully joined the meeting and tested your audio and video settings, you are now ready to participate and engage with the other participants. In the next steps, we will discuss how to share your screen during the Zoom meeting and make the most of the screen sharing feature.
Step 3: Understanding the Zoom Interface
Before you start sharing your screen on Zoom, it’s important to familiarize yourself with the Zoom interface. Understanding the different elements on the interface will help you navigate through the meeting efficiently. Here are the key components of the Zoom interface:
- Meeting Controls: Located at the bottom of the Zoom window, the meeting controls allow you to manage various aspects of the meeting. Here, you will find buttons to mute/unmute your microphone, start/stop your video, share your screen, and manage participants.
- Chat: The chat panel is located on the right side of the screen. It allows participants to send messages to the entire group or privately to specific individuals. You can use the chat feature to communicate, ask questions, or share information during the meeting.
- Participants List: The participants list displays the names of all the attendees in the meeting. It also shows who is currently speaking and provides options to manage participant settings, such as allowing them to unmute themselves or rename themselves.
- Screen Sharing Options: When you click on the “Share Screen” button, you will see a pop-up window that allows you to select which screen or application you want to share. You can choose to share your entire screen, a specific application window, or a portion of your screen.
- Gallery/Speaker View: By default, Zoom displays the active speaker in a large window at the center of the screen. However, you can switch to gallery view to see all the participants’ video feeds in a grid layout. Use the “Speaker View” button to toggle between the two views.
- Recording: If the host grants permission, participants can record the meeting. The recording button is located in the meeting controls bar. You can choose to record the meeting locally on your computer or in the Zoom cloud, depending on your settings.
Take some time to explore and familiarize yourself with these different elements of the Zoom interface. Understanding how the interface works will make it easier for you to navigate through the meeting, manage settings, and make the most of the screen sharing feature.
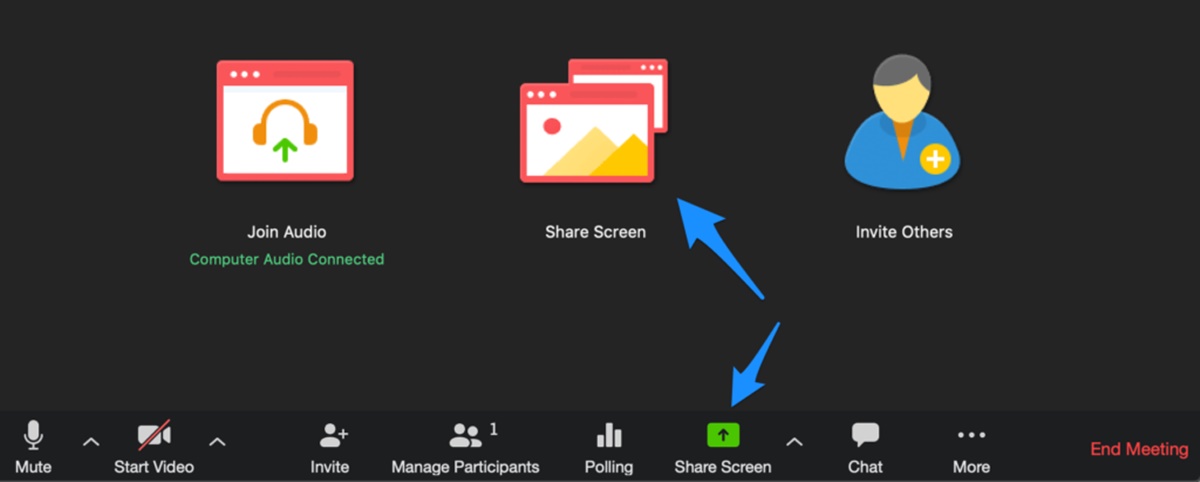
Step 4: How to Share Your Screen
Sharing your screen on Zoom allows you to display your computer screen to other meeting participants. This feature is useful for presentations, demonstrations, or providing visual instructions. Here’s how you can share your screen on Zoom:
- Click on the “Share Screen” Button: Located at the bottom of the Zoom window, the “Share Screen” button is represented by an icon that resembles a computer screen. Click on this button to initiate screen sharing.
- Select the Screen or Application to Share: After clicking on the “Share Screen” button, a pop-up window will appear. Here, you can choose whether you want to share your entire screen, a specific application window, or a portion of your screen. Select the desired option by clicking on it.
- Start Screen Sharing: Once you have selected the screen or application you want to share, click on the “Share” button in the bottom right corner of the pop-up window. Your screen will then be visible to all the meeting participants.
- Use Zoom Tools While Sharing: While sharing your screen, you have access to various Zoom tools and features. For example, you can use the annotation tools to draw or highlight on your screen, or you can switch between different applications or windows. The meeting controls will still be visible at the top of your screen, allowing you to manage other aspects of the meeting.
- Stop Screen Sharing: To stop sharing your screen, click on the “Stop Share” button located at the top of the Zoom window or in the meeting controls bar at the bottom. Your screen sharing will end, and the meeting participants will no longer see your screen.
Sharing your screen on Zoom is a powerful feature that enhances collaboration and communication during meetings. By following these steps, you can effortlessly display your screen and share relevant content with the other participants. Experiment with the different screen sharing options to find the most suitable method for your specific needs.
Step 5: Sharing Specific Applications or Windows Only
When sharing your screen on Zoom, you have the option to share specific applications or windows instead of your entire screen. This allows you to focus on particular content without revealing unnecessary information. Here’s how you can share specific applications or windows on Zoom:
- Click on the “Share Screen” Button: Locate the “Share Screen” button at the bottom of the Zoom window, represented by an icon that resembles a computer screen. Click on this button to initiate screen sharing.
- Select the Application or Window to Share: After clicking on the “Share Screen” button, a pop-up window will appear. Instead of selecting the option to share your entire screen, choose the specific application or window that you want to share. This could be a presentation, a document, a spreadsheet, or any other application or window that is currently open on your computer.
- Start Sharing: Once you have selected the desired application or window, click on the “Share” button in the bottom right corner of the pop-up window. The selected application or window will now be visible to all meeting participants.
- Toggle Between Applications or Windows: While sharing a specific application or window, you can switch to a different application or window without interrupting the screen sharing. Simply navigate to the desired application or window, and it will automatically be updated in the screen sharing view for the participants.
- Stop Sharing: To stop sharing the specific application or window, click on the “Stop Share” button located at the top of the Zoom window or in the meeting controls bar at the bottom. The screen sharing will end, and the meeting participants will no longer see the shared application or window.
Sharing specific applications or windows on Zoom enables you to focus the attention of participants on the content that matters most. By following these steps, you can easily share specific applications or windows during your Zoom meetings, providing a streamlined and efficient screen sharing experience.
Step 6: Annotating Your Screen
One of the powerful features of screen sharing on Zoom is the ability to annotate your screen in real-time. This allows you to highlight important points, draw attention to specific areas, and engage your audience during presentations or collaborations. Here’s how you can annotate your screen on Zoom:
- Start Screen Sharing: Begin by sharing your screen using the screen sharing feature discussed earlier. Once your screen is shared, the annotation tools will become available for you to use.
- Access the Annotation Tools: To access the annotation tools, move your mouse to the top of the Zoom window. A toolbar will appear with various annotation options, such as a pen, highlighter, shapes, text, and an eraser. Click on any of these tools to select it.
- Use the Pen or Highlighter: The pen and highlighter tools allow you to draw or write on your screen. Simply click and hold the mouse button while moving your cursor to draw or write. You can choose different colors and line thicknesses to customize your annotations.
- Add Shapes or Text: If you want to emphasize a specific area or provide additional context, use the shape or text tools. Click on either tool and then click and drag on the screen to create shapes or type text. You can resize or reposition the shapes or text as needed.
- Erase Annotations: If you make a mistake or want to remove any annotations, use the eraser tool. Select the eraser, and then click and drag over the annotations you want to remove. The annotations will be instantly erased.
- Save Annotated Screenshots: If you want to save the screen with annotations, you can take a screenshot by pressing the “Alt + Print Screen” keys on Windows or “Command + Shift + 4” on macOS. This will capture the screen along with all the annotations.
- Clear All Annotations: To remove all the annotations from the screen, click on the “Clear” button in the annotation toolbar. This will erase all the annotations made during the screen sharing session.
Annotation tools provide an interactive and engaging experience for both presenters and participants during Zoom meetings. By following these steps, you can leverage the annotation feature to enhance your presentations, emphasize key points, and facilitate collaboration in real-time.
Step 7: Stopping Screen Sharing
Once you have finished sharing your screen on Zoom, it’s important to know how to stop the screen sharing to ensure privacy and a smooth transition. Here’s how you can stop sharing your screen during a Zoom meeting:
- Locate the “Stop Share” Button: To stop screen sharing, locate the “Stop Share” button at the top of the Zoom window or in the meeting controls bar at the bottom. The button is represented by an icon that resembles a computer screen with an arrow pointing upward.
- Click on the “Stop Share” Button: Once you have located the “Stop Share” button, click on it. This will immediately stop the screen sharing and remove your shared screen from the view of all meeting participants.
- Confirmation: After clicking on the “Stop Share” button, you will see a confirmation message indicating that you have stopped sharing your screen. You may also see a prompt asking if you want to end the meeting or continue without screen sharing.
- Resume Screen Sharing (Optional): If you need to share your screen again later in the meeting, you can do so by following the steps outlined earlier for sharing your screen. Simply click on the “Share Screen” button and select the screen or application you want to share.
Stopping screen sharing at the appropriate time ensures that you regain control of your screen and maintain the privacy of your information. It allows the meeting to proceed smoothly, especially if you need to transition to another topic or participant’s screen.
By following these steps, you can confidently start and stop screen sharing during your Zoom meetings, providing a seamless and efficient sharing experience for yourself and the other participants.
Step 8: Troubleshooting Screen Sharing Issues
While screen sharing on Zoom is generally a seamless experience, you may encounter some issues along the way. Here are some common troubleshooting steps to help resolve screen sharing issues:
- Check your Internet Connection: A stable and reliable internet connection is crucial for smooth screen sharing. Ensure that you have a strong internet connection to prevent any disruptions or lag during the sharing process.
- Update Zoom: Make sure that you have the latest version of the Zoom application installed on your computer. Updates often include bug fixes and improved features that can address potential issues with screen sharing.
- Restart Your Computer: Sometimes, simply restarting your computer can resolve various software-related issues. If you’re experiencing problems with screen sharing, try restarting your computer and launching Zoom again.
- Check Screen Sharing Permissions: If you’re attempting to share your screen but encountering issues, check if you have the necessary permissions to share your screen. Confirm with the meeting host or administrator that you have the appropriate privileges.
- Disable Antivirus or Firewall Settings: In some cases, antivirus or firewall settings may interfere with screen sharing. Temporarily disable these security programs and see if the issue is resolved. Remember to re-enable them once you have finished screen sharing.
- Close Unnecessary Applications: Having multiple applications open on your computer can consume system resources and impact screen sharing performance. Close any unnecessary applications to free up resources and improve screen sharing performance.
- Use Wired Connection: If you’re using a Wi-Fi connection, try connecting your computer to the internet using an Ethernet cable instead. A wired connection generally offers more stability and can help overcome potential Wi-Fi-related screen sharing issues.
- Try a Different Browser: If you’re using the Zoom web client to join a meeting, consider switching to a different browser. Different browsers may have varying compatibility with the Zoom web client, and switching browsers could resolve any issues you may be experiencing.
- Contact Zoom Support: If none of the above troubleshooting steps help resolve your screen sharing issues, reach out to Zoom’s support team for further assistance. They have dedicated resources to help troubleshoot and address any technical difficulties you may encounter.
By following these troubleshooting steps, you can identify and resolve common screen sharing issues on Zoom. Remember to stay patient and seek assistance if needed to ensure a productive and successful meeting experience.