Downloading and Installing Zoom
Zoom is a popular video conferencing platform that allows you to connect with colleagues, friends, and family from around the globe. To get started with Zoom, you’ll first need to download and install the Zoom application on your device. Whether you’re using a computer, smartphone, or tablet, the process is quick and straightforward.
To download Zoom, simply follow these steps:
- Visit the Zoom website at zoom.us using your preferred web browser.
- Once on the website, locate the “Resources” tab in the navigation menu and click on it to reveal a dropdown menu.
- From the dropdown menu, select “Download Zoom Client”.
- You will be taken to the download page, where you’ll find options for downloading Zoom on various platforms. Choose the version that matches your operating system (Windows, macOS, or Linux).
- Click on the download button to start the download process.
- Once the download is complete, locate the downloaded file on your device and double-click on it to begin the installation.
- Follow the on-screen instructions to complete the installation process.
Once you have successfully installed Zoom, you can open the application and create an account to start using its features. Keep in mind that you will need a valid email address to sign up for an account.
Downloading and installing Zoom is a simple and essential step in your journey to connect with others through video meetings. By following these steps, you’ll be on your way to experiencing the convenience and flexibility that Zoom has to offer.
Creating an Account
Before you can start hosting or joining meetings on Zoom, you’ll need to create an account. Creating a Zoom account is free and allows you to access additional features and settings. Follow these steps to create your account:
- Open the Zoom application on your device.
- Click on the “Sign up” or “Sign in” button, depending on whether you already have an account or not.
- If you don’t have an account, click on the “Sign up” button.
- Enter your email address in the provided field and click on the “Sign up” button.
- You will receive an email from Zoom with a verification link. Open your email and click on the link to verify your account.
- Once your account is verified, you will be prompted to complete your profile. Fill in your name and any other required information.
- Create a secure password for your account and click on the “Continue” button.
That’s it! You have successfully created your Zoom account. Now you can start using the various features and settings available to you.
Having a Zoom account allows you to schedule and host meetings, join meetings as a participant, customize your meeting settings, and access additional features such as screen sharing and recording.
Remember to use a strong, unique password for your Zoom account to ensure the security of your meetings and personal information. It’s also a good practice to regularly update your password and enable any additional security measures offered by Zoom.
Creating a Zoom account is quick and easy, and it opens up a world of possibilities for remote collaboration and communication. Start creating your account today and take full advantage of all that Zoom has to offer.
Scheduling a Meeting
One of the key features of Zoom is the ability to schedule meetings in advance. By scheduling a meeting, you can send invitations to participants, set a specific date and time, and have everything organized in one place. Follow these steps to schedule a meeting on Zoom:
- Open the Zoom application on your device and sign in to your account.
- Click on the “Schedule” button on the home screen.
- Fill in the details for your meeting, including the topic, date, and time.
- Select the duration of the meeting. You can also choose whether the meeting is recurring or not.
- Specify any additional options you want, such as enabling a waiting room or requiring a meeting password.
- Click on the “Schedule” button to create your meeting.
- Once the meeting is scheduled, you will be provided with options to invite participants. You can send invitations via email, calendar invites, or copy the meeting link to share manually.
When sending invitations, make sure to include all the necessary details such as the meeting date, time, and any instructions for joining the meeting. Participants can join the meeting by clicking on the invitation link or entering the meeting ID and password if applicable.
By scheduling a meeting in advance, you can ensure that all participants are aware of the meeting details and have ample time to prepare. It also allows you to stay organized and have a dedicated space for your meeting on the Zoom platform.
Remember to keep track of your scheduled meetings and make any necessary updates or adjustments as needed. Zoom also provides reminders and notifications to both hosts and participants to ensure everyone is aware of upcoming meetings.
Scheduling a meeting on Zoom is a convenient way to plan and organize your virtual gatherings. Whether it’s for a team meeting, online class, or social gathering, Zoom’s scheduling feature helps make your virtual events efficient and seamless.
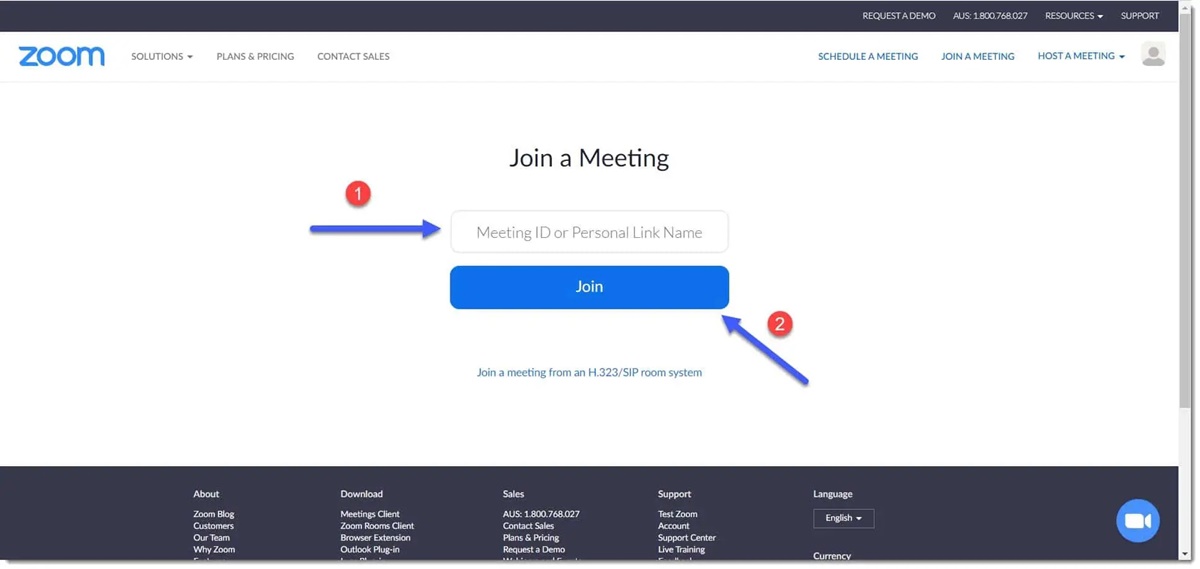
Joining a Meeting as a Participant
Joining a Zoom meeting as a participant is a straightforward process that allows you to connect with others and collaborate in real-time. Whether you received a meeting invitation or have the meeting details, joining a Zoom meeting can be done in just a few simple steps:
- Open the Zoom application on your device.
- Click on the “Join” button on the home screen.
- Enter the meeting ID provided by the host. This is typically a 9 or 10-digit number.
- If required, enter the meeting password provided by the host.
- Choose whether you want to join the meeting with or without video. You can also choose to join with or without audio.
- Click on the “Join” button to enter the meeting.
- Once you join the meeting, you can choose to enable or disable your video and audio as desired. You can also access additional meeting controls such as screen sharing and the chat function.
It’s important to be mindful of meeting etiquette when joining as a participant. Ensure that your microphone is muted when you are not speaking to minimize background noise and distractions. If you have any questions or need assistance during the meeting, you can use the chat function to communicate with the host or other participants.
By joining a Zoom meeting as a participant, you have the opportunity to engage in discussions, ask questions, and collaborate with others in a virtual environment. It allows you to connect with colleagues, attend online classes, or participate in social gatherings, regardless of your physical location.
Remember to be punctual and prepared when joining a meeting as a participant. Check the meeting time and any additional instructions provided by the host to ensure a smooth and productive meeting experience. With Zoom, you can stay connected and involved in various virtual activities and events.
Joining a Meeting as a Host
As a host, you have the responsibility of initiating and managing Zoom meetings. Joining a Zoom meeting as a host allows you to have full control over the meeting settings and features. Here’s how to join a meeting as a host:
- Open the Zoom application on your device.
- Click on the “Sign in” button and enter your Zoom account credentials.
- On the home screen, click on the “Meetings” tab.
- Select the meeting you want to host from the list of scheduled meetings.
- Click on the “Start” button to launch the meeting.
- Once the meeting starts, you will have access to various controls and features, including video and audio settings, screen sharing, and participant management.
- You can also invite participants to join the meeting by sharing the meeting ID and password or sending them an invitation link via email or other communication channels.
As the host, you have the ability to control the meeting settings, such as muting and unmuting participants, managing screen sharing permissions, and controlling participant access.
During the meeting, it’s important to facilitate effective communication and ensure that everyone has a chance to speak. Encourage participants to use the chat function to ask questions or provide input, and utilize features such as breakout rooms for smaller group discussions.
Being a host puts you in a position of leadership and facilitation. Take advantage of Zoom’s features and tools to create an engaging and productive meeting experience for all participants.
Remember to be prepared and organized when joining a meeting as a host. Familiarize yourself with the meeting agenda, have any necessary documents or presentations ready, and ensure a stable internet connection for a smooth meeting experience.
Joining a meeting as a host on Zoom allows you to take control and facilitate productive discussions. With a host account, you can create a collaborative environment that encourages participation, engagement, and effective communication.
Navigating Zoom’s Interface
Navigating Zoom’s user interface is essential to effectively utilize all the features and tools available during your meetings. Familiarizing yourself with the various elements of the Zoom interface will help you navigate the platform with ease. Here’s a breakdown of the key components:
1. Meeting Controls
Located at the bottom of the Zoom window, the meeting controls include icons for controlling your video and audio settings, screen sharing, managing participants, accessing the chat function, and more. Take some time to explore these controls and understand their functionalities.
2. Video and Audio Settings
You can control your video and audio settings by clicking on the camera icon and microphone icon in the meeting controls. Here, you can toggle your video on or off, mute or unmute your microphone, and adjust your audio settings.
3. Gallery View and Speaker View
Zoom offers two primary viewing options: Gallery View and Speaker View. Gallery View displays all participants’ video feeds in a grid, while Speaker View focuses on the active speaker’s video feed. You can switch between the views by clicking on the “Gallery View” or “Speaker View” button at the top of the Zoom window.
4. Participants Panel
The Participants panel displays a list of all meeting participants. Here, you can see their names, raise hands, and manage participant settings. You can access the Participants panel by clicking on the “Participants” icon in the meeting controls.
5. Chat Function
Zoom’s chat function allows participants to send messages to everyone in the meeting or privately to specific individuals. You can access the chat function by clicking on the “Chat” icon in the meeting controls. Use it for sharing links, asking questions, or engaging in side conversations during the meeting.
6. Share Screen
The screen sharing feature allows you to share your screen with other participants in the meeting. You can choose to share your entire screen or just a specific application or window. Click on the “Share Screen” icon in the meeting controls to begin sharing your screen.
7. Recording Options
Zoom allows you to record your meetings for future reference or for participants who couldn’t attend. You can start, pause, and stop recording by clicking on the “Record” button in the meeting controls. Remember to inform participants before recording the meeting.
By understanding and utilizing these elements, you can easily navigate Zoom’s interface and take advantage of its features. Familiarize yourself with the options available to you and experiment with the different functionalities to make the most out of your Zoom meetings.
Customizing Meeting Settings
Customizing your meeting settings in Zoom allows you to tailor the experience to your specific needs and preferences. By exploring the various options available, you can optimize your meetings and ensure a smooth and productive virtual gathering. Here are some key settings you can customize:
1. Meeting ID and Password
You have the option to generate a personal meeting ID or use a random meeting ID for each meeting. You can also set a meeting password to ensure only invited participants can join. Adjust these settings to enhance the security and control of your meetings.
2. Audio and Video Settings
Customize your audio and video settings to suit your preferences. You can enable or disable participants’ audio and video upon joining a meeting and choose whether to start meetings with your video on or off by default. You can also adjust settings for the quality of video and audio.
3. Screen Sharing and Annotation
Control who can share their screen during meetings by selecting the appropriate option. You can also allow participants to annotate when sharing their screen, enabling collaborative discussions and visual explanations.
4. Waiting Room
The waiting room feature allows you to screen participants before they join the meeting. This can be particularly useful for preventing unauthorized access or managing large meetings. Customize the waiting room settings to suit your security requirements.
5. Breakout Rooms
If you have a larger meeting and want to facilitate smaller group discussions, enable the breakout rooms feature. This allows participants to be split into separate virtual rooms for more focused conversations. Customize the number of breakout rooms and assign participants as needed.
6. Recording
Adjust the settings for recording meetings, including whether participants can record, where the recordings are saved, and the file format. Ensure you comply with privacy policies and inform participants if you plan to record the meeting.
7. Additional Settings
Explore other settings such as enabling/disabling virtual backgrounds, enabling closed captioning, managing participant permissions, and configuring audio conferencing options. Customize these settings based on your specific needs and meeting requirements.
Customizing your Zoom meeting settings allows you to have more control over the meeting experience and tailor it to your preferences. Take the time to review and adjust these settings to create a comfortable and productive environment for yourself and your participants.
Sharing Your Screen
The screen sharing feature in Zoom is a powerful tool that allows you to share your computer screen with other meeting participants. Whether you want to present a slideshow, demonstrate a software application, or collaborate on documents, screen sharing enables seamless collaboration and communication. Here’s how you can share your screen during a Zoom meeting:
- Join a Zoom meeting as a host or participant.
- Locate the meeting controls at the bottom of the Zoom window.
- Click on the “Share Screen” button.
- A popup window will appear, displaying the available screens or applications that you can share.
- Choose the screen or application you want to share and click on it.
- Check the option to “Share computer sound” if you want participants to hear audio from your shared screen.
- Click on the “Share” button to start sharing your screen.
- While sharing your screen, the meeting controls will move to a floating toolbar that you can reposition as needed.
- To stop sharing your screen, click on the “Stop Share” button on the floating toolbar or the meeting controls.
When sharing your screen, it’s important to be mindful of what is being displayed and ensure that any sensitive or private information is not accidentally shared. Double-check your screen content before starting the screen share and use the “Pause Share” function if needed.
Additionally, as the host, you can allow meeting participants to also share their screens. To do this, click on the “Participants” tab, locate the participant’s name, and select “Allow to Share Screen.” This enables collaborative discussions and allows others to contribute to the meeting by sharing their own content.
Screen sharing is a versatile feature that can enhance collaboration and engagement during Zoom meetings. From presentations to document editing, screen sharing enables participants to follow along closely, ask questions, make comments, and provide real-time feedback.
Remember to communicate with participants about screen sharing activities and guide them on how to use any features or applications you may be presenting. This helps to ensure that everyone is on the same page and can actively participate in the meeting.
With Zoom’s screen sharing feature, you can effectively convey information, collaborate on projects, and provide engaging presentations, making your virtual meetings more interactive and productive.
Using the Chat Function
The chat function in Zoom allows participants to communicate through text messages during a meeting. It serves as an excellent tool for asking questions, sharing links, providing context, or engaging in side conversations. Here’s how you can effectively use the chat function during your Zoom meetings:
- Join a Zoom meeting as a host or participant.
- Locate the meeting controls at the bottom of the Zoom window.
- Click on the “Chat” button to open the chat panel.
- In the chat panel, you can select whether you want to send a message to everyone in the meeting or to specific participants.
- Type your message in the chat input field and press “Enter” to send it.
- Participants will see your message in the chat panel and can respond accordingly.
- You can also access the chat function during screen sharing by clicking on the “More” button in the meeting controls and selecting “Chat.”
- Utilize the chat function to share important links, instructions, or relevant information during the meeting.
- Encourage participants to use the chat to ask questions, contribute to discussions, or provide feedback in real-time.
- If needed, the host can save the chat transcript at the end of the meeting by clicking on the “More” button in the meeting controls and selecting “Save Chat.”
The chat function in Zoom allows for seamless communication and collaboration, especially in larger meetings where participants may have limited speaking opportunities. It provides an excellent platform for sharing thoughts, ideas, and resources without interrupting the flow of the meeting.
As the host, it’s important to stay attentive to the chat and address any questions or concerns that arise. Regularly monitor the chat panel to ensure that important messages are not missed, and facilitate discussions by summarizing key points or responding to queries.
Participants can also use the chat function to privately message the host or other participants by selecting the appropriate recipient in the chat panel. This allows for one-on-one conversations and enhances the overall engagement of the meeting.
When using the chat function, it’s essential to maintain professionalism and respect for others. Avoid using excessive emojis, capital letters, or inappropriate language. Treat the chat function as a valuable tool for collaboration and effective communication.
By incorporating the chat function into your Zoom meetings, you can foster increased interaction and collaboration among participants. It provides an additional means of communication that complements verbal exchanges and ensures that everyone’s voice is heard.
Recording a Meeting
The ability to record a Zoom meeting is a valuable feature that allows you to capture important discussions, presentations, or training sessions for future reference or for participants who couldn’t attend. Whether it’s for documentation, review, or sharing purposes, recording a meeting is a convenient way to preserve valuable content. Here’s how you can record a meeting on Zoom:
- Join a Zoom meeting as a host or participant.
- Locate the meeting controls at the bottom of the Zoom window.
- Click on the “Record” button.
- From the dropdown menu, choose whether to record the meeting on the local device or in the cloud, if available.
- The recording will start, and an indicator will appear in the top-left corner of the Zoom window.
- Throughout the meeting, Zoom will capture the audio, video, and any screen sharing that takes place.
- When the meeting is over, click on the “Stop Recording” button in the meeting controls.
- Zoom will process the recording and save it in the designated location (local device or cloud) as specified during recording.
- Once the recording is complete, you can access and manage it in the “Recordings” tab on the Zoom app or in the designated folder on your device.
It’s important to inform the participants before recording a meeting to ensure compliance with privacy regulations and gain their consent. This allows participants to adjust their behavior and be aware that their actions and statements are being recorded.
Keep in mind that the recording feature may not be available in some cases, based on the settings and permissions set by the host or the Zoom account administrator.
Recording meetings can be particularly handy for training sessions, demonstrations, or important discussions where participants may want to revisit the content or share it with others. It also serves as a valuable tool for record-keeping and documentation purposes.
Remember to regularly review your recording settings and locations to ensure that the recordings are properly saved and easily accessible when needed. Clean up any unnecessary recordings to optimize storage space and organization.
By utilizing the recording feature in Zoom, you can capture and preserve valuable meeting content. It ensures that important discussions and presentations are not lost and provides a resource for participants to refer back to, enhancing the overall value and impact of your Zoom meetings.
Managing Participants in a Meeting
As a host, managing participants in a Zoom meeting allows you to control and moderate the meeting environment to ensure a smooth and productive experience for everyone involved. Whether it’s managing participant permissions, muting or unmuting individuals, or handling disruptive behavior, understanding how to effectively manage participants is essential. Here are some key strategies for managing participants in a Zoom meeting:
- Participant Permissions: As the host, you have the ability to assign participant roles and permissions. You can make someone a co-host to help manage the meeting or provide certain participants with screen sharing capabilities. Use these permissions wisely to delegate responsibilities and maintain meeting control.
- Muting/Unmuting Participants: Zoom provides the option to mute or unmute participants. This feature is useful for minimizing background noise or managing participants who may unintentionally disrupt the meeting. As the host, you can mute/unmute participants individually or mute/unmute everyone at once.
- Removing Participants: In certain instances, you may need to remove a participant from the meeting. If someone is behaving inappropriately, causing disruption, or not following meeting guidelines, you can remove them by clicking on their name in the Participants panel and selecting “Remove” or “Remove Participant.”
- Participant Reactions: Participants have the ability to use reactions during the meeting, such as clapping or raising a hand. As the host, you can monitor these reactions and address them accordingly. For example, if a participant raises their hand, you can give them an opportunity to speak or acknowledge their comment in the chat.
- Managing Chat Discussions: The chat function allows participants to communicate through text messages. As the host, you can monitor the chat for questions, comments, or concerns from participants. Address them in real-time, highlight important points, or ask participants to hold discussions for a specific time designated for Q&A.
- Encouraging Participation: Actively engage participants by encouraging them to contribute to discussions or ask questions. Make participants feel included and valued by creating a supportive environment. Foster an atmosphere of collaboration and respect to ensure all voices are heard.
- Utilizing Breakout Rooms: Breakout rooms can be used to divide participants into smaller groups for discussions or activities. Assign participants to breakout rooms strategically and provide clear instructions. As the host, you can visit breakout rooms, participate in discussions, or address any concerns participants may have.
Managing participants in a Zoom meeting requires strong leadership and effective communication. Be proactive in setting meeting guidelines, answering questions, and addressing any issues that may arise. Establishing clear expectations and managing participant interactions enhances the overall meeting experience for everyone involved.
By effectively managing participants, you can create a welcoming, collaborative, and inclusive virtual environment where participants can engage, share ideas, and achieve meeting objectives.
Troubleshooting Zoom Issues
While Zoom is a reliable and user-friendly platform, occasional technical issues may arise during meetings. These issues can disrupt communication and collaboration, hindering the meeting’s progress. However, with some troubleshooting techniques, most problems can be quickly resolved. Here are some common Zoom issues and their potential solutions:
1. Poor Audio or Video Quality
If you encounter issues with audio or video quality, check your internet connection. A stable and high-speed internet connection is vital for a smooth Zoom experience. Additionally, ensure that your audio and video devices are properly connected and functioning correctly. If necessary, try adjusting the settings in Zoom to optimize audio and video quality.
2. Echoes or Feedback
If you are experiencing echoes or feedback during a meeting, it may be caused by multiple audio devices being activated simultaneously. Make sure to use only one audio device, such as a headset or microphone/speaker combination, and disable any additional audio inputs or outputs.
3. Unresponsive Controls
If the meeting controls become unresponsive, try restarting the Zoom application. Restarting can help resolve any temporary glitches. If the issue persists, check for any updates to the Zoom software and ensure that your device meets the system requirements for running Zoom smoothly.
4. Issues with Screen Sharing
If screen sharing is not functioning correctly, make sure that you have the latest version of Zoom installed. Verify that the screen or application you intend to share is not restricted by security settings or permissions on your device. If necessary, try selecting a specific window or application to share instead of sharing the entire screen.
5. Disconnection or “Freezing” of Video
If your video freezes or you get disconnected from the meeting, check your internet connection strength. Consider connecting to a more stable network or restarting your router if needed. It may also be helpful to close any unnecessary applications or browser tabs that might be consuming bandwidth.
6. Audio or Video Lag
If you experience audio or video lag, it may be due to high network congestion or limited bandwidth. Consider closing any applications or processes on your device that are using significant network resources. Additionally, moving closer to your Wi-Fi router or connecting to a wired network connection could help improve your connection stability.
7. Unsuccessful Meeting Joining
If you are having trouble joining a meeting, double-check for any correct meeting ID and password provided by the meeting host. Ensure that the meeting is active and hasn’t reached its participant capacity. If connecting via a virtual meeting link, try copying and pasting the link into your browser instead of clicking on it directly.
If you encounter persistent issues that cannot be resolved through basic troubleshooting, reaching out to Zoom’s customer support or consulting their online resources can provide additional assistance. Remember, staying calm and patient while troubleshooting Zoom issues is essential for finding a resolution and ensuring the continuity of your meetings.