
Sign in to your Zoom account
To change your name on Zoom, the first step is to sign in to your Zoom account. Make sure you have your login credentials ready before proceeding. Follow the steps below to sign in:
- Go to the Zoom website or open the Zoom app on your device.
- Click on the “Sign In” button located at the top right corner of the page or app.
- Enter your email address or username associated with your Zoom account.
- Enter your password. If you can’t remember it, you can click on the “Forgot Password?” link to reset it.
- Click on the “Sign In” button to log in to your Zoom account.
Once you are successfully signed in to your Zoom account, you can proceed to the next steps to change your name. It’s important to sign in to your account before attempting any changes to ensure the changes are saved and applied correctly. Now, let’s move on to the next section to learn how to change your name on Zoom.
Click on your profile picture or initials
After signing in to your Zoom account, the next step to change your name is to locate and click on your profile picture or initials. This will take you to your Zoom profile where you can make various changes including updating your name. Follow the steps below to continue:
- Once you are signed in, look for your profile picture or initials at the top right corner of the page or app.
- Hover over your profile picture or initials and a drop-down menu will appear.
- Click on the “Profile” option from the drop-down menu.
By clicking on the “Profile” option, you will be taken to your Zoom profile page where you can manage your personal information and settings. This is the page where you can update and change your name to reflect your preferred choice. Let’s move on to the next section to learn how to edit your name on Zoom.
Select “Profile” from the drop-down menu
Now that you have clicked on your profile picture or initials, a drop-down menu will appear. From this menu, you need to select the “Profile” option to access your Zoom profile settings. Here’s how to do it:
- After clicking on your profile picture or initials, a drop-down menu will appear.
- Scan through the options in the drop-down menu and locate the “Profile” option.
- Click on “Profile” to proceed to your Zoom profile settings.
Selecting the “Profile” option will redirect you to a page where you can view and edit your profile details. This is where you can customize your personal information, including your name, on Zoom. In the next section, we will guide you on how to edit your name and save the changes. Let’s move forward!
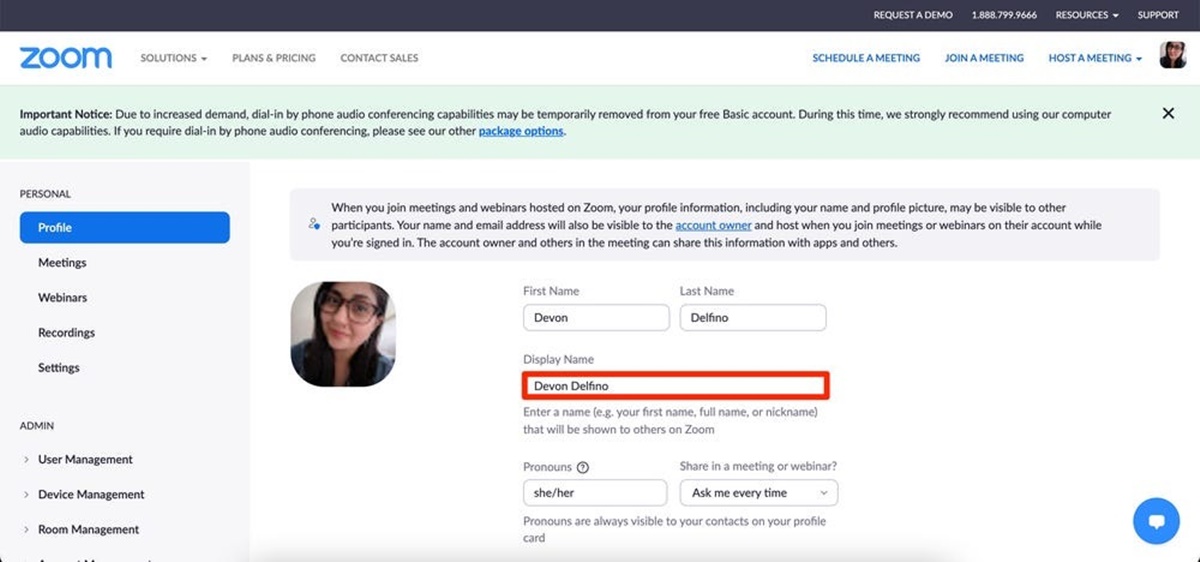
Click on the “Edit” button beside your current name
Once you are on your Zoom profile page, you can proceed to change your name by clicking on the “Edit” button beside your current name. This will allow you to modify your name and update it according to your preference. Follow the steps below to continue:
- On your Zoom profile page, locate your current name displayed.
- Next to your name, you will find an “Edit” button. Click on it.
Clicking on the “Edit” button will enable you to make changes to your name. It’s important to note that if you have linked your Zoom account with an integrated platform, such as Google or Facebook, your name may be synchronized with those platforms. In such cases, you may need to update your name on the integrated platform to reflect the changes on Zoom.
Now that you know how to access the editing option, let’s move on to the next section to learn how to enter your new name and save the changes on Zoom.
Enter your new name in the provided field
Once you have clicked on the “Edit” button beside your current name, a text field will appear where you can enter your new name. This is where you will make the necessary changes to update your name on Zoom. Follow the steps below to enter your new name:
- After clicking on the “Edit” button, a text field will appear next to your current name.
- Select the text field and delete or remove your current name.
- Now, enter your new name in the provided field.
When entering your new name, ensure that you spell it correctly and accurately. You have the freedom to choose any name that you prefer, as long as it complies with Zoom’s guidelines and policies. Once you have entered your new name, review it to make sure there are no mistakes or misspellings.
In the next section, we will guide you on how to review your changes and save your new name on Zoom. Keep following the steps to complete the process successfully!
Review your changes and click “Save”
After entering your new name in the provided field, it is important to review your changes before saving them. This allows you to ensure that your new name is accurate and reflects the desired update. Follow the steps below to review and save your changes:
- Take a moment to review the new name you have entered in the text field.
- Make sure there are no typos, spelling mistakes, or any other errors in your new name.
Once you have checked and confirmed that your new name is correct, it’s time to save your changes. Look for the “Save” button or option on the Zoom profile page. Click on it to save your new name. The button is usually located at the bottom of the page or in close proximity to the name editing field.
By clicking “Save,” your new name will be updated and applied to your Zoom account. From now on, whenever you join Zoom meetings or interact with the Zoom platform, your updated name will be displayed to others.
It’s a good practice to double-check your name after saving the changes to ensure that the update was successful. In the next section, we will guide you on how to verify that your name has been successfully changed. Let’s proceed!
Open the Zoom app on your device
To change your name on Zoom, you can also make updates directly from the Zoom app on your device. Whether you are using a smartphone, tablet, or computer, follow the steps below to open the Zoom app:
- Locate the Zoom app on your device. The app icon typically features a blue background with a white video camera logo in the center.
- Tap or click on the Zoom app icon to open it.
If you don’t have the Zoom app installed on your device, you can download it from the official app store for your operating system. Visit the App Store for iOS devices or Google Play Store for Android devices to download and install the Zoom app. For computers, you can visit the Zoom website and download the app for your specific operating system.
Once the Zoom app is open and you are signed in to your account, you can proceed to the next steps to change your name on Zoom. In the following section, we will guide you on how to join or start a meeting using the Zoom app.
Join or start a meeting
To change your name on Zoom using the Zoom app, you can join or start a meeting and update your name from within the meeting interface. Whether you are joining an existing meeting or starting a new one, follow the steps below:
- Open the Zoom app on your device and sign in to your Zoom account if you haven’t already.
- In the Zoom app, you will be presented with various options. Tap or click on the “Join” or “Start” button, depending on whether you want to join an existing meeting or initiate a new meeting.
- If you are joining a meeting, you will be prompted to enter the meeting ID or the link to the meeting. Enter the required details and tap or click on “Join Meeting”.
- If you are starting a meeting, you will have the option to customize the meeting settings. You can set the meeting topic, choose audio and video settings, and more.
Once you are in the meeting interface, you can proceed to change your name. Follow the next steps to complete the process.
Keep in mind that changing your name within a meeting will only apply to that specific meeting. If you want to change your default name for all future meetings, you need to follow the steps mentioned in the earlier sections of this guide.
In the following section, we will guide you on how to change your name within a Zoom meeting using the Zoom app. Let’s continue!
Click on the three dots in the bottom right corner
Once you are in a Zoom meeting using the Zoom app, you have the option to change your name within the meeting interface itself. To do so, you need to locate and click on the three dots icon in the bottom right corner of the screen. Follow the steps below to continue:
- During a Zoom meeting, look for the toolbar at the bottom of the screen.
- In the right corner of the toolbar, you will find three dots arranged vertically, indicating the “More” options. Click on these three dots.
Clicking on the three dots will open up a menu of additional options and settings related to the meeting. The menu provides various customization features for participants, including the ability to change your displayed name. Let’s move on to the next section to learn how to proceed with changing your name within the Zoom meeting using this menu.
Choose “Rename” from the menu
After clicking on the three dots in the bottom right corner of the Zoom meeting interface, a menu will appear with additional options. From this menu, you need to select the “Rename” option to change your displayed name. Follow the steps below to continue:
- After clicking on the three dots, a menu will pop up with various options.
- Scroll through the menu options and look for the “Rename” option.
- Click on “Rename” to proceed with changing your name.
By selecting the “Rename” option, you will be able to edit your displayed name within the Zoom meeting. This is particularly useful if you want to use a different name for a specific meeting or if you need to correct any existing name discrepancies. In the next section, we will guide you on how to enter your new name within the Zoom meeting interface.
Enter your new name in the pop-up window
Once you have selected the “Rename” option from the Zoom meeting menu, a pop-up window will appear where you can enter your new name. This allows you to customize your displayed name specifically for the current meeting. Follow the steps below to enter your new name:
- In the pop-up window, you will see a text field where your current name is displayed.
- Click on the text field and delete or remove your current name.
- Now, enter your new desired name in the provided field.
This pop-up window serves as a temporary name change within the meeting specifically, but your default name for future meetings remains unchanged. It’s important to note that the new name you enter in the pop-up window will be displayed to other participants during the meeting. Take a moment to ensure that you have entered your new name correctly and accurately.
In the next section, we will guide you on how to save your new name and verify that the change has been successfully applied within the Zoom meeting.
Click “OK” to save your new name
After entering your new name in the pop-up window during a Zoom meeting, the next step is to save your changes. Once you are satisfied with your new name, click the “OK” button to apply it to your displayed name within the meeting. Follow the steps below to save your new name:
- Review the new name you have entered in the pop-up window.
- Make sure there are no typos or errors in your new name.
- Once you are confident with your new name, click the “OK” button to save your changes.
By clicking “OK,” your new name will be updated and displayed to other participants within the Zoom meeting. Your name will now be shown as your newly entered name throughout the duration of the meeting. It’s always a good practice to double-check your name after saving the changes to ensure that the update was successful and is being correctly displayed to others.
In the next section, we will guide you on how to verify that your name has been successfully changed within the Zoom meeting interface.
Verify that your name has been successfully changed
After saving your new name in the Zoom meeting, it’s important to verify that the change has been successfully applied. This will ensure that your newly updated name is visible to other participants in the meeting. Follow the steps below to verify the success of the name change:
- Take a look at the participant list or video grid within the Zoom meeting interface.
- Locate your name and check if it is displayed as your newly entered name.
- If your new name is correctly shown, it means that the change has been successfully applied.
It’s a good idea to ask other participants in the meeting to confirm that they can see your new name as well. This will provide additional assurance that the change has been successfully implemented on their end too.
If for any reason you are unable to see your new name or if it didn’t update as expected, you may need to repeat the steps and ensure that you have saved your changes properly. If the issue persists, you can try refreshing the Zoom meeting or restarting the app to see if that resolves the problem.
Congratulations! You have successfully changed your name within the Zoom meeting interface. Your new name will be displayed to other participants for the duration of the meeting. Remember that this change is specific to the current meeting and does not affect your default name for future meetings.