
Enable IMAP in Gmail
To set up Gmail in Outlook, you need to ensure that IMAP access is enabled in your Gmail account. IMAP (Internet Message Access Protocol) is a protocol that allows you to access and synchronize your email messages across multiple devices. Enabling IMAP in Gmail is a straightforward process. Here’s how you can do it:
- Open your web browser and go to the Gmail website.
- Login to your Gmail account using your email address and password.
- Click on the gear icon located in the top right corner of the screen and select “Settings” from the dropdown menu.
- In the Settings tab, click on the “Forwarding and POP/IMAP” tab.
- Scroll down to the IMAP Access section and select the option “Enable IMAP”.
- Click on the “Save Changes” button at the bottom of the page to enable IMAP in your Gmail account.
Enabling IMAP will allow Outlook to synchronize your Gmail emails, folders, and labels. It ensures that any changes you make in Outlook are reflected in your Gmail account and vice versa. With IMAP enabled, you can access all your Gmail emails seamlessly in Outlook.
It is important to note that enabling IMAP gives access to your Gmail account from other email clients as well, so make sure you have a secure password and regularly monitor your account for any unauthorized access.
Once you have enabled IMAP in your Gmail account, you are ready to add your Gmail account to Outlook and start setting it up for a smooth email experience.
Add a new email account in Outlook
To set up your Gmail account in Outlook, you need to add it as a new email account. This allows you to manage your Gmail emails alongside your other email accounts in one convenient location. Follow these steps to add a new email account in Outlook:
- Open Outlook on your computer. If you don’t have Outlook installed, you can download and install it from the official Microsoft website.
- Click on the “File” tab located in the top left corner of the Outlook window.
- In the File menu, click on the “Add Account” button.
- The Add Account dialog box will appear. Enter your full name, email address, and password in the respective fields.
- Click on the “Connect” button to let Outlook attempt to automatically detect the settings for your Gmail account.
- If Outlook successfully detects the settings for your Gmail account, it will prompt you to confirm the account setup. Click on the “Finish” button to complete the process.
- If Outlook is unable to automatically detect the settings, you will need to manually configure the account settings. Select the “Manual setup or additional server types” option and click on the “Next” button.
- In the Choose Service dialog box, select the “IMAP” option and click on the “Next” button.
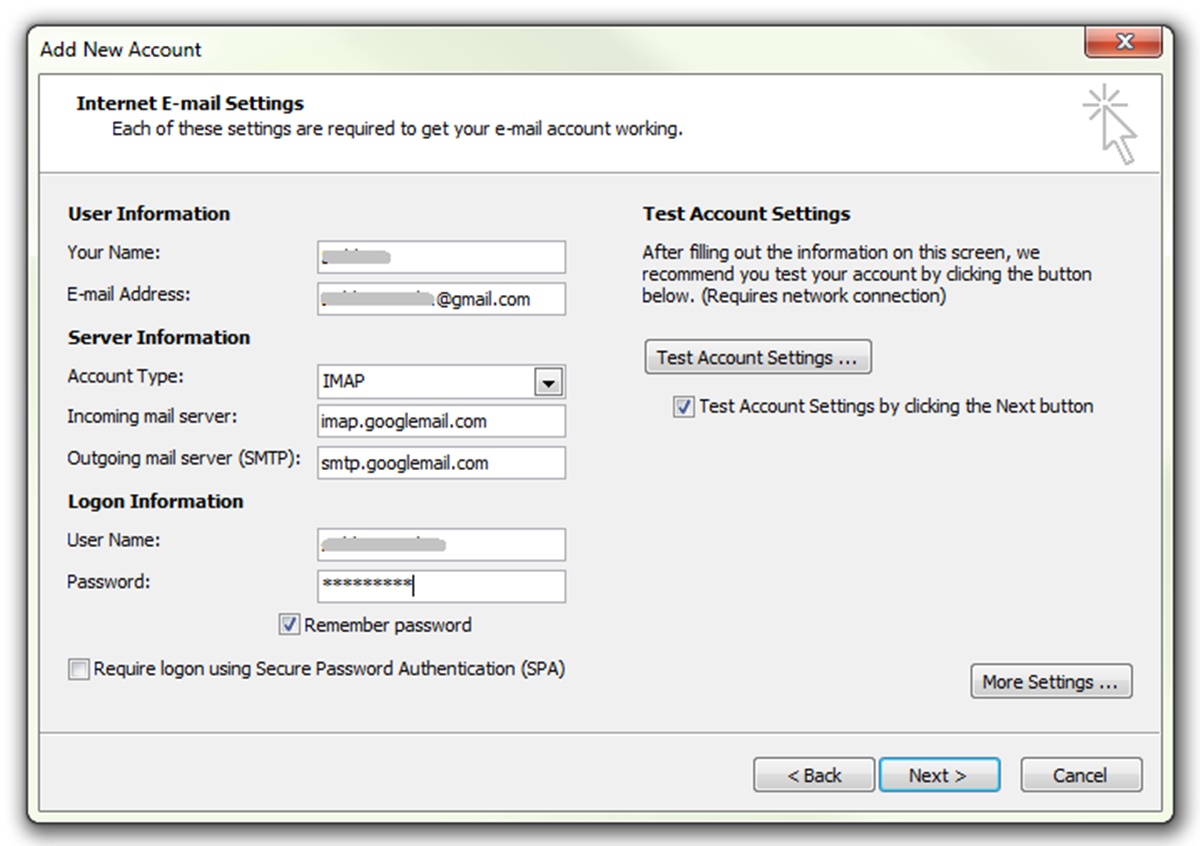
- Enter the required information in the Account Settings dialog box. This includes your email address, username, password, incoming mail server (imap.gmail.com), and outgoing mail server (smtp.gmail.com).
- Click on the “More Settings” button to configure additional settings such as SSL encryption and authentication.
- Once you have finished configuring the settings, click on the “Next” button to let Outlook perform a test to ensure that the account settings are correct.
- If the test is successful, click on the “Close” button and then click on the “Finish” button to complete the setup process.
After adding your Gmail account to Outlook, you will be able to send, receive, and manage your Gmail emails directly from the Outlook application. This allows you to take advantage of Outlook’s powerful features while staying connected to your Gmail account.
It is important to note that the steps mentioned above may vary slightly depending on the version of Outlook you are using. However, the general process remains similar across different versions.
Enter your account information in Outlook
After adding your Gmail account as a new email account in Outlook, the next step is to enter your account information to establish a connection between Outlook and your Gmail account. Follow these steps to enter your account information in Outlook:
- Open Outlook on your computer and select the “File” tab located in the top left corner of the Outlook window.
- In the File menu, click on the “Add Account” button.
- In the Add Account dialog box, enter your full name, Gmail email address, and password in the respective fields.
- Click on the “Connect” button to let Outlook attempt to automatically detect the settings for your Gmail account.
- If Outlook successfully detects the settings, it will display a confirmation message. Click on the “Finish” button to complete the process. Your Gmail account is now connected to Outlook.
- If Outlook is unable to detect the settings, you will need to manually configure them. Select the “Manual setup or additional server types” option and click on the “Next” button.
- In the Choose Service dialog box, select the “IMAP” option and click on the “Next” button.
- Enter your email address, username, password, incoming mail server (imap.gmail.com), and outgoing mail server (smtp.gmail.com) in the respective fields.
- Click on the “More Settings” button to access additional settings such as SSL encryption and authentication.
- In the Outgoing Server tab, select the option “My outgoing server (SMTP) requires authentication” and choose “Use same settings as my incoming mail server.”
- In the Advanced tab, configure the port numbers and SSL encryption settings. For Gmail, the recommended settings are port 993 for incoming mail with SSL encryption and port 587 for outgoing mail with TLS encryption.
- Click on the “OK” button to save the settings and return to the Account Settings dialog box.
- Click on the “Next” button to let Outlook perform a test to ensure that the account settings are correct.
- If the test is successful, click on the “Close” button and then click on the “Finish” button to complete the setup process.
By entering your account information correctly, Outlook will establish a secure and seamless connection to your Gmail account. You will be able to send, receive, and manage your Gmail emails directly within the Outlook application.
It is important to remember that the steps provided above may vary slightly depending on the version of Outlook you are using. However, the general process remains similar across different versions.
Set up the incoming and outgoing mail servers
After adding your Gmail account to Outlook and entering your account information, the next step is to set up the incoming and outgoing mail servers. These servers allow Outlook to establish a connection with your Gmail account and retrieve or send emails. Follow these steps to set up the incoming and outgoing mail servers:
- Open Outlook on your computer and navigate to the Account Settings menu. This can usually be found under the “File” tab, and then selecting “Account Settings” or “Manage Accounts”.
- In the Account Settings window, select your Gmail account from the list of email accounts.
- Click on the “Change” or “Properties” button to access the settings for your Gmail account.
- In the settings window, click on the “More Settings” or “Advanced” button to configure the incoming and outgoing mail servers.
- Click on the “Outgoing Server” tab. Check the box that says “My outgoing server (SMTP) requires authentication”. Make sure the option to use the same settings as the incoming mail server is selected.
- Go to the “Advanced” tab. Set the incoming server (IMAP) port to 993 and select SSL as the encryption method.
- For the outgoing server (SMTP), set the port to 587 and choose TLS as the encryption method.
- Click on the “OK” button to save the settings and return to the previous window.
- Click on the “Next” button to let Outlook perform a test to ensure that the incoming and outgoing mail server settings are correct.
- If the test is successful, click on the “Close” button and then click on the “Finish” button to complete the setup process.
By setting up the incoming and outgoing mail servers correctly, Outlook will be able to securely communicate with your Gmail account. You will be able to send and receive emails without any issues, ensuring a smooth email experience.
It is important to note that the steps mentioned above may slightly vary depending on the version of Outlook you are using. However, the general process remains similar across different versions.
Configure SSL and authentication settings
When setting up Gmail in Outlook, it is essential to configure SSL (Secure Sockets Layer) and authentication settings to ensure the security and privacy of your email communications. SSL encrypts the data transmitted between the mail server and your Outlook client, while authentication verifies your identity when connecting to the server. Follow these steps to configure SSL and authentication settings:
- Open Outlook on your computer and navigate to the Account Settings menu. This can usually be found under the “File” tab, and then selecting “Account Settings” or “Manage Accounts”.
- Select your Gmail account from the list of email accounts and click on the “Change” or “Properties” button.
- In the settings window, click on the “More Settings” or “Advanced” button to access additional settings.
- Go to the “Advanced” tab.
- Under the “Incoming Server (IMAP)” section, ensure that the option “This server requires an encrypted connection (SSL/TLS)” is selected.
- Set the incoming server port to 993.
- Under the “Outgoing Server (SMTP)” section, select the option “This server requires an encrypted connection (SSL/TLS)”.
- Set the outgoing server port to 587.
- Click on the “OK” button to save the settings and return to the previous window.
- In the same settings window, go to the “Outgoing Server” tab.
- Check the box that says “My outgoing server (SMTP) requires authentication” and select the option to use the same settings as the incoming mail server.
- Click on the “OK” button to save the settings.
- Finally, click on the “Next” button to let Outlook perform a test to ensure that the SSL and authentication settings are correct.
- If the test is successful, click on the “Close” button and then click on the “Finish” button to complete the setup process.
By configuring SSL and authentication settings correctly, you add an extra layer of security to your Gmail account when using it in Outlook. This helps protect your sensitive data from unauthorized access and ensures the confidentiality of your email communications.
Please note that the steps provided above may vary slightly depending on the version of Outlook you are using. However, the general process remains similar across different versions.